
Homemade candle-making begins with one critical component: the candle wick. The wick is the flame’s fuel delivery system—its material, thickness, and construction directly affect how the candle burns. Poor wick quality leads to tunneling, smoke, and weak scent throw. A well-made wick ensures clean, even burning and maximizes fragrance diffusion.
This guide outlines four simple methods to make DIY candle wicks using cotton, wood, hemp, and upcycled fabrics. It explains wick anatomy, details material choices, and walks through each crafting process step by step. Users gain control over performance, aesthetics, and eco-impact while avoiding common store-bought wick issues.
System types covered include:
Zero-core upcycled styles for sustainable reuse
Braided cotton for even burn and beginner ease
Wooden strips for modern aesthetics and audible crackle
Hemp/fabric blends for natural, aromatherapeutic value
What Makes a Good Candle Wick?
A candle wick is defined by its ability to draw melted wax upward to feed the flame, sustaining combustion without smoking, drowning, or uneven burning. The primary attributes of a good wick are fiber material, structural core, flame stability, and burn rate.
A wick works by capillary action, pulling liquefied wax upward. This process relies on the wick’s material density, coating, and braid structure. Cotton, wood, and hemp are the most used DIY wick materials due to their burn consistency and accessibility.
Wick Burn Quality Depends on Flame Size and Stability
A good wick must generate a flame that stays stable without flickering or mushrooming. An unstable flame often results from poor material choice or oversized diameter. A braided cotton wick, when coated in wax, typically holds flame height under 1.5 inches with minimal carbon buildup—ideal for 4–8 oz jar candles.
Wick Material Affects Fragrance Throw and Soot Output
Cotton fibers absorb wax evenly, improving fragrance diffusion. In contrast, untreated wooden wicks emit a crackling sound and burn cleaner but can produce soot if not deburred. Hemp wicks absorb essential oils directly, enabling aromatherapy candles without synthetic additives.
Core Type Determines Structural Integrity
Wicks may be cored (reinforced with paper, zinc, or cotton threads) or no-core (flexible braids or fabric strips). Cored wicks burn straighter and are easier to center, while no-core wicks allow more customization. For example, a no-core braided hemp wick suits rolled beeswax tapers, while a zinc-cored cotton wick supports tall soy candles.
Wick Thickness Governs Burn Rate
A wick’s diameter impacts how quickly it consumes wax. A 2 mm braided wick burns slower and suits small containers. A 3.5 mm braided wick fits larger vessels (10 oz+), producing a broader melt pool.
Wick Coating Enhances Ignition and Rigidity
Wax-coated wicks are easier to light and retain shape during setup. A thin layer of paraffin or soy wax increases stiffness and ensures uniform burn initiation.
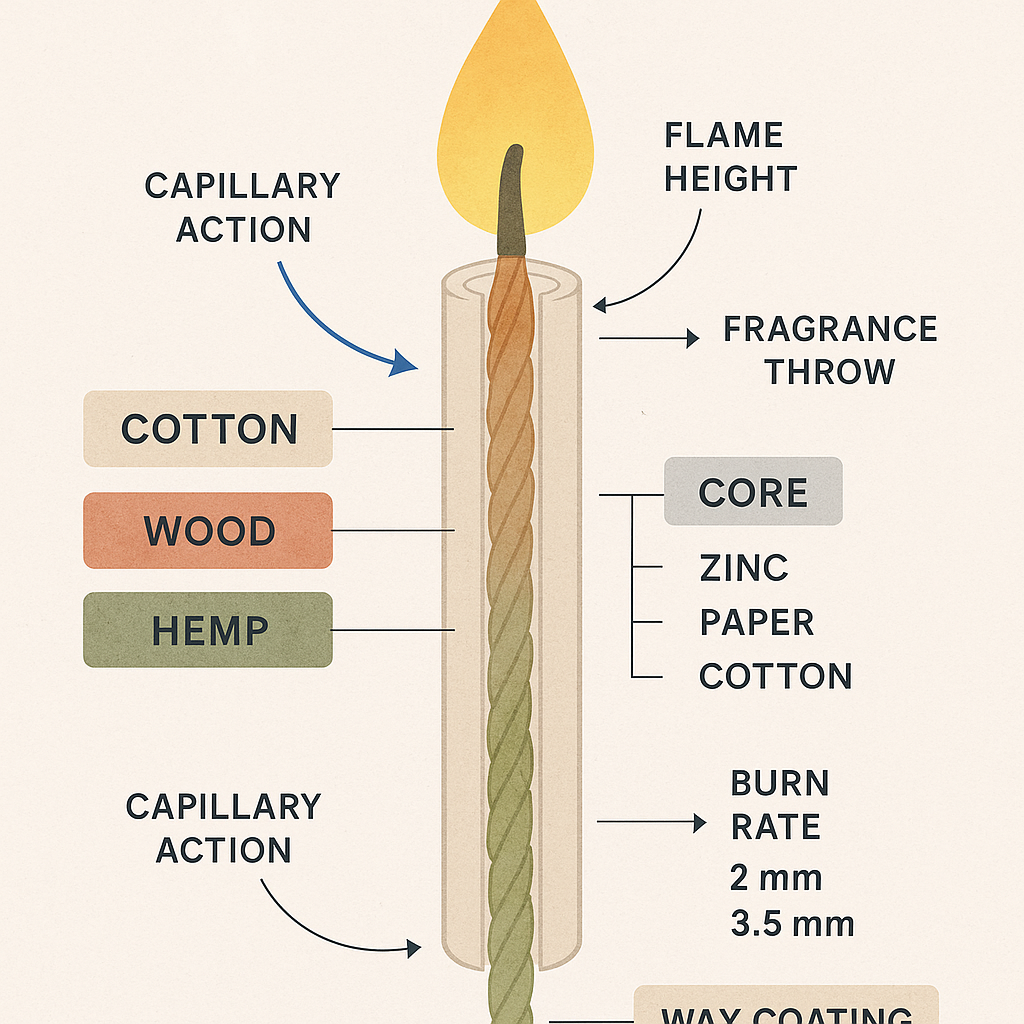
Cross-section diagram showing candle wick anatomy with labeled fiber, core type, and wax coating attributes
Proper oxygenation safeguards root health, which makes material readiness and tool choice the next priority.
Tools and Materials You’ll Need
Effective DIY wick-making requires several basic tools and materials, each contributing to wick performance and safety.
Essential tools include cutting instruments, measuring guides, wax-melting setups, and coating tools. Choosing the right components streamlines crafting and improves flame behavior.
Scissors and Cutting Tools Shape Clean Wick Ends
Sharp stainless-steel scissors or fabric shears trim twine, wood, or fabric without fraying. Wicks must be trimmed evenly—ideally ¼ inch above wax level—to prevent mushrooming.
Wick Holders and Anchoring Devices Ensure Flame Centering
A metal wick holder or reusable stick keeps the wick upright during wax pour. Wick stickers or adhesive dots secure the base, especially for wooden or fabric-based wicks.
Wax Melting Pot and Thermometer Control Coating Temperature
A double boiler or wax melting pot allows for controlled wax heating. Use a candle thermometer to maintain optimal dip range (130–160°F / 54–71°C), preventing wax discoloration or overheating.
Wick Coating Blocks or Wax Types Tailor Burn Qualities
Choose compatible wax: soy wax for clean burns, paraffin for rigid coating, or beeswax for natural finishes. Coating affects ignition reliability and wicking speed.
Measuring Rulers or Burn Templates Standardize Testing
Consistent wick lengths and burn strip sizing ensure valid test comparisons. For instance, 6-inch cotton wicks suit 8 oz jars; 3-inch wood planks work best in low-profile tins.
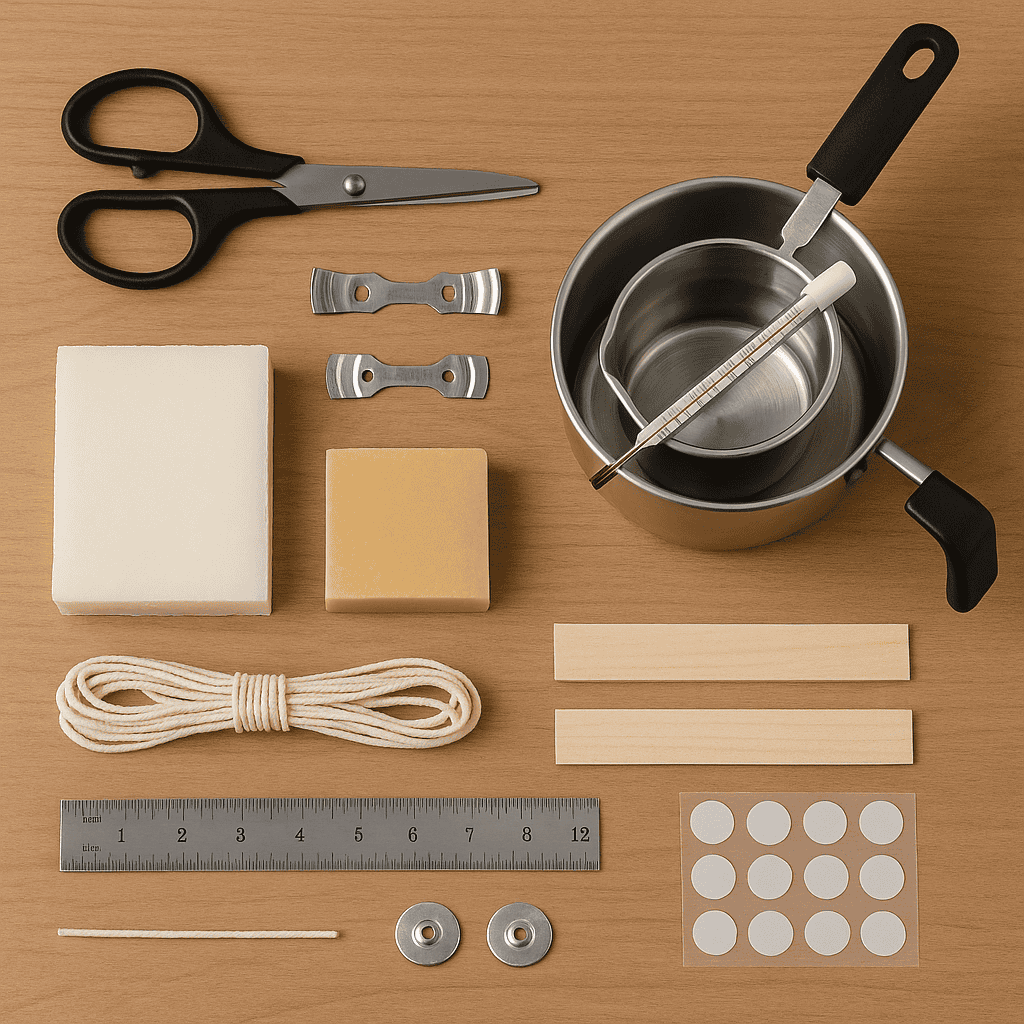
Overhead view showing essential wick-making tools and materials including wax types, cutters, and holders
With the right tools assembled, makers can proceed to specific crafting techniques—starting with the easiest: the braided cotton wick method.
Method 1: Braided Cotton Wick
A braided cotton wick is the most accessible DIY wick type. It works by leveraging tightly twisted cotton fibers to draw wax upward efficiently, producing a stable, clean flame.
This method suits beginners because it requires minimal tools and adapts to any wax type. Braided wicks burn evenly and resist mushrooming when correctly coated.
Materials Needed
This method uses common household and craft supplies, making it cost-effective and scalable for small-batch production.
Essential materials include:
- Cotton twine (100% unbleached, size #24–#36)
- Wax for coating (soy, paraffin, or beeswax)
- Double boiler or wax melting pot
- Metal tongs or tweezers
- Wick holder or centering tool
- Scissors
- Paper towel or drying rack
The cotton fiber must be tight-braided. Loosely twisted cords produce unstable flames and weak capillary action. Choose smooth, medium-weight cord for best results. Paraffin coating offers stiff structure; soy wax ensures clean burning.
Step-by-Step Instructions
This process includes braiding, dipping, and drying the cotton wick.
- Cut three equal lengths of cotton twine, each 6–8 inches.
- Secure one end under a heavy object or tape to a surface.
- Braid tightly, ensuring even tension across strands. Keep the braid flat and uniform.
- Trim the ends for evenness. A clean cut prevents fraying and improves wax absorption.
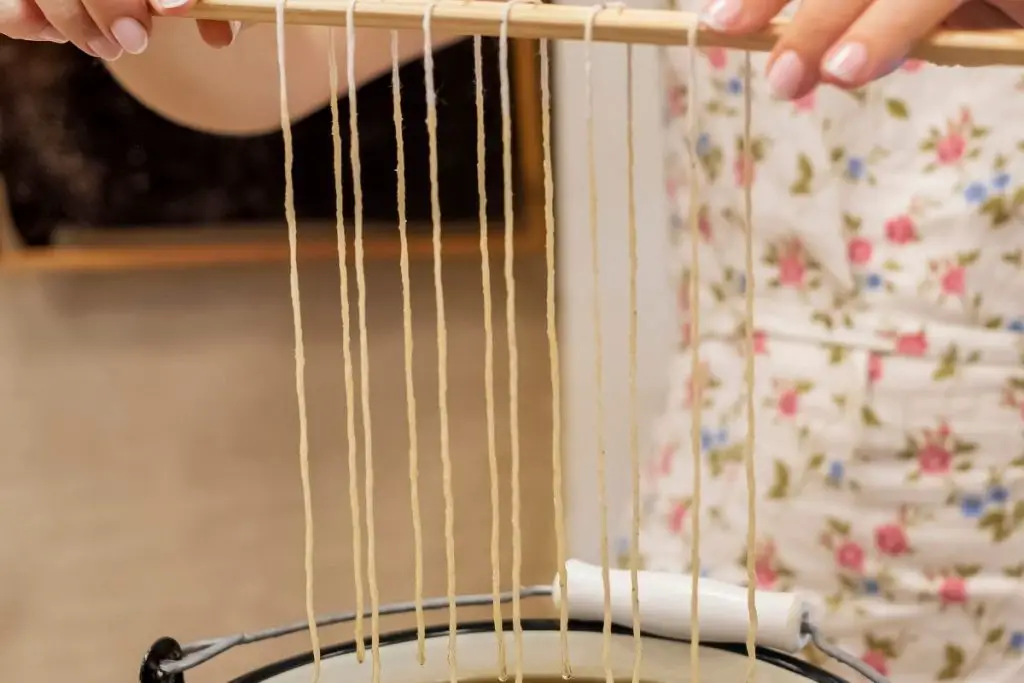
- Melt wax to 130–160°F (54–71°C). Use a thermometer to maintain range.
- Dip the braided cord fully using tongs. Hold for 5 seconds.
- Remove and cool for 30 seconds, then repeat the dip 2–3 more times.
- Hang or lay flat to dry for at least 1 hour before use.
For added rigidity, twist while warm. To test, light a trimmed end and check for even burn and minimal smoke.
The cotton method balances simplicity and control—qualities not always guaranteed in harder wick types like wood.
Method 2: Wooden Wick
A wooden wick offers a modern aesthetic and emits a signature crackling sound. It works by burning a thin, treated strip of wood that vaporizes wax consistently across its surface.
This method is ideal for wide containers and users seeking flame visual appeal and auditory ambiance. Wooden wicks provide broad melt pools and support strong scent throw.
Materials Needed
Each component impacts ignition, flame height, and burn longevity.
Required materials include:
- Wood strips (balsa, cherry, or maple; 0.04–0.06 inch thick)
- Scissors or saw for trimming
- Wax (for coating)
- Wick clips or holders
- Sandpaper or nail file
- Thermometer
- Heat-proof surface
The wood must be untreated and kiln-dried. Balsa is easiest to light; cherry gives longer burns. Strip width depends on container diameter: ½ inch for jars under 3 inches; ¾ inch for wider tins.
Step-by-Step Instructions
Wooden wick preparation focuses on size, finish, coating, and seating.
- Cut wood strip to jar height minus ¼ inch.
- Deburr the edges with sandpaper to prevent splintering.
- Soak the strip in wax (140–160°F) for 30 seconds.
- Let cool on a rack for at least 1 hour.
- Insert into a metal clip for base anchoring.
- Center wick in container using holder.
- Pour wax around wick and let cure.
For harder lighting wicks, lightly notch the top with a blade to catch flame. Trial burns should run at least 2 hours to measure melt pool width and soot levels.
With wooden wicks mastered, natural and sustainable options like hemp and fabric offer the next level of eco-optimized wick crafting.
Method 3: Hemp or Fabric Wick
A hemp or fabric wick enables natural-burning candles that align with eco-conscious goals. It works by using plant-based or textile fibers to wick wax while minimizing synthetic content.
This method supports essential oil compatibility, creating aromatherapy-friendly candles. Hemp fibers are strong and absorbent, while cotton fabric strips provide burn stability and creative reuse.
Materials Needed
Materials influence fragrance retention, burn rate, and flame shape.
You’ll need:
- Hemp twine (untreated, medium-gauge)
- Cotton or linen fabric strips (½ inch x 6 inches)
- Essential oils (optional, up to 10% by weight)
- Wax for dipping (soy or beeswax recommended)
- Scissors
- Tongs and drying rack
- Wick anchor clip or clothespin
Hemp twine must be food-grade and chemical-free. Fabric should be tightly woven to burn evenly. Avoid polyester blends—they emit toxic fumes.
Step-by-Step Instructions
The process emphasizes preparation, coating, and stabilization.
- Cut twine or strip to jar height plus 1 inch.
- Soak in essential oil blend (optional) for 30–60 minutes.
- Melt wax to 140°F and dip twine or strip for 10 seconds.
- Repeat 2–3 dips for rigidity.
- Hang to dry on a rack for 2 hours.
- Secure wick base using a clip or weight.
- Pour wax and cure before lighting.
For best results, trim wick to ¼ inch. Hemp burns hotter than cotton—ideal for cooler waxes like coconut or beeswax blends.
This method is preferred by sustainable makers who want both low-tox and scent-enhanced options.
Method 4: Upcycled or No-Core Wick
An upcycled or no-core wick leverages non-traditional fibers—like old clothing or scrap textiles—to create zero-waste wicks. It works by converting tightly rolled or folded fabrics into capillary wax feeders.
This method eliminates core materials and suits casual makers seeking resourceful, low-cost alternatives. Burn quality varies based on weave, saturation, and coating.
Materials Needed
All materials should be clean, cotton-based, and tightly woven.
You’ll need:
- Old cotton shirts or denim
- Fabric scissors
- Wax for dipping
- Tweezers
- Wick clip or heat-safe adhesive
- Wick centering tool
Avoid elastic or blended fabrics. Use light-colored materials to reduce soot output. Flannel and denim produce the most stable burns due to tight weaves.
Step-by-Step Instructions
Success relies on tight rolling, full saturation, and solid anchoring.
- Cut strips ¼ to ½ inch wide and 6 inches long.
- Roll or fold tightly into cigar-shaped strands.
- Dip into melted wax at 145°F for 15 seconds.
- Repeat until firm, then cool.
- Attach base clip or press into wax anchor pad.
- Center in jar and pour candle wax.
Allow 24-hour curing before lighting. Shorten length to reduce flicker; thicken roll for stronger flames. This approach blends frugality with creativity—perfect for gift kits or experimental batches.
Upcycled wicks complete the set of DIY techniques. To make the most of these methods, effective troubleshooting and testing are essential.
Wick Troubleshooting & Optimization
Wick performance issues often emerge during test burns. These include mushrooming, tunneling, soot production, and flame instability. Troubleshooting works by identifying wick–wax mismatches and adjusting variables such as diameter, coating, and material type.
Wick refinement is critical to flame quality, fragrance release, and burn time. Below are the most frequent problems and targeted solutions.
Problem: Mushrooming (Carbon Build-Up)
Mushrooming is a carbon clump forming on the wick tip. It occurs when the wick burns too hot or is oversized for the wax pool.
Fix: Use thinner wick material or reduce coating thickness. Trim to ¼ inch before lighting. For cotton braids, switch from size #36 to #24.
Problem: Tunneling (Wax Walls Remain)
Tunneling happens when wax melts only around the wick, leaving unmelted sides. This shortens candle life and weakens fragrance throw.
Fix: Increase wick thickness or switch to a wooden wick. Ensure initial burn reaches jar edges (usually 2+ hours). Poor centering also causes uneven melts.
Problem: Sooting (Dark Smoke on Jar or Air)
Soot indicates incomplete combustion. It’s common with loose fabric wicks or poorly coated hemp.
Fix: Trim wick lower and improve coating. Use soy wax instead of paraffin for cleaner combustion. Avoid heavily dyed or oil-saturated fabrics.
Problem: Drowning Wick (Flame Flickers or Dies)
A drowning wick is submerged by liquefied wax, extinguishing the flame.
Fix: Raise wick using a taller clip or increase braid rigidity via extra dipping. Avoid narrow jars with wide wicks.
These refinements lead directly into comparative analysis for selecting the best method per situation.
Wick Comparison Table
Comparing wick methods side-by-side allows DIY makers to choose based on material cost, complexity, burn performance, and eco-alignment.
This table simplifies decision-making for beginners and experienced crafters alike.
| Method | Materials Needed | Skill Level | Burn Quality | Cost | Eco Rating |
|---|---|---|---|---|---|
| Braided Cotton Wick | Cotton twine, wax, scissors | Easy | Stable, low soot | Low | Medium |
| Wooden Wick | Wood strips, clips, wax | Moderate | Broad flame, crackle | Medium | High |
| Hemp or Fabric Wick | Hemp twine/fabric, wax, oils | Easy | Aromatherapy-capable | Low | High |
| Upcycled/No-Core Wick | Old clothing, wax, clips | Moderate | Variable, sustainable | None | Very High |
Skill level reflects required precision and equipment. Burn quality includes flame height and soot. Eco rating estimates biodegradability and reuse value.
Homemade wick crafting benefits from comparing performance metrics across styles before batch production.
Safety and Storage Tips
Safe wick production and testing involve controlled heat use, labeling, and storage practices that reduce fire risk and material waste. Wick safety works by preventing combustion hazards before wax pouring and lighting stages.
Use Heat-Resistant Surfaces and Equipment
Melt wax using a double boiler on a flat, stable surface. Never overheat wax above 180°F (82°C)—doing so can trigger flashpoints. Use thermometers and heat-resistant gloves during wick dipping.
Label and Pre-Test All Wicks
Before embedding in candles, label each wick with its material, length, and coating type. Use aluminum trays or sand beds for isolated trial burns. Allow at least 2 hours for each test burn to reach full melt pool.
Cure Wicks Fully Before Use
After coating, wicks must dry for minimum 2 hours. Wicks left sticky or under-cured can bend, drown, or smoke excessively when lit.
Store Wicks in Cool, Dry Containers
Place finished wicks in airtight jars or sealed bags to prevent moisture absorption. Organize by type and size using labeled dividers. Avoid storing near direct sunlight or heat vents, which may soften wax coating.
Dispose of Scraps and Oils Responsibly
Do not flush wax or used wick scraps. Wrap in paper and dispose with solid waste. For essential oils, absorb spills with baking soda before discarding.
With tested, stored wicks ready for use, the full crafting cycle becomes repeatable, safe, and efficient—ideal for scaling home candle production or gift packaging.