
Homemade candles crack because the wax surface hardens faster than the wax underneath.
Most cracked tops come from uneven shrinkage, which is the natural contraction that happens as wax cools and solidifies. For broader context, see candle troubleshooting.
That is why cracks usually show up during cooling, not during melting. The top may look set, but the center can still be soft enough to move. If the wax loses heat too quickly, the surface becomes a thin shell over a shifting middle. For the main guide, see candle making .
Several common setup problems make that stress worse. Wax that goes in too hot can contract harder while it cools. A cold jar or mold can pull heat out of the edges too fast. Drafts, cold counters, and sudden temperature changes can make one part of the candle set faster than the rest. Heavy fragrance loads, extra dye, or a mistimed top-off can also change how evenly the wax hardens.
The crack pattern matters too. Fine top lines usually point to surface stress, while deeper cracks and low centers often mean the inside kept shrinking after the top looked done. The first thing to check is pour temperature, because overheated wax often creates the biggest cooling swing in the whole process.
Reason 1: Wax Was Poured Too Hot
Wax poured too hot can crack because it cools through a wider temperature swing and creates more stress as it contracts.
When wax enters the jar overheated, it stays fluid longer in the middle while the top and edges begin to firm up first. That difference creates thermal stress, which is the pull that forms when one area cools and shrinks faster than another.
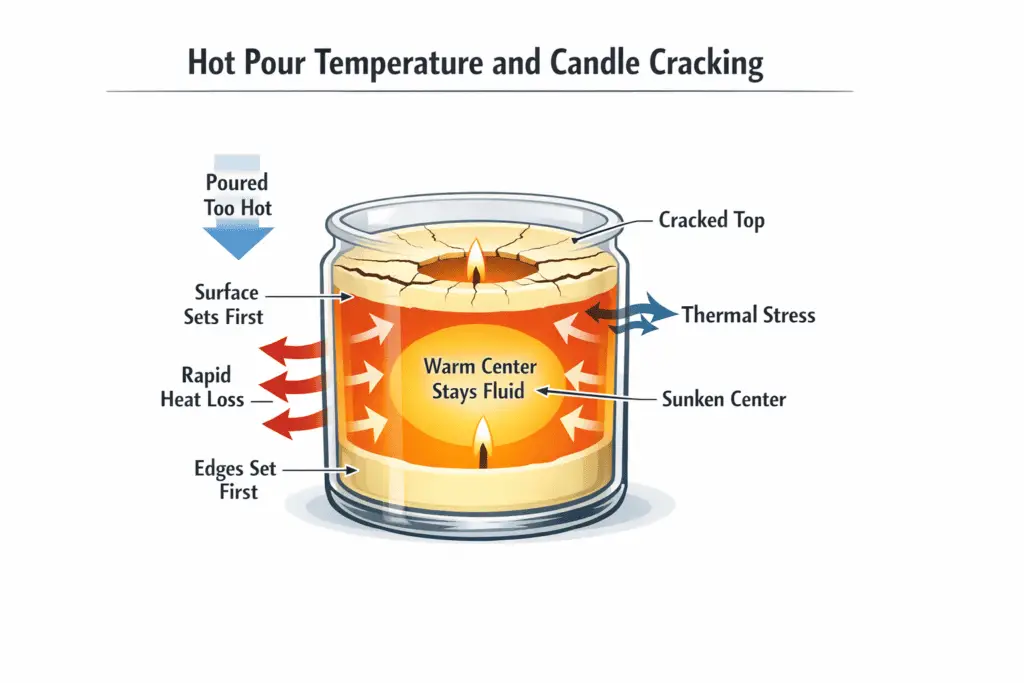
The result is often easy to spot. You may see a cracked top, a sunken center, or a rough finish that looks dry and broken rather than smooth. In some batches, the top looks fine at first and then opens slightly as the inside continues to cool and settle.
This problem is common when makers use the same pouring habit for every wax instead of following the range that fits the exact blend. Different waxes release heat differently, and fragrance or dye can change how the mix behaves after the pour. Wax that is too hot can also heat the container unevenly, which adds more stress as the candle sets.
The fix is usually simple. Let the wax cool to the recommended pour window for that blend, stir gently, and pour in a room with a stable temperature. Warm jars help too, because they reduce the shock between hot wax and a cold container.
Reason 2: The Candle Cooled Too Fast
Candles crack when they cool too fast because the surface sets before the inside finishes shrinking.
Fast cooling creates a firm top over softer wax underneath, and that mismatch can split the surface. The crack is often worse near the center because the middle stays warm longer than the edges.
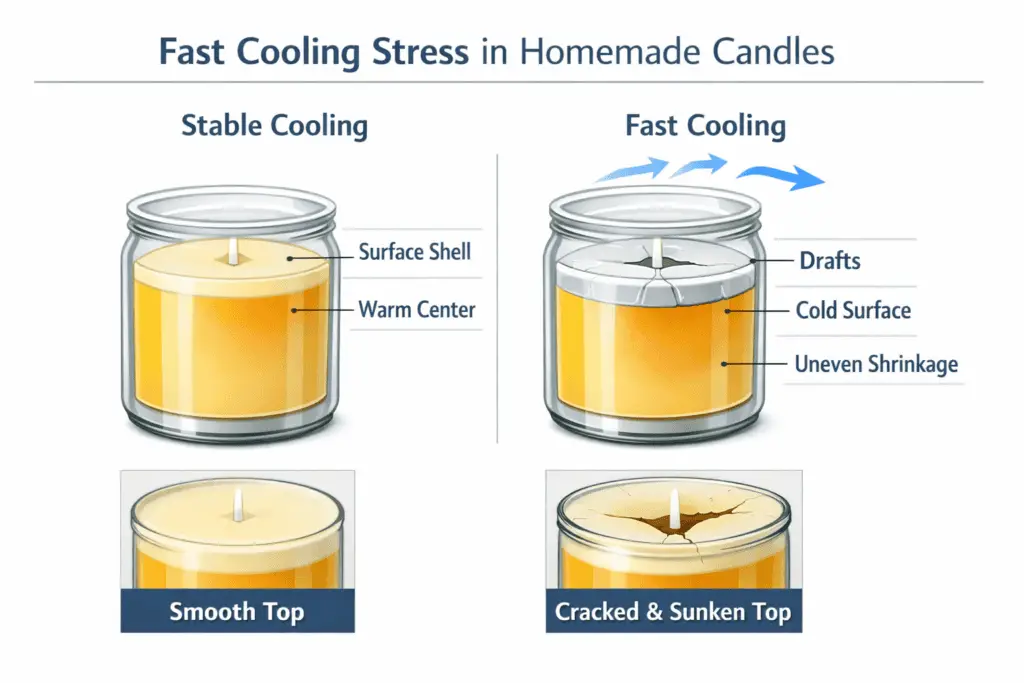
This usually happens in drafty rooms, near open windows, under ceiling fans, or on cold stone and metal surfaces. Even when the pour temperature is reasonable, the wax can still harden unevenly if the room pulls heat away too quickly. Larger candles are especially vulnerable because they hold internal heat longer while the top loses heat first.
The surface clues are usually easy to spot. Fine lines, shallow top splits, and a rough finish point to quick cooling at the surface. A deeper dip or wider crack often means the inside kept settling after the top already looked done. That is why moving a candle to a colder room too soon often creates defects that were not visible right after the pour.
The best fix is prevention during the cooling stage. Let candles set in a stable room, keep them away from direct airflow, and avoid placing hot jars on very cold counters. Slow, even cooling reduces stress across the top and gives the whole candle time to harden together.
Reason 3: The Jar or Mold Was Too Cold
A cold jar or mold can crack a candle by pulling heat out of the wax too quickly at the edges and surface.
That sudden heat loss creates thermal shock, which is stress caused by a fast temperature difference between hot wax and a colder container. Once that happens, the outer wax can grip and harden before the center has settled.
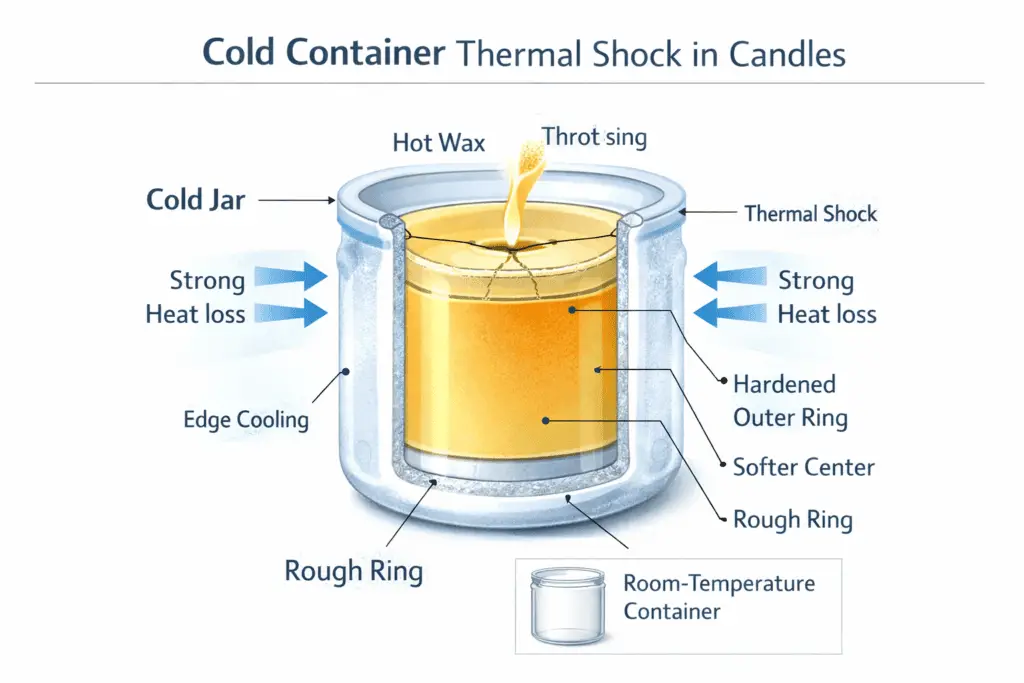
This problem is common when jars are stored in cool rooms, garages, or near windows and then filled right away. The wax may look normal during the pour, but the container starts cooling the outer layer immediately. In jar candles, that can leave top cracks, uneven edges, or a rough ring near the sides. In molds, it can show up as split corners, drag marks, or a broken-looking top surface.
Cold containers also make other problems more noticeable. A wax blend that is already prone to shrinkage will often crack more clearly in a cold jar. A hot pour that might have cooled acceptably in a room-temperature container can become unstable when the glass or mold pulls heat out too fast. That is why container temperature often works together with pour temperature instead of acting alone.
A simple preventive step helps a lot. Bring jars and molds to room temperature before pouring, and warm them lightly when your wax and setup normally need it. The goal is not to heat the container aggressively. The goal is to avoid a sharp temperature contrast when the wax goes in.
Reason 4: The Wax Blend Was Wrong for the Candle Type
A candle can crack when the wax blend does not match the container, mold, fragrance load, or cooling behavior of the project.
Different waxes shrink, hold heat, and harden at different rates. A blend that performs well in one setup can struggle in another, especially when the candle size or vessel changes.
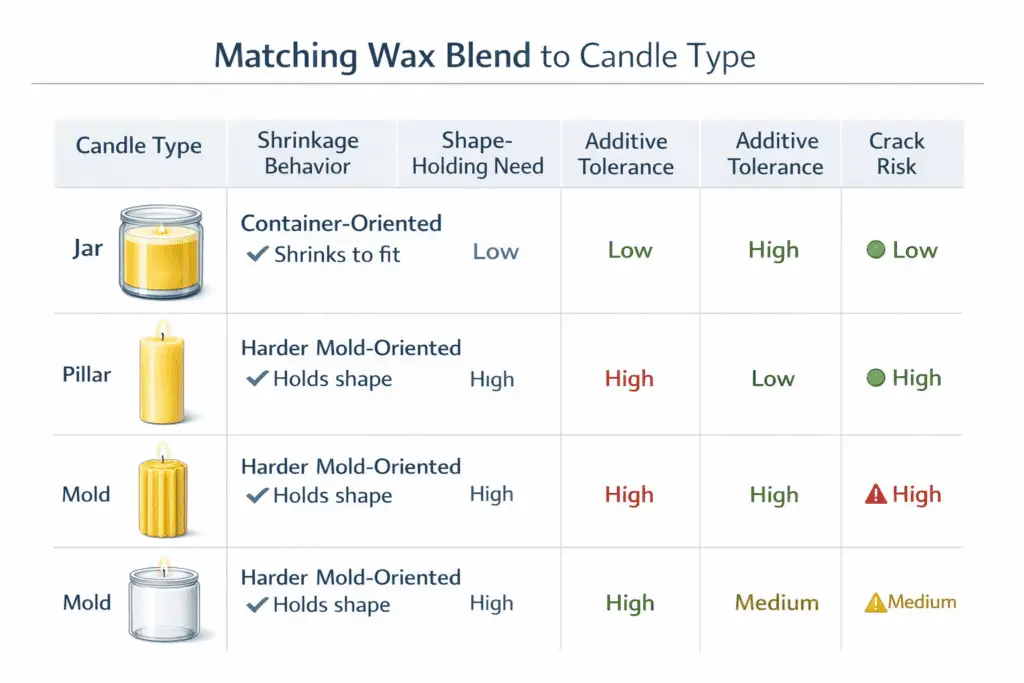
This matters because not every wax is built for every job. A soft container blend may give a smooth top in jars but behave poorly in pillars or molds. A harder wax may hold shape well, but it can also show more visible stress if the cooling setup is not controlled. Even within soy, coconut, paraffin, beeswax, or blended systems, the exact formula changes how the candle sets.
Cracks often appear when the wax shrinks more than expected for the candle style. In a jar candle, that may look like a split top or a low center near the wick. In a mold, it may show up as edge cracking or a broken-looking surface after release. A blend that is too brittle for the project can also make top defects more obvious instead of letting the surface settle smoothly.
That is why a crack is not always just a pouring mistake. Sometimes the real issue is that the wax was asked to do a job it is not designed to handle. Matching the blend to the candle type, container size, and additive load usually improves both appearance and consistency.
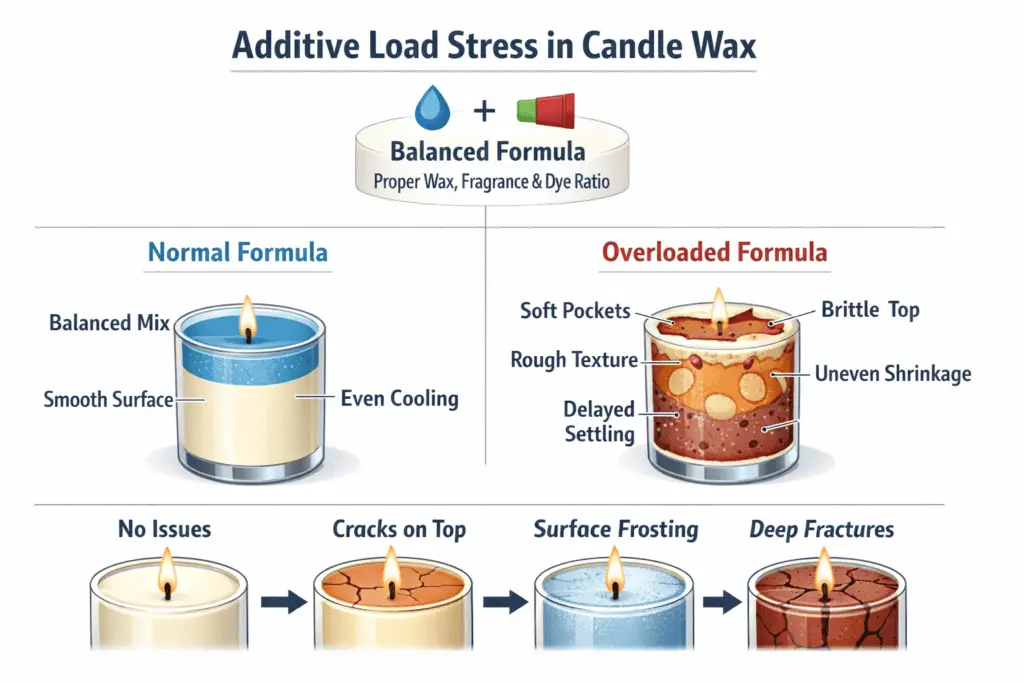
Reason 5: Too Much Fragrance Oil or Dye Changed the Wax
Too much fragrance oil or dye can make candles crack by changing how the wax binds, cools, and settles.
Wax works best when the formula stays within the load it can hold evenly. Once that balance shifts, the surface may harden with weak spots, soft pockets, or uneven shrinkage.

Fragrance oil is one of the most common causes. When the load runs too high for the wax, the blend can cool less predictably and the top may lose its smooth finish. Instead of setting as one even layer, the wax may contract in patches and open small lines or dips. Some oils also make the candle stay softer for longer, which can delay stable curing and leave the top vulnerable to cracking later.
Dye can create trouble too, especially when more is used than needed. Extra dye changes the mixture and can make overheating more likely during melting. It may also reduce how cleanly the wax settles, which leaves rough texture, weak-looking spots, or a brittle top that shows defects more easily. When both heavy fragrance and heavy dye are added together, the stress on the wax formula becomes even harder to control.
The practical fix is to stay within the load your wax is designed to handle, mix thoroughly, and test changes in small batches. A candle that needs stronger scent or deeper color may need a different wax blend rather than simply more additive.
Reason 6: A Second Pour or Top Correction Was Mistimed
A second pour or top correction can crack a candle when the new wax hits the surface at the wrong stage of cooling.
The problem is usually a mismatch between layers. If the first pour is still too warm, the added wax can disturb the structure underneath. If the first pour is already too cool, the new layer can set separately and create a visible split or stressed top.
This often happens when makers try to fix a sink or rough surface too quickly. The top may look firm enough to correct, but the center can still be releasing heat and shrinking underneath. When a fresh layer is added during that stage, the surface may level for a moment and then open again as the inside continues to settle.
Temperature matters here as much as timing. A very hot top-off can remelt the upper layer unevenly and create a rough reset instead of a smooth finish. A top-off that is too cool can sit on the surface without bonding cleanly, which makes the candle look layered, cracked, or slightly separated around the wick. In both cases, the correction ends up creating a second stress point instead of removing the first one.
The best approach is to let the first pour reach the right stage before making any surface fix, then use a light, controlled top correction rather than a heavy second layer.
Reason 7: The Candle Was Moved Before It Fully Set
A candle can crack when it is moved too early because the top may look solid before the inside has actually finished setting.
Wax does not harden all at once. The surface cools first, while the center often stays warm and soft much longer, especially in larger jars.
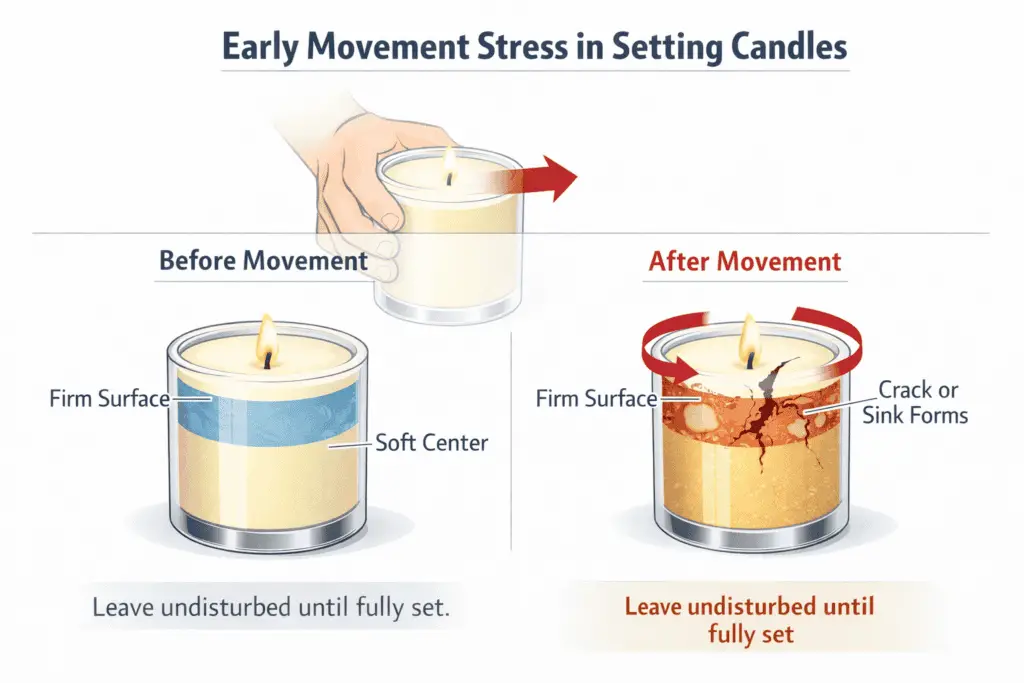
That means a candle can be disturbed even when it seems ready. Lifting the jar, sliding it across a counter, or carrying it to another room can shift the still-soft center under a firmer top. Once that happens, the surface may split, sink, or pull unevenly around the wick. The crack may appear right away, or it may show up later as the inside keeps cooling.
This is especially common after small fixes. A maker smooths the top, thinks the correction is done, and then moves the candle to free up workspace. The movement itself creates the new flaw. It also happens when candles are checked too often during cooling, since repeated handling adds small stress before the wax has finished settling.
The simple fix is patience. Leave the candle in one stable place until the entire container has cooled and the wax has had enough time to set fully.
What to Do if Your Candles Already Have Cracks
You can usually fix a cracked candle by matching the repair method to the depth of the crack and the condition of the container.
Small surface cracks are often cosmetic, while deeper splits can affect how evenly the candle burns. The first step is to let the candle cool completely so you can see the real shape of the damage.
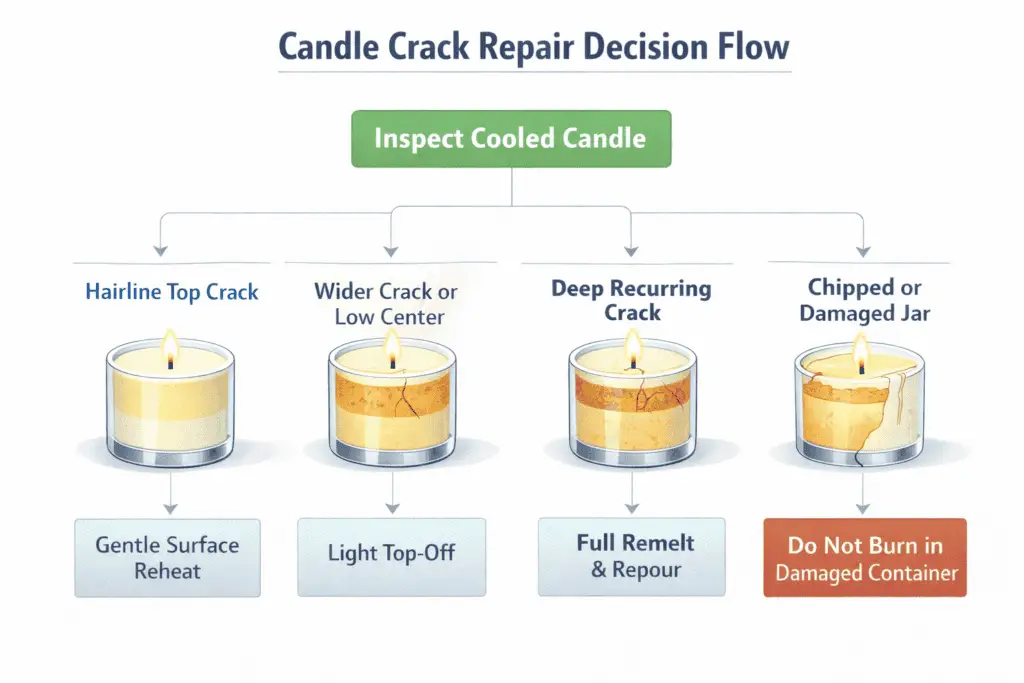
Hairline cracks on the top are the easiest to handle. A gentle surface reheat can soften the top just enough for it to settle smoother. The goal is not to melt the whole candle again. The goal is to relax the stressed surface so it can level without creating a new dip or rough patch.
Wider cracks or low centers usually need a light top-off. That works best when the added wax is controlled and the candle is fully settled first. A heavy correction can repeat the same cooling problem and open the top again. If the crack runs deep, keeps returning, or forms around a badly sunken center, a full remelt and repour is usually the cleaner fix.
You should also check the container before trying to save the wax. If the jar or mold has any chip, fracture, or damage, the candle should not be burned as it is. In that case, the safest choice is to move the wax into a suitable container or start over.
How to Prevent Candle Cracks on the Next Batch
The best way to prevent candle cracks is to keep wax temperature, container temperature, and cooling speed as even as possible from start to finish.
Cracks usually happen when one part of the candle sets faster than another. Prevention works best when you remove sudden temperature swings and avoid extra handling during the cooling stage.
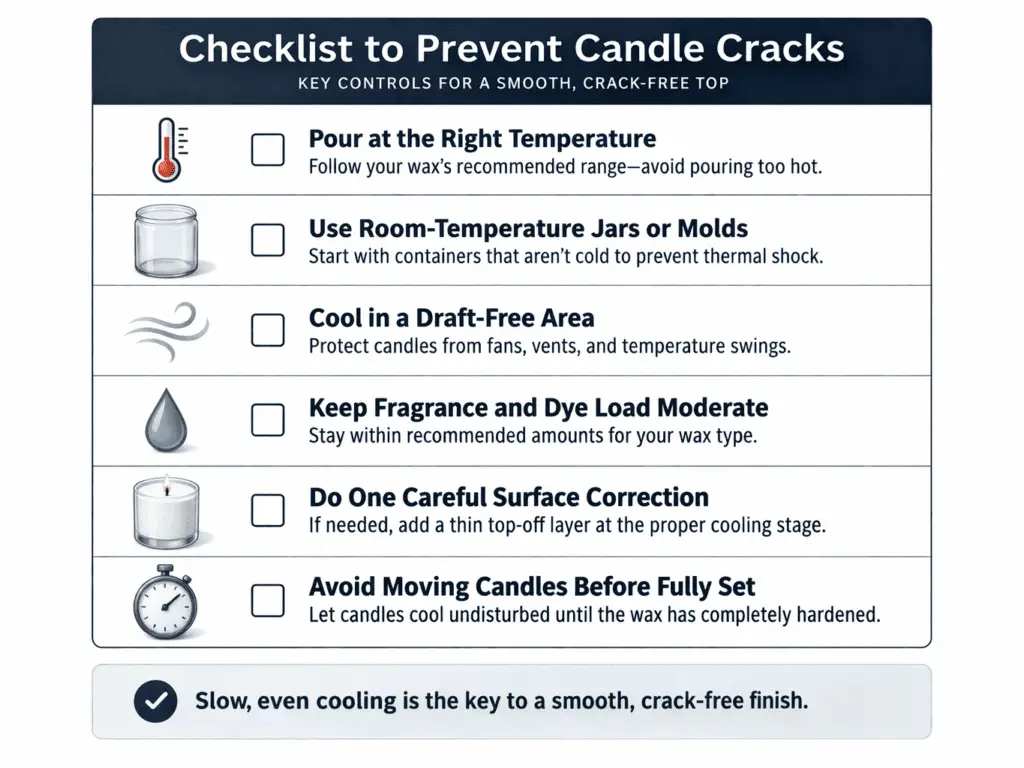
Start with the setup before the pour. Use the wax blend that matches the candle type, keep jars or molds near room temperature, and work in a space without strong drafts. Avoid placing fresh pours on very cold stone, metal, or window-side surfaces that pull heat out too quickly.
Next, keep the wax in the correct working range for the blend instead of treating every batch the same way. Overheated wax creates a larger cooling swing, while wax that is too cool can begin setting unevenly before it settles properly. Add fragrance oil and dye within the range your wax can hold, and test changes in small batches rather than making several formula changes at once.
The cooling stage matters just as much as the pour. Leave candles undisturbed until the full body of wax has set, not just the top layer. If a surface needs correction, use one careful fix at the right stage instead of several rushed top-offs. Consistent pouring, stable cooling, and patient handling prevent most cracking problems before they start.
Conclusion
Homemade candles usually crack for predictable reasons, not random bad luck. In most batches, the real cause is uneven cooling, a poor temperature match between wax and container, or a surface correction made at the wrong time.
Once you identify whether the crack came from the pour, the cooling stage, the wax formula, or early movement, the fix becomes much simpler and more repeatable. Better candles usually come from steady temperatures, patient cooling, and making one controlled adjustment instead of chasing the surface with multiple quick fixes.