Candle wick types and sizing describe how wick material or family, then wick size, are matched to the wax, vessel, and finished formula so the candle burns in a controlled way.
This page covers the broad wick overview: the main wick types, the first-pass sizing order, and the basic test checks that confirm a starting wick. Use the linked child pages for exact size-chart workflow, double-wick layouts, material comparisons, and deeper troubleshooting.
Quick wick selector: use this before you read the deep sections
Use this table to choose a starting direction, not a final answer. Supplier wick charts are family-specific, so matching numbers across series do not mean the same burn behavior. Pick the family your supplier recommends for your wax and usable inside diameter, then test one size cooler and one size hotter.
Here, ECO, CD, HTP, and LX refer to supplier wick families or series, not universal sizes, so matching numbers across those names does not make them interchangeable.
| Candle setup | Start with this decision | Common first family to test | If the first burn is too cool | If the first burn is too hot |
|---|---|---|---|---|
| Soy container candle | Match wick to inside diameter using a soy chart | ECO, CD, or HTP | Go up one size in the same family | Go down one size in the same family |
| Paraffin container candle | Match wick to inside diameter using a paraffin chart | LX, HTP, or a paraffin-friendly family | Go up one size | Go down one size |
| Beeswax pillar or firm wax | Start with a stronger braid or hotter family made for dense wax | Square braid or a beeswax-friendly series | Step up size or test a stronger family | Step down size |
| Coconut or coconut-soy blend | Size by diameter, then retest with your actual fragrance load | ECO, CD, HTP, or wood if the product style calls for it | Go up one size or test a slightly stronger family | Go down one size |
| Wide vessel | Test a double-wick layout before forcing one oversized center wick | Two smaller matched wicks | Increase size or spacing slightly | Reduce size or spacing |
| Wood-wick container candle | Match by usable wax diameter and the manufacturer width chart | Single, booster, or dual wood wick | Test the next wider or stronger variant | Test the next narrower or cooler variant |
For a deeper material-by-material taxonomy after this overview, use the different candle wick types guide.
What are the main candle wick types?
The main candle wick types are grouped by material or construction—such as flat-braided cotton, square braid, cored wicks, and wooden wicks—while sizing determines how strongly that wick burns in a specific wax and vessel.
| Wick type | Where it commonly appears | What it changes first |
|---|---|---|
| Flat-braided cotton | Many container candles and general-use wick families | Baseline cotton burn behavior across common supplier series |
| Square braid | Beeswax pillars and firmer waxes | Stronger feed in denser or slower-melting candles |
| Cored wick | Some votives, pillars, and specialty applications | Rigidity and flame behavior in the finished candle |
| Wooden wick | Container candles where crackle or a wider flame shape is part of the product style | Width and variant choice as much as the nominal size |
Wick family vs series vs size
A wick family is a named line such as ECO, CD, HTP, or LX. The series number is the size step inside that family, and that number does not transfer across other families, so wick size only makes sense inside its own family before you compare burn behavior or switch families.
How to confirm the starting wick works
Run one controlled test round before you commit to production. Keep the wax, vessel, fragrance load, and cure time the same across the full test set so the wick is the only major variable.
- Measure the usable inside diameter of the vessel, not the outside width or fill volume.
- Keep the wax, fragrance, dye, jar, and cure time the same across all test candles.
- Test one starting wick plus one size cooler and one size hotter in the same family.
- Burn all tests on the same schedule and log flame height, melt-pool reach, soot, and glass heat.
- Keep the calmest wick that reaches a full melt pool without an oversized flame, heavy mushrooming, or obvious overheating.
Judge the wick after repeated supervised burns on the same schedule, such as 3–4 hour sessions, because first-burn hang-up alone is not a final fail if later burns settle down and the candle stays calm.
| What you see | What it usually means | Change first |
|---|---|---|
| Small flame and wax ring remains | The wick is too cool for the formula or diameter | Go up one size in the same family |
| Tall flame, smoke, or fast edge-to-edge melt | The wick is too aggressive | Go down one size |
| Wick drowns after one or two burns | The formula is too demanding for the current size | Go up one size or test a stronger family |
| Center gets very hot but edges still lag in a wide jar | The layout is wrong, not just the size | Test a double-wick layout |
| Wood wick goes out | The variant is too narrow or too weak for the wax/load | Test a wider or booster variant |
| Heavy mushrooming with an otherwise full melt pool | The family runs too aggressively in that formula | Step down or test a cooler family |
For a deeper troubleshooting path after the first round, see fix common candle wick problems.
Choose the starting wick in this order: diameter → wax → formula → test
Measure your jar’s inner diameter accurately, choose a starting wick size from that diameter in your chosen family, then confirm or adjust with timed burn tests instead of guessing.
Use this order every time you test a new candle: measure the usable inside diameter, pick a wick family that suits the wax, choose the starting size from the chart, and then test one size down and one size up. This keeps wick selection simple and keeps the wick as the main variable during the first round of testing.
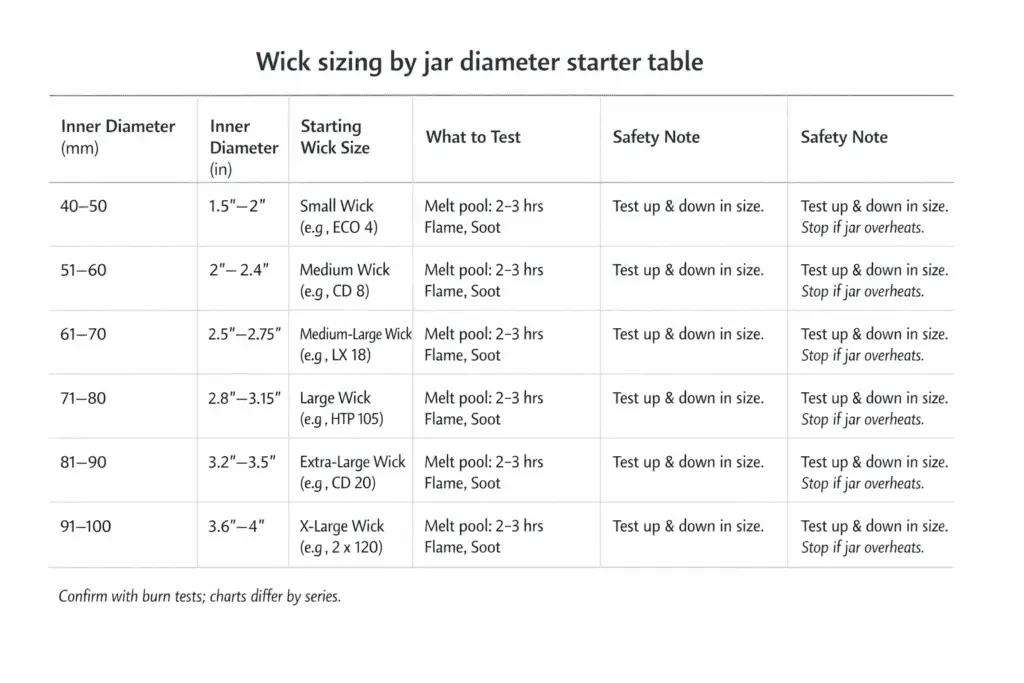
This visual shows diameter-to-starter-size logic before you confirm the final wick with burn testing.
Use the supplier chart as a starting reference only. Measure the usable inside diameter, match that measurement to your wax in the chosen family, and test one size cooler and one size hotter before you lock the wick.
For a fuller first-pass selection walkthrough before deeper size adjustments, see how to choose a candle wick.
If the chart suggestion and the live burn behavior disagree, trust the burn behavior and adjust within the same family first. For the full measurement and chart workflow, see the candle wick sizing guide or the wick sizing starter chart.
When to test double wicks instead of sizing up
Test two smaller wicks before you keep sizing up one center wick in a wide vessel. Split the usable wax diameter into two smaller burn zones, keep spacing even, and compare that layout against one stronger center wick in the same jar. In wide, low vessels, a balanced double-wicking guide approach often gives cleaner edge reach and lower center overheating than one oversized single wick.
Use your supplier’s burn guidance and your own test logs to judge whether two smaller matched wicks solve the wide-vessel problem more calmly than one oversized center wick. For full spacing and layout execution, use the linked double-wicking guide.
Simple burn-test log template
For each test candle, keep a short log with fields like:
- Wax type, blend ratio, and batch ID
- Vessel type and inner diameter (mm and inches)
- Fragrance percentage and dye level
- Wick family, size, and number of wicks
- Burn session times plus melt-pool reach and flame height
- Final verdict: too cool, acceptable, or too hot
How to match wick families to wax types (soy, paraffin, beeswax, coconut blends)
Match each wax to wick families known to behave well in it—often ECO or CD for soy, LX or HTP for paraffin, and carefully chosen hotter families for beeswax and coconut blends, then confirm with burn testing.
| Wax family | What it usually needs from the wick | Common starting families | What most often forces a retest |
|---|---|---|---|
| Soy | Enough push to reach a full melt pool in many jars | ECO, CD, HTP | Higher fragrance load, dark dye, wider jars |
| Paraffin | A cleaner, controlled flame often works at smaller sizes | LX, HTP, paraffin-friendly cotton families | Tall flames, smoking, or hot-running containers |
| Beeswax | Stronger feeding in denser wax | Square braid, hotter cotton families, beeswax-specific recommendations | Dripping, tunneling, or slow melt in thick candles |
| Coconut or coconut-soy blend | A family that stays stable under your real fragrance load | ECO, CD, HTP, or a tested wood setup | Flooding, drowning, or inconsistent burn across scents |
Use wax behavior to narrow the field first, then size inside that short list. This page only identifies common starting families by wax; deeper family comparisons belong on the linked child pages.
Example workflow for a new scent and jar
- Define your wax recipe and final formula before you pick a wick family.
- Shortlist two or three families that commonly match that wax type.
- Use each family’s chart to pick adjacent starter sizes for the jar.
- Burn-test that shortlist and keep the combination that stays controlled in your finished formula.
Retest when the formula changes: fragrance, dye, and additives
Fragrance load, dye, and additives can all change wick performance, so any meaningful formula change should trigger a wick retest.
Higher fragrance loads can make a formula harder to burn cleanly, while dark dyes and additive packages can change melt behavior, soot, and glass heat. Keep the vessel and wax family the same, then compare the current wick against one cooler and one hotter option so you can see whether the new formula needs more fuel, less fuel, or a different wick family.
Higher fragrance loads often make a formula harder to burn cleanly because they change how the melted wax feeds the flame, and a wick that works in a lighter load can start drowning, mushrooming, or sooting when you raise the oil level. Test the wick against the final formula you plan to use, not just the base wax, and keep the jar, wax, cure time, and burn schedule the same while you compare the current wick against one cooler and one hotter option.
Some makers screen an unscented base first to narrow the wick range, but final approval should always happen in the finished formula you plan to use.
Dark dyes and additive packages can also shift burn behavior by changing heat absorption, viscosity, and how stable the flame feels in later burns. If a wick that worked in undyed wax suddenly tunnels, smokes, or overheats once the color or additive package is added, retest the finished formula one variable at a time instead of forcing a large size jump.
Treat every new combination of wax, fragrance, dye, and additives as its own system. If the same symptom repeats across adjacent sizes, step back and test a different wick family or a lower formula load rather than assuming one bigger wick will solve it.
When wick type or family choice actually matters
Wick material, construction, and family matter after the first-pass choice, but they should not replace sizing by diameter, wax compatibility, and burn testing.
Use this section to identify when a deeper wick page is needed, not to replace those child guides.
Use a deeper wick page only when the first test gives you a clear reason to change material, family, or layout. That keeps this page focused on first-pass wick choice instead of turning it into a full wick encyclopedia.
- If you want a different flame style or crackle, compare cotton vs wooden wicks after you establish a stable baseline wick.
- If one wick family runs too hot or too cool in the same jar, compare families such as CD vs ECO wicks instead of guessing by the printed number.
- If you still need a taxonomy of materials and constructions, use the different candle wick types guide, then return here to make the actual choice.
- If the container is wide, test two smaller matched wicks before sizing one center wick too aggressively.
- If you are testing wood wicks specifically, use the wood wick guide because wood-wick width and variant logic is its own subtopic.
For a broader start-to-finish overview, see the candle making guide.
Quick answers to common wick-sizing questions
Use these quick answers as starting rules for common wick-sizing decisions. Final wick choice still depends on your supplier’s family-specific chart and controlled burn tests. Do not fail a wick on first-burn hang-up alone; judge it after repeated supervised burns on the same schedule.
What wick size should I test first?
Start with your supplier’s chart for your wax type and usable inside diameter, then test one size down and one size up from that starting point.
Does higher fragrance load always mean I need a bigger wick?
Not always, but heavier or more demanding formulas often need a stronger wick or a retest because they can change flame stability and melt-pool behavior.
Should I size up for dark dyes and additives?
Sometimes. Dark colors, heavy pigment, or extra additives can change how the candle burns, so retest the same family before you assume the old wick still works.
When should I double-wick instead of using one larger wick?
Test a double-wick layout when one center wick would need to run aggressively in a wide vessel just to reach the edge.
Can I treat CD 10 and ECO 10 as the same wick?
No. Match by jar range and burn behavior, not by the number printed in the series name.