
Recycled jars can be safe for candles when the glass is sound and thick, the jar is rated for hot contents, and you test-burn with a conservative wick and proper fill line.
On this page, a recycled jar means a previously used glass container that was not sold as a candle vessel. “Safe” here means only that the jar is worth screening and a controlled test burn; it does not mean the jar is pre-approved, certified for open flame, or automatically suitable for selling or gifting candles.
On this page, “too hot” means the jar starts showing aggressive upper-wall or shoulder heating during testing. It does not mean ordinary warmth from a normal container candle, and it does not stand in for a full overheating diagnosis.
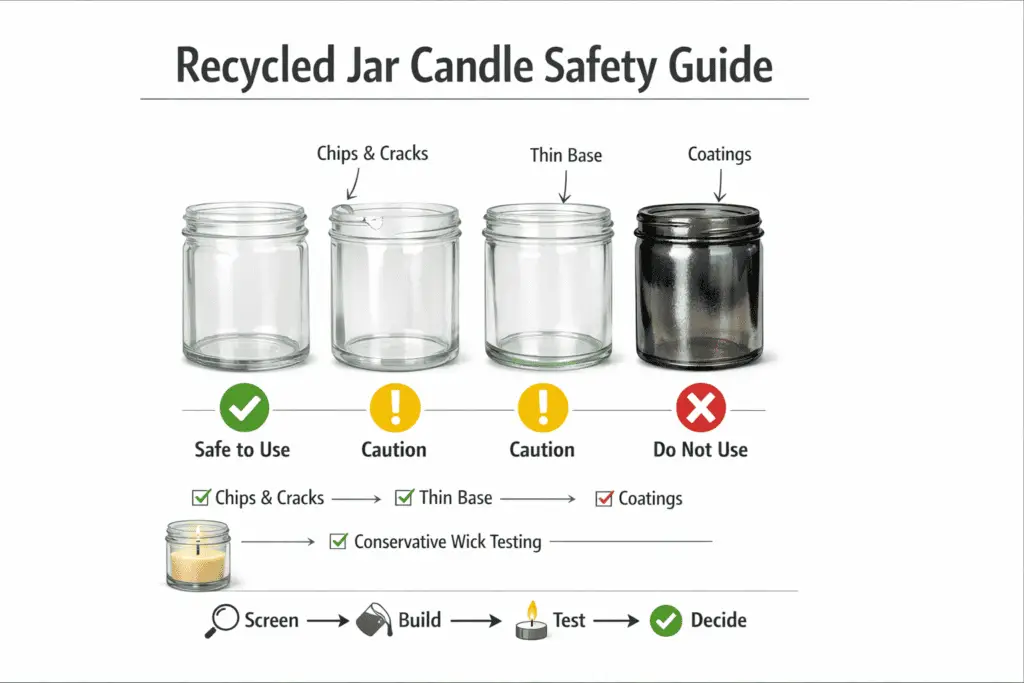
If you’re upcycling jam jars or thrifted glass for candles, treat reused glass as a higher-risk part of candle containers and jars until the jar proves otherwise. The biggest risks are hidden cracks, thin bases, coatings that can scorch, and heat trapped by the wrong wick. A quick screen plus a careful test burn tells you far more than labels like “hot-fill” or “dishwasher-safe.”
Quick workflow (Screen → Build → Test → Decide)
- Screen: Reject jars with rim chips, hairline cracks, deep scratches, or raised/misaligned seams; avoid interior coatings or unknown “decorative” finishes.
- Build: Set a conservative fill line (10–15 mm below the rim and below any shoulder), center the wick securely, and start with a conservative wick for the inside diameter.
- Test: Burn in controlled sessions (start with 2–3 hours), trim the wick between sessions, and watch for soot, aggressive flame, drifting wicks, crack “ticking,” or a hot band near shoulders.
- Decide: If the jar develops any crack lines, coatings bubble/char, the flame repeatedly soots or mushrooms, or the container becomes “too hot to touch,” fail the jar or downsize the wick/load and retest.
Quick accept / caution / reject guide
| Jar type | Decision | Why |
|---|---|---|
| Candle-grade jar | Best choice | Designed for sustained candle use, though it still needs test burns. |
| Plain food or canning jar | Caution | Can work when undamaged and straight-walled, but hot-fill use does not equal candle approval. |
| Painted or decaled jar | Caution to reject | Only consider it if the finish stays well below the heat band and nothing is coated inside. |
| Thin drinking glass or decorative glass | Reject | These containers are often not made for sustained point-source heat. |
| Unknown coated or lined jar | Reject | Hidden finishes and liners can scorch, soften, or fail when heated. |
Tempered vs. Non-Tempered Glass for Candle Jars (Which Is Safer?)
Tempered glass is usually safer for candle jars because it tolerates fast temperature changes better and tends to break into small chunks instead of long, sharp shards.
For this page, “safer” means more forgiving during reused-jar screening and test burns, not a full approval for open-flame use. For the deeper glass-process distinction, see Non-tempered (annealed) jars and thermal-shock guidance.
Here are practical ways to assess glass type without doing anything destructive:
- Look for markings: some jars have “tempered” stamped on the base or printed on a label (if you still have it).
- Treat “hot-fill,” “dishwasher-safe,” or “microwave-safe” as use clues, not candle approval; those ratings do not automatically mean the jar is suitable for an open flame.
- Use a cautious “unknown = higher risk” rule: if you can’t verify the glass, choose a conservative wick and do a closely watched test burn.
When the glass type is unknown, lower wick energy and watch the first test burn closely. Labels such as “hot-fill,” “dishwasher-safe,” and “microwave-safe” are use clues, not candle approval.
How Thick Should Candle Jars Be? (Measuring Wall & Base Uniformity)
A recycled jar is safer when its walls are even and its base is hefty enough to absorb heat spikes without creating stress points.
Use container thickness and base mass guidelines thinking: you’re not hunting one magic number—you’re checking for uniformity, a solid base, and no “thin spots” that heat up faster than the rest.
Thicker, more consistent glass spreads heat across a larger cross-section, which slows how quickly any one spot expands.
A heavier base acts like a thermal buffer, reducing the chance that the bottom edge becomes the stress “hinge” where hot wax meets cooler glass.
Quick ways to evaluate thickness at home (no special gear required):
- Visual scan in strong light: rotate the jar and look for obvious “thin windows,” warping, or uneven seams that suggest inconsistent glass.
- Paper gauge trick: slide a strip of paper around the inside wall; if it catches or gaps in one area, the wall may be uneven or the seam may be raised.
- Weight comparison: compare two jars of similar size; the noticeably heavier one often has a thicker base and sturdier walls (still inspect for chips and cracks).
Wick choice has to match what the glass can handle, so plan wick size adjustments for thin walls even if your wax and fragrance normally run fine in candle-grade containers.
When you’re unsure, lean on base mass & thermal buffer heuristics: pick jars with a thicker-looking bottom, avoid feather-light bases, and treat base-heavy rocks glasses as a safer starting point than thin food jars of the same diameter.
A practical pass/fail mindset: if the rim looks visibly thin, the base looks light for its size, or the wall thickness seems to change as you rotate the jar, move on. If the glass looks consistent, the base feels substantial, and the jar stays stable through a conservative test burn, you’ve cleared the biggest thickness-related risk.
Two simple decision rules that tighten thickness into a “keep or skip” choice:
- If the base is visibly thin for the jar’s size (or the jar feels feather-light), don’t use it for candles—use it for storage or non-flame projects instead.
- If you can measure with calipers and the thickness changes noticeably from one side to another, skip the jar for container candles and use a purpose-made vessel instead.
How to Inspect Recycled Jars: Chips, Micro-Fractures & Seams
Reject any jar with rim chips, spreading hairlines, deep scratches, or misaligned seams—these defects amplify thermal stress and failure risk. Before you pour, follow a simple jar inspection checklist so you don’t waste wax on glass that’s already halfway to cracking.
Small surface flaws act like “starter notches” for cracks, and repeated heating can widen them until a line suddenly runs. Rims and shoulders are the most common failure zones because they see the biggest temperature swings during burns.
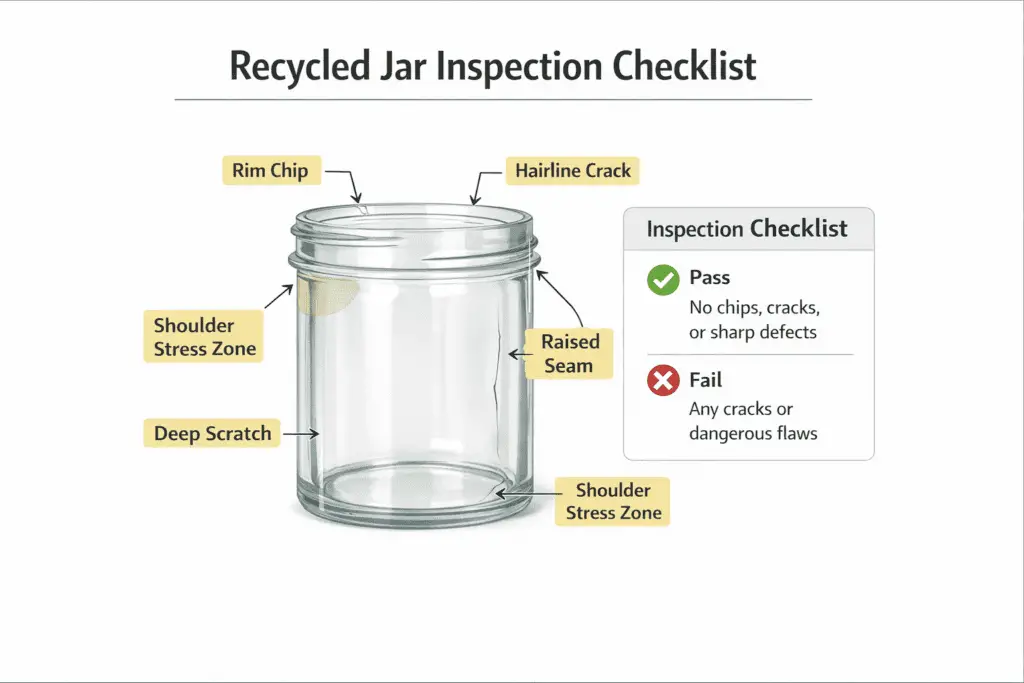
Quick inspection you can do in under a minute:
- Rim sweep (finger + light): run a fingertip around the rim and rotate the jar under a bright light; any sharp nick, flake, or “sparkle line” is a red flag.
- Dark-room flashlight scan: shine a small light through the glass and tilt slowly; cracks look like continuous lines, while scratches usually stop and start.
- Seam check: look for an off-set seam or a ridge you can feel inside; uneven seams can become stress concentrators when the jar heats.
To reduce rim cracking even in “good” jars, set a safer fill line to limit rim stress and keep the hottest part of the melt pool farther from the rim.
If you can’t confidently trust the jar’s past life, avoid dishwasher-fatigued jars because repeated hot cycles and detergents can leave the glass weaker even when it looks fine.
Common questions that trip people up:
- Seam lines aren’t automatically unsafe, but a seam that looks shifted, wavy, or raised is a much bigger risk than a clean, straight seam.
- A tiny rim chip can stay stable for a while, but it can also become the starting point for a hairline once the jar goes through a few long burns, so it’s not worth gambling on when you’re reusing unknown glass.
Inspection reduces risk, but it doesn’t certify a recycled jar as candle-safe. If a crack line appears during testing, retire the jar from candle use rather than trying to push it through another burn.
Jar Geometry & Heat: Diameter, Height, and Shoulders for Safer Burns
Wide, straight-wall jars often run cooler, while tall or narrow jars tend to concentrate heat.
Use a quick vessel geometry risk map to spot where heat is likely to build up before you ever choose a wick.
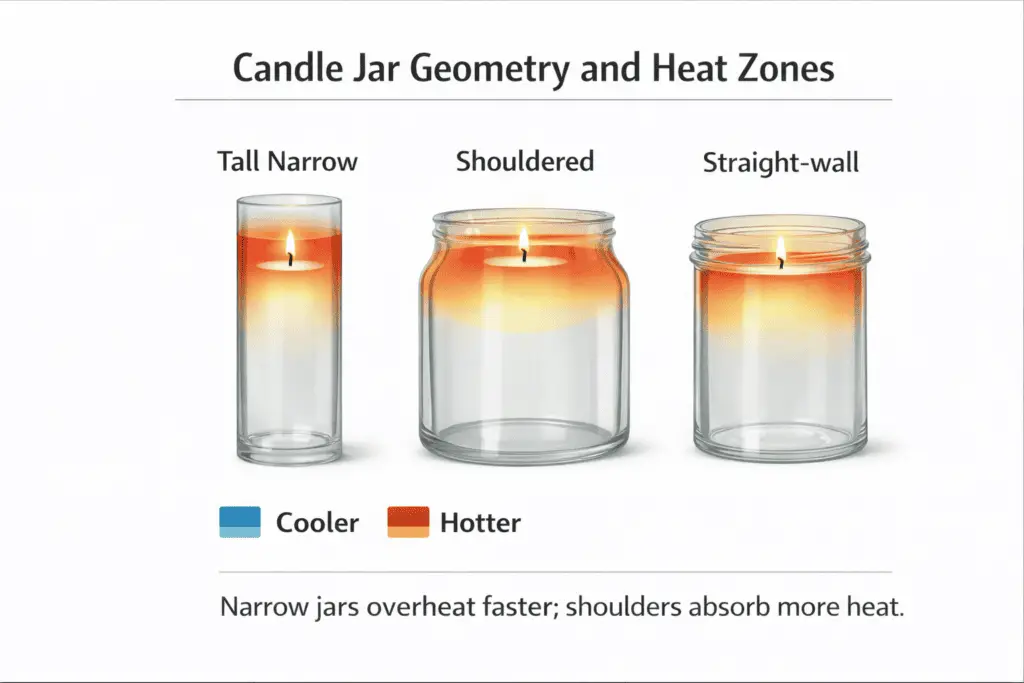
Diameter changes how easily heat spreads across the wax surface, while height and shoulders change how hot gases circulate near the rim.
A pronounced shoulder can trap heat on one side, which can raise wall temperatures and encourage soot and stress lines in that hot band.
What the “hot spots” usually look like in real burns:
- Tall + narrow: the upper wall runs hotter because warm air has less room to escape upward and outward.
- Shouldered jars: a ring-shaped hot band can form near the shoulder where flame heat reflects back toward the glass.
- Straight-wall tumblers: heat tends to distribute more evenly, which makes it easier to wick conservatively and keep wall temperatures steadier.
If a test burn keeps creating a hot band, soot, or a very hot upper wall, learn how to prevent overheating and shattering containers before you keep troubleshooting the same jar.
And when a jar is tall, don’t ignore the bottom: consider base mass when jars are tall because thin bases heat faster and can become the stress point during long burns.
A simple measuring checklist that improves decisions fast:
- Measure the inside diameter near where the melt pool will sit, not the outside of the glass.
- Note whether the jar is straight-wall or shouldered, and where that shoulder begins relative to the expected flame height.
- Treat narrow necks and tight openings as higher risk because they can trap heat near the rim.
How Much Headspace Should a Candle Jar Have? (Fill Line Rules)
Leave about 10–15 mm (1.0–1.5 cm) of space below the rim, and never pour above a shoulder or narrowing. Think of headspace safety range as a simple buffer that keeps the hottest part of the burn farther from the rim and reduces flare-ups from splashes or sudden drafts.
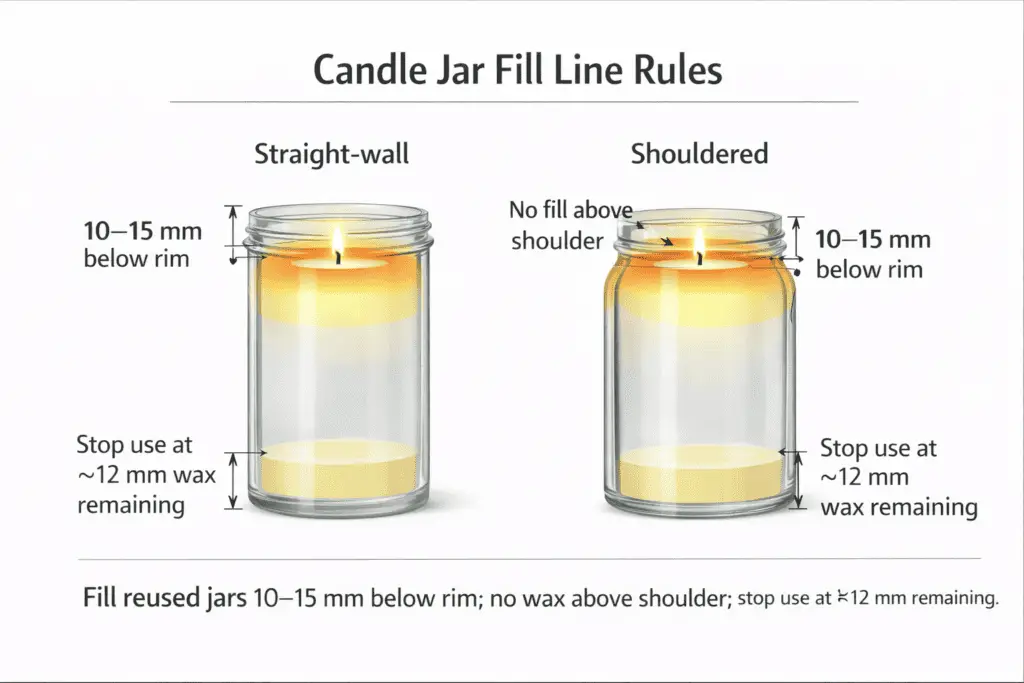
The easiest way to set it is to place the jar on a flat surface, hold a ruler on the inside wall, and mark a line 10–15 mm down from the rim.
Then add a second “do not cross” mark at any shoulder constriction, because wax above that point can put heat where the glass is most stressed.
If you’re torn between 1 cm and 1.5 cm, choose the larger gap when the jar is tall, narrow, or has a tight opening, because those shapes trap heat near the top.
Also, choose a cooler wick for high-load scents because hotter flames can push heat up the walls faster and make your safe fill line feel “too high” in practice.
Finally, avoid filling into painted neck zones (or any coated band near the top) since coatings can discolor, soften, or smell off when they’re repeatedly heated.
Whatever fill line you choose, stop using the candle when about 12 mm (1/2 in) of wax remains so the base does not overheat late in the candle’s life.
Manufacturer Guidance & Heat Ratings: What to Look For Before Pouring
“Hot-fill” and “thermal shock resistant” usually mean the glass was tested for hot liquid pouring or sudden temperature changes, not that it’s approved for an open flame.
Before you reuse any container, read jar specs before use and treat missing or vague ratings as “unknown,” not “safe.”
Hot-fill testing focuses on brief contact with hot contents, while a candle creates sustained point-source heat plus repeated radiant heating and cooling cycles.
That mismatch is why a jar can be fine for hot jam or sauce, yet still crack when a wick runs too large or a shoulder forms a hot band.
When you do find a spec sheet or product listing, look for clues that actually map to candle stress:
- Glass thickness or base thickness notes (thicker bases handle cycling better than thin “drinkware” bases).
- Any mention of thermal shock testing conditions (it’s informative, but still not a candle certification).
- Warnings about direct flame, heating elements, or rapid temperature swings.
If specs are missing, run vessel testing before pouring so you learn how that exact jar behaves with your wax, wick, and fragrance choices instead of guessing from labels alone.
Even canning jars are not automatically open-flame approved, so treat mason jars as test-only unless the maker clearly states candle use.
If your question is specifically about canning jars, see can you use mason jars for candles.
And if you want fewer unknowns from the start, choose the best candle container instead of guessing from recycled packaging.
A tighter “accept / caution / reject” decision rule for labels and specs:
- Accept (best case): the container is sold as a candle vessel or explicitly states it’s intended for candle use/open flame.
- Caution (test required): ratings like hot-fill, dishwasher-safe, microwave-safe, or “thermal shock resistant” without any candle/open-flame language—use conservative wicking and a documented test burn.
- Reject: anything labeled decorative only, not heat resistant, or any warning that explicitly discourages heating or open flame; also reject when interior coatings/liners can’t be removed or verified.
How to Choose Wick Size/Type for Reused Jars (Avoid Overheating)
Start with a conservative wick for the inside diameter and wax/load, then test-burn and step up in small increments until you get a stable melt pool by about 2–3 hours without pushing the glass into aggressive upper-wall heating during testing.
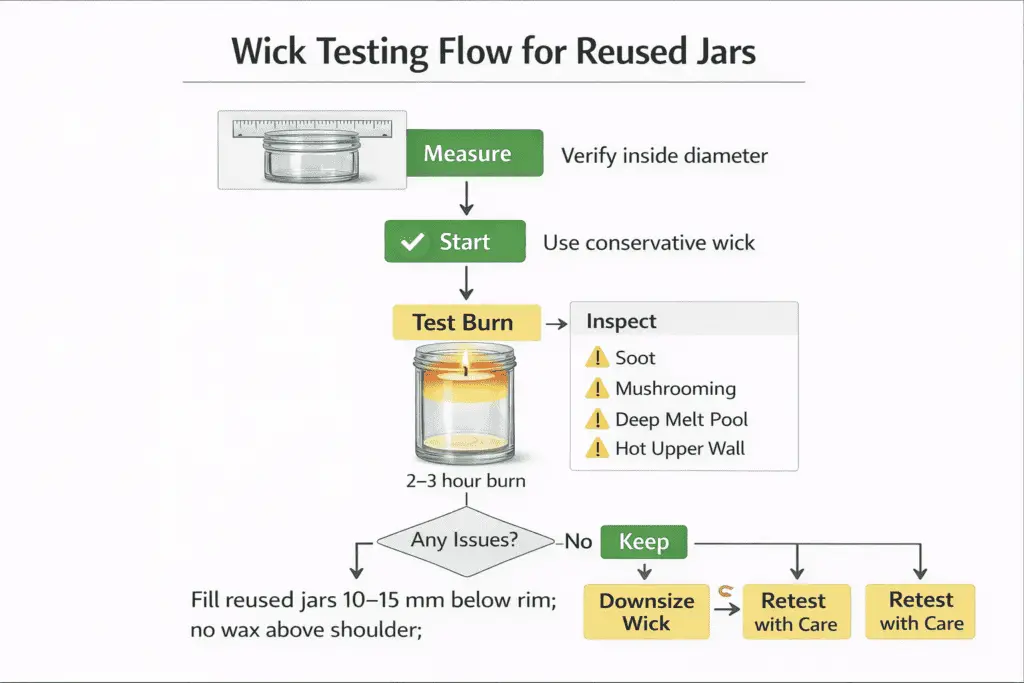
The core risk is wick output vs jar heat: a stronger wick raises flame height, expands the melt pool, and pushes more heat into reused glass.
Unknown glass, coatings, and prior heat history make small wick changes matter more, so change one variable at a time and retest before blaming the jar.
Use this simple process to pick a safe starting point:
- Measure the inside diameter where the melt pool will form, not the outside of the jar.
- Choose a wick family and start one step conservative for your wax type and fragrance load, then test-burn in controlled sessions with notes.
- Watch for overheating signals: tall dancing flame, heavy mushrooming, fast sooting, a very deep pool early, or the upper wall heating aggressively.
If a wide reused jar needs more melt-pool coverage, multiple smaller wicks can be tested as a new setup, not as an automatic fix. If the jar keeps showing the same overheating signals, move to the overheating page rather than turning this page into a full diagnosis.
Are Painted or Decaled Jars Safe for Candles? What to Check First
Direct answer: Skip jars with paint or decals near the melt pool or upper wall; only consider finishes that stay well below the heat band and away from the inside of the jar.
Start with coating/decal safety rules because the biggest problem isn’t just cracking—it’s coatings that smoke, char, or delaminate as the jar cycles hot and cool.
A practical safety margin is to keep decoration out of the part of the jar that gets hottest during a full burn.
Interior paint, interior labels, and “film” decals are the highest risk because they’re heated directly by the melt pool and hot gases; exterior-only decoration can be acceptable when it stays well below the heat band.
To reduce heat exposure near graphics, use a cooler wick to keep flame clear and aim for a steady melt pool without a tall, flickering flame that licks upward.
If you see bubbling, darkening, or a sharp chemical smell, what to do if paint blisters is simple: end the test burn, let everything cool fully, and retire that jar from candle use.
Quick pre-check list before you pour:
- Inside the jar: if any paint/decal is on the interior wall, treat it as a no-go for candles.
- Top third of the jar: avoid finishes near where the flame plume rises; that’s where scorching and odor issues start.
- Unknown “dishwasher-safe” claims: don’t assume they mean “candle-heat safe”; candle heat is sustained and localized.
A simple heat-spot test (for jars you still want to try): run a short, supervised test burn with a conservative wick and stop early if you see smoke staining, sticky residue, softening, or lifting edges around the decoration.
Food Jar vs Cosmetic Jar vs Candle-Grade: What’s the Difference for Safety?
Candle-grade jars are usually the safer bet because they’re designed for sustained, point-source heat and tend to have clearer thermal guidance and sturdier bases.
On this page, that makes candle-grade vessels the cleaner benchmark for screening reused jars, not the start of a full container-buying comparison.
Food jars and cosmetic jars can still be test candidates, but their original use gives you less direct evidence about open-flame performance.
A practical comparison (assuming all jars are undamaged and you wick conservatively):
| Jar type | What it’s optimized for | Common safety advantage | Common safety risk in candles |
|---|---|---|---|
| Food jar | Hot-fill + closure sealing | Readily available, often straight walls | Unknown flame tolerance; thinner bases are common |
| Cosmetic jar | Appearance + product compatibility | Sometimes thicker decorative glass | Coatings/liners/unknown chemistry; inconsistent specs |
| Candle-grade jar | Open-flame heat cycling | More consistent bases and vessel designs | Still needs test burns; not immune to over-wicking |
Use this table as a quick provenance screen, then test any unknown jar with your exact wax, wick, and fragrance setup. For broader container selection, use the parent container guide rather than stretching this comparison further.
Quick Q&A
Can you use any glass jar for candles?
No—plain, undamaged glass is only the starting point, and many jars are still poor candidates because of thin walls, decorative coatings, narrow openings, or unknown heat history.
Are mason jars safe for candles?
Some can work, but treat them as test-only unless the maker clearly supports candle use. Handle a canning-jar-only decision on the separate mason-jar page.
What jars should you avoid?
Skip jars with chips, cracks, very thin bases, interior coatings, decorative-only finishes, or shapes that trap heat near the shoulder or rim.
Can you sell or gift candles in recycled jars?
Only after repeatable testing with that exact jar, wax, wick, and fragrance setup, and even then a purpose-made vessel is the lower-risk choice. Use the parent container guide when the decision shifts from jar screening to container selection.