

A black candle wick usually means carbon buildup on the wick tip during or after burning, not automatically wall soot, jar staining, or a room-smoke event.
Here, a black wick means wick-tip carbonization, where fuel leaves dark buildup on the wick during or after a burn. The job is to tell normal post-burn darkening from repeat blackening that needs a fix. Repeat buildup usually traces back to trim length, wick size, long burn sessions, fragrance or dye load, or drafts that disturb the flame. If the issue turns into visible smoke, wall soot, or a wood-wick-specific problem, it belongs in a different troubleshooting path.
Why Candle Wicks Turn Black: Carbon Buildup vs Harmless Char
A black candle wick tip means carbon buildup on the wick, not automatically soot in the jar or a room-air problem.
A black candle wick tip here means carbonized buildup on the wick during or after a burn. Mild darkening after the candle is out can be normal char, but blackening that keeps growing during the burn, makes the flame larger, or shows visible smoke is a different signal that needs action.
| What you see | Likely cause | Next move |
| Slight dark tip mostly after extinguishing | Normal char | Monitor the next burn |
| Blackening keeps building during the burn | Active carbon buildup | Cool, trim, and relight |
| Black tip returns fast after a correct trim | Likely setup imbalance | Check wick size or recent formula changes |
| Black tip plus visible smoke or soot | The issue has moved past simple blackening | Route to smoke or soot troubleshooting |
| Blackening on a wood wick | Wood-wick-specific behavior | Route to wood wick troubleshooting |
What people misread most often:
- A dark tip after extinguishing is treated as a hazard even when the flame burned normally.
- A growing carbon cap during the burn is ignored because the wick is “supposed to look black.”
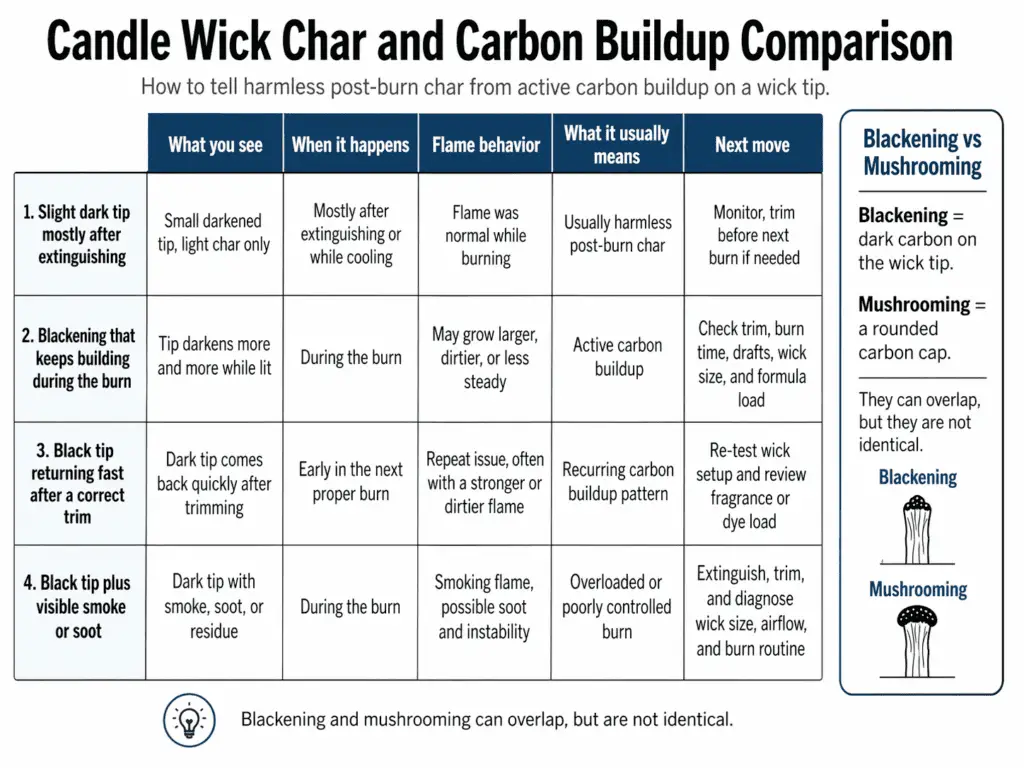
Normal Char vs a Real Problem Signal
Use timing, flame behavior, and smoke together rather than color alone. That is the fastest way to separate harmless darkening from a wick that is burning dirtier than it should.
| What you see | When it happens | Flame behavior | What it usually means | Next move |
| Slight dark tip | Mostly after extinguishing | Flame stayed steady | Normal char | Monitor it |
| Dark cap that keeps building | During the burn or right after relighting | Flame starts looking larger or dirtier | Active carbon buildup | Trim and relight |
| Dark cap plus smoke or soot | During the burn | Flame is unstable, smoky, or both | The issue has moved past simple blackening | Route out to smoke or soot troubleshooting |
A wick turns black because extra fuel or unstable combustion leaves carbon at the tip faster than the flame burns it away. That is why blackening often overlaps with mushrooming, but the two are not identical: blackening describes the carbonized tip, while mushrooming describes the cap shape that can grow from that buildup.
| Compare | Normal char | Active-burn carbon buildup | Mushrooming overlap |
| Main sign | Light darkening after the flame is out | Black cap forms during burning or returns fast | Cap becomes fuller and more ball-like |
| Flame effect | Little or none | Flame often grows or dirties | Flame may enlarge and soot risk rises |
| What to do | Watch the next burn | Trim before relighting | Treat the carbon cap, then check the cause |
Quick checks:
- Is a black wick always bad? No. A dark tip after the burn can be normal.
- Is blackening the same as mushrooming? No. Blackening is the carbonized tip; mushrooming is the cap shape that can grow from it.
- When should you trim before relighting? When loose carbon is present or the tip built up during the last burn.
For full treatment of mushrooming in cotton wicks, use How to Prevent Mushrooming in Cotton Wicks; if the black tip comes with visible smoke, move to black smoke and soot in Candle Black Smoke and Soot (Causes, Fixes, Safety), and if the question has shifted from diagnosis to risk, are candle wicks safe? is a separate question from why the tip turned black.
How to Trim and Relight to Prevent Repeat Blackening
Cool the candle, remove loose carbon, trim the wick to about 1/4 inch, and relight only after the flame has fully reset.
Properly trimmed here means the wick is cool, cut to about 1/4 inch, and cleared of loose carbon before relighting. A common care target is about 1/4 inch because a shorter wick is not always better if it struggles to stay lit or burns too weakly.
Follow this reset routine in order:
- Let the candle cool fully.
- Remove loose carbon from the tip.
- Trim the wick to about 1/4 inch.
- Relight and watch whether the flame stays controlled or quickly starts enlarging again.
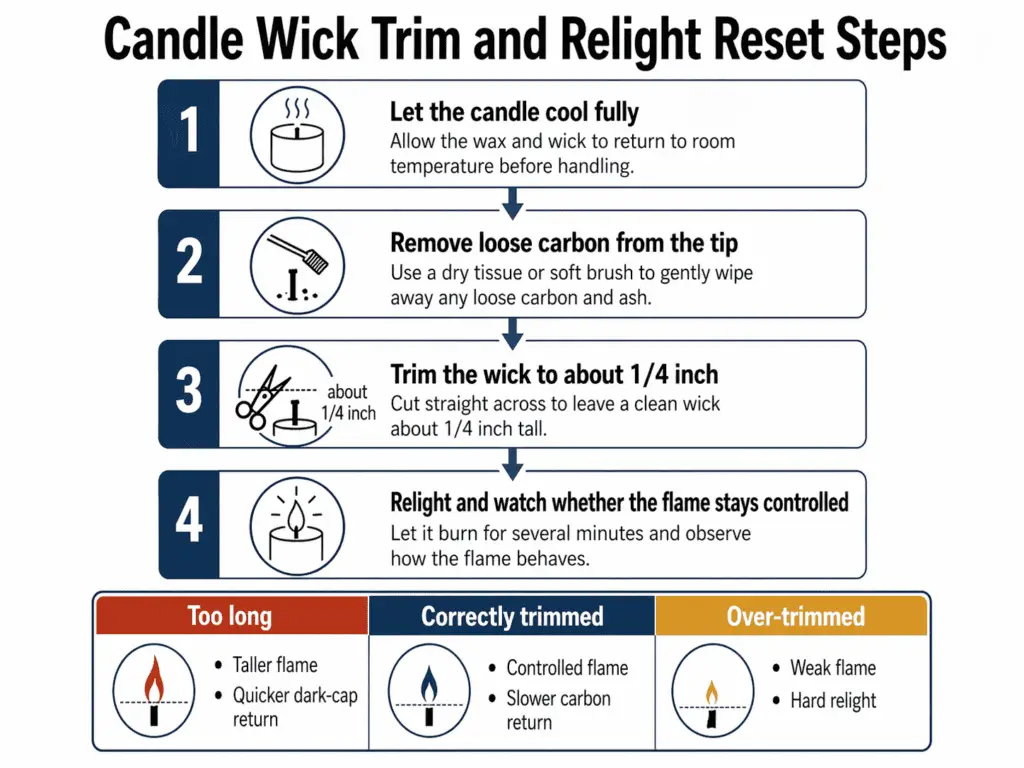
Judge the result by three signs on the next relight: flame height, fresh carbon returning at the tip, and how fast the dark cap builds again. If the flame settles and the tip stays cleaner, trimming helped; if the black cap comes back fast, trimming was only part of the answer.
| Relight state | What you usually see | What it usually means |
| Too long | Taller flame, quicker dark cap return | Too much exposed wick and more fuel draw |
| Correctly trimmed | Controlled flame, slower carbon return | Better balance between wick length and fuel draw |
| Over-trimmed | Weak flame, hard relight, or poor melt | The wick may now be too short |
When a Burn Has Gone Too Long
Too long here means a repeat burn that ran long enough for flame growth and carbon-cap return to become visible, so the next move is to extinguish, cool, trim, and relight after the candle resets. It does not mean the first burn lasted long enough to reach a full melt pool.
Use the visible signs on your candle alongside the maker’s instructions rather than treating first-burn advice and repeat-burn blackening as the same rule.
Quick checks:
- Do you trim before every burn? Trim before relighting when loose carbon or repeat blackening is present.
- Can trimming too short cause problems? Yes. The wick can relight poorly or burn too weakly.
- What if blackening returns right away? Treat it as a likely setup problem, not just a trim issue.
For a full wick-length routine, How to Trim Candle Wicks (When, Why, and to What Length) covers the broader method; Why Do Candle Wicks Mushroom? handles the full carbon-cap issue, and if the real confusion is first-burn behavior, How to Prevent Tunneling in Container Candles and How to Burn Test Candle Wicks belong there instead. If the wick still blackens after a proper reset, the next question is Why Wick Size Is Often the Root Cause.
Why Wick Size Is Often the Root Cause
Repeated blackening after correct trimming usually points to an oversized wick or another setup imbalance, not just a maintenance miss. An oversized wick here means a wick that pulls more fuel and heat than this jar, wax, and formula can burn cleanly. “Too big” does not mean the wick simply looks tall before lighting; it means the burn output is out of balance for the vessel and fuel mix.
That imbalance follows a clear chain: oversized wick, larger flame, dirtier burn, and repeated carbon buildup at the tip. A trim problem usually improves after a proper reset, but overwicking keeps coming back because the setup is still feeding more fuel than the flame can handle cleanly. The usual bundle is repeat blackening, a larger flame, fast return of buildup, and a candle that still looks dirty even after you trimmed it correctly. If the wick blackens again soon after a correct trim and the flame stays large, treat that pattern as a setup imbalance rather than a maintenance miss.
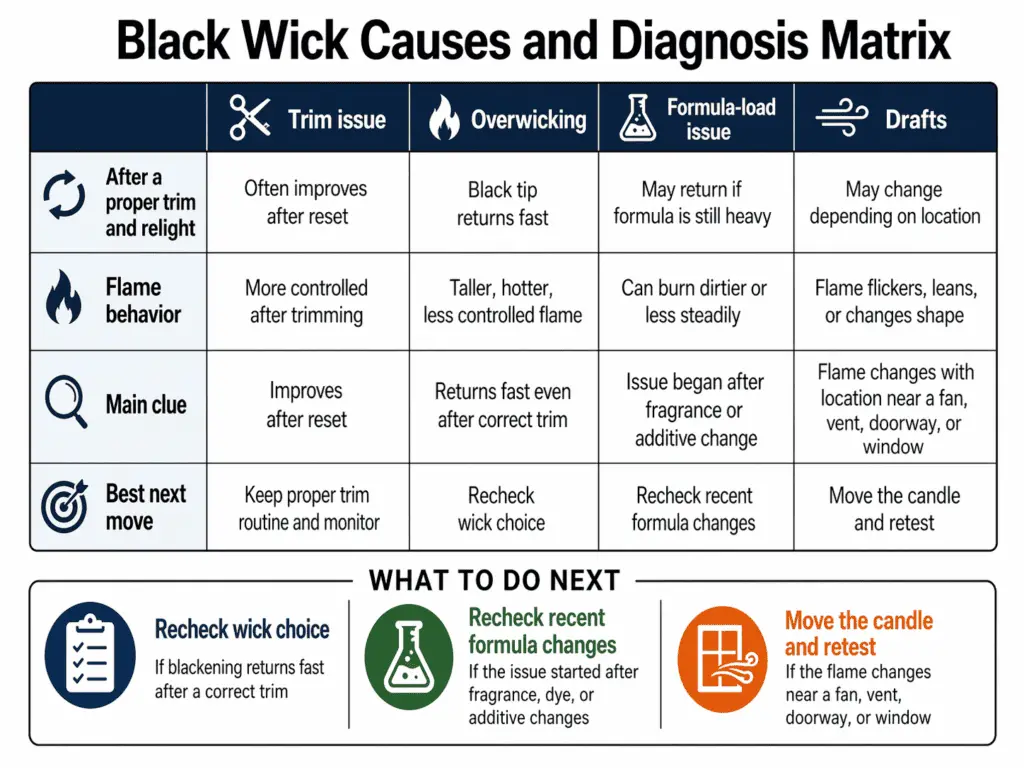
| What you see | Trim issue | Overwicking | Formula-load issue |
| After a proper trim and relight | Often improves | Usually returns fast | May return if the mix changed |
| Flame behavior | Settles down | Stays larger or hotter | Can look dirtier without an obviously oversized wick |
| Main clue | Maintenance fixed it | Setup is still out of balance | Fuel mix became harder to burn cleanly |
| Best next move | Keep trimming on schedule | Recheck wick choice | Recheck recent formula changes |
Signs that sizing is the real cause rather than maintenance:
- The wick blackens again soon after a proper reset.
- The flame keeps running larger than expected.
- Trimming helps for a short time, then the same buildup returns.
- The candle behaves worse after moving to a larger wick without other changes.
Quick checks:
- Can a wick be too big for the jar? Yes. It can pull more fuel and heat than the jar, wax, and formula can burn cleanly.
- Why does trimming not fix it? Because trimming removes the carbon cap but does not change the setup causing it.
- When should you downsize the wick? When repeat blackening and a large flame keep returning after correct trimming.
For full sizing steps, use How to Size Your Candle Wick Correctly and Wick Size Chart by Jar Diameter & Wax Type. This page only separates a maintenance miss from a setup problem so you know when the wick itself is the likely cause.
This page identifies when wick size is the likely branch; it does not replace sizing charts or full wick-selection steps.
When Fragrance, Dye, or Additive Load Is the Culprit
Formula-driven blackening happens when the fuel mix becomes harder to burn cleanly at the wick tip, so carbon buildup keeps returning even after basic trimming. A “heavy load” here means a fragrance, dye, or additive level that changes how cleanly the wick can burn the mix, not just a strong scent or a dark candle.
This matters because repeated blackening is not always a wick-size problem. If the wick used to burn cleanly and the issue began after more fragrance, more dye, or a formula tweak, the fuel mix may now be the branch to test first. Fragrance alone does not always cause blackening, but formula changes can when they push the burn out of balance.
Use this short check:
- Has the formula recently changed?
- Did blackening begin after increasing fragrance or additives?
- Does the problem persist despite correct trimming?
- Did the issue appear without moving to a larger wick?
If those answers point to the fuel mix, keep the diagnosis narrow and move to Clean-Burning Wax & Wick Setups for broader setup balance. If the real need is formula math or deeper tuning, that belongs in Candle Wax Calculator Hub, not inside this troubleshooting page.
This page only flags formula load as a likely cause; it does not replace formula math or recipe-tuning steps.
How Drafts Make a Clean Setup Burn Dirty
Yes, a draft can make a workable candle develop a blackened wick by disturbing the flame and making the burn less stable. A “draft” here means localized moving air from a fan, vent, doorway, or window that visibly disturbs flame behavior, not general room air quality.
Moving air changes flame shape and the way the wick burns fuel, so the tip can carbonize even when trimming and wick choice are otherwise close to right. That is why repeated trimming will not solve a location problem if the flame keeps flickering or leaning in one direction.
Try this location test:
- Move the candle away from the vent, fan, window, or doorway.
- Recheck whether the flame looks steadier.
- Watch whether blackening returns as quickly in the new spot.
A draft issue differs from overwicking because the flame often changes with location, while a wick-size issue follows the candle wherever it burns. It differs from a formula-load issue because airflow problems usually show up as visible flame disturbance first, not only repeat buildup after a recipe change.
If the symptom has shifted into visible smoke, soot, or room-level concern, route that question to Candle Black Smoke and Soot (Causes, Fixes, Safety) instead of treating it as a draft-only issue. If the candle uses a wood wick, route the exception to How to Fix Common Wood Wick Problems rather than applying cotton-wick logic where it does not fit.