A candle jar usually moves from one wick to two when one flame is unlikely to cover the inner usable diameter well enough for even melt coverage and the scent goal you want.
As a starting test bias, jars under about 3.0 in / 76 mm often stay on a one-wick path, jars around 3.0 to 3.4 in / 76 to 86 mm are a borderline zone, and jars around 3.5 in / 89 mm and wider often justify two-wick testing first.
Within the broader candle wick types and sizing context, this page answers only when a container jar should stay single-wick or move to two wicks.
For this page, the decision is only about container-candle wick count. Here, need means functionally justified for melt coverage, scent throw, and the absence of overheating signs during repeated comparable burns, not a style choice or a default upgrade. Inner usable diameter is the main input, while wax behavior and hot throw can shift a borderline jar in either direction. Burn testing makes the final call because wick count is still a starting decision until the jar proves it in repeated burns.
This page does not choose wick series, exact wick size, or wick spacing.
Here, hot throw means scent strength while the candle is burning. It matters only as a wick-count pressure variable, not as a reason to chase more flame, more heat, or a style-driven two-wick look.
At What Diameter Should You Test Two Wicks in a Candle Jar?
Start with two-wick testing when the inner usable diameter is wide enough that one wick is unlikely to heat the wax surface evenly.
For many container candles, jars under about 3.0 in / 76 mm are often reasonable one-wick starting points, while jars around 3.5 in / 89 mm and wider often deserve two-wick testing first. Treat those as starting-test ranges, not fixed rules, because jar shape, wax behavior, and scent goals can still change the result.
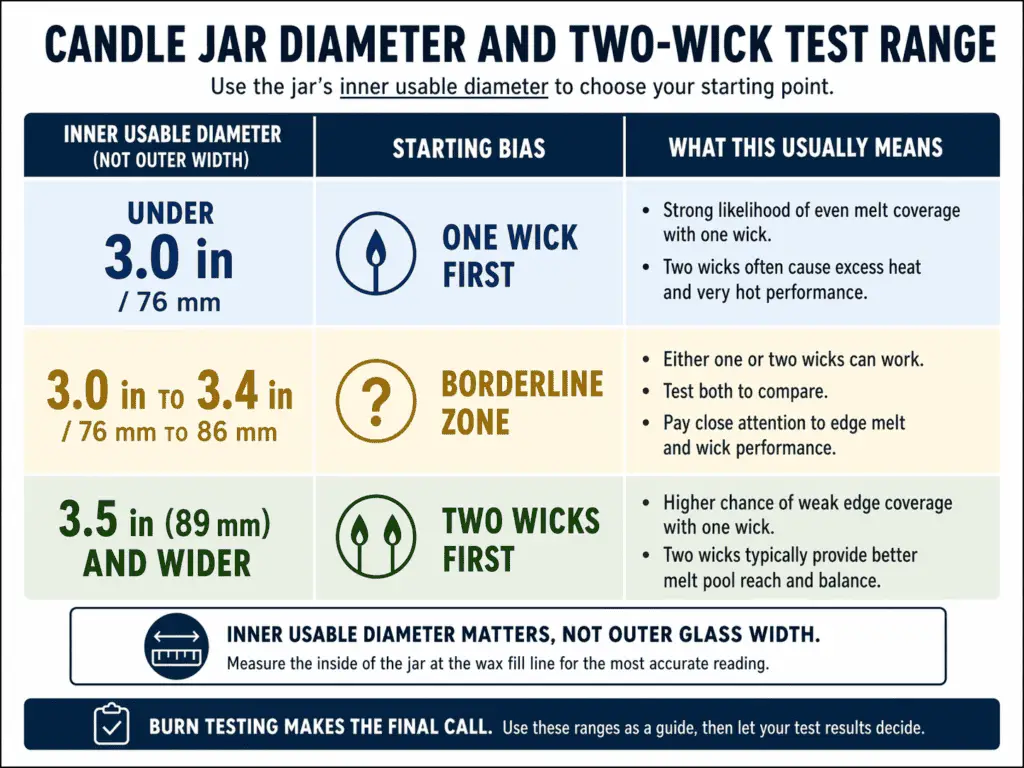
Use the same inner-width logic you would use in a candle jar wick guide: judge the wax surface that one flame has to heat, not the outer width of the glass.
| Inner usable diameter | Starting test bias | What that usually means |
|---|---|---|
| Under 3.0 in / 76 mm | One wick first | One flame often has a fair chance to cover the jar |
| 3.0 to 3.4 in / 76 to 86 mm | Borderline zone | Wax, shape, and scent goals matter more |
| 3.5 in / 89 mm and wider | Two wicks first | One wick is more likely to leave weak edge coverage |
When supplier wick charts or tested wick-family guidance are available for the jar and wax, use them ahead of these generic diameter ranges.
Use those bands to choose the first test setup, not to replace actual burn results.
When Can a Borderline Jar Still Stay Single-Wick?
A jar near the crossover zone can still stay on a one-wick path when the wax melts easily, the scent target is moderate, and early burns show broad enough coverage without heat warnings. Before you compare jars, measure candle jar inner diameter so you are working from the true wax surface, not from the outside wall.
Why Same-Diameter Jars Can Still Act Differently
Two jars with the same stated diameter may not give the flame the same job. Straight-sided jars usually behave closer to their inner width, while shouldered or tapered jars can change the usable melt area. After you settle wick count, choose candle wick size only after deciding wick count because wick count and wick size are different decisions.
How Does Wax Type Change Whether One Wick Is Enough?
Wax type changes the wick-count decision because different waxes spread heat across the jar differently.
Diameter still leads the decision. After that, wax behavior can make one wick more or less likely to cover the jar well enough.

A wax label alone does not settle the question. One soy blend can behave differently from another, a paraffin blend can still struggle in a wide jar, and a softer blend can sometimes keep a borderline container on a one-wick path.
| Wax family or broad blend type | Melt reach tendency | What that can do to wick-count pressure |
|---|---|---|
| Paraffin or paraffin-heavy blend | Easier reach | Can leave more room for a one-wick start |
| Soy or soy-heavy blend | Slower reach | Can push borderline jars toward two-wick testing |
| Coconut blend | Often easier reach when the blend is soft | Can keep some borderline jars in one-wick testing |
| Beeswax or firmer blend | Slower reach | Can raise pressure for more wick coverage |
Use that table as a starting comparison, not as a promise. The real question is not whether soy, paraffin, or coconut is “better.” The real question is whether your wax lets one flame cover the jar well enough for the result you want.
That is why wax type can change the answer in the same container. In a borderline jar, soy often pushes testing toward two wicks sooner than paraffin, while a soft coconut blend may hold the line a little longer. If you need the material comparison next, compare candle wax types for containers, then select wick size after wax and wick-count decision once the wick count itself is settled.
When Do Hot Throw Goals Justify Testing Two Wicks?
Hot throw can justify two-wick testing when one wick is not heating enough wax surface to reach the scent strength you want.
That does not mean two wicks are always the better answer. On this page, a stronger throw goal only matters because it can raise the amount of wax that needs to melt and release fragrance during the burn. It does not mean maximum flame, maximum fragrance oil, or a hotter jar is the right result.
If stronger throw appears only when wall heat, soot, flame size, or flame merge worsen, that gain does not justify moving to two wicks.
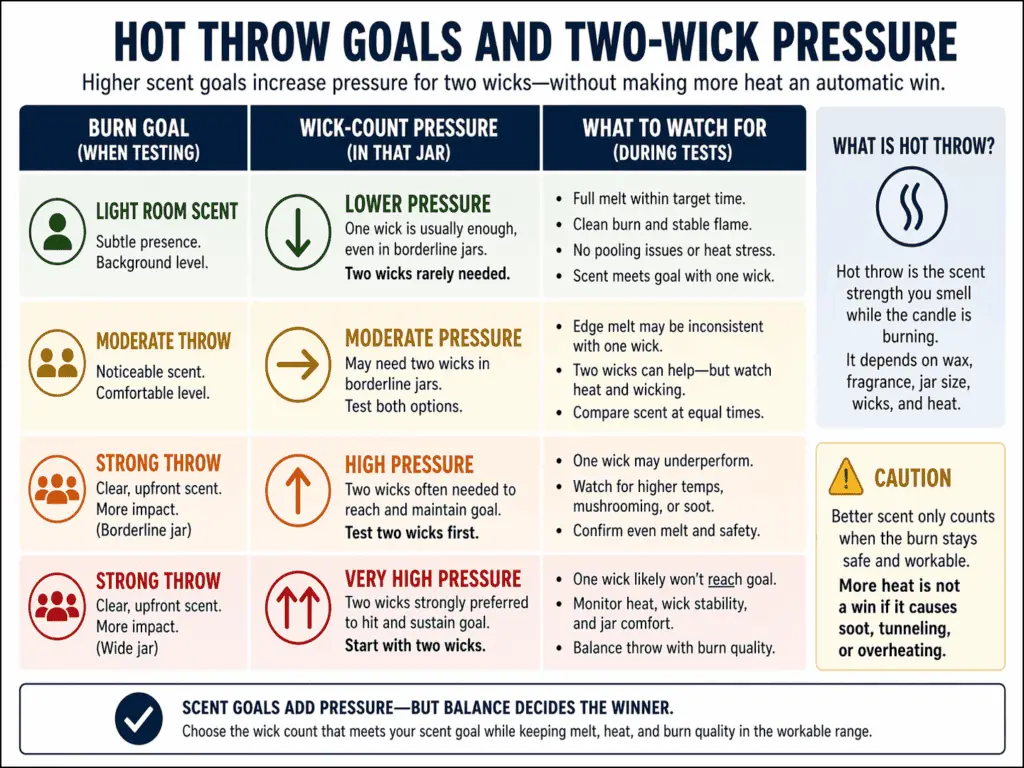
Keep the same order: diameter sets the starting point, wax behavior shifts the bias, and then throw goals can push a borderline jar toward two-wick testing. If the next problem is scent performance rather than wick count, improve candle hot throw safely and calculate fragrance load for container candles after you decide whether one wick can realistically do the job.
| Burn goal | Wick-count pressure | What to watch for |
|---|---|---|
| Light room scent | Lower | Do not add wick power too early |
| Moderate throw | Medium | Check whether one wick is covering enough surface |
| Strong throw in a borderline jar | Higher | One wick may underheat the wax surface |
| Strong throw in a wide jar | High | Better scent may come with less heat margin |
A fuller melt pool can improve scent release, but more heat is not an automatic win. Two wicks can make the candle smell stronger because more wax is active during the burn. The same change can push wall heat higher, so better throw only counts as a win when the jar still behaves well.
A few direct checks keep this section inside scope:
- Stronger hot throw does not automatically require two wicks.
- More fragrance oil does not fix weak throw when the jar is still underheated.
- A single strong-smelling burn does not settle the decision unless later burns support it.
What Burn-Test Results Confirm One Wick or Two?
Repeated burn tests confirm wick count by showing whether one wick can meet melt coverage and scent goals without poor heat behavior.
Testing decides whether the starting setup stays. On this page, “enough” means the candle reaches broad enough melt coverage and usable scent output without pushing the container into bad heat behavior.
On this page, poor heat behavior means warning signs such as fast wall-heat rise, oversized flames, flame merge, or persistent soot and mushrooming across repeated comparable burns.
If you need a full documented workflow, use a full candle test series before you finalize the setup.
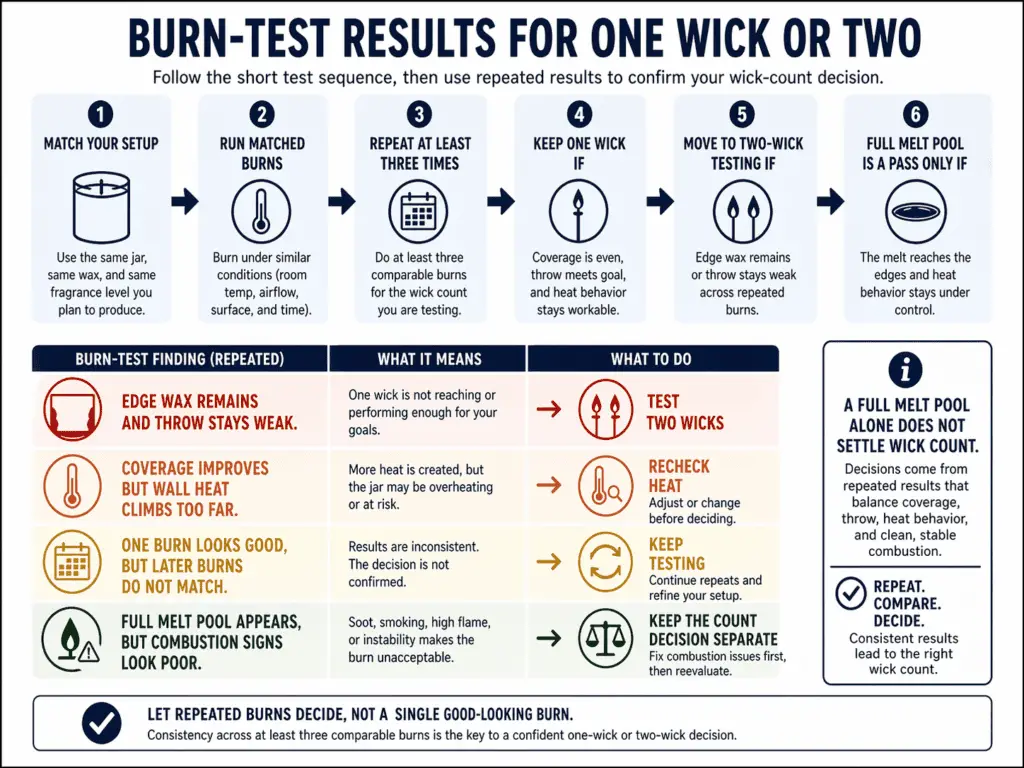
Use this short test sequence:
- Test the same jar, wax, and fragrance setup so wick count is the main variable.
- Burn matched samples under similar conditions and record melt reach, scent strength, flame behavior, and heat signs.
- Repeat the setup across at least three comparable burns before you decide.
- Keep one wick in play when coverage is broad enough, throw is acceptable, and heat behavior stays workable.
- Move to two-wick testing when one wick keeps leaving edge wax, weak throw, or coverage that only improves when the jar starts running too hot.
- Treat a full melt pool as a pass only when heat behavior also stays under control.
This quick matrix shows what repeated results usually mean:
| Repeated test result | What it suggests | Next step |
|---|---|---|
| Edge wax remains and throw stays weak | One wick may not be heating enough surface | Test two wicks |
| Coverage improves but wall heat climbs too far | Extra flame may be pushing the jar too hard | Recheck heat before treating two wicks as the answer |
| One burn looks good but later burns do not match | The result is not stable yet | Keep testing |
| Full melt pool appears but combustion signs look poor | Wick count may not be the real problem anymore | Keep the count decision separate |
Treat a full melt pool as a pass only when repeated burns also show stable heat behavior and acceptable combustion signs. A full melt pool by itself does not settle the wick-count decision.
This page stops at wick count on purpose. If the next issue is heat behavior, monitor jar wall heat during candle testing. If the count looks right but the flame still shows poor burn signs, troubleshoot soot and mushrooming separately.