Beeswax candle making is the process of making jar candles, pillar candles, and taper candles primarily with beeswax by choosing the format, melting the wax with controlled indirect heat, forming the candle in the correct setup, and cooling or finishing it according to that format.
The process starts with shared setup, then splits into the format-specific work for jars, pillars, and tapers. These are three branches of the same beeswax-candle overview because they share base preparation but do not use the same vessel, wick path, or finishing method. The goal is a practical home method that makes the branch points clear before you pour or form the wax. Exact wick calculators, deeper container screening, full taper-dipping detail, and full troubleshooting stay outside this page.
This page is an overview of the shared method and the format split, so exact wick sizing, deeper container screening, full taper-dipping detail, full troubleshooting, and deeper temperature-stage detail route to dedicated child pages.
| Format | Choose it when | What changes on this page | Deeper detail belongs on |
|---|---|---|---|
| Jar | You want the container to support the candle during burning | The candle stays in the jar | candle container safety, beeswax candle wick size chart |
| Pillar | You want a molded free-standing candle | The candle must hold shape after release | beeswax candle molds, How to make beeswax pillar candles |
| Taper | You want a narrow free-standing candle | Straightness and taper-specific shaping matter more | How to make beeswax taper candles |
What you need to make beeswax candles
To make beeswax candles, you need beeswax, a controlled melting setup, a pouring vessel, wick supplies, and the correct jar, mold, or taper setup for the format you are making.
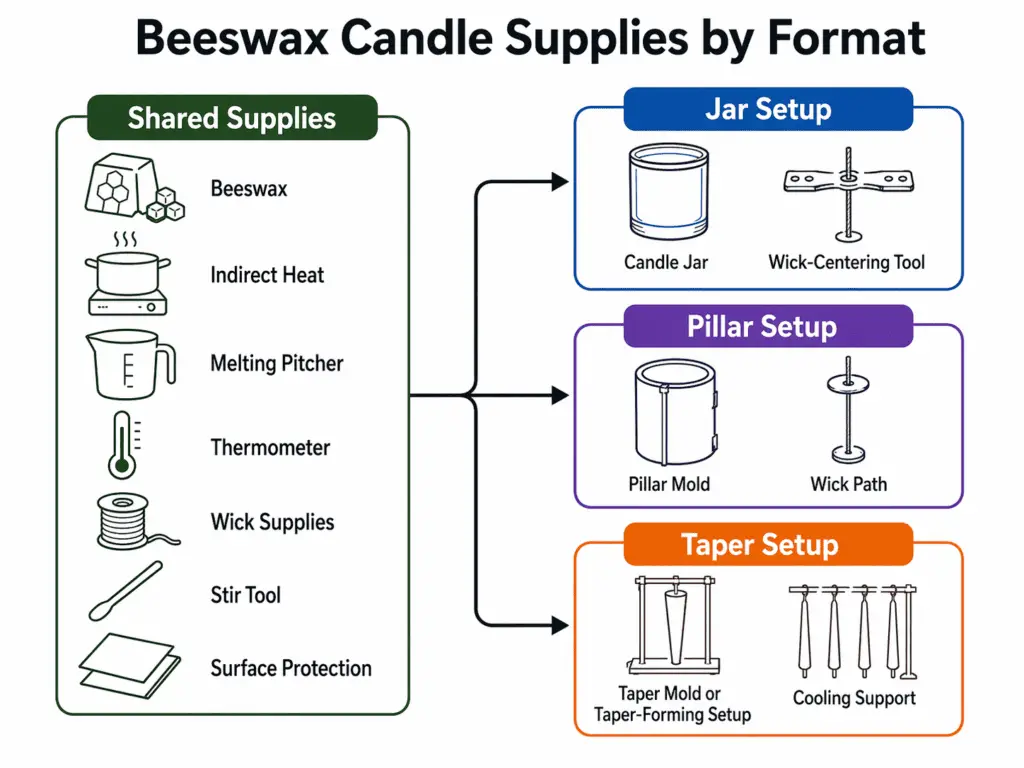
On this page, beeswax candles means three formats that share a base setup but do not use the same finishing tools. The shared essentials are beeswax, indirect heat, a melting or pouring vessel, wick supplies, a thermometer, and surface protection. That branch point matters because a jar stays in its container during use, while a pillar or taper has to hold shape as a free-standing candle.
| Shared essentials | Jar setup | Pillar setup | Taper setup |
|---|---|---|---|
| Beeswax, indirect heat source, melting pitcher, thermometer, wick supplies, stir tool, surface protection | Candle jar or other candle container, wick-centering tool | Pillar mold, wick path or threading tool, mold prep as needed | Taper mold or taper-forming setup, straight wick path, support for cooling |
A beginner does not need to buy every option at once. If you are making only jars, you can skip pillar and taper molds. If you are making only pillars, you can skip jars. If you are making only tapers, you can skip most container-only gear and focus on a taper-specific setup.
Use a jar when the vessel will stay with the candle during burning. Use a mold when the finished candle needs to stand on its own. When the question shifts from basic setup to exact matching, move to a beeswax candle wick size chart instead of guessing from a starter example. If the real problem is whether a container is suitable at all, treat that as candle container safety rather than as a supply-list question.
The next step is getting the wax into the right melt state for the format you chose.
Choose the right jar, mold, and wick basics for each format
Choose jar, mold, and wick basics by format first, then use an exact sizing tool only when the project becomes size-specific.
Here, right fit means a suitable beginner setup for the selected format and starter size range. It does not mean one universal jar, mold, or wick for every beeswax project. beeswax candles need a format-first decision because jars, pillars, and tapers do not start from the same vessel, wick path, or release method.
A jar setup works best when the container is meant to hold the wax during burning and the wick can stay centered in a supported candle. A pillar setup works best when the mold can shape a free-standing candle and the wick can pass through the mold cleanly. A taper setup works best when the equipment supports a narrow candle that must stay straight as it cools.
Keep the decision simple at this stage:
- Jar: supported container candle
- Pillar: molded free-standing candle
- Taper: narrow free-standing candle with taper-specific shaping
That is why fit basics are not exact wick sizing. When the project turns into a diameter question, move to a beeswax candle wick size chart. When the problem is choosing between vessel types or mold styles, use dedicated candle-jar or mold-selection guidance instead of forcing that decision into this page.
With the setup matched to the format, the next job is to melt and stage the beeswax so it is ready to pour or form.
How to melt and prepare beeswax for candle making
Melt beeswax with controlled indirect heat and use it only when it is practically ready to pour or form for the candle format you selected.
On this page, preparing beeswax means melting it over indirect heat and staging it for the next step in the jar, pillar, or taper process. Correctly means controlled melt handling and practical pour-readiness, not lab precision and not one fixed number that applies to every setup. The important point is that the wax should be fully liquid, evenly melted, and easy to move into the chosen format without rushing or forcing a thick pour.
On this page, ready to pour or form means the wax is fully liquid, looks even across the vessel, and moves in a steady stream without forcing thick wax into the jar, mold, or taper setup.
Use this sequence:
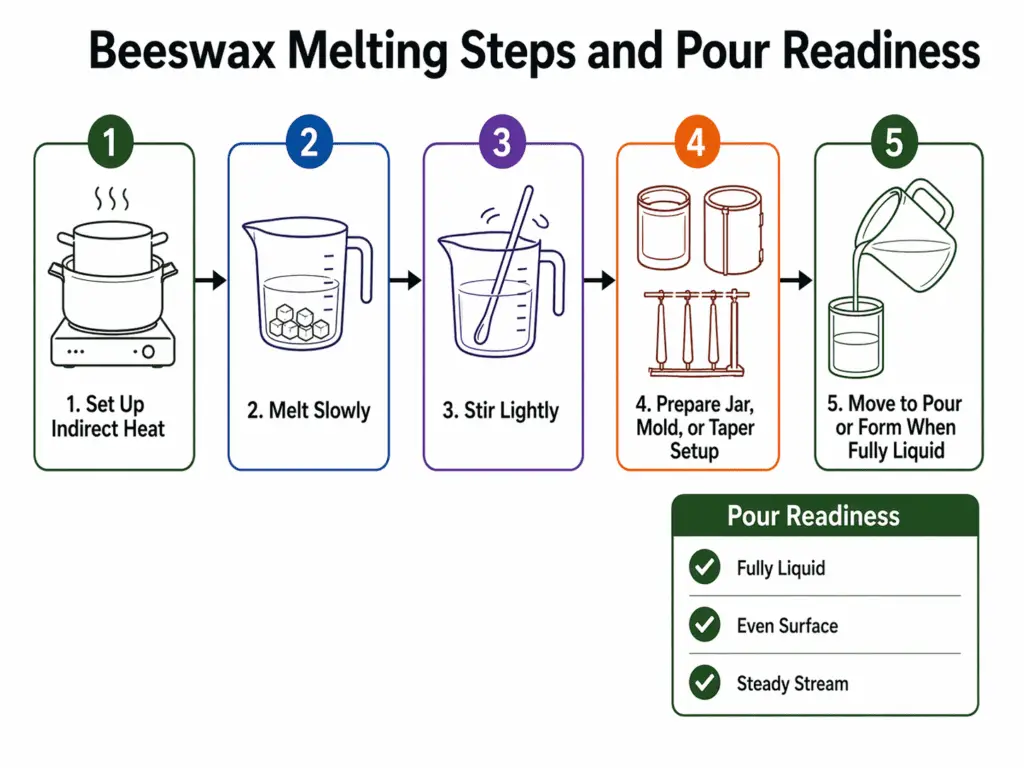
- Set up indirect heat before the wax goes into the melting vessel.
- Melt the beeswax slowly so it softens and liquefies evenly.
- Stir only as needed to keep the melt consistent.
- Prepare the jar, mold, or taper setup while the wax melts.
- Move into the selected method once the wax is fully liquid and easy to pour or form.
Indirect heat matters because it gives you more control than direct burner contact. It also makes it easier to move from melted wax into the next step without scorching the wax or letting it sit too long after it is ready. For jars, the wax needs to stay fluid enough for a controlled container pour. For molds, the wax still needs to move cleanly, but your attention shifts sooner to mold prep, wick position, and release.
If the wax keeps thickening too fast, scorches, or behaves the same way every time, that is outside this basic melt method. If you need exact stage detail for melt condition and pour timing, move to beeswax candle temperatures and pouring stages instead of turning this page into a technical reference.
From here, the shared process splits into the jar method first.
How to make beeswax jar candles
A beeswax jar candle is made by preparing a suitable container, centering the wick, pouring prepared beeswax, and letting the candle set as a supported container candle.
A jar candle is different from a pillar or taper because the container supports the wax during use. That difference matters early. beeswax candles in jars do not need to stand on their own after release, so the work focuses on container prep, wick position, a steady pour, and quiet cooling in place.
Follow this method:
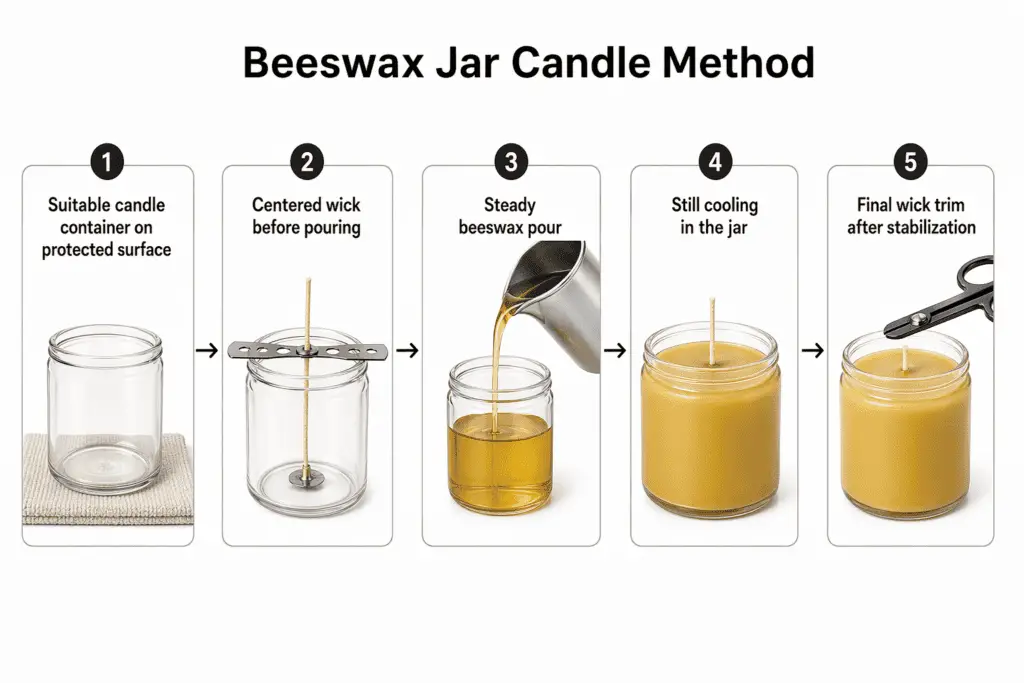
- Choose a suitable candle container and place it on a stable, protected surface.
- Secure the wick before pouring so it stays centered as the wax enters the jar.
- Pour the prepared beeswax in a steady, controlled stream.
- Leave the jar still while the candle sets.
- Trim the wick only after the candle has stabilized.
The jar branch is often easier for beginners because the container does part of the structural work. That does not mean every glass jar is a good choice. When the question becomes deeper screening, route it to candle container safety rather than assuming any reused glass will work. When the real issue is exact wick matching for the jar size, use a beeswax candle wick size chart instead of stretching this section into a sizing page.
A jar method stays inside the container branch, and the reused-jar question stays under that branch too.
When a reused jar is suitable for a beeswax candle
A reused jar may be considered only for a beeswax jar candle and only when it passes a narrow practical screen for this home-use method.
This block applies only to DIY beeswax jar candles. It does not apply to pillars, tapers, industrial production, or universal safety claims. Here, suitable means a narrow practical screen for this home-use method. It does not mean certified, compliance-approved, or risk-free.
Keep the screen narrow: use only jars with no visible damage, a stable flat base, a shape that lets the wick stay centered, and walls that already feel appropriate for candle use rather than thin decorative glass.
If you need a full reused-jar check, move to are recycled jars safe for making candles. If the broader issue is container qualification, move to candle container safety. If the container is acceptable but wick matching is still unclear, use a beeswax candle wick size chart.
After the container branch, the process moves to the molded pillar branch.
How to make beeswax pillar candles
A beeswax pillar candle is made by preparing a mold and wick path, pouring prepared beeswax, cooling it for structure, and releasing a stable free-standing candle.
A pillar candle is a free-standing molded candle, so it has to hold structure after release. That is the main difference from a jar candle. beeswax candles in pillar form need mold prep and release logic before you think about finishing.
Follow this method:
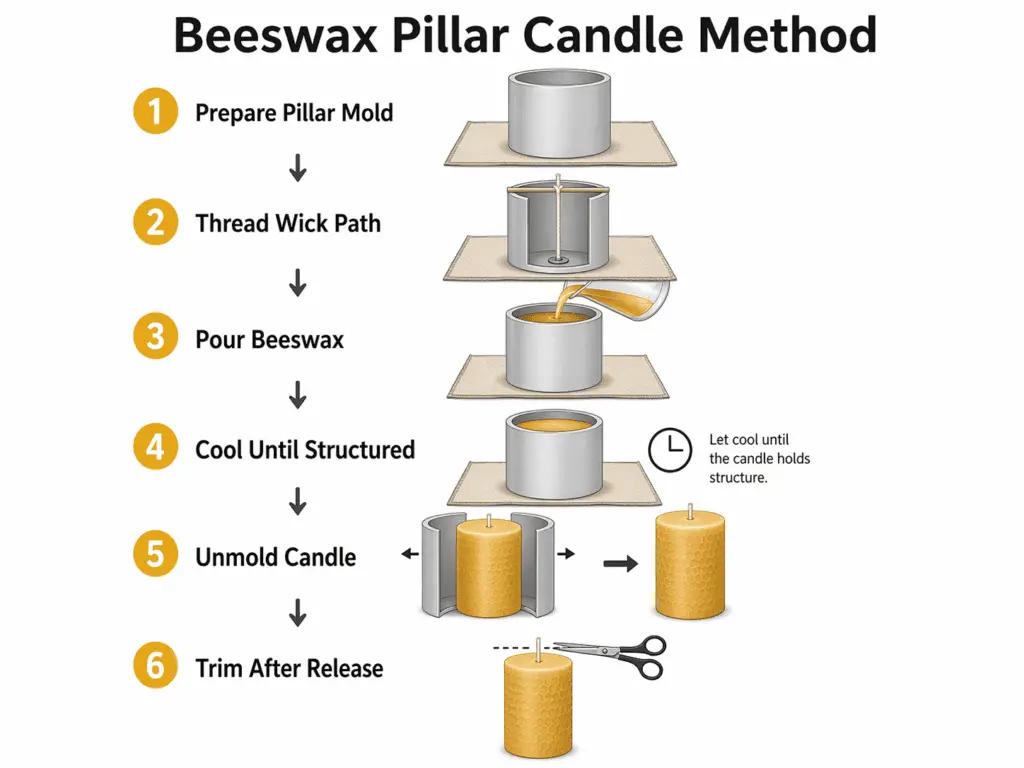
- Prepare the mold and thread or position the wick path before pouring.
- Set the mold on a stable surface where it can cool without being disturbed.
- Pour the prepared beeswax into the mold in a steady, controlled way.
- Let the candle cool long enough to hold its shape.
- Unmold only when the pillar feels firm enough to stay upright.
- Trim and finish after the candle is fully released.
The mold matters because it creates the candle’s final structure. That is why the pillar branch should not be handled like the jar branch. A jar candle sets inside its final support. A pillar has to leave the mold and stand on its own. If the real question is about mold type, mold shape, or a better mold choice, route that decision to beeswax candle molds instead of turning this section into a mold catalog.
If release problems keep repeating, that is no longer a basic method question. That belongs outside this overview page.
The last format branch is the taper method, which narrows the free-standing process even further.
How to make beeswax taper candles
A beeswax taper candle is made by choosing a taper method, preparing the wick and setup, forming the taper, and cooling it into an even narrow free-standing shape.
A beeswax taper candle is a narrow free-standing candle with a taper-specific setup. It is not just a smaller pillar. Beeswax candles in taper form need more attention to straightness, even shape, and handling during cooling because the finished candle is narrow and less forgiving.
Follow this method:
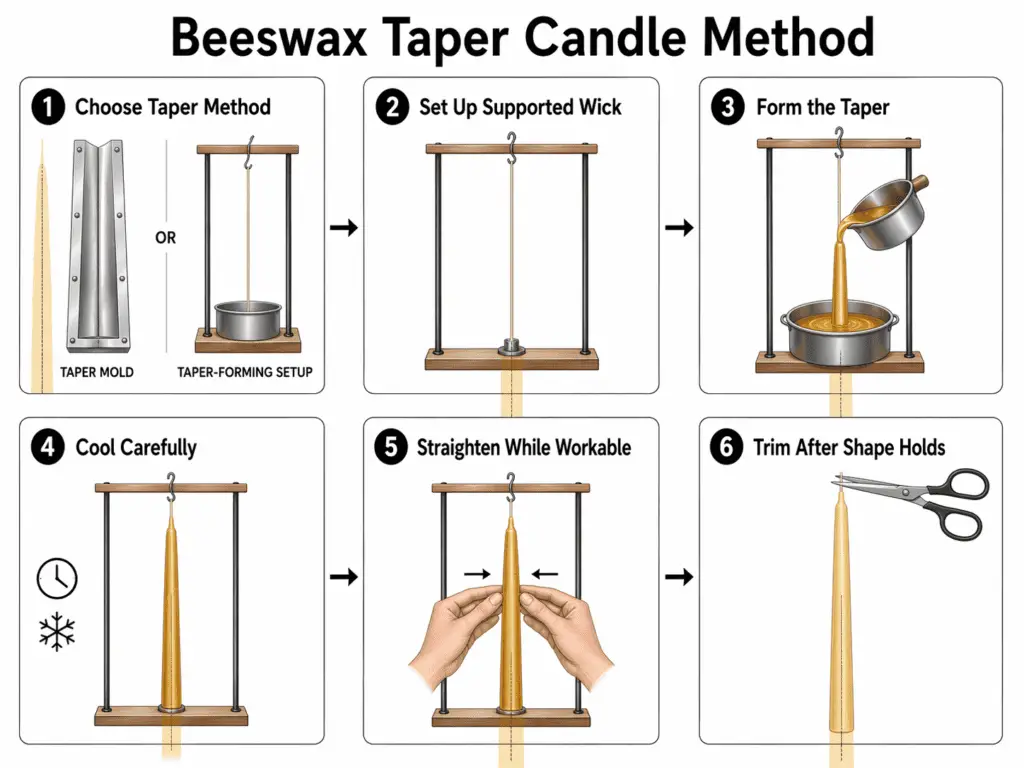
- Choose the taper approach first, usually a taper mold or a basic dip-led setup.
- Prepare the wick and support the setup so the taper can form straight.
- Form the taper with the selected method.
- Cool the taper carefully so the shape stays even.
- Straighten minor bends while the candle is still workable.
- Trim and finish once the taper keeps its shape.
For many beginners, a taper mold is the easier starting point because it gives clearer shape control. A dip method can work, but this page keeps that choice at overview depth only. If you want the full repeated-dip process, that belongs outside this page rather than inside this overview.
The other common branch point is holder fit. Once the question changes from making the taper to matching the finished taper to its holder, that also belongs outside this page rather than in a general taper example.
Once the candle is formed, the last job is cooling, release where needed, and finishing by format.
How to cool, unmold, cure, and finish each beeswax candle format
Beeswax candles cool and finish differently by format, so jars, pillars, and tapers should not all be handled the same way after pouring or forming.
This stage closes the gap between making the candle and fixing defects. On this page, ready means ready for the next practical handling step in that format, not one universal wait time for every jar, mold, room condition, or candle size. Beeswax candles need different post-pour handling because jars stay in their containers while pillars and tapers have to keep shape as free-standing candles.
| Format | What ready means here | Main handling focus | What happens next |
|---|---|---|---|
| Jar | Stable in the container | Cool in place without movement | Trim and prepare for use |
| Pillar | Firm enough to hold structure after release | Cool before unmolding | Unmold, inspect, then trim |
| Taper | Firm enough to keep a straight narrow shape | Cool and correct minor bending | Straighten if needed, then finish |
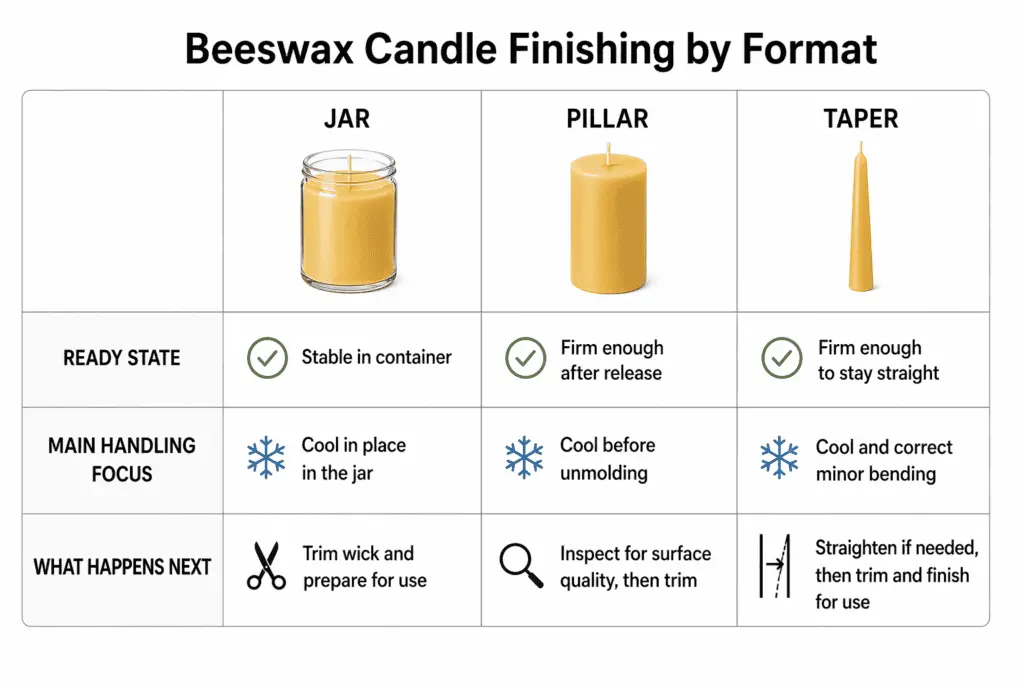
Jar candles do not need unmolding because the container is part of the finished candle. Pillars and tapers do need release or free-standing handling because their shape has to hold without a jar. That is the main post-pour split that many short tutorials leave unclear.
For jars, leave the candle still until the surface and body feel stable in the container. For pillars, wait until the candle can leave the mold and keep its form. For tapers, handle the candle gently so the narrow shape stays straight during final cooling. In all three cases, finish the candle only after the shape is stable and the wick can be trimmed cleanly.
This page covers only the handling needed to finish the process cleanly. If the issue becomes repeated cracks, sinkholes, release defects, or recurring finish problems, that belongs outside this page.