A UV inhibitor is a candle additive that can slow some light-driven fading or yellowing, and you use it by choosing a supplier-led rate for the wax and confirming the result with treated-versus-control testing.
If you make white, pastel, or display candles, UV inhibitors can help slow some color change, but they are not a cure for every yellowing problem. The main choice is whether the issue comes from light exposure, fragrance chemistry, dye behavior, or a mix of causes. You will see how to pick a supplier-led starting rate, when each wax family needs its own test, and where storage or packaging does more than another additive. The next sections move from basic limits to rate choice, wax fit, testing, and the cases where a different fix matters more.
This page covers when UV inhibitors are worth using, how to choose a supplier-led starting rate, and how to test the result. It does not replace full discoloration troubleshooting, full formula diagnosis, full anti-discoloration prevention planning, or additive safety guidance.
Calculate UV Inhibitor for Candle Wax
Enter your wax weight, supplier usage rate, fragrance load, dye load, and batch size. The calculator estimates UV inhibitor amount, total formula load, test levels, cost, and fading risk.
UV Inhibitor Amount from Wax Weight
Use this when your supplier gives a usage rate as a percentage of wax weight. Start low unless the supplier gives a tested rate for your exact wax.
UV Dose Result
Low, Middle, High UV Test Ladder
Use this for small fading tests before adding UV inhibitor to a full batch. Keep dye, fragrance, wax, jar, and storage exposure the same.
UV Test Ladder
Total Formula Check
Use this before adding UV inhibitor to a scented and colored formula. The total formula load matters more than the UV inhibitor alone.
Formula Check Result
Fading Risk Checker
Use this when you are not sure whether fading is caused by light exposure or by formula/process problems.
Fading Risk Result
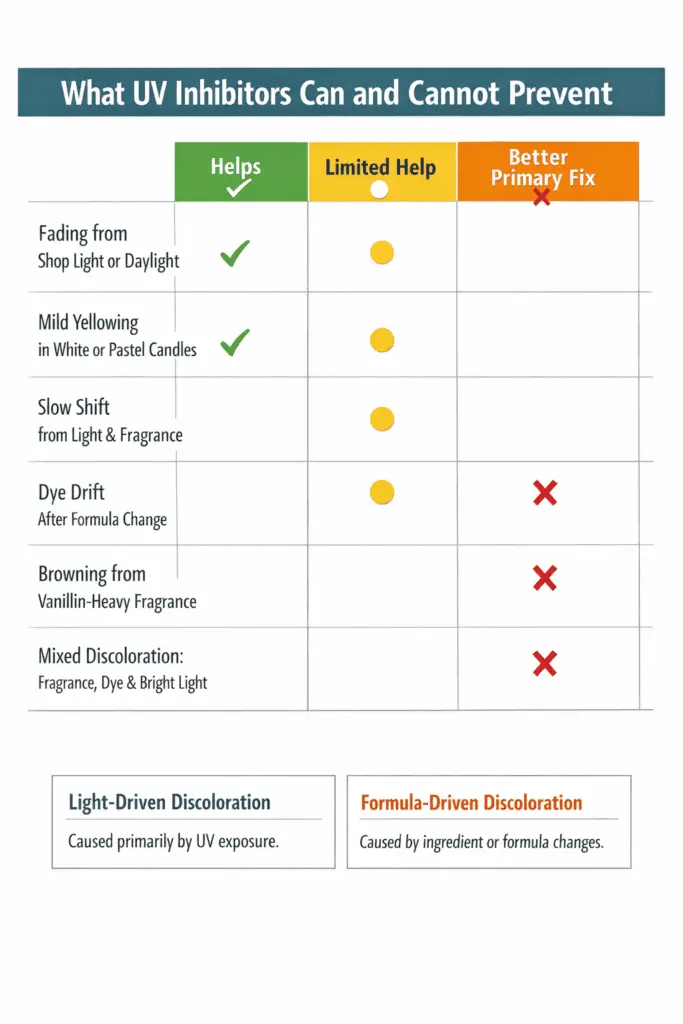
What UV Inhibitors Can and Cannot Prevent
UV inhibitor can slow some light-driven fading or yellowing in candles, but it does not fix every discoloration problem.
A UV inhibitor helps most when light is part of the problem. It has a much weaker effect when the main cause sits inside the formula, such as fragrance choice, dye behavior, or vanillin, a fragrance material that can push wax toward tan or brown over time. For the bigger picture on additive use, Candle Additives & Enhancers Hub is the parent topic that sits above this decision.
How this comparison works: the grid below sorts common color-change problems into three buckets. “Helps” means UV protection can be a sensible first move. “Limited help” means light may be part of the shift, but another cause may still win. “Better Primary Fix” means the main fix usually sits with fragrance, dye, storage, packaging, or formula choice rather than more additive.
| Problem | Helps | Limited Help | Better Primary Fix |
| Fading from shop light or daylight | Yes | ||
| Mild yellowing in white or pastel candles that sit in bright display areas | Yes | ||
| Slow shift where light and fragrance may both play a part | Yes | ||
| Dye drift that starts after a formula change | Yes | ||
| Browning from vanillin-heavy fragrance | Yes | ||
| Mixed discoloration in a candle with strong fragrance, dye, and bright display light | Yes | Yes |
Light-driven discoloration is color change caused mainly by display light or daylight over time. Formula-driven discoloration is color change caused mainly by the wax blend, fragrance, dye, or their interaction. When makers expect one additive to solve both, the result is often disappointment rather than a cleaner shelf look.
That is why UV Inhibitor Compatibility by Wax Type matters next. A soy candle, a paraffin candle, and a blend can react to the same additive in different ways, even before fragrance enters the picture.
When the candle still shifts after treatment, How UV Inhibitors Interact with Fragrance Oils, Dyes, and Vanillin is usually the better place to diagnose what the additive could not change. If the goal is a longer-lasting line rather than one more additive tweak, Other Ways to Reduce Discoloration Besides UV Inhibitors gives the better next move.
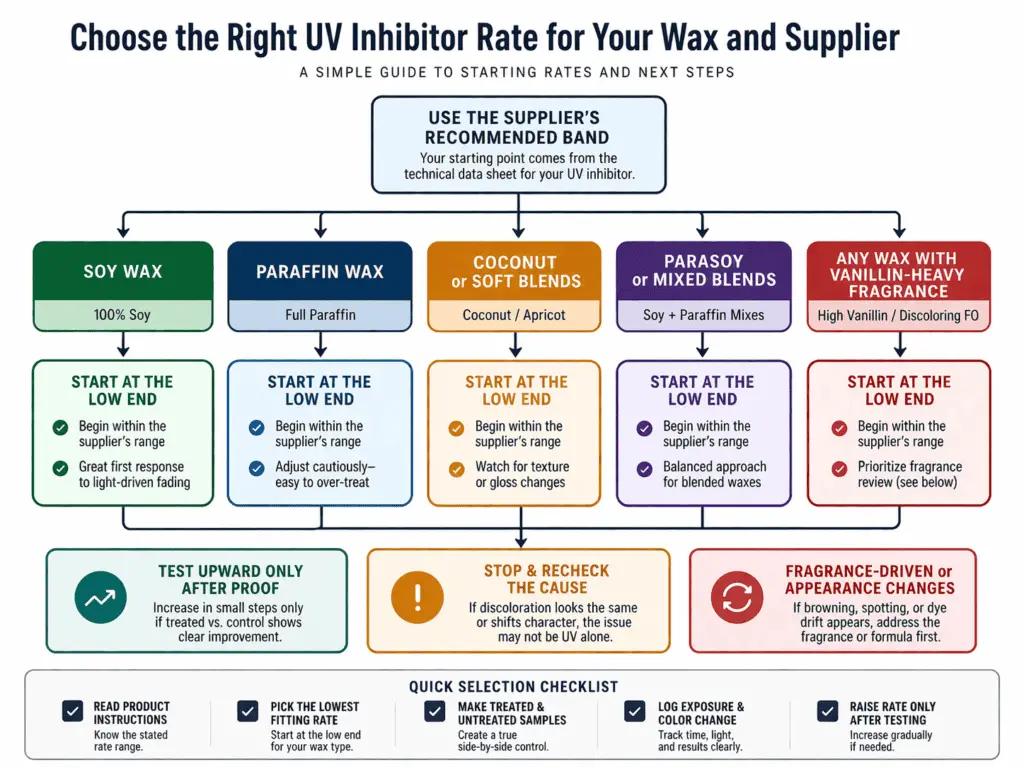
Choose the Right UV Inhibitor Rate for Your Wax and Supplier
Use the supplier’s recommended rate for your exact UV inhibitor and wax, then start low and confirm it with a treated-versus-control test.
The right rate depends on three things: the exact product, the wax system, and the amount of light the candle will face. A rate band is the supplier’s allowed percentage range for that exact additive. Start at the low end of that band, not at a copied kitchen shortcut from a forum post. For the parent view of additive choices, Candle Additives & Enhancers Hub sits above this dosing step.
On this page, the right rate means the lowest fitting supplier-approved starting rate for your exact UV inhibitor, wax system, and light-exposure problem, then confirmed with a treated-versus-control test. Add the UV inhibitor at the stage your supplier specifies for that product rather than at a guessed point in the pour process.
How this rate chart works: it does not invent one number for every wax. It shows the safest first move by wax family, when to move upward inside the supplier band, and when to stop and recheck the formula instead of adding more. Supplier sheets for the exact product still win over any general chart.
Why is there no single universal UV inhibitor rate for candles? Supplier guidance differs by product strength and wax fit, so one product may use a lower percentage while another allows a higher band. That is why this chart is a starting reference point, not a universal standard.
| Wax system | Starting move | Test upward when | Stop and recheck when |
| Soy | Use the low end of the supplier band | The treated sample still shows light fade after a fair side-by-side test | The shift looks more like fragrance browning than light fade |
| Paraffin | Use the low end of the supplier band | Display exposure is strong and the first treated sample gives only a small gain | The candle turns cloudy, odd in appearance, or the problem does not look light-driven |
| Coconut or soft blends | Use the low end and test in small batches | The product will sit in bright retail light and the first result is weak | The blend changes look, finish, or behavior after treatment |
| Parasoy or mixed blends | Treat the blend as its own system | The base blend is stable and only light exposure remains as the issue | The blend behaves unlike its main wax and results jump between batches |
| Any wax with vanillin-heavy fragrance | Keep the rate conservative | Light fade is proven in a control test | Browning from fragrance remains the main change |
In forums, makers often compare spoon measures. That shortcut breaks fast because supplier rates are tied to wax weight and product strength, not to one universal teaspoon rule. The UV Inhibitor Rate Calculator & Test Planner is the cleaner place to turn a chosen percent into a batch dose without guessing.
A short checklist keeps the choice clean:
- Read the product instructions for the exact UV inhibitor.
- Pick the lowest fitting rate in that supplier band.
- Make one treated sample and one untreated sample.
- Log light exposure, color change, and any look change in the wax.
- Raise the rate only after a fair side-by-side test.
How to Test Treated vs Untreated Candles
Test UV inhibitor by comparing treated and untreated candles made from the same formula under the same light conditions over a defined observation window.
A treated-vs-control test method keeps one thing different and keeps the rest the same. Use the same wax, fragrance, dye, vessel, pour habits, and exposure setup. Change only the additive rate. That is how Choose the Right UV Inhibitor Rate for Your Wax and Supplier turns from a guess into a decision.
A simple log works better than memory. Day 1, day 7, and day 14 are useful checkpoints for a small-batch comparison because they show whether the treated candle is really separating from the control or whether both are drifting together.
| Sample ID | Rate band | Control or treated | Exposure condition | Day 1 note | Day 7 note | Day 14 note |
| A | none | Control | shelf light | |||
| B | low end | Treated | shelf light | |||
| C | none | Control | window light | |||
| D | low end | Treated | window light | |||
| E | mid band | Treated | window light |
One-rate testing is fine for a first pass. Multi-rate testing makes more sense when the low-end result looks close but not good enough. Natural room light can show slow change, though deliberate display-style exposure is often better when retail light is the real problem. When both samples still shift, How UV Inhibitors Interact with Fragrance Oils, Dyes, and Vanillin usually gives the next clue, and UV Inhibitor Compatibility by Wax Type helps when one wax family behaves very differently from another. The UV Inhibitor Rate Calculator & Test Planner is the clean place to build the full sample plan.
Overuse, Misuse, and Trade-Offs
Too much UV inhibitor or the wrong reason for using it can create new problems without fixing the old one.
The main warning is simple: do not treat a formula problem as a dose problem. Supplier ceilings, blend-specific behavior, and small-batch proof matter more than any so-called standard max.
A compact check helps:
- Weak result after treatment: the issue may be fragrance or vanillin, not a low rate.
- Cloudy or off-looking wax after treatment: the rate may be too high for that system.
- Different results across batches: the blend may need its own test plan.
- Urge to treat every batch the same way: the better answer may sit in storage, packaging, or formula choice.
When a lower recalculation is needed, return to the UV Inhibitor Rate Calculator & Test Planner. When proof is still missing, go back to the treated-vs-control test method before changing the whole line. If the real fix sits outside additive use, Other Ways to Reduce Discoloration Besides UV Inhibitors is the better next move. A full UV additive safety guide belongs in the handling and compliance lane, not in this narrow rate decision.
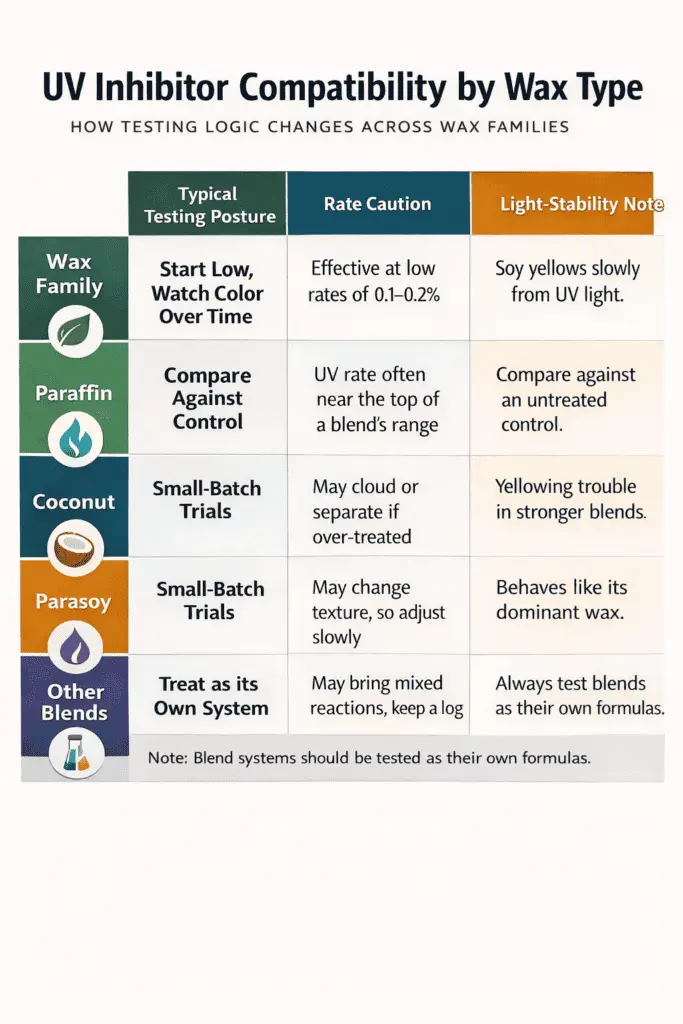
UV Inhibitor Compatibility by Wax Type
You can use UV inhibitor in soy candles, but soy, paraffin, coconut, and blends should each be tested as separate wax systems.
Compatibility here means how well one UV inhibitor fits a wax family without assuming the same starting logic, visible benefit, or test result in every formula. For the wider category around additive choices, Candle Additives & Enhancers Hub sits above this wax-by-wax decision. A blend system is a mixed wax formula, such as parasoy or coconut blends, that should usually be tested as its own formula instead of being treated like one parent wax.
This matrix uses one standard frame for every wax family: testing posture, rate caution, and the kind of light-exposure result you are most likely to watch first. The point is not to rank one wax as “best.” The point is to make it clear that wax family changes how conservative you should be at the start.
| Wax family | Typical testing posture | Rate caution | Light-stability note |
| Soy | Start low and watch color over time | Do not copy a paraffin rate into soy without proof | White and pastel soy can show visible change fast |
| Paraffin | Start low, then compare against control | A rate that behaves well in paraffin may still miss in softer blends | Light-related change may be easier to separate from formula issues |
| Coconut | Use small-batch trials first | Soft systems can need extra caution before moving up | Surface look and color shift both need watching |
| Parasoy | Treat as its own system | Do not assume the soy side or paraffin side sets the rate alone | Mixed behavior is common enough to justify its own notes |
| Other blends | Test as a distinct formula | Start with the lowest fitting supplier band | Blend makeup can matter more than the label on the box |
That is why Choose the Right UV Inhibitor Rate for Your Wax and Supplier and wax compatibility belong together. The same additive can be acceptable in several wax families while still needing a different starting band, a different observation window, or a different stop point when results look weak.
A short checklist keeps cross-wax testing clean:
- Identify the exact wax family or blend you are using.
- Start with the lowest fitting supplier band for that wax.
- Keep fragrance, dye, vessel, and exposure the same.
- Compare the treated sample against a control in the same conditions.
- Write separate notes for each wax family before you standardize a rate.
When the wax is a blend, treat it as its own formula first and its parent wax second. That habit saves more wasted batches than trying to force one “close enough” number across soy, paraffin, coconut, and parasoy. The dose math belongs in UV Inhibitor Rate Calculator & Test Planner, and the proof step belongs in How to Test Treated vs Untreated Candles.
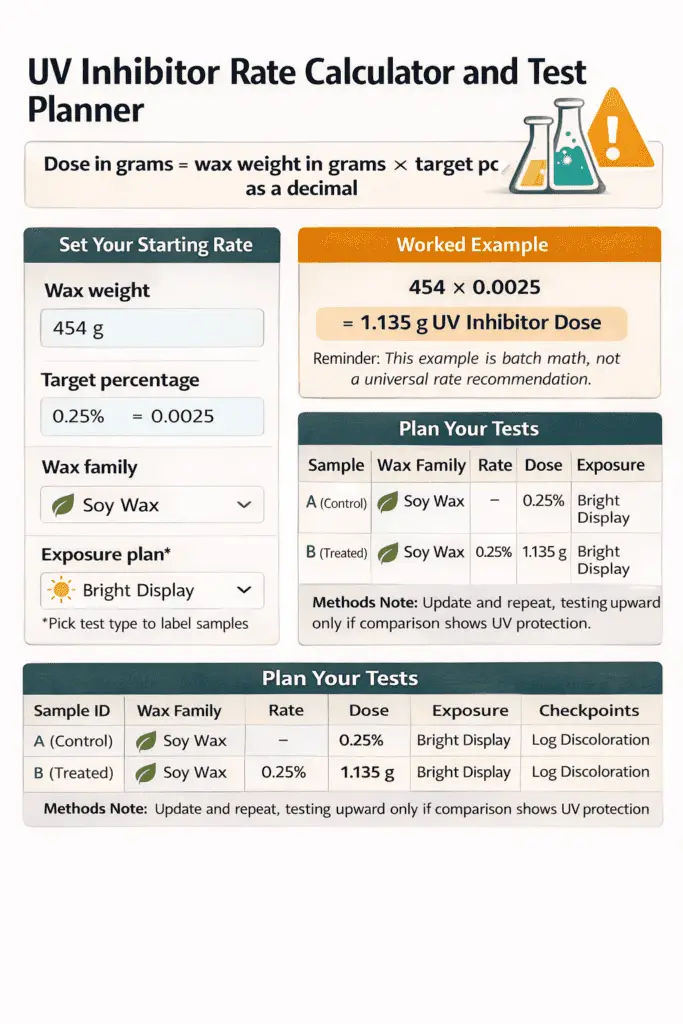
UV Inhibitor Rate Calculator & Test Planner
Convert wax weight and target percentage into grams first, then use that dose in a small treated-versus-control plan instead of guessing by spoon.
A target percentage is the supplier-led rate you plan to test against the wax weight in the batch. This tools section turns that percentage into a usable dose and keeps the planning tied to the parent workflow in Candle Additives & Enhancers Hub rather than to guesswork. It supports the earlier choices in Choose the Right UV Inhibitor Rate for Your Wax and Supplier and keeps the wax-family differences from UV Inhibitor Compatibility by Wax Type visible during setup.
Use this formula for the additive amount:
Dose in grams = wax weight in grams × target percentage as a decimal
If you work in pounds, convert pounds to grams first, then run the same math. These are planning numbers for a small-batch trial. Supplier instructions for the exact product still set the allowed range.
This input table shows the fields that matter before you run the numbers.
| Input | What to enter | Example |
| Wax weight | Total wax in grams | 454 g |
| Target percentage | Supplier-led test rate | 0.25% |
| Wax family | Soy, paraffin, coconut, or blend | Soy |
| Exposure plan | Shelf light, window light, or display light | Window light |
| Test variant | Control, low rate, or second rate | Control + low rate |
This worked example shows the calculation in plain numbers.
| Worked example | Value |
| Wax weight | 454 g |
| Target percentage | 0.25% |
| Decimal form | 0.0025 |
| Dose calculation | 454 × 0.0025 |
| UV inhibitor dose | 1.135 g |
Methods note: This worked example is batch math, not a universal rate recommendation. The 0.25% figure is only a sample input to show the formula. The real percentage must come from the supplier instructions for your exact UV inhibitor and wax.
The output only becomes useful when you read it against the test plan:
- If the low-rate trial clearly beats the control, keep that result and resist moving upward too fast.
- If the low-rate trial barely changes anything, test one higher rate inside the supplier band.
- If both samples still discolor in the same way, revisit fragrance, dye, storage, or display conditions before adding more.
- If the wax changes appearance after treatment, lower the rate and retest before changing the full line.
These steps turn the numbers into a usable plan:
- Pick one wax family and one supplier-led rate.
- Calculate the dose in grams from the full wax weight.
- Make one untreated control and one treated sample.
- Log the exposure condition and checkpoint days.
- Compare visible change before you decide on a second rate.
A compact planning grid makes the next batch easier to run.
| Sample ID | Wax family | Rate | Dose | Exposure | Checkpoints |
| A | Soy | 0% | 0 g | Shelf light | Day 1, 7, 14 |
| B | Soy | Low test rate | Calculated dose | Shelf light | Day 1, 7, 14 |
| C | Soy | Second test rate | Calculated dose | Window light | Day 1, 7, 14 |
When the result looks unclear, go back to How to Test Treated vs Untreated Candles and tighten the control before changing the formula again. When the temptation is to keep raising the dose, Overuse, Misuse, and Trade-Offs is the better corrective stop.
How UV Inhibitors Interact with Fragrance Oils, Dyes, and Vanillin
UV inhibitor may help with light-related fading, but it does not reliably cancel fragrance-driven or vanillin-driven discoloration on its own.
Use this section as a short diagnosis check before you change the rate. Candle Additives & Enhancers Hub is the wider parent topic, but the main rule here is to decide whether the visible shift is driven by light, formula chemistry, or both. Vanillin is a fragrance ingredient that often pushes wax toward tan or brown over time.
Read the cases below as a routing check: light fade tracks exposure, vanillin browning tracks fragrance chemistry, dye shift changes shade without the usual tan-brown pattern, and mixed cause means more than one driver is active.
| Visible pattern | Most likely driver | What UV inhibitor can do | Better next move |
| Color fades mostly in bright display light | Light exposure | Often helps | Keep the rate conservative and retest |
| Wax turns tan or brown even when light is not the only factor | Vanillin-heavy fragrance | Limited help | Review fragrance choice first |
| Shade shifts without clear browning | Dye behavior or dye-plus-light | Limited help | Recheck dye choice and side-by-side tests |
| White or pastel candle darkens after treatment | Fragrance chemistry or mixed cause | Limited help | Compare treated and untreated samples again |
| Treated candle holds color a bit longer but still darkens | Mixed cause | Partial help | Improve packaging or storage, then retest |
A quick pattern check is enough for this page. If the treated and untreated candles both tan at close to the same pace, move to fragrance or vanillin diagnosis instead of raising the dose. If the treated candle stays cleaner a little longer in bright light, UV inhibitor may be helping while a second cause still remains.
Use this next-step order:
- Check the fragrance notes for vanillin or other known discoloration risk.
- Compare the same formula as treated and untreated samples in the same light.
- Recheck dye choice when the base is white or pastel.
- Cut display light or improve packaging before raising the dose.
- Retest before changing the whole line.
That is why How to Test Treated vs Untreated Candles belongs before another rate change. If the issue looks broader than a UV-use decision, move to the broader UV discoloration guide. Handling cautions, supplier warnings, and product-sheet review belong in the full UV additive safety guide, not in this diagnosis check.
When Storage, Packaging, or Formula Changes Matter More Than Another UV Dose Increase
Storage, packaging, or formula changes matter more than another UV dose increase when the discoloration is not mainly light-driven.
Candle Additives & Enhancers Hub is the wider parent topic, but the narrow rule here is to fix exposure or formula issues before treating a higher rate as the default answer.
That keeps this page inside UV-use decisions instead of broad prevention planning. When the formula is browning from fragrance chemistry or the candles are sitting in harsh light, solve that cause first and move to the broader prevention pages rather than raising the dose here.
When UV Inhibitors Are Worth Using
UV inhibitor earns its place fastest in white or pastel candles that sit in bright display light or need a long visible shelf life.
This is a selective-use decision, not a blanket rule for every batch. Lines sold from dark stock, fast-turn inventory, or low-light storage may get more from better packaging and storage than from automatic treatment. When a line does meet the risk test, return to Choose the Right UV Inhibitor Rate for Your Wax and Supplier and set up the batch in UV Inhibitor Rate Calculator & Test Planner before you scale it.
| Scenario | Risk of visible discoloration | Additive priority | Better first move if not treating everything |
| Shop-window display | High | High | Shield light and test display SKUs first |
| Market table in open light | High | High | Protect exposed colors and shorten display time |
| White or pastel line with slow turnover | High | High | Improve storage, then treat the slow movers |
| Dark-stored stockroom inventory | Low | Low | Focus on packaging and stock rotation |
| Fast-selling line with short shelf time | Low to medium | Low | Keep storage tight before adding treatment to all batches |
| Vanillin-heavy fragrance line | Medium to high | Selective | Review fragrance choice before raising the dose |