
Test candle additives by pouring an unchanged control batch and one measured additive change at a time before repeating a successful formula at a larger batch size. Candle additive testing means comparing one unchanged formula with one formula that includes a single measured additive change. On this page, small batches before scaling up means measured mini pours used to validate one change before you repeat the same formula at a larger batch size. The goal is to judge appearance, scent, burn behavior, and repeatability without wasting full pours.
Use this short workflow in order:
- Pour one unchanged control batch.
- Change one additive variable in the adjusted line.
- Label each batch with the exact change.
- Cure all compared batches for the same window.
- Score the same result categories across every batch.
- Repeat the strongest result under the same setup.
- Scale only as a larger repeat of the same validated formula.
Set up a control batch before testing any additive
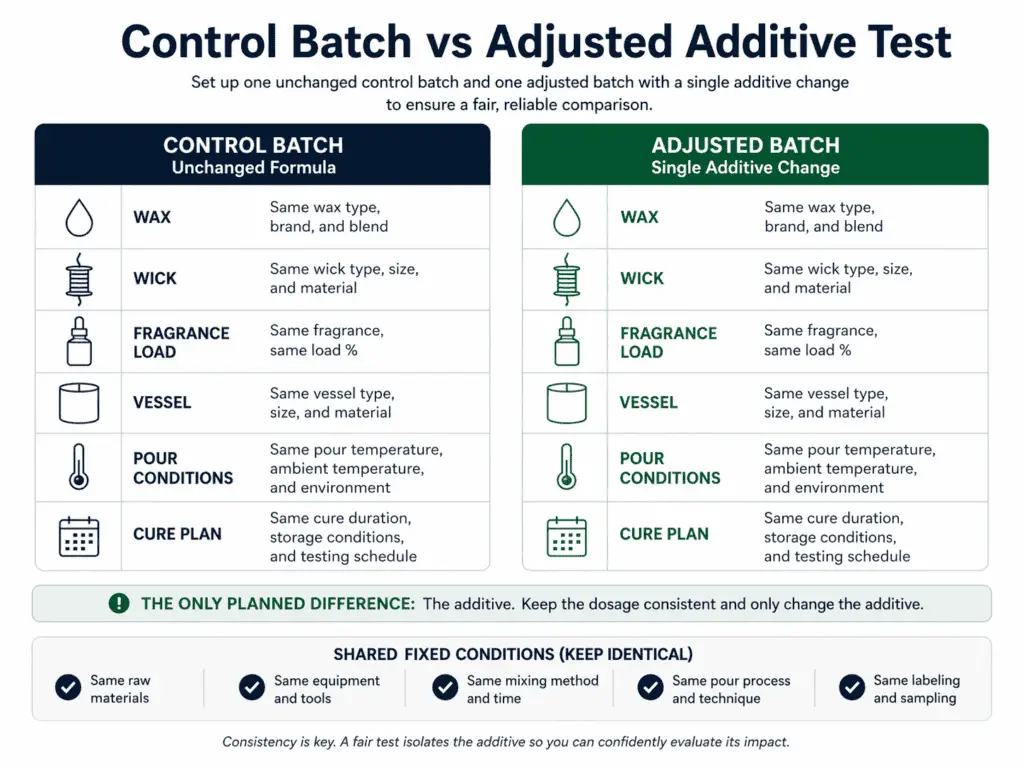
Pour an unchanged control batch first because it gives you the comparison point for every additive test. The control batch should use the same wax, wick, fragrance load, vessel, pour conditions, and cure plan as the adjusted line. The additive should be the only planned difference. When that baseline is clear, later results are easier to judge. When the baseline is missing, you can end up blaming or praising the additive for a change that came from somewhere else.
A control batch matters because candle performance is a system result. Surface finish, scent throw, burn pattern, and soot can shift when more than one part of the formula changes at once. The unchanged batch gives you a reference point for what the formula already does on its own. That saves wax, time, and guesswork because you are not trying to compare two different formulas and call it an additive test.
Build the baseline first:
- Pick one formula that you already want to test.
- Pour one unchanged control batch from that formula.
- Label it before you pour any adjusted batch.
- Keep wax, wick, fragrance load, vessel, pour routine, and cure plan the same.
- Compare the control and adjusted batches only after the same cure window has passed.
A plain control is usually better than a memory-based comparison. It is easy to think a new test “looks better” when you are comparing it with an older pour, a different jar, or a version made on a different day. A fresh side-by-side comparison is cleaner. Even small differences in finish or burn behavior are easier to spot when both batches were made as part of the same test round.
Keep this page on the testing workflow. If you still need help choosing what to test first, see choose candle additives. If you need the full incorporation method before pouring, see mix candle additives. For broader background around the category, start with candle additives and enhancers.
There is one narrow exception worth naming early. If you use a supplier-blended wax, the first question may be whether the wax already contains the performance support you were planning to add. In that case, the next step is not a broad wax comparison here. The next step is the separate question should you add additives to preblended candle wax.
Change only one additive variable at a time
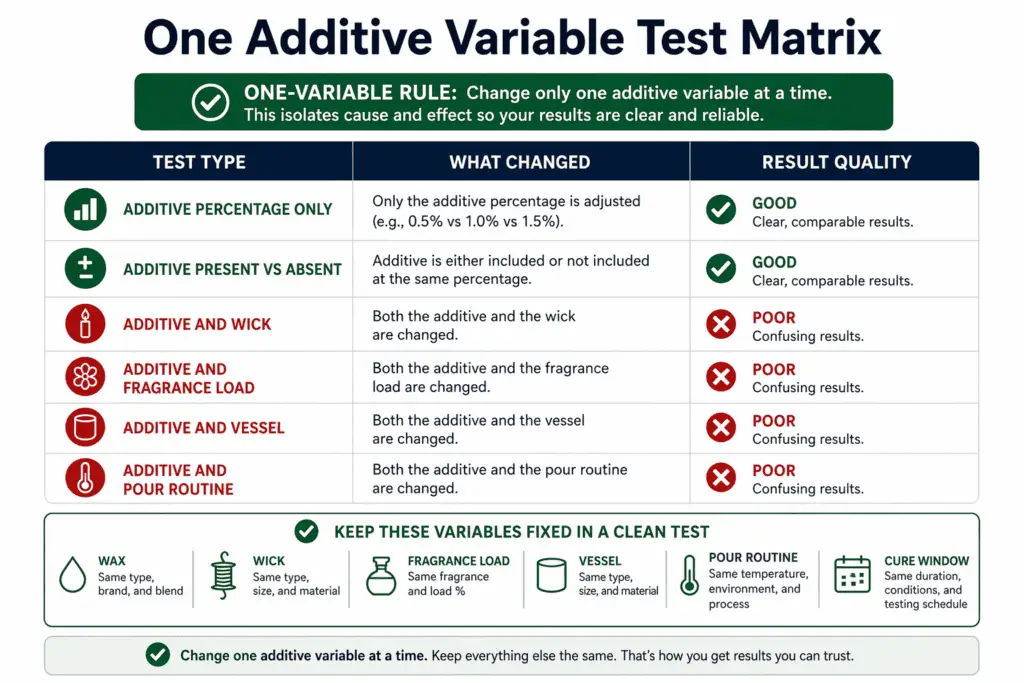
Additive testing on this page means changing one additive variable at a time while all non-additive conditions stay fixed. The changed variable can be additive type, additive percentage, or additive presence versus absence. Everything else should stay the same for that round. That is what makes the result usable.
This rule matters because a candle formula can move in more than one direction at once. If you change the additive and the wick in the same round, you do not know which change caused the better top, the weaker throw, or the dirtier burn. If you change additive level and fragrance load together, the result is even harder to read. A mixed test can produce a visible difference, but it cannot tell you which choice deserves credit.
A clean one-variable test usually answers a simple question: “What happened when I changed this additive?” A mixed test answers a messy question: “What happened when I changed several things at once?” That second question belongs to a different workflow.
A quick contrast helps:
| Test type | What changed | Result quality |
| Clean test | Additive percentage only | Easier to attribute |
| Clean test | Additive present vs not present | Easier to compare |
| Mixed test | Additive and wick | Hard to attribute |
| Mixed test | Additive and fragrance load | Hard to compare |
| Mixed test | Additive and vessel | Hard to scale |
| Mixed test | Additive and pour routine | Hard to repeat |
A common failure pattern looks like this:
| Test ID | Changed variable | Other changes slipped in | Outcome |
| T-01 | 0.5% additive | None | Useful comparison |
| T-02 | 1.0% additive | None | Useful comparison |
| T-03 | 1.0% additive | Wick changed too | Unclear winner |
| T-04 | 1.0% additive | Fragrance load changed too | Unclear winner |
The problem is not that T-03 or T-04 produced no difference. The problem is that the difference is no longer clean enough to guide the next pour.
Lock the non-additive variables before you compare batches
“Same formula” on this page means the same wax, wick, fragrance load, vessel, pour conditions, and cure window, with only the additive variable intentionally changed. This is the checklist that makes the one-variable rule real.
Lock these conditions before you compare batches:
- Wax type
- Wick type and size
- Vessel type and size
- Fragrance load
- Dye use, if any
- Pour temperature plan
- Pour timing and handling
- Cure window before evaluation
This does not turn the page into a wick-sizing page or a fragrance-load page. It only keeps the testing conditions fair. If you actually need wick-specific setup, that is a separate task. If the batch already failed and you need diagnosis, that is a separate task too. This workflow assumes the base formula is otherwise stable enough to test additives fairly.
Use this short fixed-variable checklist before each round:
| Variable | Keep fixed? | Why it matters |
| Wax | Yes | Changes finish and burn pattern |
| Wick | Yes | Changes flame, melt pool, and soot |
| Vessel | Yes | Changes heat behavior |
| Fragrance load | Yes | Changes throw and burn |
| Pour routine | Yes | Changes surface appearance |
| Cure window | Yes | Changes comparison timing |
A combination test needs its own caution. Testing two additives together is not the standard method on this page. A combination changes the experiment from “what did this one additive do?” to “how did these two additives interact?” That is a different question with a different comparison problem. If you want to test a specific combination, see can you use stearic acid and vybar together.
If you need the full incorporation method, see mix candle additives. If your batch already failed and you need diagnosis, see candle additives for weak scent, soot, or poor burn.
Use a small-batch test range you can weigh, repeat, and compare
A small batch on this page is a measured mini production lot that is large enough to weigh, repeat, and compare. It is not a random spoonful of wax, an unmarked sample cup, or a one-off pour with no clear formula record. A small batch should still behave like a real test batch. You should be able to measure the wax, calculate the additive amount, pour the candles, and repeat the same setup again.
That is why “test small” does not mean “test casually.” It means small enough to reduce waste, but large enough to make the comparison real. If the batch is too tiny to weigh the additive cleanly, the result becomes less useful. If the batch is too tiny to pour a fair control and adjusted round, you lose the repeatability that makes the page worth following.
A simple way to think about batch size is this: the batch must be large enough to support a control, one or more adjusted lines, and at least one repeat where needed. It must be large enough for the additive amount to be measurable. It must be large enough for the candle behavior to look like a real formula test rather than a casual sample.
Use this formula for each test line:
Additive grams = total wax weight × additive percentage ÷ 100
If you pour duplicates, calculate the wax for the full line first:
Total wax weight = wax per pour × number of pours
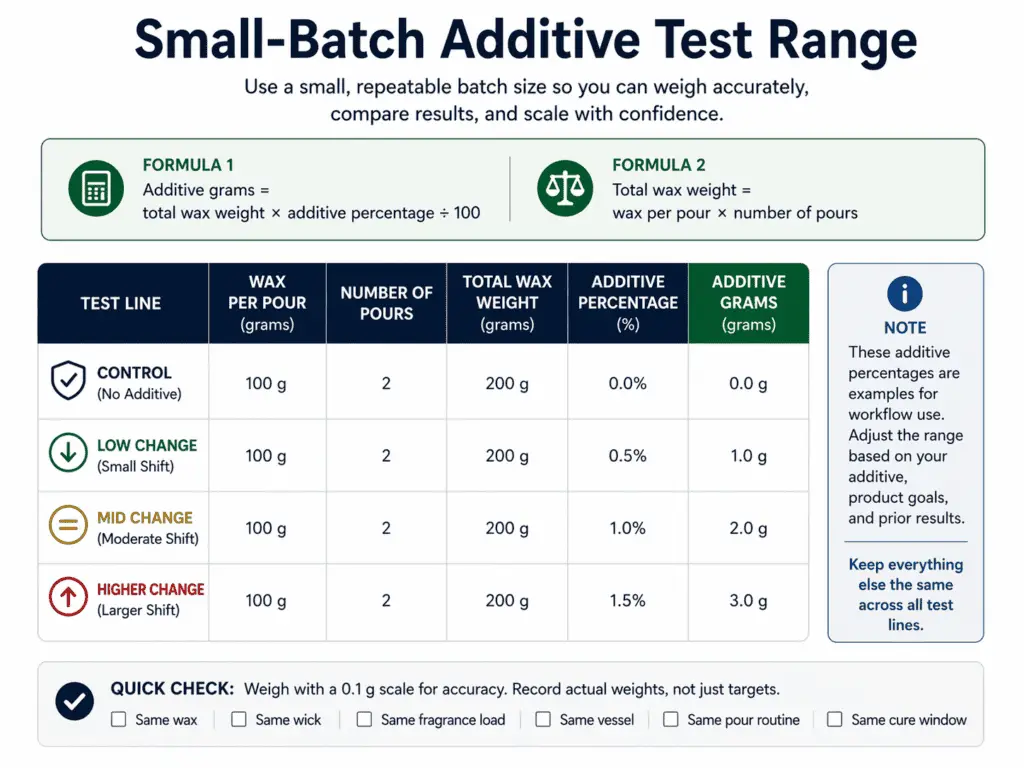
These percentages are example test increments for this workflow, not universal recommended additive rates. Use how much additive to use in candles when you need exact dosage guidance for a specific formula.
Here is a simple first-round matrix:
| Test line | Wax per pour | Number of pours | Total wax | Additive percentage | Additive grams |
| Control | 100 g | 2 | 200 g | 0.0% | 0.0 g |
| Low change | 100 g | 2 | 200 g | 0.5% | 1.0 g |
| Mid change | 100 g | 2 | 200 g | 1.0% | 2.0 g |
| Higher change | 100 g | 2 | 200 g | 1.5% | 3.0 g |
This pattern does three useful things. First, it gives you an unchanged baseline. Second, it gives you deliberate percentage steps instead of random pinches. Third, it gives you lines that are still simple enough to repeat.
A realistic increment plan is one you can measure and compare. A weak plan looks like this:
- “I added a little more”
- “I tried a scoop”
- “I used less than last time”
- “I changed the amount until it looked right”
Those notes are too loose for a testing page built around repeatability. Use percentage steps you can calculate and record.
A batch can be too small in two common ways:
- The additive amount is too tiny to weigh cleanly.
- The batch is too small to resemble a repeatable pour path.
A test range can be too wide in one common way: the step between one line and the next is so large that you skip over the useful middle ground. A gradual range gives you more usable information than one tiny change and one extreme jump.
Label every batch and log the exact change
A candle additive test log ties each batch code to the exact formula change, cure window, and observed result so the next batch can be repeated correctly. A label is not decoration here. It is the difference between a test you can revisit and a test you have to guess your way through later.
Weak labels destroy comparison value. If your note says only “better top” or “round two,” you do not know what changed, when it changed, or whether you are comparing the right batches. The log should capture the exact additive difference and the result you saw.
A minimum viable field set looks like this:
| Batch code | Date | Wax | Wick | Fragrance load | Additive percentage | Cure days | Notes |
| CTRL-01 | May 3 | Soy blend | CD 8 | 8% | 0.0% | 7 | Control batch |
| A-05 | May 3 | Soy blend | CD 8 | 8% | 0.5% | 7 | Smoother top, no change in cold throw |
| A-10 | May 3 | Soy blend | CD 8 | 8% | 1.0% | 7 | Better finish, slightly lower hot throw |
| A-15 | May 3 | Soy blend | CD 8 | 8% | 1.5% | 7 | Finish improved, burn less clean |
You can expand the log if needed, but the minimum should stay clear:
- Batch code
- Date
- Wax
- Wick
- Fragrance load
- Exact additive change
- Cure days
- Result notes
Result notes should describe evidence, not feelings. “Looks nice” is weak. “Smoother top, same cold throw, hotter melt pool” is much stronger. Good notes make later scale-up decisions easier because they show what changed and what happened.
If you need the full mixing step before labeling, go to mix candle additives. If you need exact dosage logic to record, see how much additive to use in candles. For broader category context, see candle additives and enhancers.
Score candle additive results with the same evaluation criteria
On this page, additive performance is judged by named candle outcomes such as finish, scent throw, burn behavior, soot, and repeatability, not by vague impressions. A result counts as useful evidence only when you can name what improved, what stayed the same, and what became worse. That matters because one improved metric does not automatically make the additive the winner. A smoother top with weaker hot throw is a tradeoff, not a clean win.
The scorecard keeps the comparison consistent. It helps you judge the same outcome categories across every batch instead of reacting to whichever feature looks most obvious at first glance. That keeps the page grounded in evidence rather than preference.
Use the same categories every time:
- Surface finish
- Cold throw
- Hot throw
- Burn behavior
- Melt pool behavior
- Soot
- Repeatability
A simple 1 to 5 scale works well:
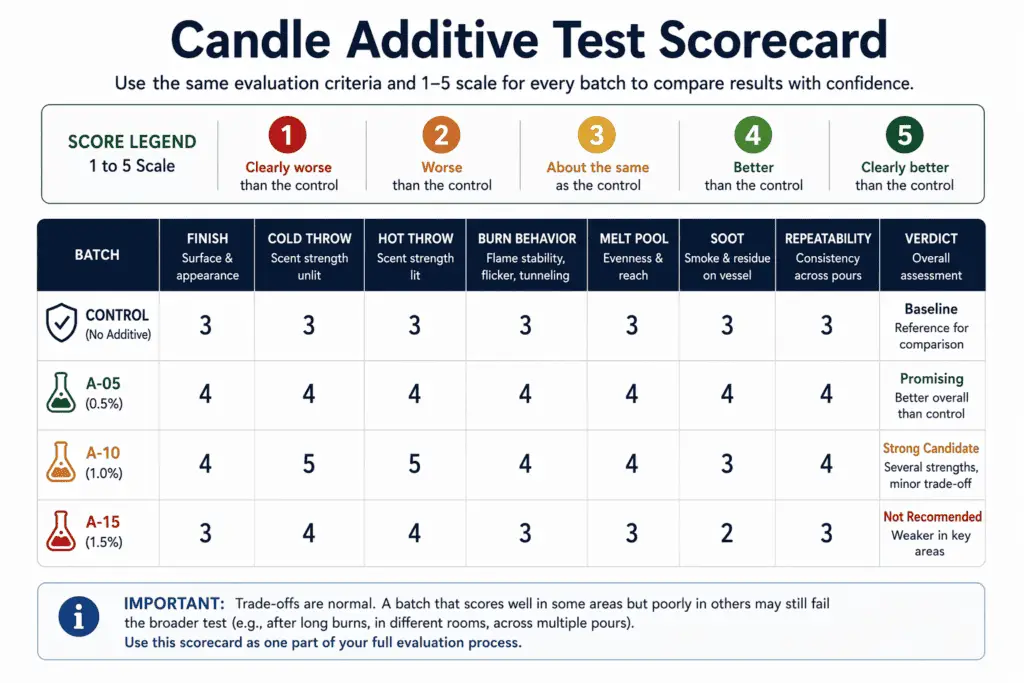
- 1 = clearly worse than the control
- 2 = slightly worse than the control
- 3 = same as the control
- 4 = slightly better than the control
- 5 = clearly better than the control
Here is a scorecard example:
| Batch | Finish | Cold throw | Hot throw | Burn behavior | Melt pool | Soot | Repeatability | Verdict |
| Control | 3 | 3 | 3 | 3 | 3 | 3 | 3 | Baseline |
| A-05 | 4 | 3 | 3 | 3 | 3 | 3 | 4 | Small gain |
| A-10 | 5 | 3 | 2 | 3 | 3 | 3 | 4 | Tradeoff |
| A-15 | 4 | 2 | 2 | 2 | 2 | 2 | 2 | Not ready |
This kind of table makes tradeoffs visible. A batch can improve one visible feature and still fail the broader test. That is why “better” must be tied to named outcomes, not a general impression.
A short tradeoff note often helps:
| Result pattern | Meaning |
| Better finish, same burn, same throw | Likely positive |
| Better finish, weaker hot throw | Tradeoff |
| Stronger throw, more soot | Tradeoff |
| Better top, unstable repeat results | Not ready |
| Cleaner burn, weaker appearance | Depends on goal |
Use that tradeoff view before you decide to repeat or scale. The scorecard does not choose your goal for you. It only shows result direction in a cleaner way.
Compare all batches after the same cure window
Cure timing is part of the test condition, not a background detail. Fresh pours and cured candles can look and perform differently. If you compare one batch after two days and another after seven, the result is less trustworthy because the maturity stage changed.
A fair comparison checks like with like:
| Comparison | Fair or unfair | Why |
| Fresh control vs fresh test | Fair | Same stage |
| 7-day control vs 7-day test | Fair | Same stage |
| 3-day control vs 7-day test | Unfair | Different cure stage |
| 7-day batch A vs 14-day batch B | Unfair | Different cure stage |
This section does not turn into a full curing guide. It only makes one point plain: every compared sample needs the same cure window before appearance or burn judgments are made. A result judged too early can look weaker or stronger for timing reasons instead of additive reasons.
If the result points to a defect pattern and you need diagnosis, see candle additives for weak scent, soot, or poor burn. If you still need help choosing which additive matches your goal, see choose candle additives. If you need the mixing method that happens before curing, review mix candle additives.
Know when a test is ready to scale and when it is not
“Ready to scale” on this page means the additive result has been repeated successfully under the same planned conditions and checked again if the vessel or other core context changes. It does not mean a single batch looked good once. It does not mean you are ready for factory production. It means you have enough repeatable evidence to try a larger repeat of the same validated formula.
When to retest from a new baseline
Retest from a new baseline when a core condition changes because the earlier result no longer answers the same additive question. A new vessel, wick, wax, fragrance load, or process change creates a new comparison path even if the additive stays the same.
Use a new baseline when any of these changes occur:
- New vessel or vessel size
- New wick type or wick size
- New wax or wax blend
- New fragrance load
- Changed pour routine or cure plan
This matters because one good-looking result can still fail later. A smooth top or clean burn in one small round does not prove that the formula is ready for a larger batch if the result has not repeated. A good testing workflow closes with a go-or-no-go rule, not a leap of faith.
A conservative workflow rule is to reach three matched repeats or repeat sets under the same setup before you move to a larger batch. That does not mean every later batch will behave the same under new conditions. It means the result is stronger than a one-off success.
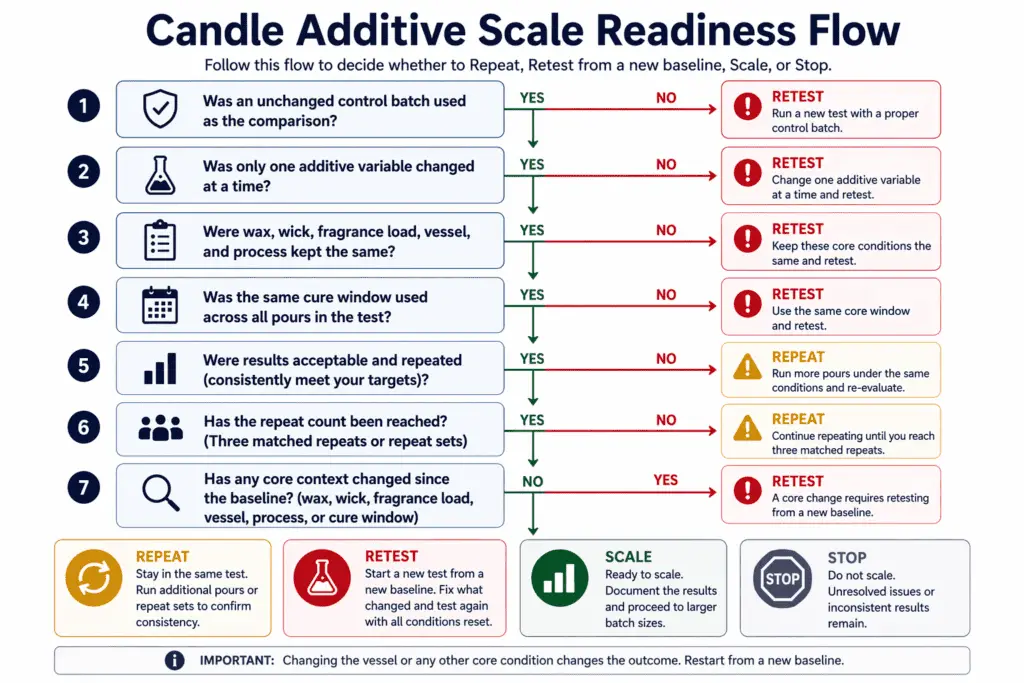
Use this checklist before you scale:
| Check | Ready to scale | Not ready to scale |
| Control used | Yes | No |
| Only one additive variable changed | Yes | No |
| Same wax, wick, fragrance load, vessel, and process | Yes | No |
| Same cure window used for comparison | Yes | No |
| Acceptable result repeated | Yes | No |
| Repeat count reached three matched repeats or repeat sets | Yes | No |
| No core context changed before scaling | Yes | No |
A short failure log shows why this matters:
| Test batch size | Repeat count | Container change | Result |
| Small test | 1 | No | Looks good but not ready |
| Small test | 3 | No | Ready for larger repeat |
| Small test | 3 | Yes | Retest required |
| Larger repeat | 1 | New vessel | Treat as new test path |
A vessel change deserves special attention. If the jar size changes, the burn system changes with it. That means the earlier result does not transfer cleanly just because the additive stayed the same. The formula may need to be retested under the new vessel conditions. The same warning applies when another core condition shifts.
A useful decision pattern looks like this:
- Repeat when the result was promising but only happened once.
- Retest when a core condition changed.
- Scale when the same setup produced an acceptable result across repeated runs.
- Stop when the additive creates a tradeoff you do not want.
A larger batch should still follow the same logic that made the small batch trustworthy. Use the same formula, the same testing discipline, and the same observation categories. Scale is a cautious larger repeat of a validated setup, not a jump away from the setup that passed.
If the bigger batch failed and you need diagnosis, see candle additives for weak scent, soot, or poor burn. If your next question is the exact additive amount to carry over, see how much additive to use in candles.