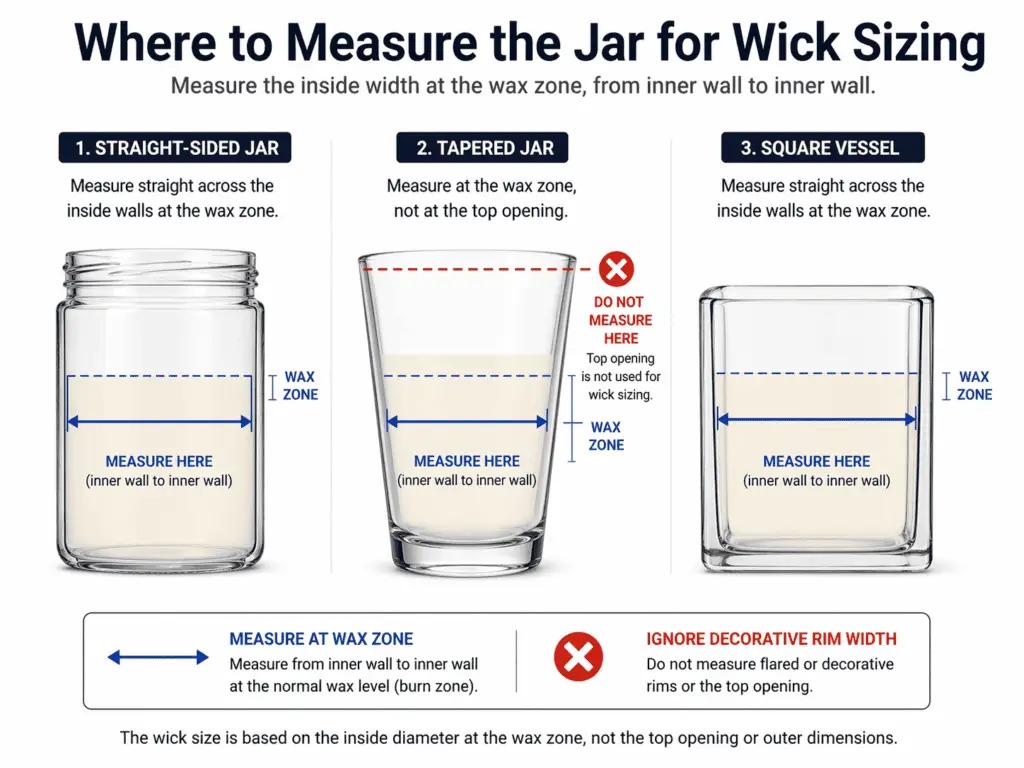
Measure the jar from inner wall to inner wall at the level where the wax will actually burn, because that usable inside width is the starting input for wick sizing.
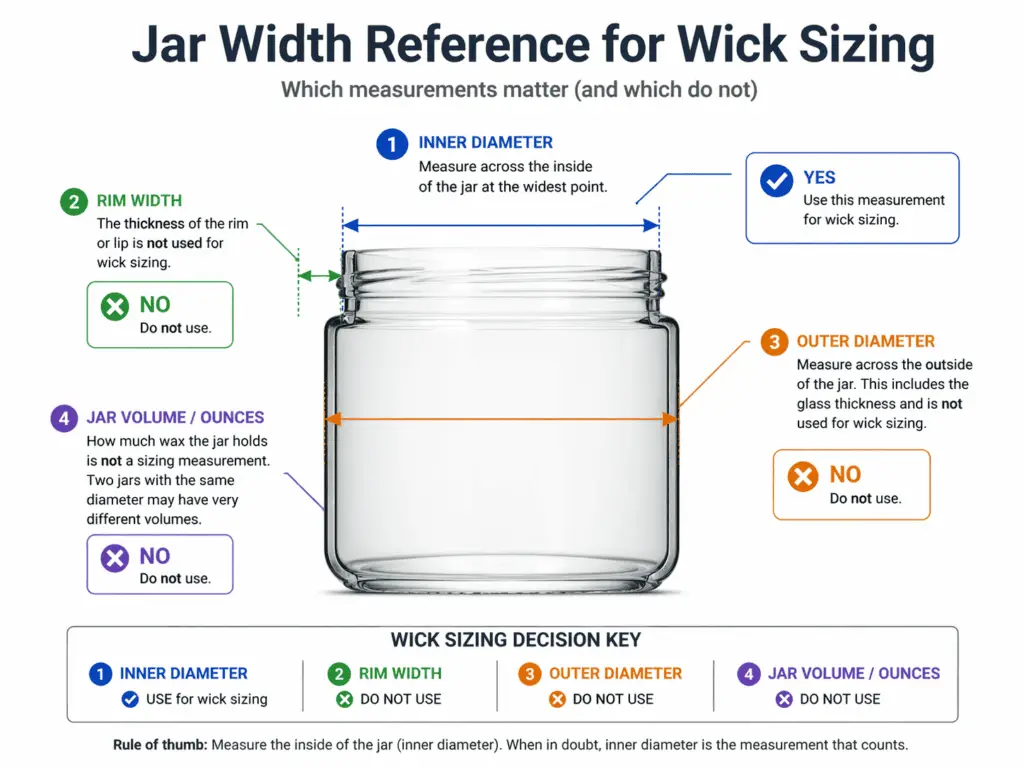
For wick sizing, jar inner diameter means the usable inside width of the container where the wax will actually burn. It is not the outside width, the rim span, the size name on the jar, the jar volume in ounces, or the jar height. In a straight-sided jar, that reading is usually taken straight across at the wax level. In a jar with a flared mouth or taper, use the inside width at the wax-bearing burn zone instead of the widest opening. Once you have that inside measurement, record the raw number, round it only for chart use, and start the first wick test range without treating it as the final wick choice.
What inner diameter means for wick sizing
For wick sizing, inner diameter is the usable inside width of the container where the wax will burn.
Jar height does not determine the starting wick-size input; inside width does.
That means the measurement runs from one inner wall to the opposite inner wall through the part of the jar that will hold the wax and form the melt pool. It does not mean the outside width of the glass, the widest lip at the top, the jar label size, or the listed ounce capacity. This page stays with the measurement stage only. The next decision step uses that inside width as an input, but the measurement itself comes first.
This table shows which jar number belongs in wick sizing and which ones do not.
| Measurement | Use it for wick sizing? | Why |
|---|---|---|
| Inner diameter | Yes | It matches the usable inside width the wick must serve. |
| Outer diameter | No | Glass thickness can make the outside wider than the burn area. |
| Rim width | Usually no | A flared or decorative rim may be wider than the wax zone. |
| Jar ounces or volume | No | Capacity does not tell you the inside width used for wick sizing. |
| Nominal jar size | No | A size label is a product label, not the measuring input. |
A jar sold as 8 oz can have a different usable inside width than another 8 oz jar. That is why wick sizing starts with the inside measurement instead of jar volume or label size.
Where to measure the jar for wick sizing
Measure the jar at the level where the wax will sit and burn, not at the widest top opening by default.
The right spot is the usable burn zone, which means the inside width at the level where the candle will actually form its melt pool. In many jars, that point is close to the fill line, but the fill line question is separate from the measuring question. The measurement here stays focused on one job: find the inside width that gives you the right starting point for wick testing.
| Vessel shape | What to measure | What to ignore |
|---|---|---|
| Straight-sided round jar | Inner wall to inner wall at the wax level | Outside width and rim thickness |
| Tapered or flared jar | Inside width where the wax mass will sit and burn | Widest top opening above the wax line |
| Square or rectangular vessel | Usable side-to-side or front-to-back span at the wax level | Corner-to-corner diagonal |
| Wide shallow vessel | Usable center span at the wax level | Outside-wall width or broadest outer edge |
If the vessel is uneven or handmade, take two inside readings and keep the usable burn-zone reading.
Use these steps to find the correct measuring spot before you read the number.
- Picture where the wax will sit after the candle is poured.
- Look at the inside width at that level, not only at the top rim.
- Ignore decorative lips or flared mouths unless the wax will actually burn at that width.
- Measure from inner wall to inner wall through the usable center.
Tools and steps to measure inside wall to inside wall
Use a ruler or caliper to read the inside width straight across the usable center of the jar.
Place the tool inside the vessel so the reading goes from one inner wall to the opposite inner wall. Read the span straight across the center, not on an angle and not across the outside glass. Write down the raw number as soon as you read it, and keep the same unit from measuring through the next sizing step.
Use this short routine to measure inside wall to inside wall.
- Set the empty jar on a flat surface.
- Decide where the wax will sit and burn.
- Put the ruler or caliper against the inside walls, not the outside walls.
- Read the span straight across the center.
- Write down the raw measurement in inches or millimeters.
- Keep that raw number for the chart step later.
In a straight-sided round jar, one centered reading at the wax level is often enough for a sound starting point. Common mistakes are measuring the outside wall, measuring off-center, or switching units before the raw number is written down.
For tapered jars, measure the width that represents the wax zone
In a tapered jar, the top opening can be wider than the part of the vessel where the wax will actually burn.
Use the inside width at the wax-bearing level, because that is the width the wick must serve first. If the jar flares above the wax line, ignore that flare and measure the wax-bearing width instead. Do not default to the widest mouth unless the wax will actually burn at that width.
How to measure square, rectangular, and wide shallow vessels
In a non-round vessel, use the inside span that matches the usable center of the burn zone.
Measure side to side or front to back across the usable center of the container at the level where the wax will sit and burn. Do not use the longest corner-to-corner diagonal as the chart input, and do not use the outside-wall width. For a square or rectangular jar, the goal is a workable starting width for wick testing without pretending the container is round.
Wide shallow vessels follow the same starting rule: measure the usable center span first. After that, the reading can be used to start a wick test range. If the vessel becomes too broad for a simple single-wick start, that becomes a separate multi-wick decision.
How to record and round the measurement for your first wick test
Record the raw inside measurement first, then round only as needed for chart use, because the rounded value is a starting test input rather than a final wick answer.
Keep the raw number and the chart-ready number together. The raw number is the exact inside width you measured in the jar. The chart-ready number is the version adjusted only to match the unit and size increment used by the chart.

Use this order so the measurement stays useful.
- Write down the raw inner diameter exactly as measured.
- Keep the same unit system from the jar to the chart.
- Check what unit and increment the chart uses.
- Convert only if needed.
- Round only to the chart-ready value required by that chart.
- Keep the raw number beside the rounded number.
- Treat the rounded number as the start of testing, not the final wick answer.
These distinctions keep the handoff clean.
- Raw measurement: the exact inside width you measured
- Chart-ready input: the version adjusted for chart use
- Starting wick-test range: the first size or narrow band to test
- Final wick choice: the wick that still has to be confirmed later
Most mistakes happen when the raw number is thrown away too early or the units are changed midway. Take the raw reading and the chart-ready reading into the next sizing step, then confirm the result with burn testing after the first chart-based wick test.
From here, use the recorded inside width in the broader wick sizing step rather than treating this page as the final wick-selection step.