A candle jar fill line is the planned final wax stop-point inside the jar, and headspace is the empty space left above it on purpose. On this page, headspace means the empty space above the finished wax level in a candle jar, not canning headspace or random unused space. The fill line is not overflow capacity, and headspace is not leftover room with no job. This page covers how to measure the usable final wax level before pouring so the jar keeps clean rim or lid clearance. Wax amount and wick size are separate measurements that come after the fill line is set.
Use this rule on this page: planned fill line = usable inner height minus chosen headspace. Example: if a jar has 3.5 inches of usable inside height and you leave 0.5 inch of headspace, set the fill line at 3.0 inches. If you need the wax weight after that, use the wax amount page after the fill line is set.
What a candle jar fill line actually means
A candle jar fill line is the intended final wax stop-point inside the jar, not the rim and not the jar’s full volume.
That stop-point belongs to the finished candle plan before any wax is poured. It sets where the wax should end while still leaving room for a clean top edge and any needed lid clearance. A jar can hold more than a finished candle should use, so the fill line is not the same as maximum capacity. Fill height, wax amount, and wick width solve different jobs, so the fill line should be set before those follow-on measurements.

What headspace means and why it is not just empty jar space
Headspace is the empty space above the finished wax level that you leave on purpose.
It is not a mistake and it is not wasted jar volume. Headspace keeps the top area neat and leaves room for the rim or lid area to stay usable after the pour. Open jars still need top clearance for a clean finish, and lidded jars need top clearance so the closure area is not crowded by wax. Once headspace is chosen, the fill line has a clear job inside the finished jar.
Next, separate the planned wax stop-point from the jar’s total listed volume.
Fill line vs overflow capacity vs usable fill zone
Fill line, overflow capacity, and usable fill zone are related, but they are not interchangeable in candle jars.
The fill line is the final wax stop-point for the finished candle. Overflow capacity is the maximum total volume the jar can hold if filled all the way up. The usable fill zone is the interior space left after headspace is reserved.
A jar’s listed ounce size or overflow volume does not equal the usable wax amount up to the planned fill line.
| Term | What it means for candle making | What it does not mean |
|---|---|---|
| Fill line | The exact point where the finished wax should stop | The top edge of the jar or its full listed volume |
| Overflow capacity | The most the jar can hold at maximum volume | The right finished fill height |
| Usable fill zone | The part of the interior you can actually use after reserving headspace | The total inside volume from bottom to top |
A jar can have a larger listed volume than the candle should use as a finished fill target. Supplier size language can be accurate and still fail to answer the fill-line question. On this page, capacity means container volume that must be read against headspace and intended candle use, not a signal to pour wax to the top.
Next, measure from the correct interior reference point.
Where to measure from inside the jar
Measure from the usable interior of the jar, not from the outer wall, label area, or listed ounce size.
Start at the inside base and measure upward through the interior space that can actually hold the finished candle. Then reserve headspace before setting the fill line. If the jar has a lid, check whether the underside or insert area reduces the usable top space. On this page, that interior height is the part of the jar that can hold finished wax while still leaving room above it.
Use this simple sequence before you mark anything:
- Put the empty jar on a flat surface.
- Measure the inside height from the base to the top interior edge.
- Decide how much headspace the finished candle needs.
- Subtract that top space from the inside height.
- Use the result as the planned fill line.
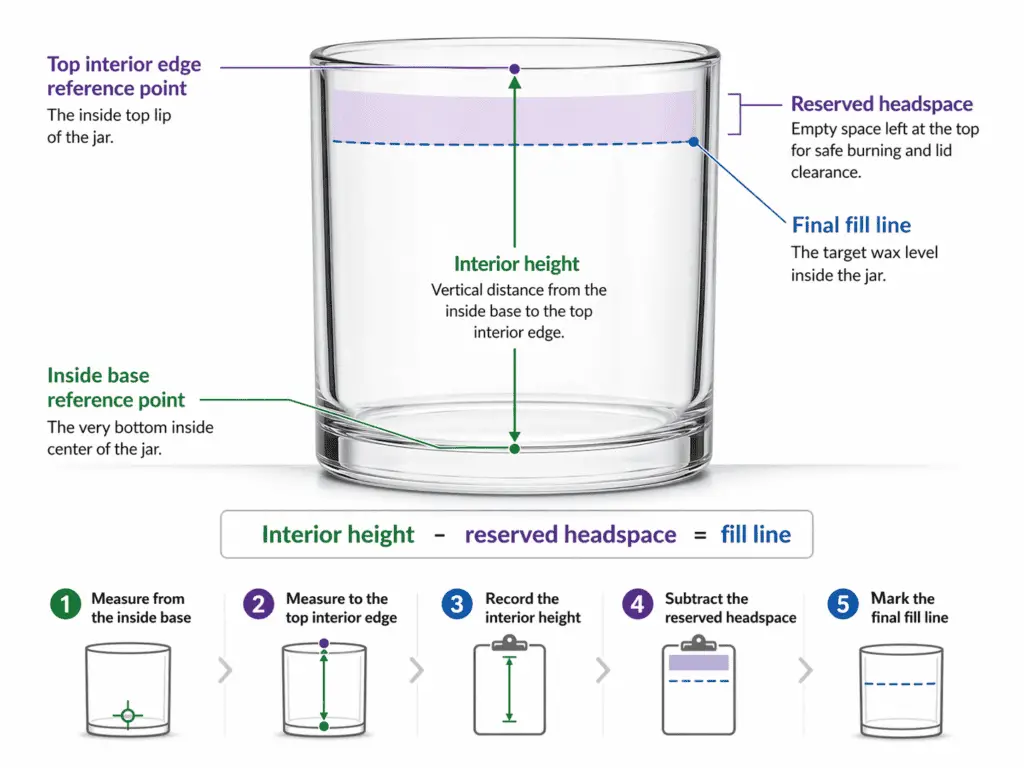
Simple fill-line formula with example
Use this formula for the planned stop-point: usable inner height minus chosen headspace equals the fill line.
Example: if the usable inside height is 3.5 inches and the chosen headspace is 0.5 inch, the fill line is 3.0 inches from the inside base. If your next step is wick sizing by jar diameter, use the wick width page after the fill line is set.
Do not measure from the outside height of the glass or from the jar’s named size. Those details describe the container, but they do not tell you where the finished candle should stop.
Then mark the fill line before any wax goes into the jar.
How to mark the fill line before pouring
To mark a candle jar fill line before pouring, measure the usable interior height, subtract the planned headspace, and mark that stopping point on the jar.
The mark gives you a clear stop-point during the pour, so the final wax height is planned instead of guessed. A temporary mark works because the point is a pre-pour reference, not decoration. Once the jar shape and lid setup are checked, the same method can be repeated across matching jars.
Use this short checklist:
- Measure the usable interior height.
- Reserve the headspace you want above the wax.
- Set the fill line at the remaining height.
- Add a temporary mark where you can see it during the pour.
- Dry-check the mark against the rim and lid area.
- Pour to the mark, not to the top edge.
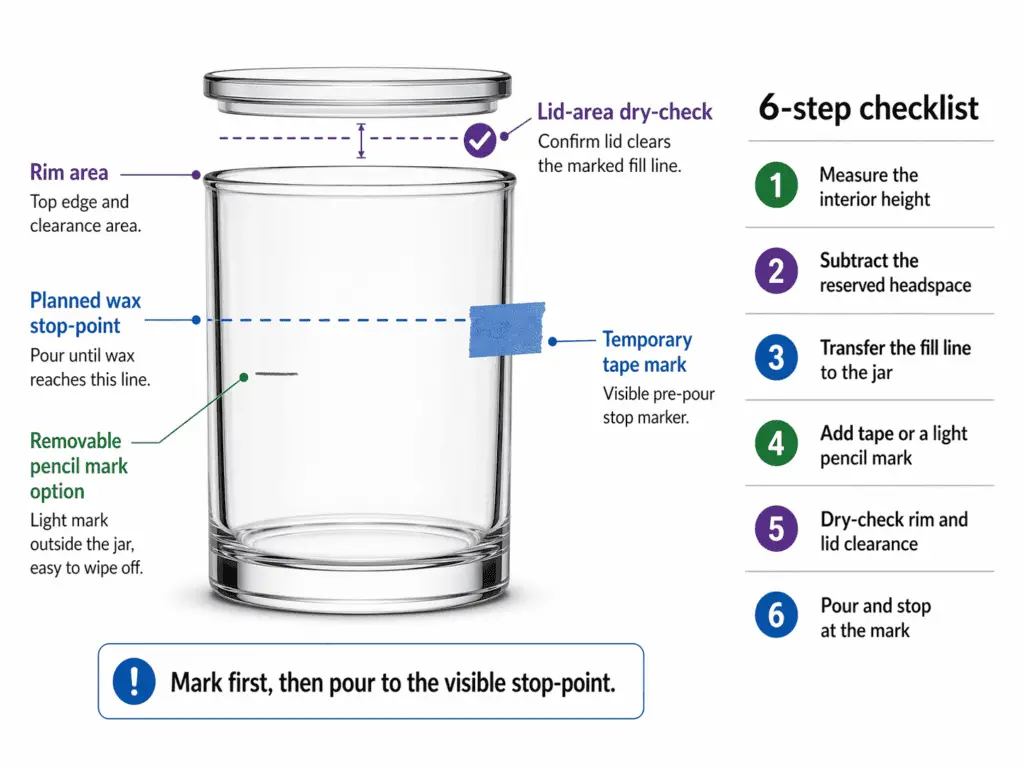
A tape mark, removable pencil mark, or similar temporary cue is enough as long as it does not interfere with the finished jar. The main point is to set the stop-point before pouring, not during the pour.
How to repeat the same fill line across matching jars
To repeat the same candle jar fill line across matching jars, use one confirmed fill-line standard and apply that same standard across the batch.
That batch standard applies only when the jars use the same SKU, the same interior shape, the same lid or insert setup, and the same target headspace.
That only works when the jars are truly the same SKU and use the same interior shape and closure setup. Once one jar is checked and marked correctly, copy that same reference instead of eyeballing each jar again. If the lid, insert, or jar version changes, recheck the fill line instead of assuming the old mark still fits.
That repeatable mark only works if you still leave usable space below the rim or lid.
How much space to leave below the rim and lid
Candle jar headspace is the measured clearance between the planned fill line and the rim or lid underside, and it should be enough to keep the top edge clean and prevent lid contact with the wax.
The point is measured clearance, not one fixed gap for every jar. Open jars need room for a clean finished top and a usable rim. Lidded jars need that same clean top area plus enough clearance for the lid or insert to sit as intended. That makes rim and lid clearance part of fill-line setup, not an afterthought.
How to check lid insert clearance
On this page, enough clearance means enough space to keep the usable top area clear and prevent the lid underside or insert from touching the planned wax stop-point.
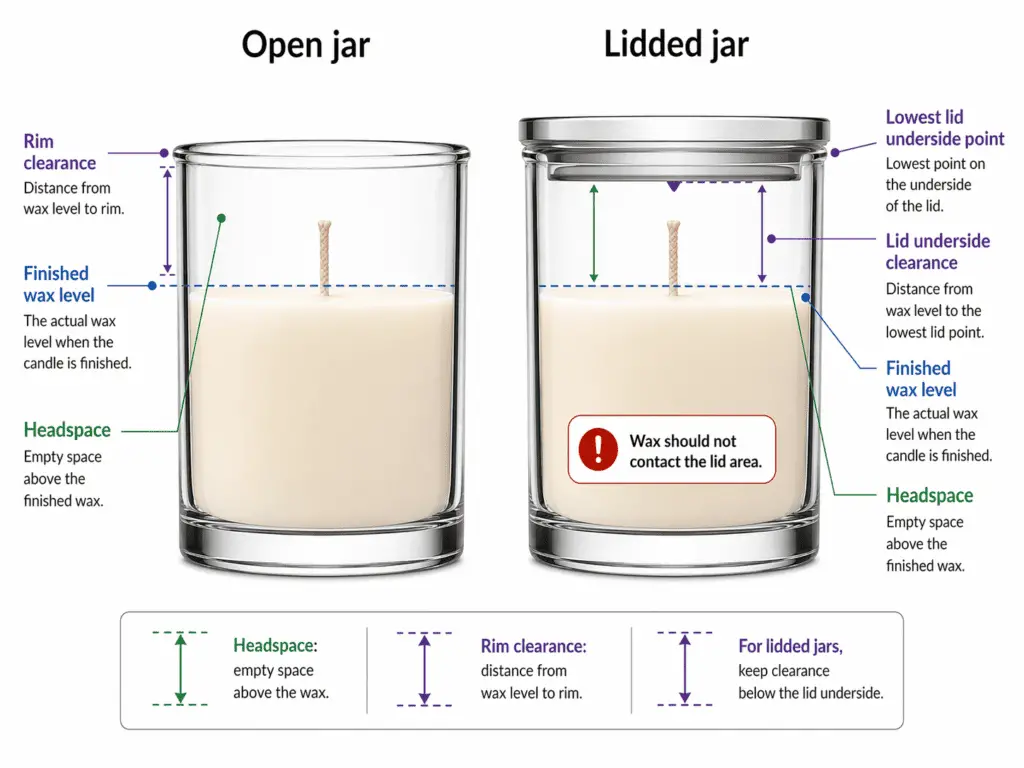
Do a dry-check before pouring: mark the fill line, place the lid on the empty jar, compare the mark to the lowest lid underside or insert point, and re-mark the fill line if that point crowds the planned headspace.
For lidded jars, check clearance to the lowest lid underside or insert point that could touch the wax, not just to the visible top edge of the jar.
Underfilling and planned headspace are not the same thing. Planned headspace has a job: it protects the usable top area of the jar. Filling to the top can leave wax too close to the rim, make cleanup harder, and reduce lid clearance in jars that need it.
Some jars make that clearance check less obvious because the top shape changes the usable interior.
Special jar shapes that change how you check the fill line
Curved walls, shoulder jars, thick rims, and insert lids can change the usable reference point, so they need a closer check before you pour.
The page still solves the same job: measure the usable final wax level before pouring. The difference is that unusual geometry can make the outside shape look simpler than the inside space really is. In those cases, measuring from the correct interior point matters even more, because the usable interior may narrow, shift, or lose top space near the rim. A shoulder jar can change where the top usable zone begins. A thick rim can reduce practical top space. An insert lid can take up part of the clearance area that looks open from the outside.
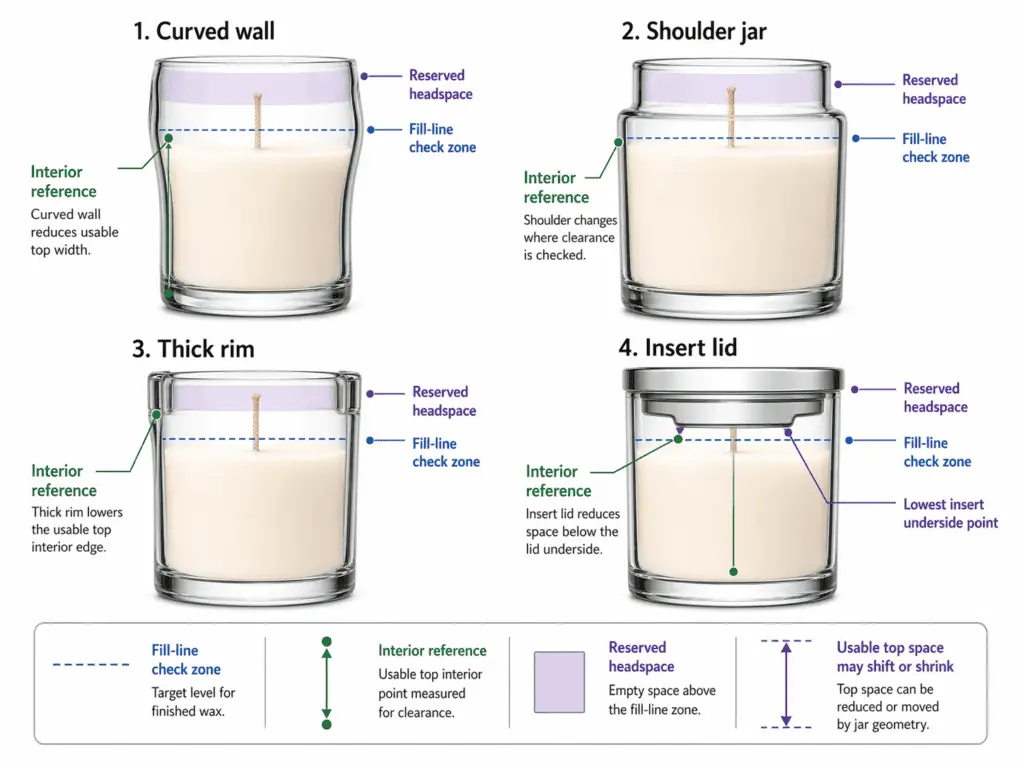
For jars like these, keep the method the same but do one extra dry-check before pouring. Measure the usable interior, reserve headspace, set the fill line, and confirm that the mark still leaves enough room once the real top shape is taken into account. If the next measurement changes from fill height to wax amount, wick width, or exact closure fit, treat that as a separate step after the fill line is set.