Jar geometry is the inside width, depth, wall profile, taper, and shape of a candle vessel where the wax actually burns.
On this page, performance means melt coverage, wall heat behavior, flame control, and hot-throw support. It does not mean decorative quality, sales appeal, fragrance quality alone, or formal safety qualification. This page explains how geometry changes wick behavior and when geometry points to a different strategy under Candle Containers & Jars, not how to choose an exact wick size or complete a full safety signoff.
This page owns the geometry-first decision. A balanced or controlled setup means melt reach, wall heat, and flame behavior stay aligned; a harsh setup gains coverage while soot, wall heat, or center aggression worsen. These terms do not refer to aesthetic preference, brand quality, or room-scent preference. Use wick charts by series and wax type for exact size selection, how to measure a candle jar for wick sizing for full measurement steps, when a candle jar needs two wicks for threshold detail, two-wick spacing in wide jars for exact placement, and container safety and heat qualification for formal pass-or-fail review.
Geometry-First Decision Map: Which Jar Variable Should Change Your Next Wick Move?
The jar variable that should change your next move first is the variable that best explains the heat path you are seeing, not the one that is easiest to measure.
On this page, the next move means whether to keep reading geometry, move to a child page for exact sizing or spacing, or stop treating the result as a simple diameter problem.
| Geometry signal | What it usually changes first | Common false reading | Better next move |
|---|---|---|---|
| Usable inner burn width | Starting melt target | Outside width is enough | Start with inner burn width, then check profile and shape before changing wick strategy |
| Deep-narrow profile | Edge timing | Slow edge reach proves under-wicking | Compare repeat burns before changing size |
| Wide-shallow profile | Surface coverage speed | Fast full pool proves the setup is right | Check wall heat and flame control before rewarding coverage |
| Taper between rim and wax line | Real burn-zone width | The widest visible opening is the melt target | Measure the wax-line width and route to the measurement page when exact sizing is needed |
| Square or rectangular shape | Corner coverage expectations | Corners should behave like a round edge | Judge non-round expectations before adding more heat |
| Center heat rises before edge reach improves | Single-wick limit | A larger center wick will solve the problem cleanly | Move to one-wick versus two-wick threshold logic |
| Heavy vessel mass | Outside heat feel | Cooler feel means calmer burn | Read flame pattern and wall behavior before trusting the hand-feel |
What Jar Diameter Matters Most for Wick Choice?
The diameter that matters for wick choice is the usable inner burn width the flame must actually melt across, not the outside width printed on the jar listing.
In candle containers and jars, the working diameter is the inside wax surface the wick has to open, not the outer glass measurement or the widest point at the rim. That distinction matters because thick walls, taper, rounded shoulders, and non-round shapes can make two “same-size” jars behave like different vessels. Diameter gives you a starting path, but shape, wax, and wick family still decide whether that path stays balanced.
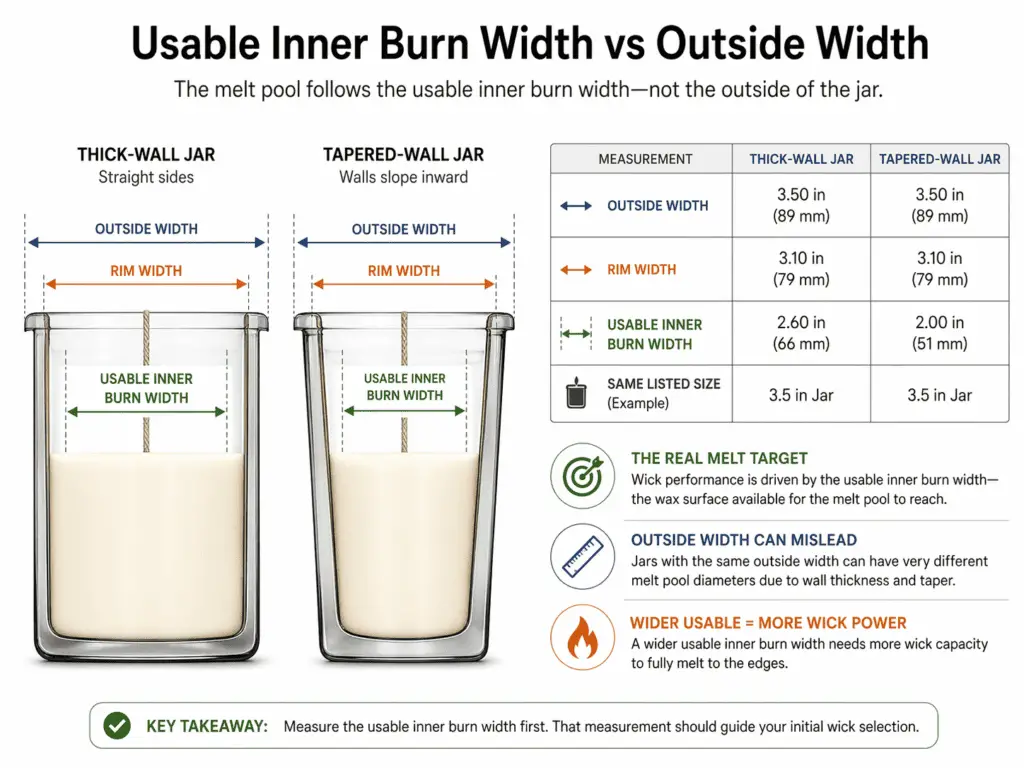
Width-reference comparison
| Measurement | What it tells you | What it does not tell you |
|---|---|---|
| Outside jar width | Product size context | Real melt target |
| Rim width | Opening size | Burn-zone width lower in the jar |
| Usable inner burn width | Best first wick reference | Final wick verdict |
| Same listed size across two jars | Label similarity | Same heat path |
Diameter decision clarifications
Is outer width enough for wick choice?
No. Outer width can mislead when wall thickness or shape changes the real melt target.
Why can two jars with the same listed size need different wick paths?
Because the inside burn width and heat path can differ even when the outside label matches.
When should diameter stop being the only factor?
As soon as taper, corners, wall shape, wax type, or wick family start changing how the surface opens.
When does this move off-page?
When the question becomes chart-grade selection or a full measurement walkthrough, which belongs to wick charts by series and wax type and how to measure a candle jar for wick sizing.
Method note: Treat the table above as a same-jar comparison framework. It compares width references, not exact wick sizes, so it stays inside this page’s role: choosing the right geometry-first starting point rather than replacing chart pages.
The next variable is profile, because width alone does not explain why two jars with similar inner width can still open at very different speeds.
Wide-Shallow vs Deep-Narrow Jars: Which Profile Changes Burn Performance More?
Jar profile changes burn performance more than many makers expect because it changes the heat path, not just the amount of wax in the vessel.
In candle containers and jars, profile means the width-to-depth shape of the vessel. A wide-shallow jar usually spreads surface heat sooner, while a deep-narrow jar tends to hold more heat in the center early and reach the edge more slowly. That slower edge reach is not automatic proof of the wrong wick, and the faster pool in a shallow jar is not automatic proof of a clean match.
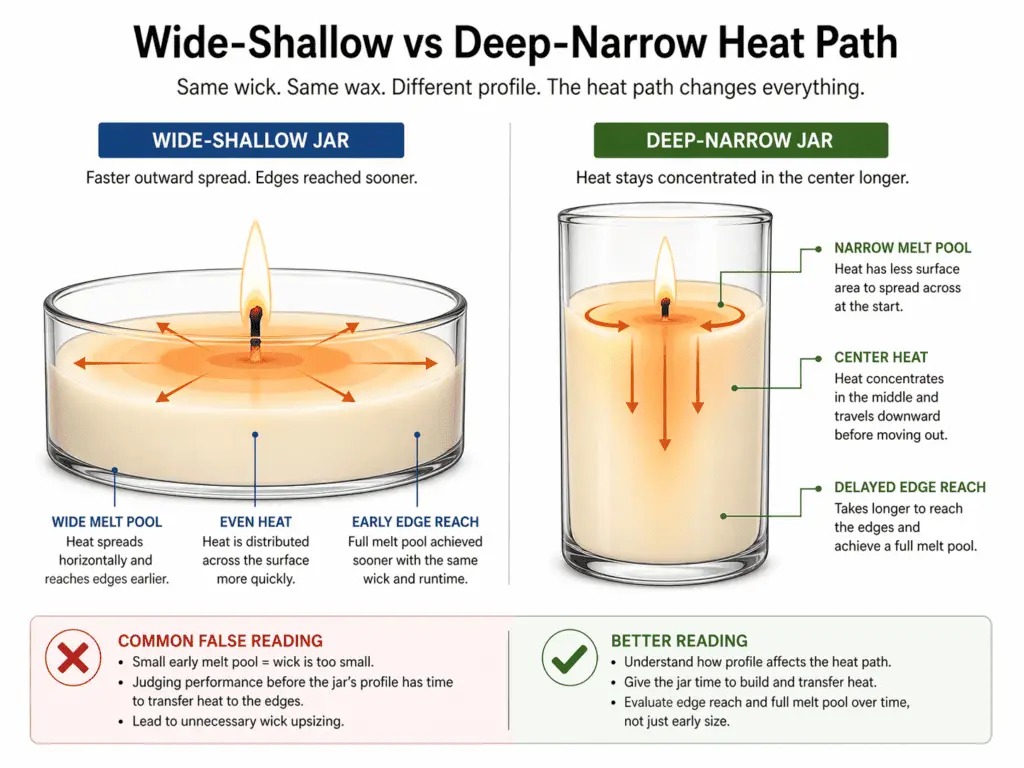
Profile effect comparison
| Profile | Early pool pattern | Common false reading | Better reading |
|---|---|---|---|
| Wide-shallow | Faster outward spread | “Coverage looks fast, so the wick is right.” | Check whether heat and flame quality stayed controlled. |
| Deep-narrow | Slower edge reach | “It must be under-wicked already.” | Check whether the lag is normal for the profile before changing size. |
| Similar volume, different profile | Different timing and wall behavior | “Volume is the same, so burn behavior should match.” | Profile changes timing even when volume is close. |
Profile decision clarifications
Does jar depth matter as much as width?
Yes. Width sets the melt target, but depth changes how heat travels toward that target.
Why do deep jars get judged too early?
Because slow edge reach can mimic under-wicking before the profile has had enough time to show its normal pattern.
Why do shallow jars get over-rewarded?
Because fast visible coverage can hide a flame that is already running too hard.
Method note: Hold wax, wick family, and fragrance load steady, then compare only profile. That is the cleanest way to separate “this jar is deeper” from “this whole setup changed.”
Profile leads directly to shape, because two jars can share a similar depth and width but still redistribute heat differently once the walls and corners change.
How Jar Shape Changes Burn Behavior Beyond Diameter Alone
Jar shape changes burn behavior because shape redistributes heat and changes how the melt pool travels across the surface.
In candle containers and jars, shape is not just a styling detail. Straight walls, rounded walls, taper, square bodies, and rectangular bodies all change where heat concentrates and how far liquid wax reaches at each stage. That is why the same diameter does not guarantee the same wick behavior.
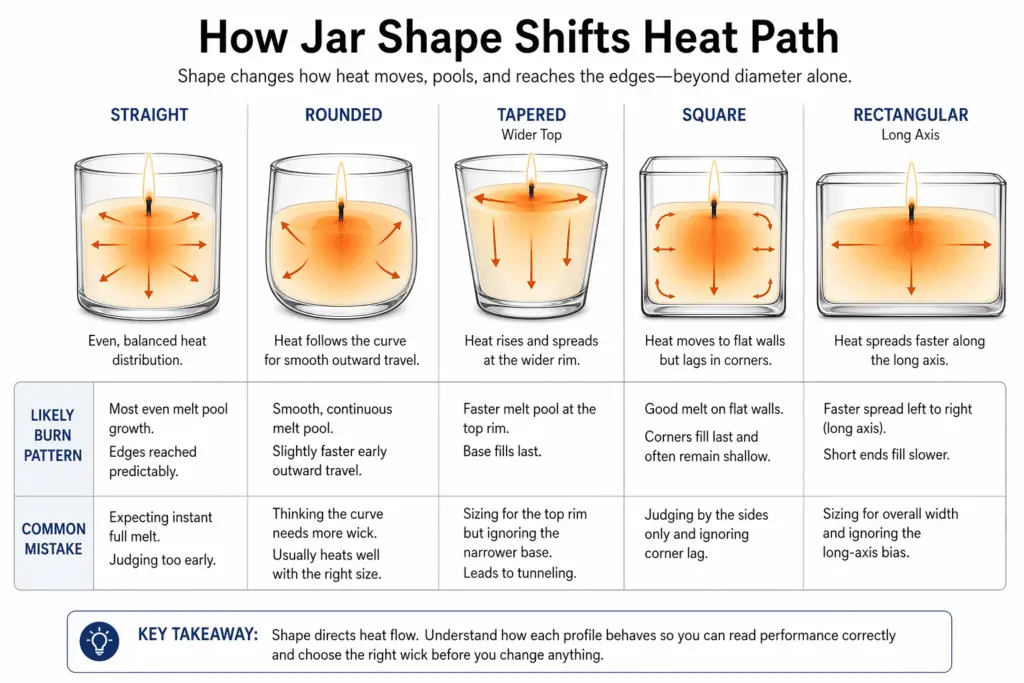
Shape effect comparison
| Shape family | Likely burn pattern | Common mistake |
|---|---|---|
| Straight | Cleanest read of width-based behavior | Assuming all jars behave this predictably |
| Rounded | Center may read stronger early | Calling the edge slow too soon |
| Tapered | Rim can exaggerate true burn width | Starting from the widest visible point |
| Square | Corners can lag | Treating corners like a round edge |
| Rectangular | Long-axis spread may appear first | Forcing extra heat to chase every corner |
Shape decision clarifications
Does jar shape matter if the diameter is the same?
Yes. Same width can still mean a different heat path.
Why do corners hold wax longer?
Because a non-round surface does not melt outward like a circle.
Why do tapered jars get over-wicked so easily?
Because the rim can look wider than the actual burn zone where the wax sits.
Where should detailed shape-specific measurement go?
To how to measure a candle jar for wick sizing and square jar corner coverage expectations when the question stops being about the parent geometry decision.
Same-width confusion often leads to the next mistake: oversizing one centered wick when the jar may really be asking for split heat instead.
When a Candle Jar Needs Two Wicks Instead of One
A jar needs two wicks when one centered wick stops improving coverage without making the center run harsher.
In candle containers and jars, the one-wick versus two-wick decision is a test-based threshold, not a hard diameter cutoff. The signal is not “this jar is wide, so it always needs two.” The signal is that one larger center flame keeps raising center heat before it solves the outer melt problem.
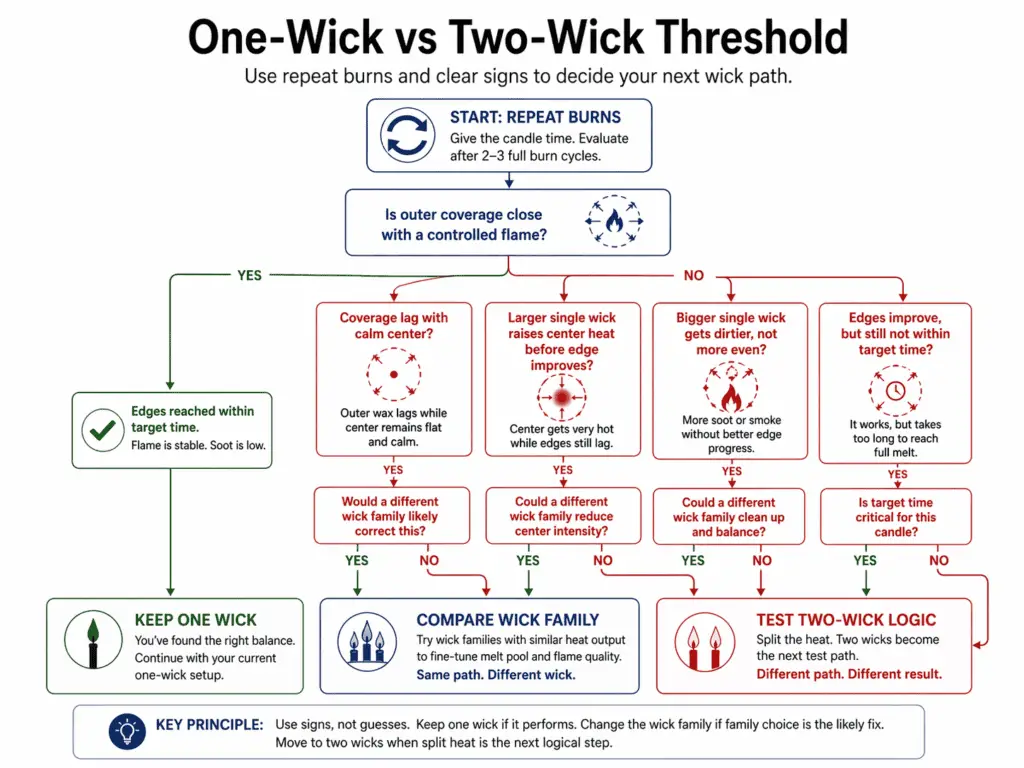
One-wick versus two-wick threshold
| What repeat burns show | Better next move |
|---|---|
| Outer coverage is close and flame stays controlled | Keep one wick and retest |
| Coverage lags, but center is still calm | Compare wick family before adding a second wick |
| Larger single wick raises center heat before edge improves | Test two-wick logic |
| One bigger wick gets dirtier, not more even | Stop upsizing one centered flame |
Two-wick threshold clarifications
When does a jar need two wicks instead of one?
When one centered wick no longer improves coverage and heat control at the same time.
Is two-wick logic just a width rule?
No. Width matters, but profile and shape change when the threshold appears.
Are two wicks always calmer than one?
No. A poor two-wick setup can still run hard.
Where should full pair logic go?
Chart-level and pairing detail belong to when a candle jar needs two wicks and wick charts by series and wax type.
Method note: Judge the threshold from same-jar testing. The point is not to name a universal cutoff; it is to spot the moment when center-force stops solving the real distribution problem.
Once that threshold appears, spacing becomes the next decision because split heat only works when the heat map is placed well.
How Two-Wick Spacing Changes Melt Coverage and Wall Heat
Two-wick spacing changes both melt coverage and wall heat because two flames create a heat map, not just more total heat.
In candle containers and jars, spacing belongs on this page only as a strategy signal. A pair placed too close can build an aggressive center band, while a pair placed too far apart can leave the pool split and uneven. This section does not assign exact placement distances or pairing templates. Use when a candle jar needs two wicks for the threshold decision and two-wick spacing in wide jars for exact placement.
What Melt-Pool Reach and Edge Wax Really Mean in Different Jar Geometries
Melt-pool reach shows how far liquid wax has progressed at that stage of the burn, and edge wax can be normal before it becomes a real mismatch signal.
In candle containers and jars, melt-pool reach is a progress reading, not a promise that every burn should hit every edge immediately. Edge wax means unmelted wax remains near the wall or corner at that stage. The key distinction is timing: some edge lag is normal in deeper or narrower profiles, while persistent lag across repeat burns points more strongly to a mismatch.
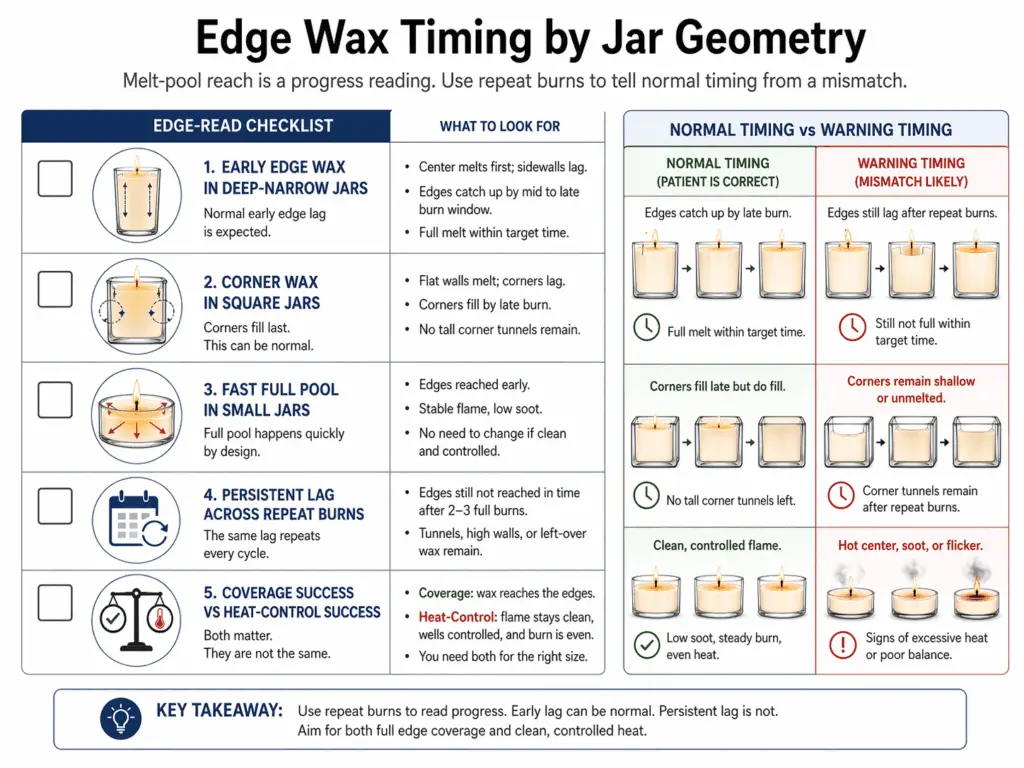
On this page, a normal timing window means the period when geometry can still explain slow edge progress before repeat burns show a stable mismatch. A false success signal means coverage looks complete while wall heat or flame control has already worsened.
How to read edge wax by geometry
- Early edge wax in a deep-narrow jar can be normal.
- Corner wax in a square jar should not be judged by round-jar expectations.
- Fast full pool in a small jar can still hide heat problems.
- Persistent lag matters more than a single early snapshot.
- Coverage success and heat-control success are not the same result.
Edge-wax decision clarifications
Is edge wax normal on early burns?
Sometimes, yes. Profile and shape decide whether the lag is expected.
When does edge wax become a warning sign?
When it stays across repeat burns after the normal timing window for that jar profile.
What is the biggest mistake here?
Treating every slow edge as under-wicking and every fast full pool as success.
Where should rescue logic go?
To persistent edge wax troubleshooting and full candle burn-test protocol when the issue turns into a correction workflow.
The next distinction is heat, because melt coverage can look good while the wall behavior still says the setup is too aggressive.
Why Jar Geometry Changes Wall Heat and Overheating Risk
Jar geometry changes wall heat because geometry decides where heat concentrates, not just how fast the surface melts.
In candle containers and jars, wall heat is the behavior of the glass and nearby wax zones during the burn. A candle can reach broad melt coverage and still show a poor heat pattern if the sidewall, shoulder, or upper vessel starts taking too much heat. That is why full pool is never the only pass signal.
Heat-pattern warning signs
- Full melt appears, but one wall runs much hotter than the rest.
- A wide jar opens faster after a wick change, but side heat rises with it.
- A small jar reaches full pool quickly, yet the burn still looks harsh.
- Thick glass feels calmer even though the flame pattern still leans hard.
Wall-heat pattern comparison
| Pattern | What it suggests |
|---|---|
| One side hotter than the other | Placement or shape is biasing heat |
| Shoulder area heating up faster | Shape is concentrating heat higher in the vessel |
| Quick full pool in a narrow jar | Coverage may be a false success signal |
| Broad coverage plus rising side heat | Heat control worsened while melt reach improved |
Wall-heat clarifications
Can a candle be fully melted and still run too hot?
Yes. Coverage can pass while wall heat still fails.
Is warm glass by itself proof of a problem?
No. The pattern of heat matters more than warmth alone.
Why can thick glass hide a harsh setup?
Because feel and flame behavior are not the same thing.
Method note: Compare wall behavior left-to-right and top-to-bottom over repeat burns. This section stays with jar geometry and wall heat; formal pass-or-fail decisions belong to container safety and heat qualification.
Heat ties directly to scent release, because the amount and spread of melted wax affect what the candle can release into the room.
Why Jar Geometry Changes Hot Throw and Scent Release
Jar geometry changes hot throw because geometry changes the melted surface area and the way heat carries fragrance through the burn.
In candle containers and jars, hot throw is the scent released while the candle is burning, and room fill is how well that scent spreads through the space. A candle can smell strong near the flame and still fill the room poorly if the melt pattern stays too narrow or uneven. That is why throw on this page means geometry-linked release support, not formula quality alone.
Geometry-linked throw comparison
| Burn pattern | Likely scent result |
|---|---|
| Broad, even melt area | Better room-fill support |
| Strong center pool, limited spread | Strong near-flame scent, weaker room fill |
| Wider pool plus rising wall heat | More release, but with a heat tradeoff |
| Full surface melt with weak room fill | Geometry may still be limiting distribution or another variable is now taking over |
Hot-throw clarifications
Does jar geometry affect hot throw?
Yes. Geometry affects how much wax melts and how evenly release happens.
Why can a candle smell strong near the flame but not across the room?
Because near-flame scent and room fill are different outcomes.
Should weak throw be blamed on fragrance first?
Not before the melt pattern is understood.
Method note: Hold fragrance, wax, and wick family steady, then compare only geometry or wick layout. Full fragrance-load diagnosis belongs to fragrance load for candles once the geometry picture is clear.
Wick Family Differences in the Same Jar Geometry
The same jar geometry can behave differently across wick families because wick family changes heat spread, cap behavior, and burn style.
In candle containers and jars, wick family belongs on this page only as a same-jar qualifier. Use wick charts by series and wax type for chart-grade family selection once the geometry pattern is clear.
Soy vs Paraffin vs Blends: How Wax Type Changes the Same Jar’s Wick Behavior
Wax type changes how the same jar responds to heat, but jar geometry still stays at the center of the decision.
In candle containers and jars, wax type belongs on this page only as a same-jar qualifier. Soy, paraffin, and blends can shift pool timing, edge lag, and wick demand in the same vessel, but exact wax selection stays on wax type comparison for container candles.
Why Fragrance Load Can Stress the Same Jar and Wick Setup
Fragrance load can stress a fixed jar-and-wick setup because a stronger oil load can change burn behavior without any change to the vessel.
In candle containers and jars, fragrance load belongs on this page only as a stress qualifier. A setup that looked balanced at one load can show slower reach, dirtier flame behavior, or stronger local scent with weaker room fill after the load changes. Full percentage guidance stays on fragrance load for candles.
Why Wall and Base Thickness Change Heat Readings in Candle Jars
Wall and base thickness change heat readings because vessel mass changes how heat feels from the outside, not necessarily how balanced the burn is inside.
In candle containers and jars, thicker walls and heavier bases can delay or soften what your hand notices. That can make one vessel feel calmer than another even while the flame pattern, soot tendency, or wall bias remains aggressive. Formal pass-or-fail review still belongs to container safety and heat qualification.
Why Tall Narrow Jars Lag at the Edge Before They Truly Fail
Tall narrow jars often lag at the edge because a deep profile slows outward pool progress before it proves a real mismatch.
In candle containers and jars, lag means delayed edge progress, not automatic failure. Tall jars often hold more heat in the center early, so they can mimic under-wicking before the profile has had time to show its normal pattern. The main risk is changing the setup too early and creating a harsher burn while trying to solve a lag that was still inside normal timing.
This section stays at interpretation level only. Use full candle burn-test protocol when the question becomes a full correction workflow.
Why Wide Shallow Jars Pool Fast and Soot Sooner
Wide shallow jars can pool fast because the surface is easy to open, but that fast pool can hide an overdriven flame.
In candle containers and jars, fast edge reach is not the same as balanced performance. A broad, shallow surface can show quick coverage while soot, mushrooming, or rising wall heat signal that the wick is already too aggressive. The false reading is “it reached the edge, so it must be right.”
This section stays at pattern-reading level only. Use soot and mushrooming fixes when the issue becomes a repair workflow.
Steps for Burn-Testing Jar Geometry Before Revising Wick Size
Burn-test jar geometry before revising wick size by logging the same variables the same way across repeat burns.
In candle containers and jars, this page keeps burn testing at a summary level only. The decision point is whether width, profile, shape, wall heat, flame behavior, and throw stay in the same pattern across repeat burns. Use full candle burn-test protocol when the page needs a complete workflow.
Tapered Jars: Measure the Burn Zone, Not the Rim
In a tapered jar, measure the burn zone where the wax actually sits, not the widest point at the rim.
In candle containers and jars, a tapered vessel can look wide at the top while narrowing where the wax surface actually burns. If the first test starts from the rim alone, the wick path can be pushed hotter than the real target requires. The burn zone matters more than the widest visible opening. This section does not replace the full measurement walkthrough on the child page.
Burn-zone measurement comparison
| Measurement point | Why it matters |
|---|---|
| Rim width | Gives opening context |
| Wax-line width | Gives the real first-test melt target |
| Difference between the two | Shows how much taper may distort the starting choice |
Tapered-jar measurement clarifications
Why does the rim mislead in tapered jars?
Because it may be wider than the actual wax surface.
Which width should drive the first test?
The burn-zone width at the wax line.
When should the full measurement process move elsewhere?
When the vessel shape needs a dedicated walkthrough, which belongs to how to measure a candle jar for wick sizing.
Method note: Record both widths in the same unit before the first burn. This page owns the decision logic under jar geometry and wall heat; the full measurement tutorial stays on the child page.
After taper, the next shape exception is non-round coverage, because corners change what “full melt” should even mean.
Square and Rectangular Jars: What Corner Coverage Should You Expect?
Square and rectangular jars need different melt expectations because corners are not the same target as a round edge.
In candle containers and jars, corner coverage means how wax progresses into the far corners of a non-round vessel. A square or rectangular jar can be behaving normally even while corners lag behind the pattern you would expect from a round vessel. The mistake is forcing a round standard onto a non-round shape.
Corner-coverage expectation comparison
| Vessel shape | Early expectation | False reading |
|---|---|---|
| Round | More even circular edge reach | Using that pattern as the universal rule |
| Square | Corners may lag | Calling the jar a failure too soon |
| Rectangular | Long-axis spread may appear first | Forcing extra heat just to chase corner melt |
Non-round expectation clarifications
Do square jar corners need to melt right away?
No.
Why can chasing the corners make the jar worse?
Because extra heat aimed at corners can raise center and wall stress first.
When should corner behavior raise the one-wick versus two-wick question?
When the shape is asking for wider heat distribution rather than a harsher single center flame.
Method note: Judge corner behavior with square jar corner coverage expectations, not round-vessel expectations. The strategic threshold question belongs to when a candle jar needs two wicks.
Feel can mislead in non-round jars, and vessel prestige can mislead too, which is why premium vessels need their own warning.
Why Heavy-Base or Premium Vessels Can Distort Heat Readings
A heavy-base or premium vessel can feel calmer while still hiding an aggressive burn pattern.
In candle containers and jars, premium feel can create a false safety halo. Extra mass, thicker walls, and a more expensive vessel finish can make the jar seem controlled in the hand even while soot, wall bias, or a hard-running flame say otherwise. Use container safety and heat qualification for formal review.
Why a Small Jar Can Look Fully Melted Yet Still Run Too Hot
A small jar can look fully melted quickly because the target is short, but that fast full pool can be a false positive.
In candle containers and jars, a false positive means the surface looks right while the heat pattern still runs too hard. Narrow jars can reach a full pool under concentrated heat long before the setup proves that wall behavior and flame control are balanced. Visual success is not enough.
Small-jar false-positive signs
- Full pool appears fast.
- The wall or shoulder still runs harder than it should.
- Soot or mushrooming begins even though coverage looks complete.
- The jar looks “done” before the burn looks controlled.
Small-jar heat-control clarifications
Can a candle be fully melted and still run too hot?
Yes.
What should outrank full pool in a small jar?
Heat control, wall behavior, and flame cleanliness.
Why can a small jar soot even with full melt?
Because fast melt does not cancel an overdriven flame.
Where should the next comparison go?
To jar geometry and wall heat and, when repair logic is needed, soot and mushrooming fixes.
Method note: This section owns the small-jar false-positive distinction. It does not absorb full overheating rescue or compliance detail.
That false-positive problem leads to the final wide-jar strategy question: whether split heat beats one oversized center flame.
Two Smaller Wicks vs One Larger Wick in Wide Jars
In a wide jar, two smaller wicks can outperform one larger wick because the real problem is heat distribution, not raw flame strength.
In candle containers and jars, split heat is a distribution strategy. One large center wick can drive the middle harder before it solves the outer reach problem, while two smaller flames can spread the melt path with less central aggression. More flame is not the point; better placement of heat is the point.
Wide-jar strategy comparison
| Strategy | Strength | Weakness |
|---|---|---|
| One larger center wick | Simple setup | Center can overheat before coverage becomes even |
| Two smaller wicks | Better spread across wide geometry | Still depends on correct spacing |
| Bigger single flame | Strong central force | Can fail on balance even if output rises |
| Split heat | Better distribution potential | Can fail if spacing and placement are wrong |
Wide-jar strategy clarifications
Why can two smaller wicks outperform one larger wick?
Because wide-jar balance depends on where heat is placed.
When should a maker stop upsizing one centered wick?
When the middle gets harsher before the outer coverage problem improves.
Are two wicks automatically harsher?
No. Harshness depends on distribution, spacing, and the rest of the setup.
What comes after the strategy choice?
When a candle jar needs two wicks and two-wick spacing in wide jars, because threshold logic and placement detail are the next child decisions.
Method note: Read this as a same-jar strategy comparison. This page owns the strategic choice; pairing charts and templates stay off-page.