
Use soy wax successfully by choosing one container wax, one jar, a soy-friendly wick series, a safe fragrance load, and supplier-backed add and pour temperatures, then validating the setup with a full cure and burn test.
This page is for makers pouring soy container candles, not pillars, label compliance, or storage policy. Follow the workflow in order: wax grade, container prep, wick, fragrance load, add temperature, pour temperature, cure, then burn test. When a batch fails, change one variable at a time and log the result. Anything beyond that baseline belongs on a dedicated follow-on page.
Quick-start soy wax settings for a first test batch
For a first soy container candle, start with one container wax, one jar, one wick series, 6–8% fragrance, supplier-recommended add temperature, supplier-recommended pour temperature, and a full 7–14 day cure.
Use that setup as your starter benchmark before you tune for stronger throw or smoother tops. For the macro view, read the full candle wax types guide. For the full beginner workflow, use the step-by-step soy candle guide.
| Variable | Safe starting move | Why this is the best first test |
| Wax | Use one soy container wax only | Mixed wax systems hide the real cause of failures |
| Jar | Use one straight-sided jar size | Consistent diameter makes wick testing easier |
| Wick | Test 2–4 wick sizes in one soy-friendly series | One chart is only a starting point |
| Fragrance load | Start at 6–8% by wax weight | Enough scent for testing without overloading the wax |
| Fragrance add temp | Use the wax supplier’s add range | Supplier guidance is more reliable than generic forum numbers |
| Pour temp | Use the wax supplier’s pour range | Soy performance changes by wax blend and jar |
| Cure | Wait at least 7 days; retest at 10–14 days | Hot throw often improves after the first week |
| Burn test | Record melt pool, flame height, jar heat, and scent | Notes turn guesses into repeatable adjustments |
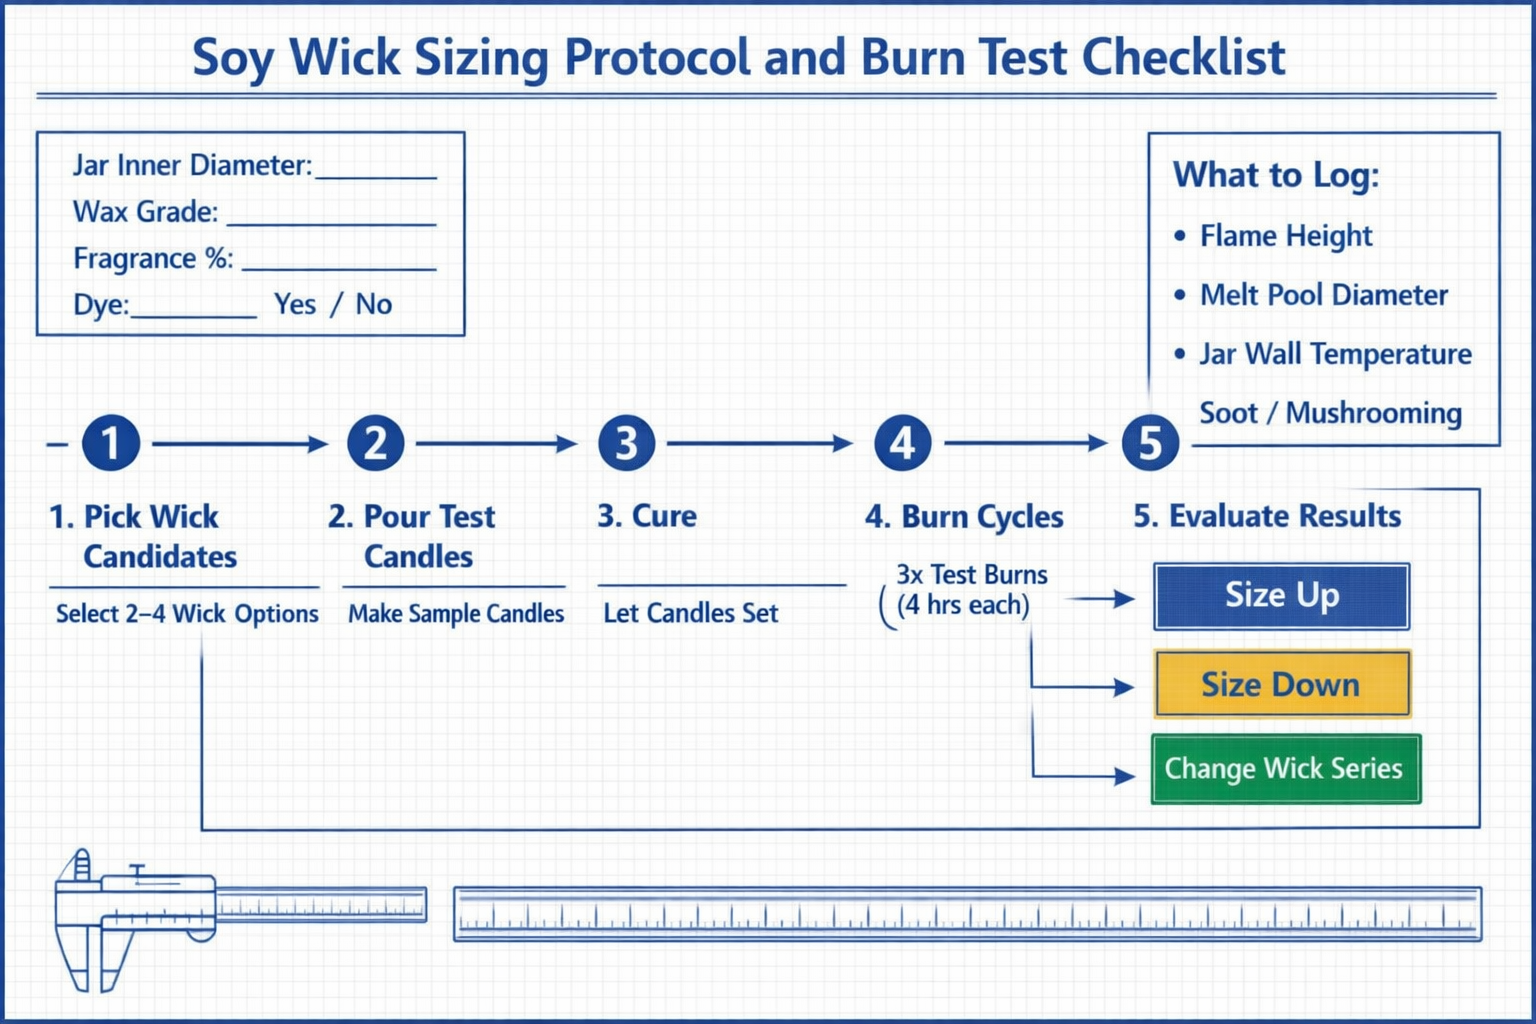
Use this order for your first batch:
- Measure your jar’s inner diameter.
- Pick one soy wax and two to four wick candidates.
- Calculate fragrance in grams from wax weight and percentage.
- Add fragrance and pour within the tested range for that wax.
- Cure the candle fully before judging throw.
- Change one variable per round and log the result.
Methods note: The temperatures and fragrance percentages on this page are starting ranges, not universal limits. Use the wax manufacturer’s datasheet and the fragrance supplier’s paperwork first, then validate with at least three matched test candles for the same jar, wick series, and room conditions.
Choose the right soy wax grade for your jar and room conditions
For most soy container candles, 464 works as the easier default, while 444 works better when you need a slightly firmer wax for hotter rooms or warm-weather shipping.
Choose 464 when you want easier adhesion and a softer, more forgiving setup. Choose 444 when you need a bit more heat resistance and a wax that holds up better when room temperature or shipping conditions run warm.

Supplier datasheets usually describe 464 as lower-melt and softer than 444, which is why 464 often feels creamier and more forgiving while 444 usually handles warm conditions better. In side-by-side comparison, you can treat the grades like this in practice:
464: lower melt point, strong adhesion with good glass prep, slightly more frosting risk in cold rooms, softer feel.
444: higher melt point, better jar stability in hot climates, a bit more shrink and pull-away risk if jars are cold, slightly crisper tops.
Once you choose the right wick type, the wax grade becomes the second lever that decides how wide your melt pool gets for a given jar and how much headspace you must leave. With 464, you often can stay on the conservative side of the wick chart and still get full melt pools because the wax softens quickly. With 444, you may need to nudge the wick up one size in wider jars so the flame can keep up with the slightly higher melt point, especially when fragrance load and dye push the wax toward the heavy side.
If you already pour 464 and battle frosting, wet rings, or random adhesion rings, treat 444 as a targeted tweak rather than a magic solution and focus on temperature control first. Pour both grades into the same jar style at matched temperatures, then cool them in different rooms so you can see how each responds to drafts and temperature swings. Log melt point, pour temperature, room temperature, and cure time for each batch so you can turn “464 vs 444” from forum theory into a repeatable choice for your own workspace.
To test the grades methodically, pour at least three pairs of jars: one pair cooled on the counter, one in a box or insulated space, and one in a slightly warmer room. Keep wicks, fragrance load, and dye identical, and record frosting, glass adhesion, and hot throw after a consistent cure period. When you can compare labeled 464 and 444 jars with notes on each, the choice for your climate stops being guesswork and becomes a documented house rule.
Prepare and warm containers before pouring soy wax
Clean, dry, and pre-warm containers (about 35–45 °C) before pouring soy so the wax doesn’t shrink away from cold glass, which is a common cause of wet spots and poor adhesion.
Methods note: Treat 35–45 °C as a gentle starting range, not a universal target. Thin or decorative jars can need less heat, so stop if the glass feels hot or shows any sign of stress.
Work through the baseline soy workflow above so your jar prep matches your wax grade and pour temperature. Cold glass acts like a heat sink, forcing the outer ring of wax to set too fast while the center keeps cooling and contracting. That “edge shock” is why a candle can look perfect at pour, then develop wet spots days later. Before you spend time rewicking, choose the best candle container because thick walls, curved shoulders, and tinted glass all change cooling behavior. If you want a repeatable routine you can hand to someone else, follow prepare candle containers before pouring wax so you don’t skip the boring steps that prevent most defects.
Use this fast, repeatable jar-prep routine before you pour.
- Inspect and sort. Reject jars with chips, hairline cracks, or oily residue; those become failure points once heated.
- Wash and fully dry. Warm water + mild soap works for most new jars; let them air-dry upside down until there’s zero moisture (water = adhesion problems).
- Final wipe (lint control). Wipe the inside with isopropyl alcohol on a lint-free cloth, then let it flash off completely.
- Photo check (takes 10 seconds). Take a quick phone photo into the jar under side light; lint, smudges, and water spots jump out in a photo even when your eyes miss them.
- Pre-warm evenly. Aim for a gentle, even warmth—warm box, low oven with the door cracked, or a quick heat-gun pass—so the glass isn’t “cold-soaking” your pour.
- Wick and secure. Center the wick, press firmly, and let adhesives set before you pour; a drifting wick can mimic “bad wax” when it’s really airflow and heat imbalance.
Too much pre-warming can damage the container.
If the jar feels hot to the touch or you see stress lines or rapid temperature change, back off—thin glass and some decorative containers don’t like aggressive warming, and avoiding thermal shock matters more than hitting an exact number.
Pre-warming can help frosting indirectly.
It can help indirectly by smoothing the cooling curve at the edges, but frosting is mostly a crystal-structure issue—jar warmth is only one part of the cooling environment.
Choose and size a wick for soy candles that burns cleanly
For soy jar candles, start with the jar’s inside diameter, pick a conservative wick series designed for soy, and confirm the choice with at least one full burn test per jar size instead of trusting a single chart.
Use the jar width, wax grade, fragrance load, and any dye as your starting inputs. Aim for a wick that gives you a full melt pool in about three to four hours without persistent smoke, heavy mushrooming, or a jar that runs too hot during testing.
Measure the inner diameter of each jar with a ruler or calipers, then note the wax grade, fragrance percentage, and presence of dye on your test sheet. Those four inputs give you a starting row on any wick chart and make it easier to revisit decisions when you change wax or fragrance strength later.
Next, build a short list of candidate wicks from at least one or two families and use a candle wick types and sizing guide rather than betting everything on a single series. For a straight-sided soy jar around 7–8 cm wide, you might test two sizes from a flat braid series and two from a more rigid cored or specialty series. Plan your wick sample orders so you get small bundles across sizes, not just refills of one favorite, because soy formulas, jars, and fragrance oils change over time. A simple log that notes jar, wax, wick series, size, and results will quickly become more valuable than any generic chart.
When you want to tune burn behavior or handle tricky fragrance loads, compare CD vs ECO candle wicks rather than swapping randomly. CD wicks often give a strong, centered flame that helps with stubborn soy blends but can mushroom or soot if oversized. ECO wicks can burn a bit cooler and may suit softer formulas or jars that tend to overheat, at the cost of needing careful sizing to avoid tunneling. Try at least two sizes from each series in the same jar and wax, trimming wicks to the same length before every burn so your notes reflect the wick, not random trimming.
Run each test candle in three- to four-hour sessions, recording flame height, melt pool width, jar temperature, and any mushrooming or soot on a simple chart. A kitchen scale, timer, and an inexpensive infrared thermometer are practical tools that make your tests more accurate and help justify investing in wick sample kits. After one or two rounds, you will have a reliable “house wick map” for your soy jars that you can reuse whenever you introduce a new fragrance, dye, or seasonal wax tweak.
Calculate safe fragrance load for soy wax (grams and %)
To size fragrance safely for soy candles, choose a target percentage below both your wax manufacturer’s limit and the fragrance oil’s IFRA allowance, then multiply total wax grams by that percentage.
That gives you fragrance grams from wax weight, not volume. For deeper scenting guidance, see candle fragrance scenting. For faster batch math, use the fragrance load calculator.
Methods note: The percentages on this page are working test ranges for soy container candles, not universal or legal maxima. Stay below the lower of your wax supplier’s fragrance limit and the oil’s IFRA allowance, then confirm performance with matched burn tests.
The easiest way to calculate fragrance load by weight is to think in percentages: fragrance grams = wax grams × (fragrance % ÷ 100). If you melt 500 g of soy wax and want 8% fragrance, you multiply 500 × 0.08 for 40 g of oil. Always work in grams, not milliliters, because different fragrance oils have different densities and “a teaspoon” is too imprecise for repeatable batches. Most serious makers keep a small digital scale on the bench for this reason.
For beginners, a safe fragrance percentage for soy candles usually falls somewhere around 6–8% by weight, with some waxes and oils going higher when the manufacturer explicitly allows it. Check your soy wax datasheet: many popular container blends list a maximum fragrance load (often 10–12%) but also hint that performance may be better at slightly lower levels. Fragrance houses also give recommended usage ranges for candles, often under IFRA Category 12, which is where their own tests show good scent and safe combustion behavior.
Before you dial in a “house formula,” always check IFRA maximum levels first for each fragrance oil you plan to use. Download or request the IFRA certificate for that specific oil, find the candle/air freshener category, and note the maximum percentage. Even if it says you can use up to, say, 20% in theory, your wax and wick system may not tolerate that much without sweating, poor burn, or soot. Treat the IFRA number as an upper bound, and your wax manufacturer’s recommendation plus your own tests as the practical working range.
A simple step pattern keeps you out of trouble and makes your recipes repeatable:
- Decide the final wax weight you want in each jar (for example, 200 g).
- Choose a test percentage within the wax’s recommended range (say, 7%).
- Multiply wax grams by percentage: 200 × 0.07 = 14 g fragrance per candle.
- Pour at least three test candles at that level, then repeat a set at +1% and −1% if needed.
As you test different oils, you’ll notice that some perform better at the low end of your range and others only “wake up” closer to the maximum. Keep a logbook where every batch includes wax type, fragrance name, IFRA maximum, chosen percentage, and your burn-test notes so you can refine each scent without starting from zero every time.
Set fragrance add-in temperature for soy wax correctly
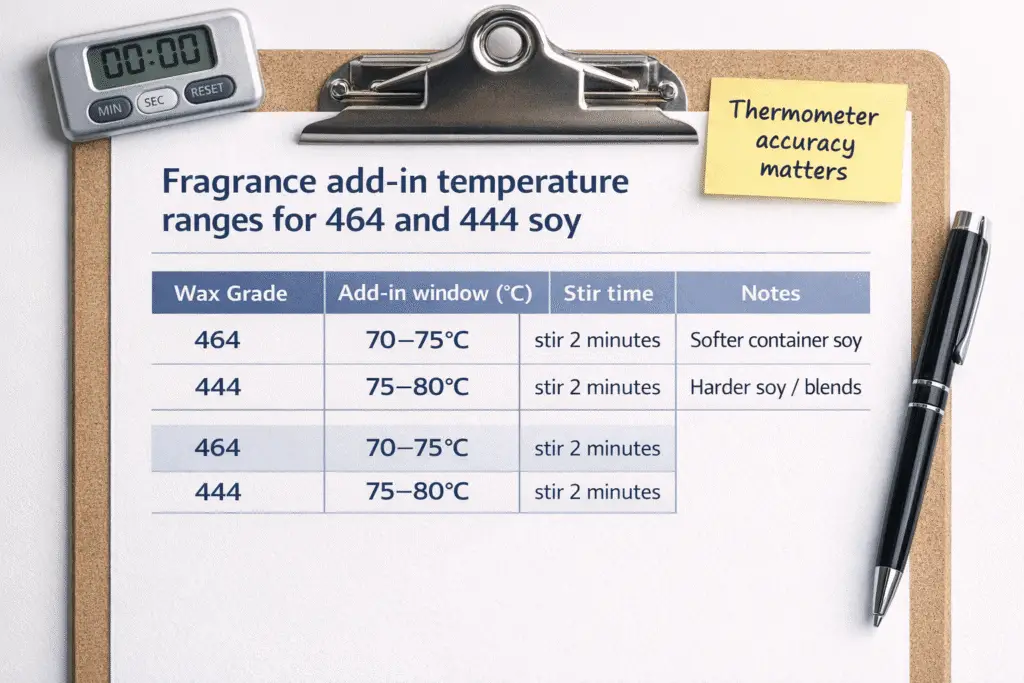
For most soy container waxes, fragrance mixes in best inside a warm working window that usually lands around 70–80°C, adjusted to the wax grade and the oil itself.
Use your wax supplier’s add range as the default, then test inside that window with the same jar, fragrance, and stir time. For the detailed breakdown, see when to add fragrance by wax temperature window.
Methods note: The 70–80°C band is a starting range used in supplier guidance for many soy container waxes, not a universal number. Use your wax datasheet first, then validate the final add temperature with matched pours in your own room conditions.
Think of fragrance add temperature as a balancing act between binding and burn quality. If you add oil when the wax is just barely melted, it may not fully incorporate and can separate or sweat later. If you wait until the wax is extremely hot, you risk driving off some of the lighter notes and creating harsher burns. Wax suppliers usually give a recommended add range on the datasheet; treat that as your default and then fine-tune with tests. For lower-melt soy blends (like softer, 464-style waxes), aim toward the lower half of the range; for harder blends (444-style or mixed with higher-melt components), you can blend nearer the upper half.
Many makers misunderstand flash point, so it helps to have fragrance binding vs flashpoint explained clearly. The flash point on your fragrance safety sheet is the temperature at which the undiluted liquid could ignite in the presence of a flame or spark under lab conditions; it is not the temperature at which fragrance “burns off” inside melted wax. Your real goal is to work warm enough that the fragrance can dissolve thoroughly into the soy without shocking the wax or scorching the oil. That is why supplier charts and experienced makers focus on an add range rather than a single “magic” number.
In practice, you adjust fragrance add temperature by wax grade and oil behavior:
- For softer soy container waxes, many makers add fragrance around 70–75°C, stir for two minutes, then cool to pour temperature.
- For slightly harder soy or soy-blend waxes, 75–80°C can help stubborn oils dissolve more evenly.
- For delicate fragrance oils that discolor or smell “cooked,” test a slightly lower add temperature within the recommended range and extend your stir time.
Use a reliable thermometer, not guesses, and keep your process consistent: heat wax just above its melt point, let it fall into your chosen add range, add fragrance slowly while stirring, then continue to stir for at least two full minutes. Record the exact add temperature in your notes for every batch. Over a few rounds of testing, you’ll see patterns: some oils behave better when added a few degrees cooler, others need a little extra heat to stop tiny beads or haziness from forming. Once you know each wax grade’s comfort zone, you can plug new fragrances into a proven workflow instead of reinventing your process every time.
Pick the best pour temperature for smooth soy candle tops
Pour soy container wax inside the supplier’s tested range, then fine-tune in your own room until the candle sets with a smooth top and steady glass adhesion.
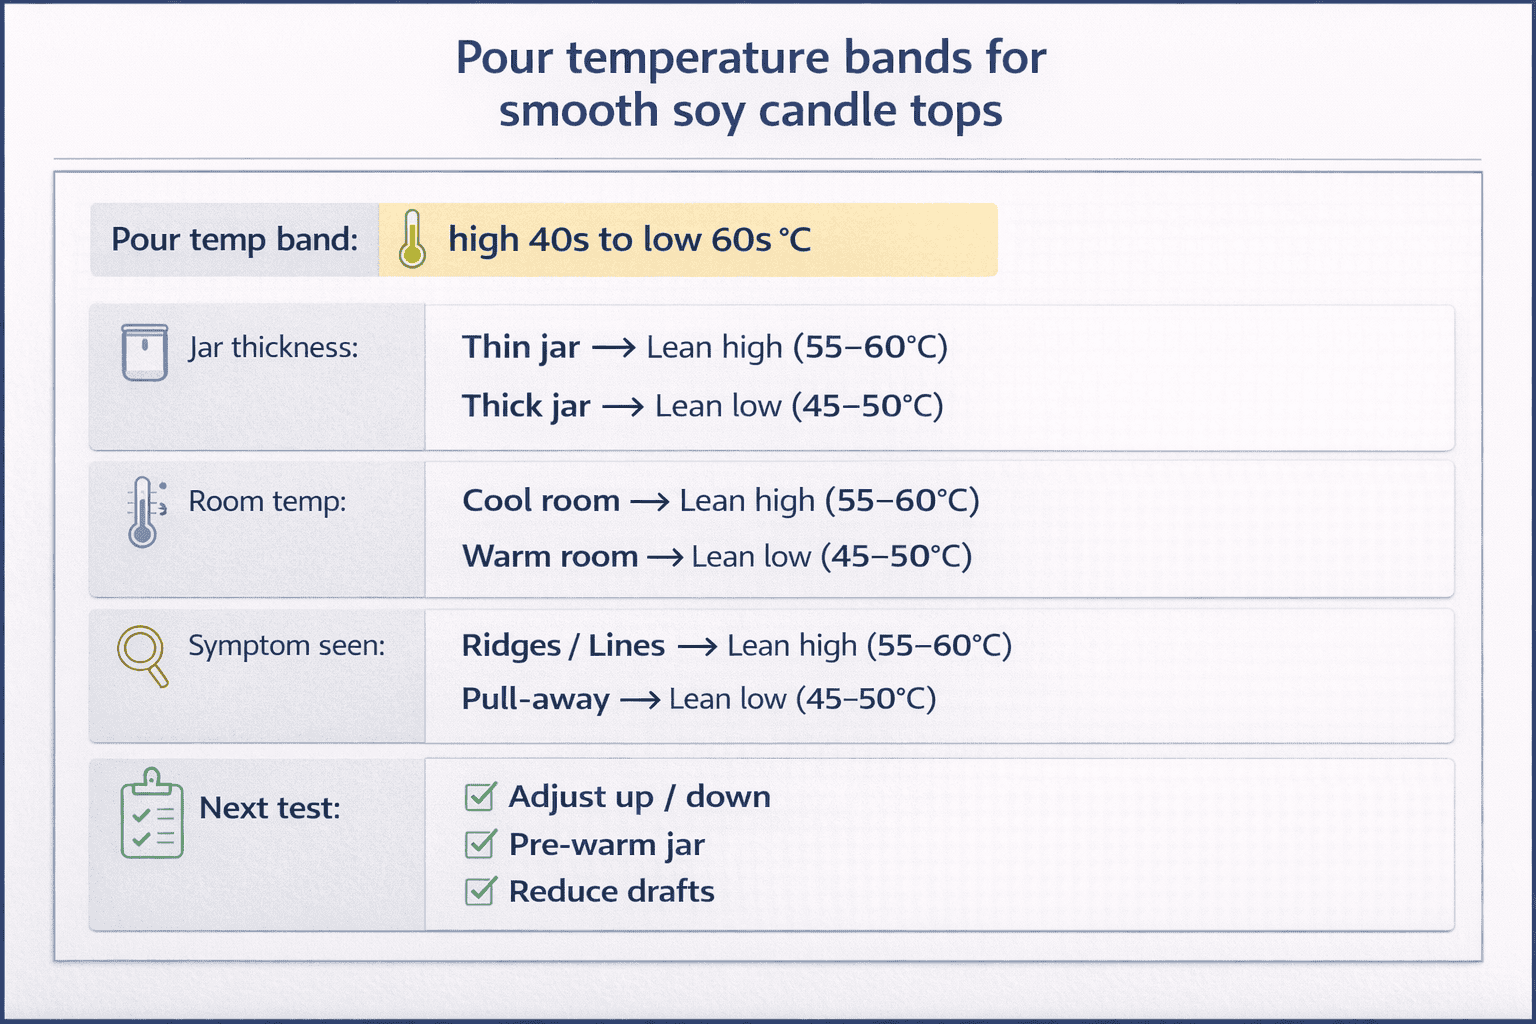
For many container soy waxes, the workable band falls somewhere from the high 40s to the low 60s °C. For the deeper workflow, use the guide to ideal candle pour temperature.
Methods note: The temperature band here is a test range for common soy container waxes, not a fixed rule for every blend or jar. Start with the supplier range, then compare matched pours in the same room before you change anything else.
If you pour too hot, wax can shrink more and pull from the glass; too cool and you may trap air or create heavy lines and ridges. The goal is a temperature where the wax is fluid enough to level as it cools, but not so hot that it shocks against the jar or cools unevenly.
For many container soy waxes, that sweet spot falls somewhere between the high 40s and low 60s °C, but your exact number depends on jar thickness, room temperature, and cooling method. Thin, straight-sided jars in a mild room often tolerate slightly cooler pours, while thick glass or cold winter benches may need a warmer pour to avoid jump lines. To fix rough tops and sinkholes, avoid chasing a single “magic” number and instead watch how the surface looks on the first pour and after a full cool. You can usually rescue minor imperfections with a gentle heat gun pass, but the long-term fix is adjusting pour temperature and cooling conditions rather than endlessly re-melting.
Instead of guessing, deliberately test multiple pour temperatures for every new wax and jar combo. Melt and fragrance your wax as usual, then wait until it cools to the warmest temperature in your test band and pour your first jar. Let the wax cool another 3–5°C, pour a second jar, and repeat once more for a cooler third jar. Label each candle with pour temperature, then compare tops, adhesion, and surface texture after full cooling and again after a day. The best-looking candle in your actual workspace becomes your default pour temperature for that wax and jar.
Pay attention to practical details that affect pour behavior as much as the thermometer: keep jars dust-free and at room temperature, avoid fans or open windows, and pour in a steady stream down the side of the jar rather than splashing air into the center. If you use silicone or metal molds for specialty pieces alongside jars, run a separate pour-temperature test for those, because molds typically like warmer pours than glass containers. Over time, you’ll build a small notebook of pour-temperature “house rules” that let you set up any new scent or jar quickly instead of starting from scratch.
Maintain soy candle cure time and conditions for strong hot throw
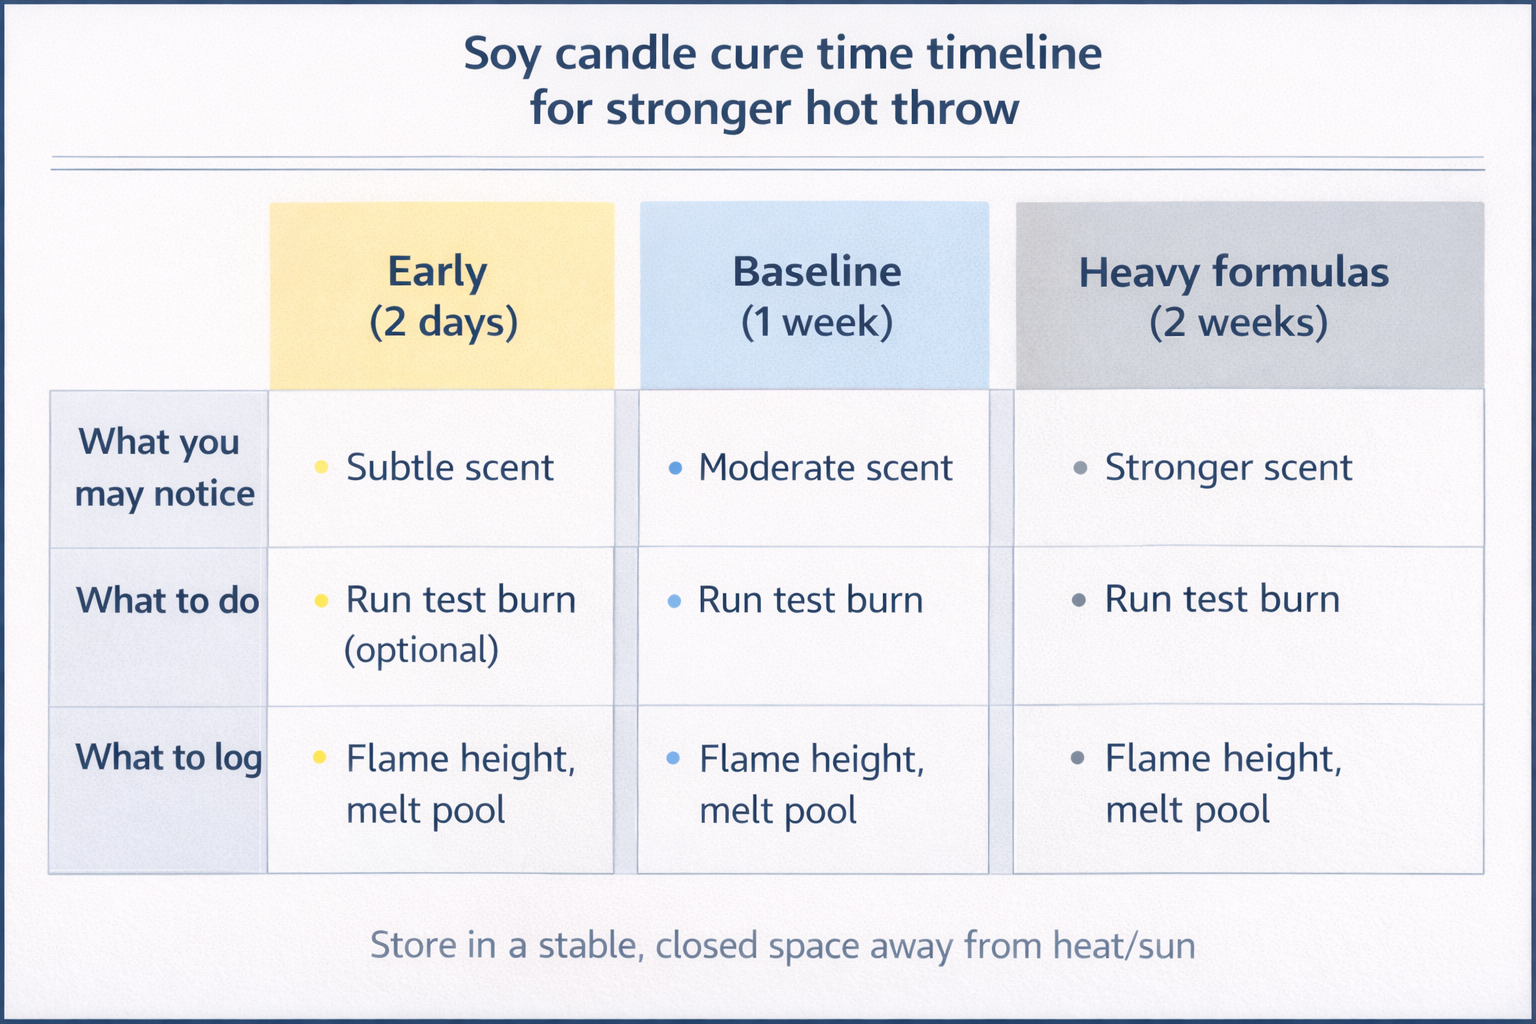
Most soy container candles need at least one week of cure time, and many perform better after 10–14 days when hot throw is the main concern.
Cure time gives the wax and fragrance time to settle before you judge scent strength or burn behavior. For wax-specific benchmarks, see how long soy candles should cure before burning.
Methods note: The one- to two-week cure guidance on this page is a working benchmark for soy container candles, not a universal guarantee. Keep the wax, fragrance, jar, and storage conditions matched before you compare early and later burns.
Many makers notice a big difference between a candle burned after two days versus one burned after ten, even when the formula is identical. Rushing this step is one of the most common reasons “perfect on paper” soy recipes smell weak or inconsistent in real life.
As a starting rule, aim for at least a week of cure for simple soy container blends, and two weeks for heavier formulas, complex fragrances, or high fragrance percentages. Right after pour, let candles cool completely at room temperature without lids; once fully set, trim wicks if necessary and then store finished candles in a stable environment. That usually means a closed cupboard, box, or curing shelf away from sunlight, radiators, and big temperature swings. Consistent, moderate temperature helps fragrance molecules settle into the wax instead of condensing on container walls or escaping from open jars.
Good curing conditions are dark, dry, and boring. Avoid stacking candles while they are still slightly warm, and don’t move them from a very cool basement to a hot upstairs room day after day. Sudden changes in temperature can encourage frosting, cause minor surface sweating, or subtly flatten delicate top notes. To avoid mix-ups, label each candle or tray with pour date, wax type, fragrance, and target burn-test date so you don’t “accidentally” burn your only good test candle too soon. Small adhesive labels or painter’s tape on the bottom of jars work well and don’t add much cost.
Because real life gets busy, it helps to track cure time in your candle journal rather than relying on memory. Divide a notebook or spreadsheet into columns for batch code, wax, fragrance, pour date, cure plan (for example, 7, 10, or 14 days), and actual first burn date plus results. Over several batches, you’ll see patterns, such as certain fragrances blooming dramatically after day ten, or some waxes delivering acceptable throw at day five but noticeably better at day twelve. Use those patterns to refine your standard cure times and to decide when a rush order is realistic and when you should say no.
With a clear curing routine, your burn tests become more trustworthy, because you’re comparing candles in the same stage of “maturity” instead of a random mix of fresh and fully cured jars. That, in turn, makes it easier to judge whether weak hot throw is really a formula problem, a wick mismatch, or simply a candle that needed a few more days on the shelf before lighting.
Run a simple burn test protocol for soy candles
A simple soy candle burn test uses matched candles, timed sessions, and written notes to show whether your wick, fragrance load, and jar work together safely.
Make at least three identical test candles and run them in the same room so each comparison points to one clear adjustment. For the full workflow, see how to run a full candle test series.
Methods note: The three matched candles and three- to four-hour sessions on this page are working comparison conditions, not legal certification tests. Keep the room, jar, wick trim, fragrance percentage, and burn timing matched so one variable changes at a time.
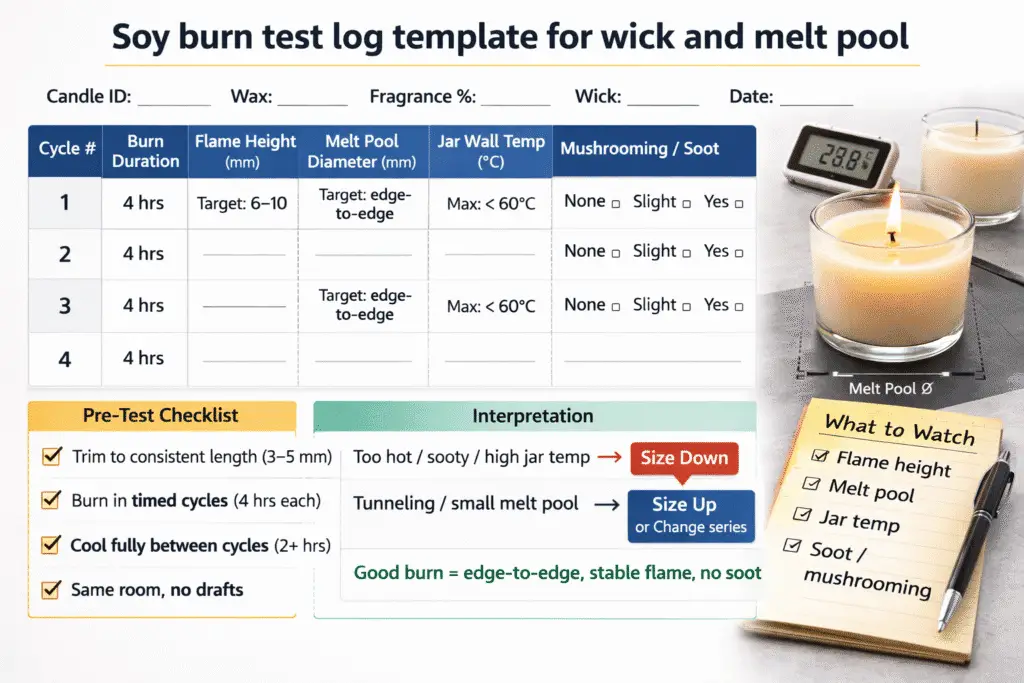
Label the bottom of each jar with a batch code, wick type and size, fragrance percentage, and pour date. Then plan burn cycles of three to four hours across several days so your test resembles real use.
Before lighting, trim wicks to a consistent length and place candles on a heat-safe, level surface away from drafts. As each session runs, record candle burn test data in a notebook or spreadsheet. For every hour, note flame height, melt pool diameter, jar wall temperature (if you have an infrared thermometer), and any mushrooming, soot, or smoke. Watch how long it takes for the melt pool to reach the jar edges and whether the wick leans, drowns, or flares. Between sessions, let candles cool completely before relighting so you mimic real-world use.
After a few sessions, you can start to interpret burn test results for safety and performance. A wick that creates a very deep, aggressive melt pool and excessively hot jar walls is too strong and should be sized down or swapped for a cooler-burning series. A wick that never reaches a full melt pool or tunnels badly is too weak or incompatible with the jar and wax combination. Moderate mushrooming can be acceptable if soot and smoke are minimal, but heavy mushrooming with black smoke is a clear warning sign. Hot throw also matters: if scent is weak despite good burn behavior, you may need to adjust fragrance percentage within safe limits, or choose a more suitable oil.
Document your conclusions alongside the raw data so future you can understand past decisions. For example, write short verdicts like “Wick A: slightly hot, reduce one size” or “Wick B: good melt pool by hour three, acceptable jar temp, keep for production.” Repeat the process whenever you introduce a new jar, wick series, or wax grade. Burn testing does take time and materials, but it turns candle making from a string of lucky (or unlucky) accidents into a controlled craft where you can deliberately create reliable, safe, and great-smelling soy candles.
Fast troubleshooting matrix for soy candles
When a soy candle looks wrong, test the variable most likely to change the result before you rebuild the whole recipe.
Use the matrix as your first controlled retest, then move deeper only when one change does not solve the problem. For the full decision tree, use the candle troubleshooting matrix.
| Symptom | Most likely cause | First variable to test | What to do next |
| Weak hot throw | Under-wicked candle, short cure, or poor fragrance fit | Cure longer, then test one wick size up | Re-test fragrance one step lower and one step higher within the safe range |
| Wet spots / pull-away | Cold jars or uneven cooling | Warm jars gently and slow the cooling environment | Adjust pour temperature by 3–5°C in the next round |
| Frosting | Fast cooling or normal soy crystallization | Box-cure and reduce drafts | Test a slightly different pour temperature |
| Rough top / sinkhole | Uneven cooling around the wick | Heat-gun reflow or a thin repour | Adjust pour temperature slightly and retest |
| Tunneling | Wick too small for the jar and wax system | Test the next wick size up | Re-check fragrance load and jar diameter |
| Smoking / very hot jar | Wick too large or fragrance too heavy | Test one wick size down | Lower fragrance load and repeat the burn test |
Use the matrix first, then go to the full soy wax troubleshooting guide if the issue remains after one controlled retest. This page should tell you which variable to test next; the dedicated troubleshooting page should handle deeper repair paths for frosting, wet spots, rough tops, and cooling defects.
When pure soy stops working for your goal
When pure soy still misses your goal after controlled wick, temperature, and cure testing, move blending to a separate formulation project.
Start by locking a reliable pure-soy baseline on this page, then move to a dedicated blend workflow on How to Blend Different Candle Waxes Effectively. That keeps this page focused on using soy wax well before you introduce a second wax variable or drift into label, storage, or advanced formulation decisions.