Double wicking uses two smaller wicks in one container so wide jars burn evenly, but it demands careful spacing, lower-heat sizing, and thorough burn testing to avoid overheated glass and sooting.
In this guide, double wicking means designing a container candle with two smaller candle-grade wicks. It does not mean duplicating the single-wick size, adding a second wick to a finished candle, or solving every tunneling problem with more flame.
On this page, a safe double-wick setup means stable flames, controlled container heat, minimal soot, no glass stress, and repeatable results across burn tests. It does not mean legal compliance, product certification, toxicology approval, or a formal fire-code pass. A conservative candidate means a lower-heat starting choice that still has to pass testing; the right setup is not a universal wick answer.
A wide jar can look finished on top while hiding thick walls of unmelted wax. Two wicks can spread heat across the surface, but they also raise the stakes for glass temperature, soot, and burn rate. The right setup comes from matching your container’s inside diameter and shape with a wick series that behaves well in your wax and fragrance load. Once you can repeat the same placement and trimming every time, burn testing becomes a way to confirm safety rather than guesswork.
When You Actually Need to Double Wick a Candle
You should double wick a candle only when the container is wide enough that a single safe wick cannot create an even, full melt pool.
In practice, double wicking shows up when your jar is wide enough that one correctly-sized wick still leaves thick walls (tunneling) or uneven melt coverage—often around the 3.5–4 inch (9–10 cm) inside-diameter range, depending on wax and fragrance. Many supplier education hubs frame it the same way: prioritize an even melt pool without pushing the jar into an overheated, smoky burn.
If you’re deciding purely on “more flame = better,” pause—two flames also multiply heat, fuel use, and the chance of sooting or an overly hot container. Double wicking is a tool for coverage in wide or awkward containers, not a shortcut to “stronger” candles.
If you want the baseline rules first, start with Candle Wick Sizing & Selection Guide.
Quick “single vs double vs multi” decision table (starting point only)

| Container inside width & shape | Usual starting decision | Why it tends to work that way |
| ≤3.0″ (≤7.5 cm), round | Single wick | Two flames often overheat small vessels before improving coverage. |
| 3.0–3.25″ (7.5–8.3 cm), round | Single wick (test a stronger single first) | Borderline jars often respond to a better wick match or a small formula tweak. |
| 3.25–3.75″ (8.3–9.5 cm), round | Borderline: strong single or cautious double | This is the grey zone where wax, fragrance load, and jar thickness decide. |
| 3.75–4.5″ (9.5–11.5 cm), round | Often double wick | Two smaller flames can cover the surface more evenly than one large flame. |
| >4.5″ (>11.5 cm) or bowls/ovals/rectangles | Often multi-wick (or choose a different vessel) | Wide spans and corners need more coverage, but heat risk climbs quickly. |
One big wick vs two smaller wicks (the tradeoff)
- One large wick can create a deep hot spot: fast melt pool growth in the center, higher soot risk, and hotter glass near the flame.
- Two smaller wicks can improve surface coverage, but only if spacing and total heat stay in a safe range.
A simple decision flow you can actually repeat
- Measure inside diameter (and note whether the shape is round, oval, or rectangular).
- Decide “single / double / multi” using the table above as a conservative starting point.
- If it’s borderline, test a strong single-wick option before committing to two flames.
- Only after that decision, pick wick sizes and plan a burn-test log.
A quick rule of thumb for wide jars is to divide the inside diameter by the number of wicks to estimate the melt-pool “share” per wick (a 4″ jar with two wicks is roughly 2″ per wick). If you’re still stuck diagnosing performance, Single-Wick Candle Troubleshooting can help you rule out easier fixes before adding a second flame. And if your container choice is the real problem—thin glass, sharp shoulders, or an odd footprint—the Container Jar Buying Guide can save you from fighting a vessel that’s simply hard to wick safely.
How to Choose Wick Size & Type for Double-Wicked Candles
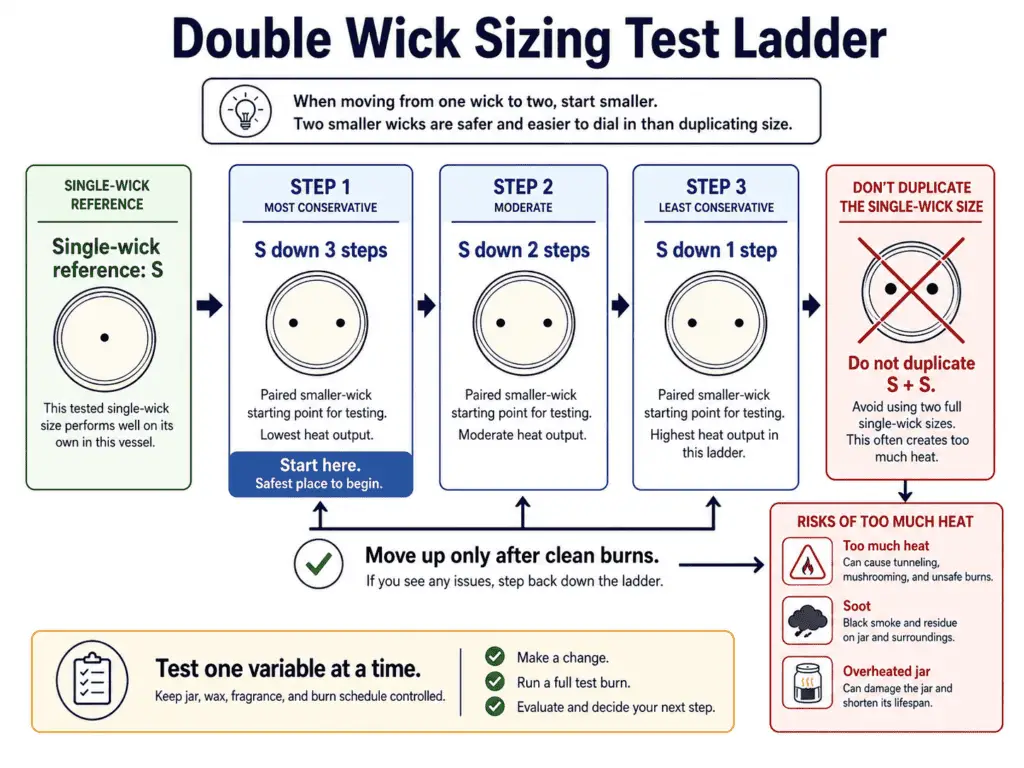
To choose a wick size for a double-wick candle, start from the single-wick recommendation and switch to two slightly smaller wicks from the same series.
Do not use two of the same wick size you would choose for a single-wick version of that jar. In double wicking, two full single-wick sizes usually create too much combined heat before they create a better candle.
The lower-risk mental model is “share the heat,” not “double the wick.” If a supplier chart (or your past tests) points to one wick for that jar and wax, a double-wick plan usually means two smaller wicks that add up to similar coverage—without turning the jar into an overheated candle. A clean decision rule is: start conservative, then only move up if the melt pool cannot reach the walls within a 3–4 hour test burn and the jar stays within your heat limit with no soot.
For the bigger picture of series behavior and why charts differ, revisit Candle Wick Sizing & Selection Guide.
Why You Should Not Duplicate the Single-Wick Size
Duplicating the single-wick size usually doubles the heat source instead of solving the coverage problem. A double-wick test should begin with a smaller pair, then move one variable at a time only if the melt pool, flame, soot, and container heat stay controlled.
Mini starting-point table (structured as a test ladder, not a promise)
| What you know | Build a conservative double-wick test ladder | Why this avoids wasted batches |
| Your tested single-wick pick for this jar/wax (call it “S”) | Test 3 pairs: (S down ~2 steps, S down ~2 steps), then (down ~3, down ~3), then (down ~1, down ~1) if needed | You learn the heat boundary without jumping straight to an overheated setup. |
| You’re choosing a wick family/series | Pick one series you can source reliably, then stay within it for your first ladder | Mixing series adds variables (flame shape, curl, rigidity) that cloud results. |
| You care about smoke/soot control | Prefer a ladder that starts conservative and only moves up after clean burns | With two flames, small increases compound quickly. |
Quick maker Q&A
Q: “Can I use two of the same wick I’d use for a single-wick jar to ‘guarantee’ edge coverage?”
A: That’s the fastest path to an overheated candle. Start smaller, then earn coverage back through testing.
How these starting points were chosen (and why you still test): The “test ladder” approach comes from reading supplier wick charts as coverage ranges rather than exact answers, then validating with controlled burn tests. The conservative steps are meant to reduce excessive-heat risk first, because a double-wicked jar can look “great” early and still run too hot later. Data points typically come from supplier documentation plus repeatable maker testing notes across common jars and wax families.
Wick series matters (it’s not just the number)
Wick “size” is the specific designation inside a wick family, while the family itself influences flame profile and heat delivery. If you’re trying to standardize across multiple jars, a simple comparison like CD vs ECO vs LX helps you think in terms of behavior, not just labels.
How Wax Type & Fragrance Load Change Your Double-Wick Choice
Wax family and fragrance load often require adjusting your double-wick choice because they change how easily the wax feeds the flame and how much heat is needed for full surface coverage.
A practical way to think about it is “softer wax + heavier fragrance can push you toward more heat,” while “harder/leaner systems may tolerate less.” This is why a pair that looks perfect at ~6% fragrance in one wax can soot or burn too fast at ~10% in another—especially with two flames.
Wax × fragrance-load pattern matrix (guideline-level, then verify by testing)
| Wax system | Lower fragrance load (around 6%) | Higher fragrance load (around 10%) |
| Typical container soy | Often burns clean with a conservative pair | May need adjustment after testing (either more heat for melt pool or less to reduce soot) |
| Paraffin or strong blends | Often reaches full melt pool quickly | Can tip into overheated conditions sooner; watch soot and container heat carefully |
| Soft coconut blends | Can be sensitive to excessive heat | High fragrance can destabilize the burn; test smaller steps and monitor closely |
In maker communities, a common pattern is to start slightly more conservative when adding the second wick, then move up only if the melt pool can’t reach the edges without long burn times. If you’re changing wax systems, a Wax Selection Guide helps you predict which direction your next test ladder should move before you spend money on a new round of wicks.
Fast answers to the questions people keep repeating
- Do you just double your single-wick size? Usually no—two smaller wicks are typically safer than one oversized wick.
- Which series is “best” for double-wicked soy? Here, “best” means the wick pair that passes the same test protocol in your exact jar, wax, fragrance load, and wick series—not a universal wick family.
- Why does a double-wicked candle burn too fast? Total heat may be too high, or fragrance/wax is feeding the flame more aggressively than expected.
How to Space & Place Wicks in a Double-Wicked Jar
For a double-wick jar, place two wicks symmetrically so each one sits roughly centered between the jar wall and the midpoint, then adjust only if testing proves you need it.
Good spacing balances three things at once: melt pool coverage at the walls, stable flames, and a jar that stays in a safe temperature range. You’re aiming for two flames that overlap just enough to finish the surface, without creating one oversized “hot zone” in the middle.
If you want the bigger-picture basics first, Candle Wicking 101 gives the vocabulary that makes spacing rules easier to apply.
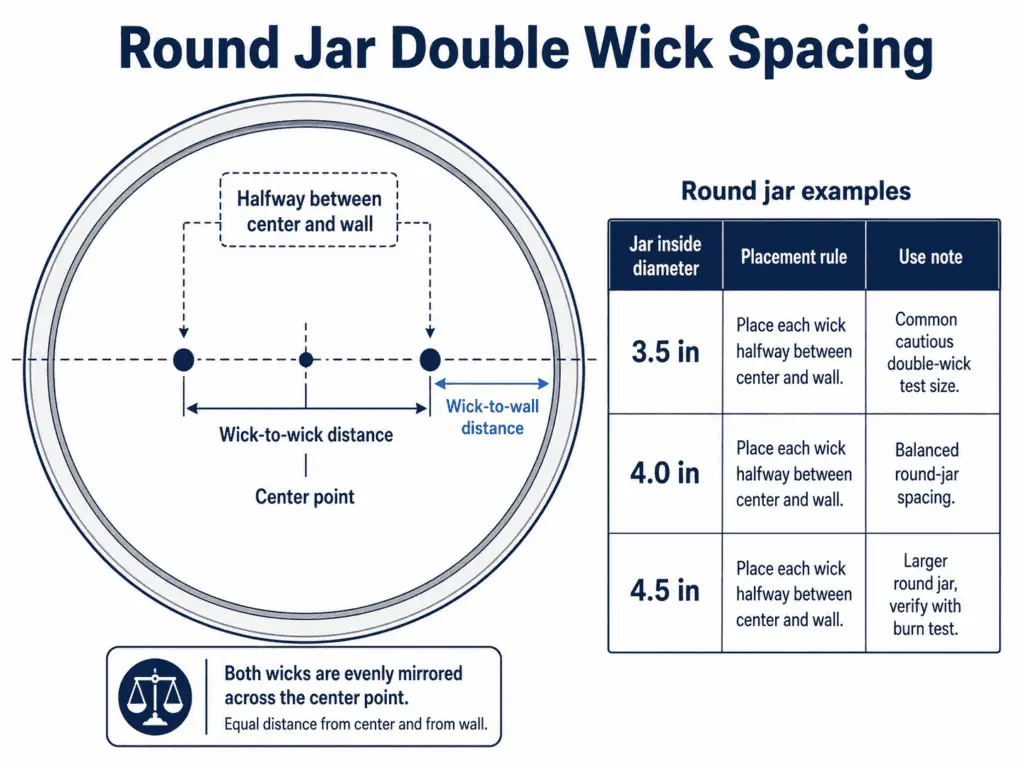
A Repeatable Spacing Template for Round Jars
A repeatable round-jar spacing template starts both wicks on the same line, mirrored across the center, with each wick roughly halfway between the center point and the nearest wall.
Top-down view (round jar)
[wall] •———center———• [wall]
wick wick
Starting geometry (round jars): “halfway between center and wall.”
This is a conservative, easy-to-measure template that matches the spirit of many supplier multi-wick diagrams: each wick sits midway between the center point and the nearest wall.
| Inside diameter | Wick-to-wick (center-to-center) | Each wick to nearest wall |
| 3.5″ | ~1.75″ | ~0.875″ |
| 4.0″ | ~2.0″ | ~1.0″ |
| 4.5″ | ~2.25″ | ~1.125″ |
How these numbers were chosen: the “midway” layout comes from simple jar geometry (radius ÷ 2) and the practical goal of sharing heat across the surface instead of concentrating it. Treat these as starting measurements, then tighten or widen based on what your burn test shows (hang-up vs. overheating), using supplier diagram tutorials as a comparison point.
Too Close vs. Too Far
Wicks that are too close together usually increase center heat and soot risk, while wicks that are too far apart usually leave stubborn wax at the walls.
- Too close together: the melt pools overlap aggressively, flames look taller or more sooty, and the jar can run hotter than expected. A simple red flag is when the flames lean inward and act like one combined flame field.
- Too far apart: you get clean burns in the middle but stubborn hang-up at the walls.
If your main issue is leftover wax at the edges, Correcting Candle Tunneling and Hang-Up is a useful companion, because the fix is sometimes spacing—but sometimes it’s wick size, wax blend, or burn cycle length.
Step-by-Step Placement Method
The placement method should turn wick location into a measured template before you pour, so each test candle repeats the same geometry.
- Measure your container’s inside diameter at the top (and note any taper or shoulders).
- Make a quick paper circle template the same diameter, mark the center, then mark two wick points using the table above as your starting distances.
- Attach both wicks to the jar using the same method every time (stickers or a small dot of adhesive), and double-check that both wick centers match your marks.
- Hold the wicks upright and centered at the rim so they don’t drift during the pour and cool-down.
- Record your final measurements (wick-to-wick and wick-to-wall) in your test notes so you can repeat the exact geometry later.
If you struggle to keep both wicks perfectly symmetric, the Wick Centering Tools Guide can help you stay consistent across batches without “eyeballing” your way into uneven heat.
Common Spacing Fails
Common spacing failures usually come from asymmetry, wick drift, or center overlap that looks acceptable early and becomes hotter later in the burn.
- Makers often report “one side burns hotter” even with the same wick pair; the cause is frequently one wick sitting a little closer to the wall than the other. The fix is not moving the wick mid-burn—it’s correcting the template and re-pouring the next test.
- Another common report is “it looked fine early, then started smoking later.” That pattern often shows up when wicks are too close together and the overlap intensifies as the melt pool deepens.
Testing Protocol for Double-Wicked Candles
To test burn a double-wick candle, run several 3–4 hour burns while recording melt pool size, flame behavior, container heat, soot, and end-of-life stability.
A burn test is a structured series of controlled burns that tells you whether your wick pair and spacing are safe and repeatable, not just pretty for one session. Double-wicked jars need stricter testing because two flames amplify heat, fuel use, and the odds of soot or stressed glass.
Use a Candle Testing Checklist as the place to keep your rules consistent across every product you make.
Standard Test Conditions
Standard test conditions keep the room, wick trim, burn length, and cool-down period consistent so each wick pair can be compared fairly.
- Low-draft room, stable surface, heat-resistant base
- Same wick trim routine every session
- Same burn length each cycle (a consistent 3–4 hours is a common supplier-style testing window for container candles)
- Full cool-down between burns so results aren’t skewed by retained heat
What to Check at 1 Hour, 2 Hours, and 4 Hours
Timed checks show whether the double-wick setup is moving from stable heat into soot, deep melt, uneven flames, or container overheating.
- 1 hour: Are both flames steady and similar, or is one wick flaring/drowning? Any visible smoke or early soot?
- 2 hours: Measure melt pool diameter (and note whether it’s trending toward full coverage or stalling). Record any hang-up thickness at the edge.
- 4 hours (end of cycle): Does the melt pool reach the walls without becoming unusually deep? Is soot appearing on the jar or in the wax? Is the container still within your chosen heat-fail red line?
A practical expectation is that a well-matched double-wick setup trends toward an even surface by the end of a 3–4 hour cycle without escalating soot or heat. If you can’t describe what changed between hour 2 and hour 4, your notes aren’t specific enough to guide the next wick decision.
Quick maker Q&A
Q: “How many burn sessions is ‘enough’ before I trust a double wick?”
A: Enough to see early life, mid life, and late life behavior—because many problems show up later, not on burn #1.
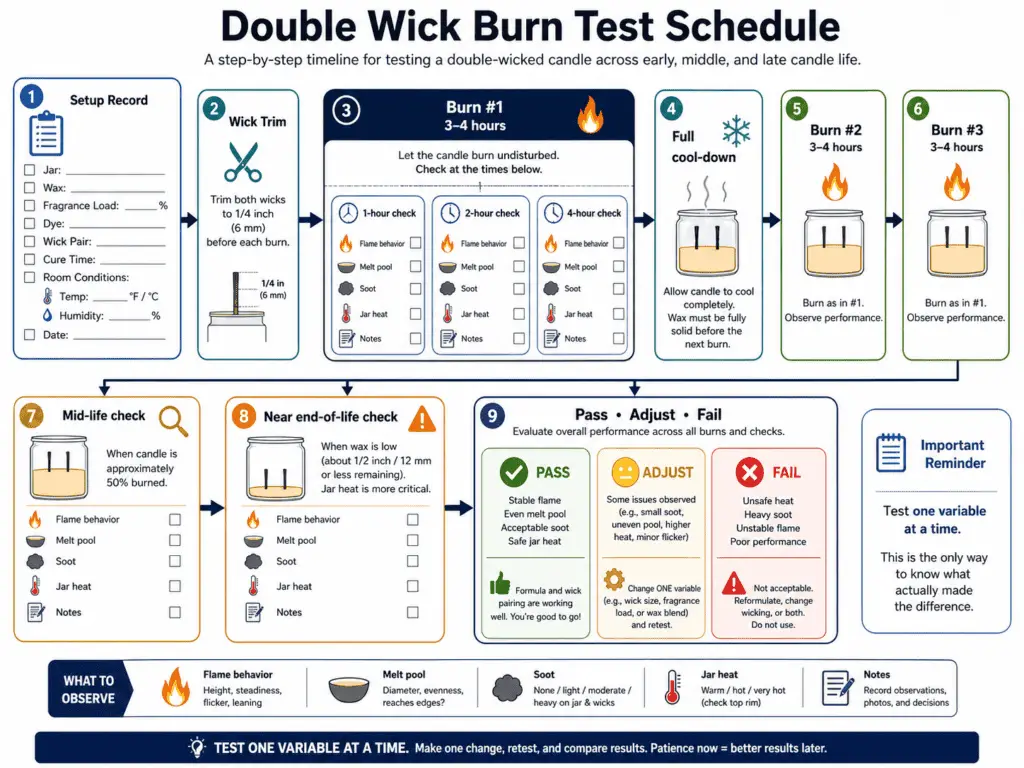
Step-by-Step Burn Test Schedule
A double-wick burn schedule should test early, middle, and late candle life because heat and soot problems can appear after the first clean-looking burn.
- Record setup: jar type, inside diameter, wax type, fragrance load, wick series + size pair, and your measured spacing.
- Prep wicks: trim both wicks to the same length; confirm both are upright and centered.
- Burn #1 (3–4 hours): observe flames, soot, and melt pool spread; note any uneven wall heat or one wick dominating.
- Cool completely: do not “top off” or scrape wax to force a result; let the candle reset to room temperature.
- Burn #2 and #3: repeat the exact cycle; look for trends (getting hotter over time, increasing soot, faster fuel use).
- Mid-life check: confirm the candle remains stable after multiple sessions, not just on the first burn.
- Near end-of-life check: continue controlled burns until the candle approaches the last portion of wax; watch for rising heat and soot risk as the system changes.
- Decide: pass, adjust (wick/spacing/formula), or fail and stop.
Test log template (copy/paste and fill in each burn)
| Field | Your notes |
| Jar + inside diameter | |
| Wax type + fragrance load | |
| Wick pair (series + sizes) | |
| Measured spacing (wick-to-wick / wick-to-wall) | |
| Burn # (1, 2, 3…) + duration | |
| Flame behavior (steady, flicker, one stronger) | |
| Melt pool (width / depth trend) | |
| Soot on jar or in wax | |
| Wick mushrooming / carbon | |
| Jar heat (comfortable warm vs uncomfortably hot) | |
| Any red flags (smoke, odor, glass stress) | |
| Decision (pass / adjust / fail) |
Pass–adjust–fail grid (turn observations into the next step)
| What you observe | Likely meaning | Next test action |
| Walls still have thick hang-up after multiple burns | Not enough coverage or spacing too wide | Adjust spacing slightly inward or test a slightly stronger pair, then repeat the protocol |
| Melt pool overlaps aggressively early, flames act “big” | Too much combined heat or spacing too tight | Test a smaller pair or widen spacing, then restart the test sequence |
| Soot appears, especially later burns | Too much wick heat, draft sensitivity, or poor trim control | Pause, tighten test conditions and trim routine; if it persists, wick down |
| Jar becomes uncomfortably hot or shows stress | Unsafe heat load for that container | Stop testing that setup and review Safety Risks & Common Double-Wicking Mistakes before changing anything |
How these thresholds were chosen: supplier burn-testing guides commonly emphasize controlled burn windows, consistent trimming, and documenting melt pool and soot so you can compare candidates fairly. Fire-safety guidance also leans conservative on “stop if it feels unsafe,” which is why the grid prioritizes clear halt conditions over chasing a perfect edge-to-edge melt pool.
Keep the full log format in a Candle Testing Checklist so every double-wick candidate is judged by the same notes, not memory.
What changed — 2024-01-01: Safety recommendations increasingly emphasize conservative burn cycles and clearer stop rules for overheated containers. Impact: Treat “uncomfortably hot” as a fail signal and log jar heat every cycle, not just the first burn.
Safety Risks & Common Double-Wicking Mistakes
Double-wicked candles fail safety checks when the two-flame setup creates unstable flames, heavy soot, excessive container heat, deep melt pools, or visible vessel stress.
For this page, “too hot” means the container heat triggers a fail condition during testing, not a formal legal threshold. As a baseline, trim wicks to about 1/4 inch (6 mm) before each burn and keep sessions to roughly 3–4 hours so heat and soot do not build beyond the test plan.
For general user-facing precautions, keep the separate Candle Safety Basics page as the safety route.
What Counts as a Fail During Double-Wick Testing
A double-wick setup fails when heat, soot, flame behavior, or vessel condition moves outside the limits you set before the test burn begins.
If you can, use an infrared thermometer and log the hottest outside-surface reading near the wax line at least once mid-burn and once at the end of each 3–4 hour session. If you don’t have a thermometer, use a simple fallback: if you can’t comfortably keep your hand on the container for about 3 seconds, treat it as “too hot,” stop the burn, and mark that setup as a fail until proven otherwise.
Quick maker Q&A
Q: “The melt pool is perfect, but the jar is hot. Can I accept it?”
A: No. Heat is a safety outcome, not a cosmetic one. A perfect melt pool is meaningless if the container runs too hot.
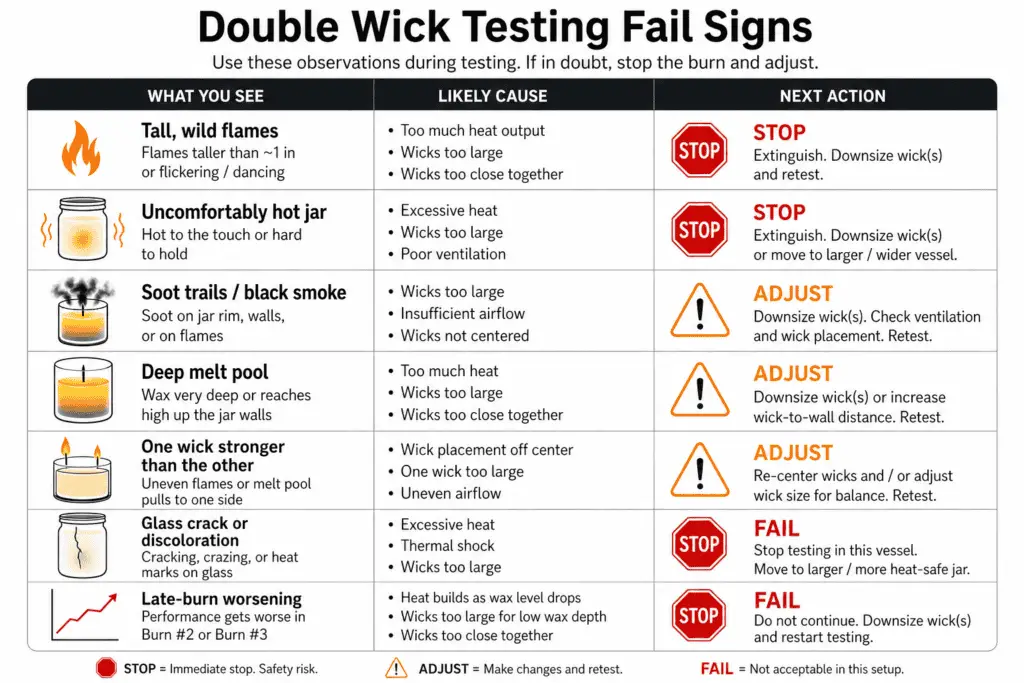
| What you see during a test burn | Likely cause in a double-wick setup | Next test action |
| Flames consistently tall, wild, or “dancing” | Too much combined heat, draft, wicks too close together | Extinguish, cool fully, then downsize both wicks one step and re-test in a draft-free spot |
| Jar is uncomfortably hot to the touch | Too much total heat for the vessel/wax, thin glass, hot spots from placement | Stop the test; switch to a thicker-walled vessel or a cooler wick pair before trying again |
| Heavy soot trails on jar / smoke smell | Wicks too large, wicks too long, draft, high fuel rate | Extinguish; trim to 1/4 inch (6 mm); re-test with smaller wicks and check for drafts |
| Melt pool gets very deep very fast | Too much heat output (often doubled by two flames) | Halt; wick down and consider a different wick series that burns cooler in your wax |
| One wick outperforms the other (one huge flame, one weak) | Off-center placement, uneven airflow, inconsistent trimming | Re-center and equalize trimming; re-test and watch for “one-sided” hot spots |
| Glass discolors, warps, or shows any crack/chip change | Vessel failure risk | Retire that vessel/candle immediately—do not burn again, do not sell or gift |
| You “fix” one symptom but another appears later (mid-burn or near end) | Pair is borderline; end-of-life runs hotter and dirtier | Treat as a fail until it passes full-life testing without red flags |
How these safety thresholds were chosen: The “trim to 1/4 inch (6 mm)” and “burn ~3–4 hours per session” defaults come from mainstream candle safety and supplier burn-testing guidance, applied conservatively to multi-wick heat behavior. Observations should be recorded under consistent conditions (same room, minimal drafts, same trim length, timed sessions) so changes in wick pair or placement are the only variables. Limitations: vessels, wax blends, and fragrance loads change heat output, so a “passes in one jar” result doesn’t transfer automatically to another.
What “Over-Wicked” Means
A double-wick candle is “over-wicked” when the combined heat output is simply too much for the wax and the vessel. Two flames don’t just “melt faster”—they can create hotter walls, deeper pools, and more soot, especially if you used two of the same wick you’d normally choose for a single-wick jar.
A well-wicked double-wick burn looks steady: medium flames, an even melt pool that spreads without racing downward, and a jar that stays comfortably touchable. An over-wicked burn looks aggressive: louder flicker, rapid fuel consumption, soot creeping up the glass, and a container that feels like it’s daring you to touch it.
Double-Wick Safety Checklist
A double-wick safety checklist turns heat, soot, flame shape, and vessel condition into stop-or-adjust decisions instead of judgment calls.
- Compare every burn to your pass/adjust/fail rules, not to what you hope is acceptable.
- If you see cracking, distortion, extreme heat, or persistent heavy soot, stop and retire that configuration.
- If flames are too tall or unstable, wick down before you try anything else.
- If heat is the problem, consider a different vessel (thicker walls, smaller diameter) instead of chasing bigger wick changes.
- Write down what failed so you never repeat the same jar/wax/FO/wick combo by accident.
Use Testing Protocol for Double-Wicked Candles to log the exact symptom, when it happened, how long into the burn it appeared, and how it changed after trimming.
Lower-Risk Fixes Than Pushing Through
Lower-risk fixes reduce combined heat or improve repeatability before you change more variables at once.
- Downsize both wicks one step before you try drastic changes.
- Switch wick series if your current one runs hot/sooty in your wax.
- Adjust placement (often slightly farther from walls and evenly spaced) if you’re getting hot spots.
- Reduce fragrance load and re-test if soot and instability keep showing up after trimming.
- Blacklist the vessel if it ever cracked, warped, or got painfully hot in testing.
Before anything is sold or gifted, make sure your care card and warnings match Candle Safety Labeling Guide so end users don’t accidentally create a hazard with long burns, untrimmed wicks, or drafty placement.
Wide Jars, Tins & Unusual Container Shapes
Wide jars, shallow tins, rectangles, and bowls need layout decisions that stay conservative because heat can concentrate differently from a standard round jar.
This section gives summary-level starting logic only. Use it to decide whether a vessel belongs in a double-wick test, then route specialty shapes to a container-geometry or specialty-container guide before scaling.
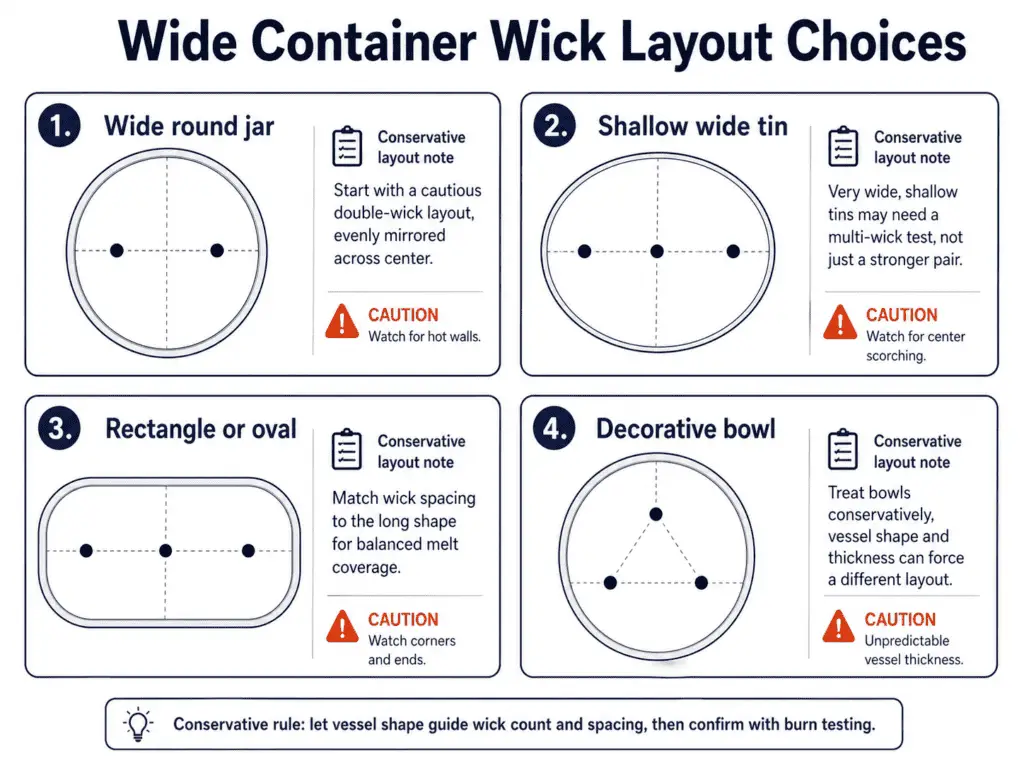
Conservative Starting Layouts
Conservative starting layouts keep heat distributed, measurable, and testable before unusual vessels are routed to a dedicated container-geometry guide.
| Container type | What makes it tricky | Conservative starting idea | When to route outward |
| Wide round jar (around 4″+) | Coverage gap with one wick; walls can heat up fast | Two smaller wicks, symmetrical placement, tested in controlled sessions | If walls stay too hot even after wicking down |
| Shallow wide tin | Heat concentrates because the fuel surface is broad and close | Smaller, distributed wicks may be better than two large heat sources | If center scorching or early soot appears |
| Rectangle / oval | Ends and corners lag; hot spots can form along rows | Use a measured row or staggered pattern, not two unmeasured centers | If end hang-up cannot be solved without overheating the long sides |
| Decorative bowl / dough bowl | Irregular thickness, airflow, and surface area make heat less predictable | Treat as specialty-container testing, not a beginner double-wick setup | If the vessel material or shape makes temperatures unpredictable |
For full layout rules, route wide and irregular vessels to Jar Geometry, Wicking & Performance or Specialty Container Wicking instead of expanding this guide into a separate vessel-layout page.
Double-Wick Starting Point Chart and Formula
Use the chart and formula below to generate conservative starting suggestions for a double-wick container candle based on jar diameter, wax family, and fragrance load—then confirm with burn testing.
These are planning outputs, not a safety guarantee, and they do not replace burn testing or local fire-safety requirements.
If you haven’t confirmed that two wicks are actually the right move for your container, revisit When You Actually Need to Double Wick a Candle before you treat any pairing as a “starting point.”
Starting Point Chart
The starting point chart groups jar diameter, wax family, fragrance load, and spacing into conservative candidates for burn testing.
| Inside diameter (ID) | Wax family | Fragrance load band | Conservative starting approach | Spacing band (round jars) |
| 3.25–3.75″ | Soy / soy-blends | ~6–8% | Borderline: test a strong single first, then a cautious double | Start near “halfway between center and wall” |
| 3.25–3.75″ | Paraffin / para-blends | ~6–8% | Double only if a safe single can’t cover; start small | Start near “halfway between center and wall” |
| 3.75–4.50″ | Most container waxes | ~6–10% | Common double-wick range: two smaller wicks from one series | Wick-to-wick ≈ ID ÷ 2 |
| 4.50″+ or non-round shapes | Any | Any | Often multi-wick or switch vessels if heat becomes hard to control | Layout depends on shape; test-only mindset |
Paper-and-Pencil Formula
The formula creates candidate starting points only; a candle passes only after the wick pair, spacing, wax, fragrance load, and vessel pass the burn-test protocol.
- Measure inside diameter (ID) at the top of the jar.
- Decide wick count: borderline (3.25–3.75″), common double range (3.75–4.50″), or “likely multi” (4.50″+ / odd shapes).
- Estimate per-wick coverage: per-wick target ≈ ID ÷ number of wicks.
- Choose a wick series you can repeat consistently, then build a small test ladder: start with two wicks a couple of steps smaller than your tested single-wick pick for that jar and wax.
- Convert the spacing band into marks: for a round jar, start with two wicks placed symmetrically and roughly halfway between the center and the wall, then tighten or widen based on results.
Worked example (4.0″ jar, two wicks)
- Per-wick “share”: 4.0 ÷ 2 = 2.0″
- Spacing marks: wick-to-wick ≈ 2.0″, wick-to-wall ≈ 1.0″
How to Use the Output Safely
The output is safe to use only as a candidate list for testing, not as proof that the finished candle is safe to sell, gift, or scale.
The chart logic is a blend of widely used supplier wick charts and fragrance-load guidance, plus repeatable burn-test patterns makers see across common container waxes. Sources like CandleScience and The Flaming Candle emphasize that wick charts are starting points, and fragrance suppliers set usage ranges that can change flame stability and soot risk. Anything that looks “perfect” on the first burn still has to earn a pass over a full test cycle.
Before you scale a batch or gift a candle, run every candidate through Testing Protocol for Double-Wicked Candles and apply the stop rules from Safety Risks & Common Double-Wicking Mistakes.
Key Takeaways & Next Steps
Double wicking is for coverage in wide containers, not for forcing bigger flames, and the safest setups come from consistent spacing and disciplined testing. Use the chart to pick conservative candidates, then treat your first pours as data collection: observe melt pool behavior, soot, and container heat over multiple burns. If anything runs hot, smokes, or looks unstable, wick down or change the vessel instead of trying to “power through” the same configuration. When you want to deepen the fundamentals behind your choices, revisit Candle Wick Sizing & Selection Guide, check your vessel assumptions against Container Jar Buying Guide, and keep your safety baseline aligned with Candle Safety Basics.
A simple next action plan
- Pick one container you want to standardize.
- Choose one wick series to test first.
- Select 2–3 wick pairs from the chart logic.
- Burn test in repeatable cycles, log results, then adjust one variable at a time.