Common wax melt problems are fixed by matching the visible symptom to when it appears, checking the most likely cause, and changing one variable at a time.
Wax melts are scented pieces of wax designed to release fragrance in a wax warmer. They do not have wicks, so their problems usually come from wax type, fragrance binding, cooling, storage, packaging, warmer heat, or handling.
A wax melt problem is any scent, surface, texture, melting, or color issue that affects how the melt looks, stores, handles, sells, or performs. “Common” means recurring wax melt production or use problems that makers and customers regularly notice. It does not mean every rare defect, every brand complaint, or every candle-making issue.
Start with timing. Did the problem appear during pouring, cooling, unmolding, storage, packaging, shipping, warming, or customer use? That timing helps separate formula problems from storage problems, warmer compatibility, cosmetic defects, and handling damage.
Quick Wax Melt Troubleshooting Matrix
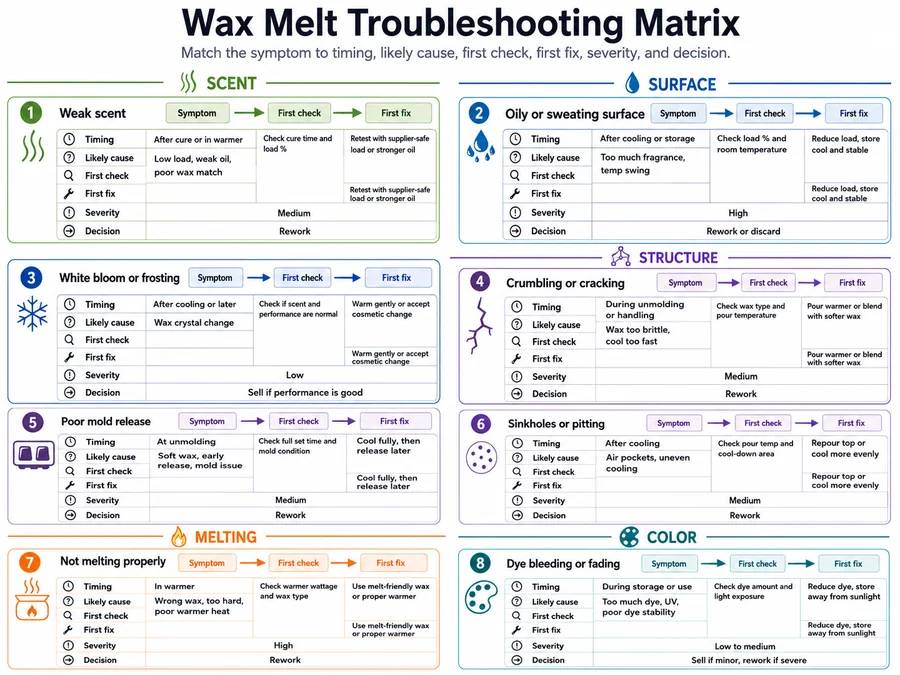
The troubleshooting matrix helps identify the likely cause of a wax melt problem by matching the observable symptom to timing, first check, and first fix.
Use this as a wax melt diagnostic aid, not as a full formula guide, safety manual, warmer repair guide, or compliance source. Each row gives the first useful check, not the complete science behind the problem.
| Symptom | When noticed | Likely cause | First check | First fix | Severity | Sell, rework, or discard? |
|---|---|---|---|---|---|---|
| Weak scent | After curing or warming | Poor fragrance release, short cure, wrong warmer heat, small portion, large room, unsuitable load | Compare cold throw and hot throw separately | Change one variable: cure time, portion size, warmer heat, or approved fragrance load | Medium–High | Rework if the batch is unsold and the formula is inside supplier limits |
| Oily or sweating surface | After cooling, storage, or packaging | Fragrance migration, heat exposure, overload, early packaging, poor wax binding | Check whether residue is oil, condensation, shine, or dye | Move to cooler storage, reduce heat swings, and check fragrance oil load limits before adding more oil | Medium | Hold or rework; do not sell greasy stock without testing |
| White bloom or frosting | After cooling or storage | Wax crystallization, soy-heavy wax behavior, temperature swings | Rub a small area and check whether scent and texture still perform normally | Adjust cooling and storage; treat it as cosmetic unless performance changes | Low–Medium | Usually sellable if disclosed and performance is normal |
| Crumbling or cracking | During unmolding, handling, or shipping | Wax too hard, cooling shock, mold stress, weak packaging, transit damage | Check whether breakage happens before or after packaging | Adjust wax hardness, unmolding timing, mold release, or packaging support | Medium | Rework if formula-related; replace if shipping-only damage affects customers |
| Poor mold release or sticking | During unmolding or release | Removed too early, mold surface grip, dirty or damaged mold, unsuitable wax hardness, forced release | Check whether wax sticks before it breaks | Let the melt set fully, clean the mold, adjust release timing, or review mold suitability | Medium | Rework if pieces break during release; hold if residue or tearing repeats |
| Sinkholes, dips, pitting, or uneven tops | After cooling | Cooling shrinkage, trapped air, pour temperature, cold mold, fast cooling | Identify whether the defect is a dip, pit, bubble, or rough top | Adjust pour temperature, mold temperature, air release, cooling, or repair method | Low–Medium | Often sellable if cosmetic and brand standards allow it |
| Not melting properly | During warming | Low warmer heat, poor dish contact, oversized cube, high melt-point wax | Test a smaller portion in the same warmer dish | Reduce cube size, compare warmer performance, or review warmer instructions | Medium | Usually not a discard issue until warmer compatibility is checked |
| Dye bleeding or fading | During storage, packaging, or warming | Dye migration, fragrance discoloration, UV exposure, heat, packaging contact | Check whether color moves, stains, fades, or turns brown/yellow | Change dye type, reduce light or heat exposure, or separate from packaging contact | Medium | Hold if staining packaging or transferring color |
Methods note: This matrix groups recurring maker and customer failure patterns into first-check actions. Supplier wax data, fragrance load limits, SDS or IFRA documents where relevant, warmer instructions, dye notes, and packaging guidance override general troubleshooting.
If the matrix points to fragrance load, check supplier load limits before increasing oil. If it points to warmer heat, compare warmer performance before changing the wax formula. If it points to color migration, treat it as a dye or packaging issue instead of ordinary frosting.
If the same batch fails more than one row, complete a batch-level quality review before selling. A repeated defect usually needs batch records, controlled testing, and one-variable changes rather than a quick surface fix.
Why Do Wax Melts Have Weak Scent Throw?
Wax melts usually have weak scent throw when fragrance is not releasing well from the wax, the batch has not cured long enough, the warmer heat is wrong, the portion is too small, the room is too large, or the fragrance load is unsuitable.
Scent throw means how strongly a wax melt smells. Cold throw is the scent before warming. Hot throw is the scent released while the wax is warming.
Weak scent does not always mean the wax melt needs more fragrance oil. A melt can smell weak because the wax holds the fragrance too tightly, the warmer is too cool, the room is too large, the cube is too small, or the scent was judged before the batch settled.
| Weak scent pattern | Likely cause | First check | First correction |
|---|---|---|---|
| Weak in the package and weak in the warmer | Under-cured batch, unsuitable fragrance, low approved load, wax binding issue | Compare cure time and supplier load range | Extend cure time within your process before changing the recipe |
| Strong cold throw but weak hot throw | Warmer heat, dish contact, portion size, room size, or wax melt point | Test the same cube in a known suitable warmer | Test a smaller portion or a warmer that gives a complete melt pool |
| Strong at first, then fades fast | Volatile fragrance, too-hot warmer, small wax portion, or open room | Track scent strength across the first melt session | Adjust portion size, warmer heat, or fragrance choice within supplier limits |
| One scent works but another smells weak | Fragrance oil compatibility differs by scent | Compare the same wax and load with another fragrance | Check supplier guidance and test the fragrance before changing the wax |
| Customers report weak scent, but maker test seems fine | Room size, warmer type, nose fatigue, batch age, or storage difference | Ask when, where, and how the melt was warmed | Give clearer portion, room-size, and warmer-use instructions before reformulating |
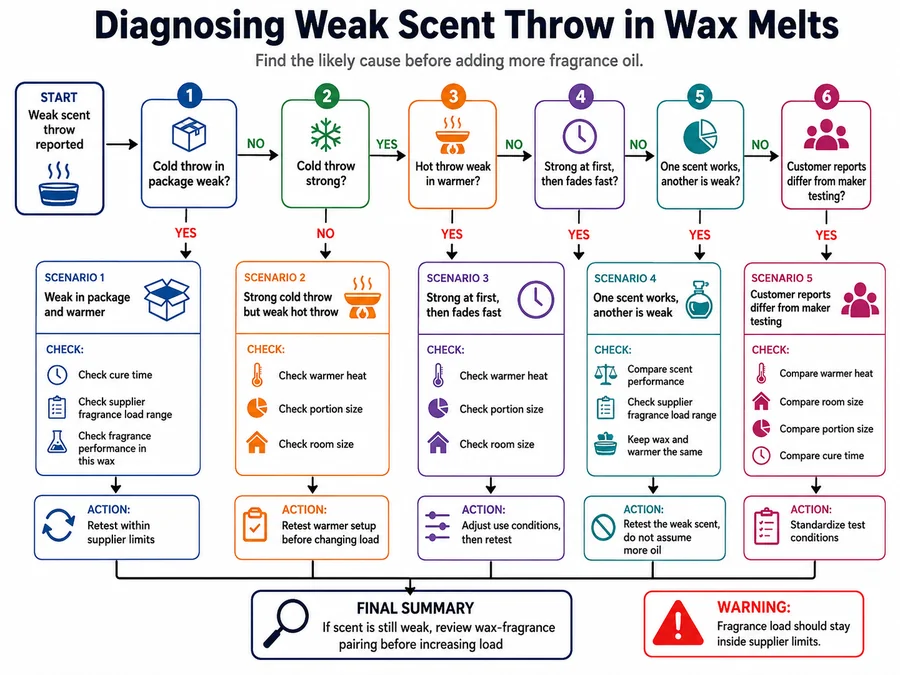
The safest fix order is to test cold throw and hot throw separately, confirm cure time, check warmer heat, test a consistent portion, and then adjust fragrance load only inside the supplier’s range.
Do not assume “add more oil” is the right fix. Too much fragrance oil can cause sweating, soft texture, staining, poor binding, and stronger customer complaints. If scent testing needs room-size scoring, warmer comparison, or batch logs, handle that as a controlled testing task before changing the formula.
Why Are Wax Melts Sweating or Oily on Top?
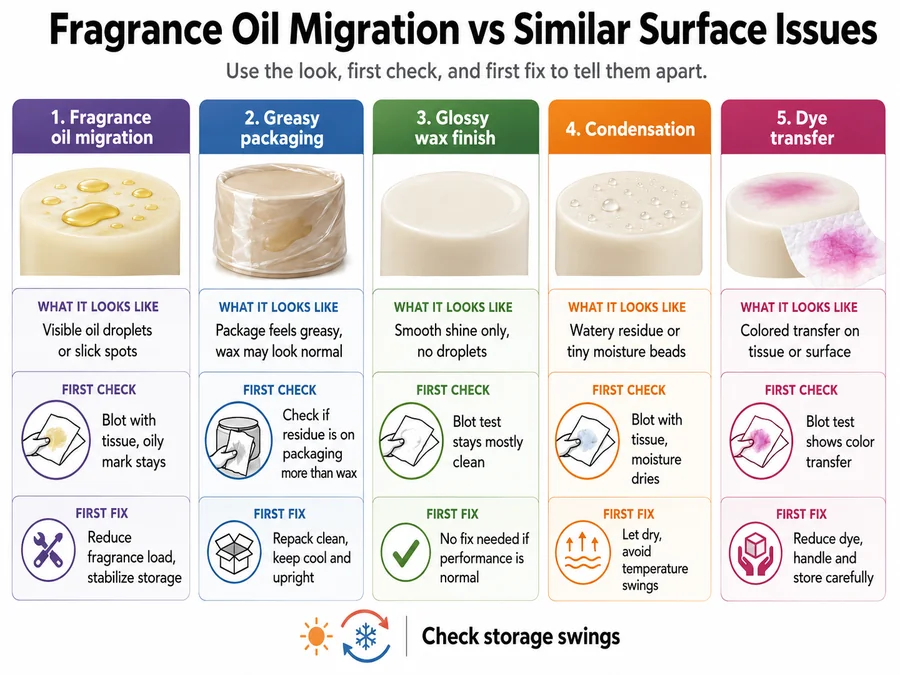
Wax melts usually look oily when fragrance oil migrates to the surface because of overload, warm storage, poor wax-fragrance binding, unstable cooling, or early packaging.
Wax melt sweating means visible oil or fragrance migration on the surface of a cooled, solid wax melt. It is not the same as a melt liquefying in a warmer, a glossy mold finish, condensation, or dye bleeding.
Start by checking the residue. Fragrance oil usually feels slick and smells strongly scented. Condensation feels watery and may appear after a cold-to-warm temperature change. Shine may look greasy but should not transfer oil onto tissue or packaging.
| Surface issue | What it looks like | Likely cause | First check | First fix |
|---|---|---|---|---|
| Oil droplets | Small slick beads on the wax | Fragrance migration, overload, heat exposure | Blot with plain tissue and smell the residue | Check fragrance oil load limits before changing the recipe |
| Greasy packaging | Oil marks inside clamshells or bags | Early packing, warm storage, poor binding | Check whether marks appear after storage | Hold the batch longer and move it to cooler storage |
| Glossy surface only | Smooth shine without transfer | Wax finish or mold surface | Press tissue lightly on the surface | No formula change unless oil transfers |
| Watery residue | Clear moisture with little scent | Condensation | Check recent temperature swings | Let melts return to room temperature before judging |
| Colored transfer | Dye stains packaging or nearby wax | Dye migration or colorant issue | Check whether the residue is tinted | Treat it as dye bleeding, not fragrance sweating |
A practical fix order is to let the melts cool fully, avoid warm storage, wait before packaging, then check the supplier’s fragrance oil range. If the batch sweats only after warm storage, the formula may be near its limit even if it looked fine after pouring.
Supplier limits matter because wax can hold only so much fragrance before excess oil moves outward. If oily surfaces repeat across batches, adjust storage conditions, packaging contact, and fragrance load before selling the batch.
What Does Frosting, White Bloom, or Cloudy Wax Mean?
Frosting on wax melts is usually wax bloom or surface crystallization, especially in soy-heavy wax or wax exposed to temperature swings.
Frosting means a white, cloudy, or crystalline-looking bloom on the surface of a solid wax melt. It is not food frosting, freezer damage, dye bleeding, or mold by default.
Most frosting is cosmetic. A frosted wax melt can still smell, melt, and perform normally if the texture is stable and there is no unusual odor, moisture, stickiness, or contamination sign.
| White or cloudy issue | Likely meaning | Performance concern? | First fix |
|---|---|---|---|
| Light white haze | Surface wax bloom | Usually cosmetic | Adjust cooling and storage consistency |
| Cloudy patches | Uneven crystallization or cooling | Usually cosmetic | Reduce temperature swings after pouring |
| White film after storage | Wax reacting to heat or cold cycles | Usually cosmetic unless texture changes | Store in a steadier, cooler place |
| Pale streaks with color change | Dye or fragrance interaction | Possible appearance defect | Check dye and fragrance compatibility |
| Fuzzy, damp, or strange-smelling surface | Not ordinary frosting | Hold batch and inspect further | Do not sell until the cause is clear |
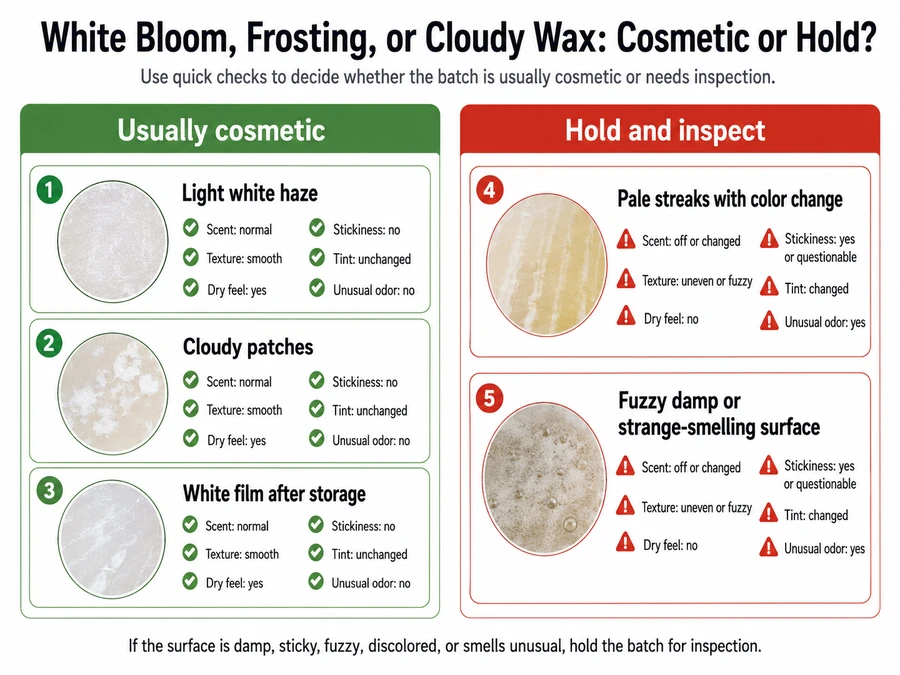
A good first check is to compare scent, texture, and surface feel. If the wax melt smells normal, feels dry, and melts as expected, the white bloom is usually an appearance issue. If the surface is wet, sticky, tinted, fuzzy, or smells off, do not treat it as normal frosting.
To reduce frosting, avoid sharp cooling changes, keep storage conditions steadier, and test whether the wax blend is prone to bloom. Soy-heavy waxes can frost more visibly than some other blends, so prevention may require wax blend adjustments instead of only repairing the surface.
Why Are Wax Melts Crumbling, Cracking, or Brittle?
Wax melts usually crumble, crack, or feel brittle when wax hardness, cooling, fragrance binding, unmolding, handling, or storage creates a fragile structure.
A finished wax melt should be firm enough to hold its shape but not so brittle that it breaks under normal handling. Brittle does not mean the clean snap of a snap bar. It means unwanted cracking, crumbling, flaking, or breakage before normal use.
| When the break happens | Likely cause | What to check | First fix |
|---|---|---|---|
| Cracks while unmolding | Wax is too cold, mold is too rigid, or release is forced | Check whether cracks follow the mold edge | Let the melt warm slightly before unmolding and test mold release timing |
| Crumbles when touched | Wax blend is too hard or lacks flexibility | Press a test piece gently at room temperature | Adjust wax hardness before changing fragrance |
| Breaks into dusty edges | Overcooling, brittle wax, or rough handling | Look for powdery crumbs near corners | Reduce cooling shock and handle after the piece stabilizes |
| Snaps only along score lines | Normal snap-bar behavior | Check whether the break follows the intended line | No fix needed if the product is designed to snap |
| Arrives broken after shipping | Transit pressure, thin shapes, loose packaging, or heat/cold stress | Check whether the batch was stable before packing | Improve packaging support instead of blaming the formula first |
| Breaks after storage | Temperature swings or packaging pressure | Check storage temperature and stacking pressure | Store flatter, cooler, and with less compression |
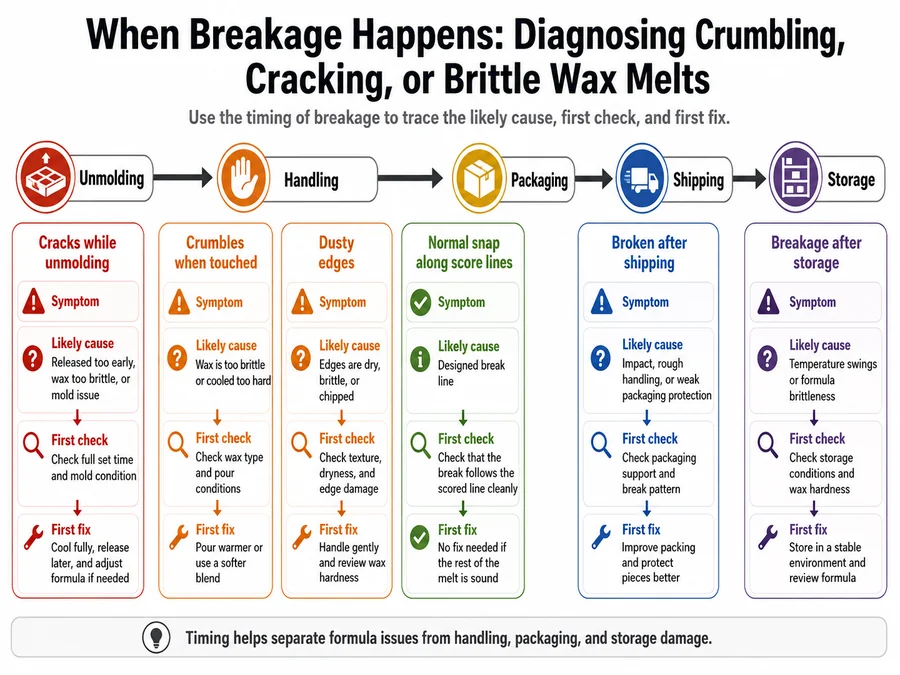
Use the break stage to choose the fix. If the melt cracks during unmolding, review mold release and temperature. If it crumbles before packaging, review wax hardness and cooling. If it leaves your workspace intact but arrives broken, review packaging support and handling before blaming the recipe.
A simple break-stage log can help: note pour date, unmolding time, room temperature, mold type, storage method, packaging method, and when the break appeared. If brittleness repeats across batches, compare wax hardness, cooling, and handling before making random fragrance changes.
Why Do Wax Melts Stick to the Mold or Break During Release?
Wax melts usually stick to the mold or break during release when they are unmolded before fully set, the mold grips the wax, the mold is dirty or damaged, the wax is too soft or brittle, or release is forced.
Poor mold release means the wax resists leaving the mold, tears, leaves residue, or breaks during removal. It is not the same as shipping damage, normal snap-bar separation, or incomplete melting in a warmer.
| Release problem | Likely cause | First check | First fix |
|---|---|---|---|
| Sticks before it moves | Removed too early or wax still soft | Press an edge lightly and check whether it flexes or smears | Let the melt set longer before unmolding |
| Leaves waxy residue | Mold is dirty, damaged, or gripping the wax | Inspect the cavity for residue, scratches, or buildup | Clean the mold and test one cavity before remaking the batch |
| Breaks at the mold edge | Forced release, rigid mold, or brittle wax | Check whether cracks follow the mold edge | Use less force and review release timing |
| Tears or bends | Wax blend is too soft for the mold shape | Compare the same batch in a simpler cavity | Use a sturdier shape or review wax hardness before changing fragrance |
| Same cavity fails repeatedly | Mold condition or cavity shape issue | Compare nearby cavities from the same pour | Retire the problem cavity or reserve it for test pieces |
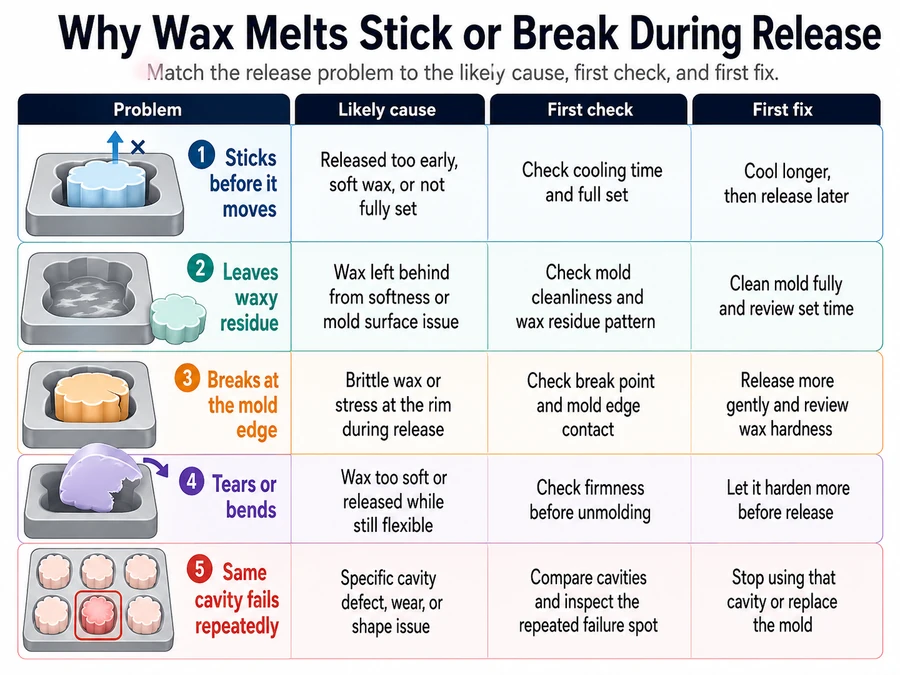
Fix mold-release problems by checking set time, mold condition, cavity shape, and wax hardness before changing fragrance load. If sticking appears only in one mold cavity, treat the mold as the first suspect instead of reformulating the whole batch.
How Do You Fix Sinkholes, Dips, Pitting, or Uneven Tops?
Fix sinkholes, dips, pitting, and uneven tops by identifying the defect shape first, then checking pour temperature, mold temperature, cooling speed, trapped air, and surface disturbance before using a heat gun or second pour.
A wax melt surface defect is a visible depression, pit, bubble mark, rough top, or shape irregularity after cooling. Uneven tops are not the same as uneven melting in a warmer or weak scent in a room.
| Surface defect | What it usually means | First check | First fix |
|---|---|---|---|
| Center dip | Cooling shrinkage as wax contracts | Does the dip sit near the middle? | Adjust pour temperature, cooling rate, or use a small second pour |
| Deep sinkhole | Shrinkage around a cooling pocket | Does the hole appear after full cooling? | Test slower cooling and review pour depth |
| Tiny pits | Trapped air or bubbles at the mold surface | Do pits cluster near edges or details? | Pour more steadily and tap or rest the mold before cooling |
| Rough or rippled top | Pour temperature, movement, or cooling disturbance | Was the mold moved while setting? | Keep molds level and still during cooling |
| Uneven shape | Cold mold, uneven surface, or warped mold | Does the same cavity repeat the defect? | Check mold condition and pre-warm only if appropriate for the wax |
| Surface repair marks | Heat gun or second-pour correction done unevenly | Are marks visible only after repair? | Use lighter repair passes and test on unsold pieces first |
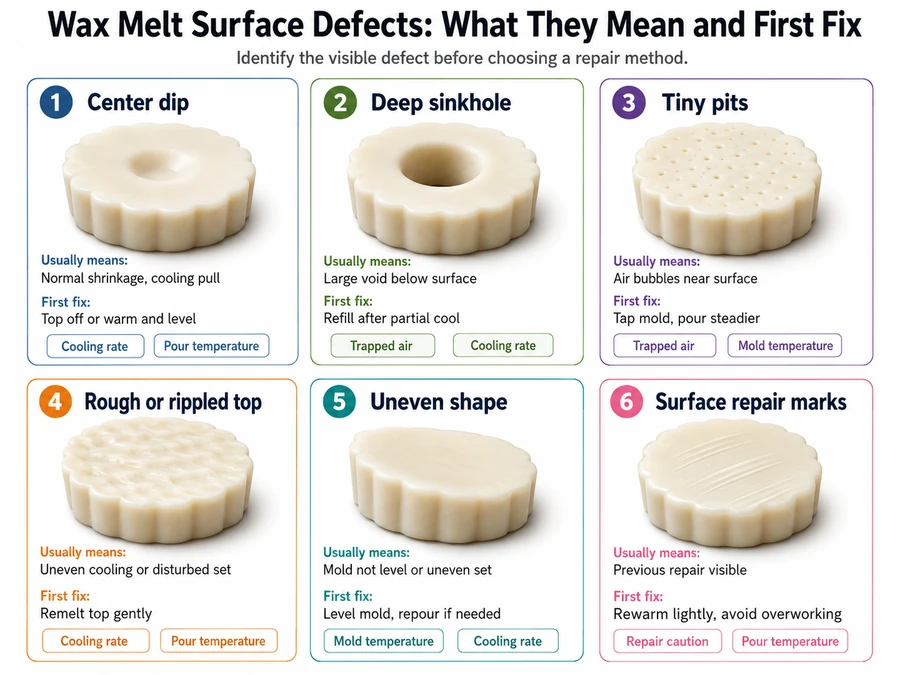
The smallest correction is usually best. Confirm the defect shape, check whether the same mold cavity repeats it, review pour temperature, then review cooling conditions. A heat gun or second pour can improve appearance, but it can also leave marks if overused.
Most sinkholes, dips, and pits are appearance issues unless they weaken the melt, expose oil pockets, affect packaging, or create a customer-quality concern. If the melt smells normal, handles well, and warms correctly, the sell or rework decision is usually based on brand quality standards.
If the same defect repeats across several batches, review batch records, mold condition, pour temperature, and cooling conditions. Keep changes to one variable at a time so the real cause is easier to confirm.
What If the Wax Melt Does Not Melt Properly in the Warmer?
A wax melt may not melt properly when the warmer is not hot enough, the cube is too large, the wax melt point is too high for the warmer, or the melt does not make enough contact with the dish.
“Not melting properly” means the wax melt only partly liquefies under normal warmer use. It does not mean candle tunneling, electrical failure, or weak scent after the melt has already formed a full liquid pool.
| Compatibility check | What it suggests | First fix |
|---|---|---|
| Cube stays mostly solid | Warmer may be too cool for that wax or portion size | Test a smaller piece before changing the recipe |
| Edges melt but center stays firm | Poor dish contact or oversized cube | Break the melt into a flatter portion |
| Melt liquefies slowly but fully | Higher wax melt point or cooler warmer | Compare warmer performance before reformulating |
| Melt pools but scent is weak | Scent throw issue, not melting issue | Return to scent testing |
| Same melt works in another warmer | Warmer-side compatibility issue | Follow warmer manufacturer instructions |
| Several waxes fail in the same warmer | Warmer or dish limitation | Check warmer type, dish contact, and manufacturer instructions |
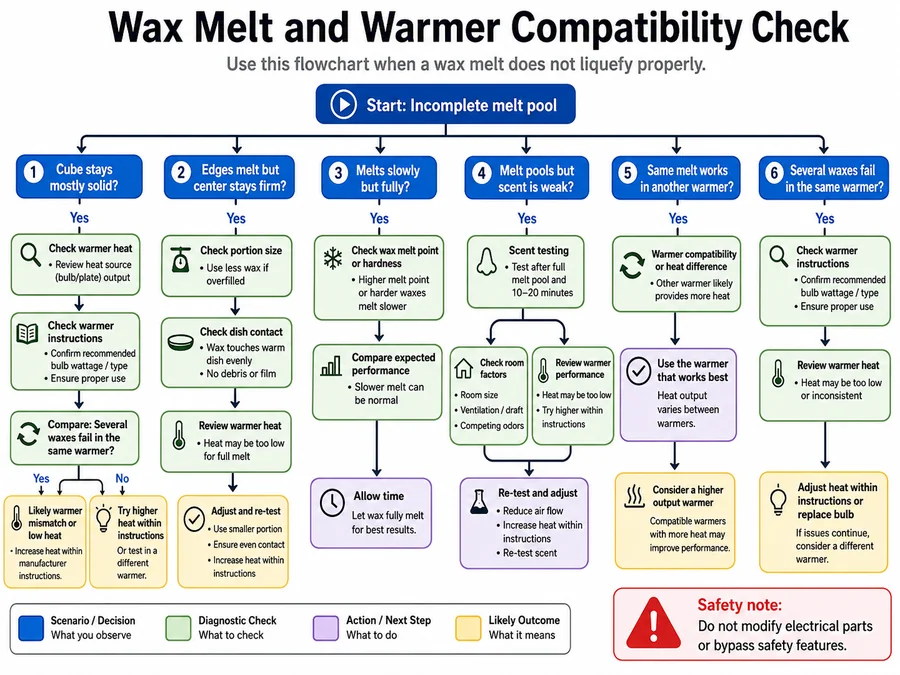
Check warmer manufacturer instructions before changing the wax formula. Do not modify electrical parts, bypass safety features, or treat this as a warmer repair problem.
If the melt pool is incomplete, test portion size, dish contact, and warmer heat first. If the melt pool is complete but fragrance still feels weak, test scent throw instead of changing warmers again.
When Are Dye Bleeding, Discoloration, or Fading a Separate Problem?
Dye bleeding, discoloration, or fading is separate when color migrates, stains, changes, or fades because of dye type, fragrance interaction, overheating, UV exposure, or packaging contact.
A wax melt color defect means dye movement, fading, browning, yellowing, staining, or an unexpected shade change. Bleeding means color migration. It is not fragrance sweating, frosting, or personal color preference.
| Color issue | What it looks like | Likely cause | First check | First fix |
|---|---|---|---|---|
| Dye bleeding | Color transfers to packaging, nearby wax, or warmer dish | Dye type, use rate, heat, or packaging contact | Wipe the contact area with plain tissue | Switch to a dye intended for wax and test compatibility |
| Fading | Color becomes lighter over storage time | UV exposure, heat, dye instability | Compare stored and freshly made pieces | Store away from light and heat |
| Browning or yellowing | Color shifts warmer or darker after curing | Fragrance discoloration or heat exposure | Compare unscented and scented test pieces | Check fragrance discoloration before blaming dye |
| Speckles or uneven color | Tiny color spots or streaks | Dye not mixed fully or wrong dye form | Cut one melt and inspect color distribution | Adjust mixing and dye type in a test batch |
| Stained packaging | Packaging picks up color | Dye migration, heat, oil, or material contact | Check whether stain appears only after packing | Change packaging contact or dye type after testing |
| Cloudy pale patches | White or cloudy surface, not tinted transfer | Frosting or wax bloom | Check whether color actually moves | Treat as frosting unless dye transfers |
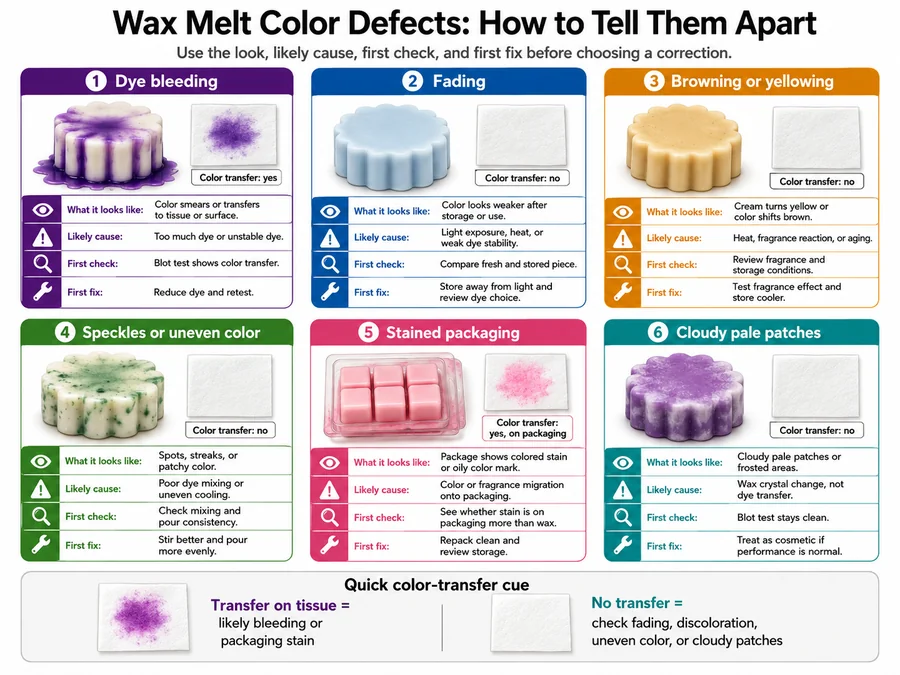
Color problems should stay inside wax melt appearance and storage troubleshooting. This section only identifies whether the problem is dye movement, fading, fragrance discoloration, or packaging contact.
If the color change appears with oil on the surface, separate dye bleeding from fragrance sweating first. If the color turns brown or yellow without transfer, fragrance discoloration may be the better route than a dye change.