Choose a wood wick by measuring the jar’s inside diameter first, then qualify the start point with wax blend, formula load, and a test burn. Width is the first lever; thickness or ply is the second.
A wood wick is a flat wooden wick used in a jar candle, and choosing one starts with the inside diameter the wax will actually fill in the jar, not just a narrower mouth the wax will not reach. Here, the right wood wick means the best first-test match for your jar, wax blend, and formula load, not a universal pick that works without testing. Start with inside diameter, use that number to choose width, use thickness or ply only after width, and then confirm the choice with a controlled burn. Full installation steps, broad wick charts, and deep troubleshooting stay outside this discussion so the sizing decision stays clear.
Use this first-pass ladder to set the first test before you adjust anything.
| Jar situation | What to measure or hold steady | First move |
| Straight-sided jar | Measure the inside diameter at the wax fill line | Choose a starting width from the matching supplier line |
| Tapered or necked jar | Measure the widest inside diameter the wax will actually fill | Do not size from a narrower mouth alone |
| Width looks close on the first burn | Hold width steady | Change thickness or booster next |
| Coverage is clearly too small or too large | Width is still the first lever | Do not change width and construction together |
Measure the Jar by the Diameter the Wax Will Actually Fill
For wood wick sizing, use the inside diameter the wax will actually fill in the jar.
A wood wick is a flat wooden strip sized from the burn area the flame must cover across the wax surface, so the number that matters is the inside span the wax will actually fill. Here, the right measurement means the best starting input for sizing, not a promise that one chart lookup ends testing. If you want wood wick sizing basics, keep one rule fixed: measure the burn area the wick must serve, not the outer glass and not a narrower mouth the wax will not fill.

For a straight-sided jar, measure straight across the inside opening at the fill line with the jar empty and level. For a tapered or necked jar, use the widest inside span the wax will actually fill, because a narrower mouth can understate the burn area. Do not use outside width, wax fill weight, or jar volume, because each can push you toward the wrong starting width. Outside glass makes the jar seem bigger than the burn area really is, while weight and volume say nothing about the width of the wax surface.
| Input used | What it measures | Likely result |
| Inside diameter | Usable opening | Sound starting input |
| Outside width | Glass plus opening | Start too wide |
| Wax fill weight | Amount of wax | No sizing value |
| Jar volume | Container capacity | Wrong lookup basis |
The table above is a modeled example that shows the direction of the error, not a final wick pick. A wood wick size chart by jar diameter becomes useful only after the opening is measured the same way every time. After that, move to width selection, then test-burn the first wick choice before treating measurement as the problem again.
Choose a Starting Wood Wick Width From the Measured Opening
Width is the first wood-wick sizing lever because it sets surface coverage.
Wood wick width is the flat-face measurement that mainly decides how much wax surface the flame can reach across the top of the candle. Here, the right width means the best first-test width for this jar and formula, not the biggest strip that makes the melt pool form fast. If you want to see how wood wick sizing works, treat width as the first move and thickness as the second.
Width labels are supplier- and series-specific, so match the measured diameter to the chart for the exact wood-wick line you are testing. Do not treat one brand’s width label as a universal size that transfers cleanly to another line.
Start with the supplier width band that matches your measured inside diameter in inches or millimeters, then keep that width fixed for the first burn. Change width when the opening itself is larger or smaller than the band you chose. Change construction later when coverage looks close but flame strength still looks weak.
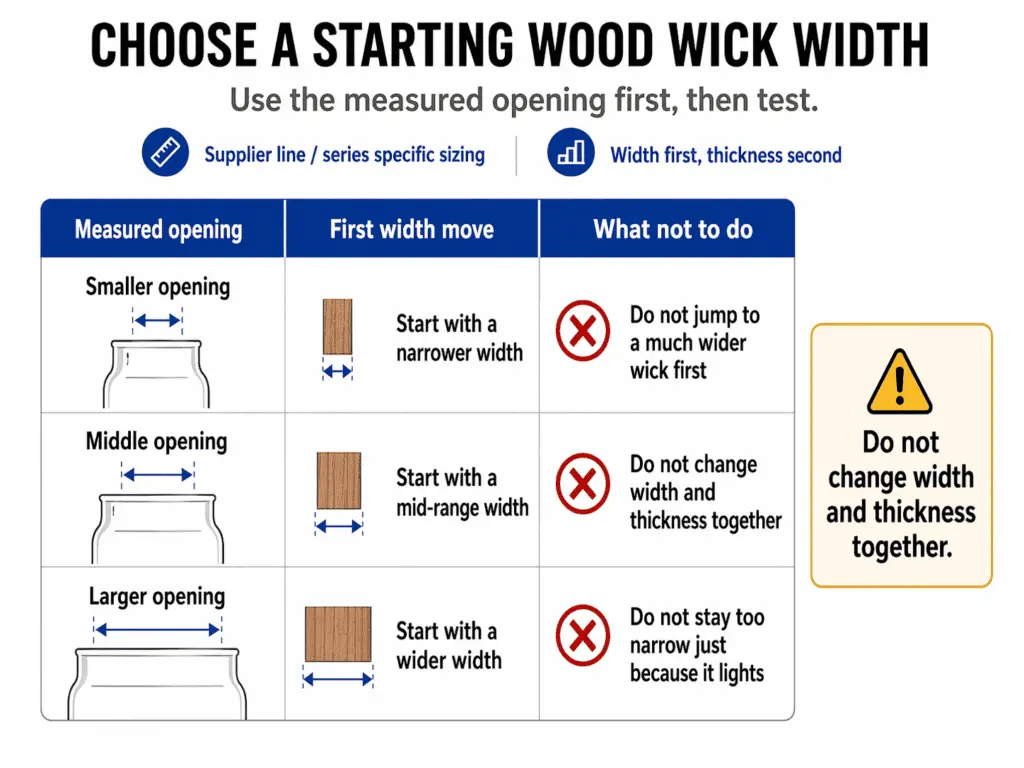
| Inside opening | First width move | What not to do |
| Smaller opening | Start in the matching smaller width band | Do not jump wider for speed |
| Middle opening | Start in the matching band for that diameter | Do not change width and thickness together |
| Larger opening | Start in the matching larger width band | Do not assume widest is best |
This is a starting-test table, not a final-answer table. A wood wick size chart by jar diameter only helps when the jar measurement is correct and the wax system is known, because a wider wood wick can still be wrong for a resistant or heavily loaded formula.
When the Same Diameter Still Needs Extra Caution Because the Jar Profile Changes the Burn
The same inside diameter can burn differently when the jar is wide and shallow, sharply tapered, or curved near the opening.
Jar profile changes how confidently a diameter-first match should be applied, but it does not replace the diameter-first rule. A straight-sided jar usually lets the filled diameter speak more clearly. A bowl-shaped or tapered jar can call for a more cautious first test because the flame and melt pool do not behave the same way across the top and down the wall.
Use the filled inside diameter first, then treat jar shape as a caution flag rather than a new sizing system. If the opening-based width looks close but the first burn still lacks strength, choose wood wick thickness next instead of widening at random, and test-burn once, then adjust after you watch that first controlled burn.
Use Thickness as the Second Sizing Lever After Width
Width affects coverage first, while thickness or ply affects flame strength after width is chosen.
A wood wick is a flat wooden wick, and its thickness or ply choice describes how much wooden material draws wax to the flame after width is already set. Here, the right thickness means the better second-step construction choice for this jar and formula, not the hottest or loudest-burning setup. For wood wick selection basics, keep the order fixed: choose width first, then change thickness only when flame strength is the real weak point.
Change thickness or ply when the wick seems close on surface coverage but still struggles to stay strong across the wax. Do not treat thickness as another name for width. A wider wick reaches more surface area, while a thicker or stronger construction helps the flame feed and hold when the formula asks more from the wick.
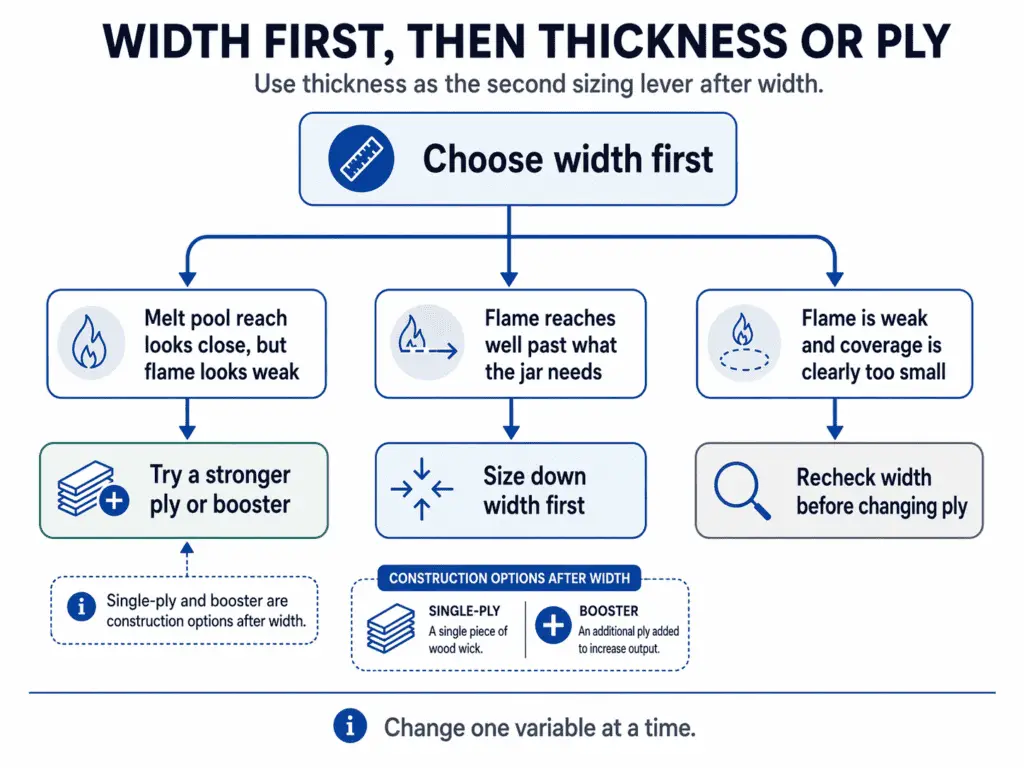
| What you see on the first burn | What the width is telling you | What the construction is telling you | Better next move |
| Melt pool reach looks close, but flame looks weak | Width may be near the mark | Fuel draw may be too light | Try a stronger ply or construction |
| Flame reaches well past what the jar needs | Width may be too large | Construction may not be the main issue | Size down width first |
| Flame is weak and coverage is clearly too small | Width is still the first issue | Construction alone may not solve it | Recheck width before changing ply |
The table is a modeled comparison that helps separate one variable from the other. It is not a final product chart. If you are still sorting out single-ply vs booster wood wick choices, keep the chosen width steady first and compare construction only after the width looks close. Then adjust the wick after the first burn test instead of changing several variables at once.
Single-Ply vs Booster: Change Construction, Not Width, When Flame Strength Is the Real Issue
Single-ply and booster wood wicks are construction options that come after width, not instead of width.
A single-ply wick is one wooden strip. A booster setup adds a second thin strip that helps the flame feed more steadily. The point is not to make the candle burn harder by default. The point is to hold the chosen width steady when the flame needs more support than a single strip can give.
Use use thickness as the second sizing lever after width as your rule when the melt pool looks close but the flame still seems underpowered. In that case, single-ply vs booster wood wick becomes a construction decision, not a reason to widen the wick again.
| Current signal | Likely issue | Better move |
| Coverage looks close, but the flame fades early | Construction may be too light | Try booster at the same width |
| Coverage looks too small and the flame is weak | Width may still be undersized | Recheck width first |
| Flame is strong enough and coverage is close | Construction is likely fine | Keep the setup and test again |
A booster is not automatically better. It is a narrower fix for a narrower problem. Keep width first, construction second, and troubleshooting third. Then validate single-ply vs booster with a burn test before you decide the jar needs a bigger wick, and route broader issues to fix wood wick flame-strength problems only when sizing logic no longer explains the result.
Adjust the Starting Choice for Wax Blend and Formula Resistance
Wax blend can change the starting wood wick choice even when jar diameter stays the same.
A wood wick burns through the actual wax system in the jar, so the same measured opening can need a different start point when the blend changes. Here, the right wick means the best first-test match for this specific wax system, not one setup that works the same across every blend. To see how wood wicks behave in different wax systems, think in terms of resistance: some blends let the wick feed more easily, while others ask more from the same width.
Here, formula resistance means how much the wax type, fragrance load, dye, and additives make the wick work to keep a steady flame and melt-pool progress.
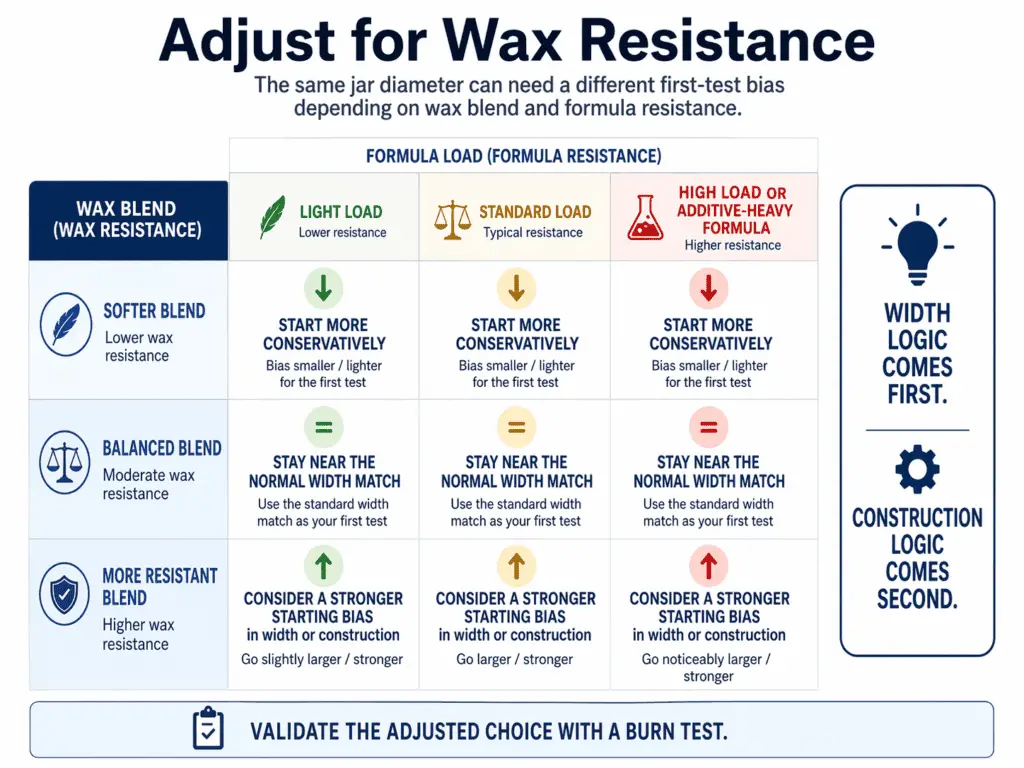
That is why the same jar can burn differently in soy, coco-soy, or a firmer blend. Softer systems often allow a calmer starting choice, while more resistant systems may need either a slightly stronger width bias or a stronger construction choice after width is set. The order still matters: change width for clear coverage limits, and change thickness or ply when coverage looks near target but the flame still lacks strength.
| Same jar, different wax system | Likely first-test bias |
| Softer blend | Start more conservatively |
| Balanced blend | Start near the normal width match |
| More resistant blend | Consider a stronger starting bias in width or construction |
This table is a working comparison, not a universal chart. It shows why jar diameter alone is not enough once the wax system changes. If you want a narrower qualifier, move next to fragrance load and additive effects on wick choice. After any wax-based adjustment, validate the wax-specific choice with a burn test rather than assuming the first bias is final.
High Fragrance Load, Dye, and Additives Can Raise Wick Demand
Fragrance load, dye, and additives can change wick demand even when jar diameter stays the same.
A wood wick must feed through the real wax formula, not an abstract jar size. That means a loaded formula can act more demanding than a lighter version of the same candle. Use adjust for wax blend and formula resistance first, then treat formula load as a qualifier to that starting point, not as a separate sizing system.
| Formula load state | Likely effect on the wick | Better first move |
| Light load | Lower resistance | Keep the base start point |
| Standard load | Normal resistance | Stay with the planned start point |
| High load or additive-heavy formula | Higher resistance | Bias the start point more cautiously and retest |
More fragrance oil does not automatically mean “size up hard.” Dye does not always force a change either. The point is that the same jar and same wax family can still behave differently once the formula gets heavier. Keep width logic first, then construction logic, then test-burn the formula-adjusted wick choice before making another move. If the candle still falls outside normal sizing logic after that, route the issue to fix loaded-formula wood wick problems instead of stacking guesses.
Test-Burn Once, Then Size Up, Change Ply, or Size Down
Test-burn cues tell you whether to keep the wick, size up, change construction, or size down.
A wood wick is only proven after a controlled burn shows that the flame and melt pool actually match the jar and formula. For wood wick burn-testing basics, keep the order fixed: watch the candle for 2 to 3 hours, check melt-pool progress, check flame behavior, then make one change at a time. Here, the right wick means the one that holds up under observation, not the one that looked right on paper. One imperfect burn does not always mean your diameter measurement was wrong.
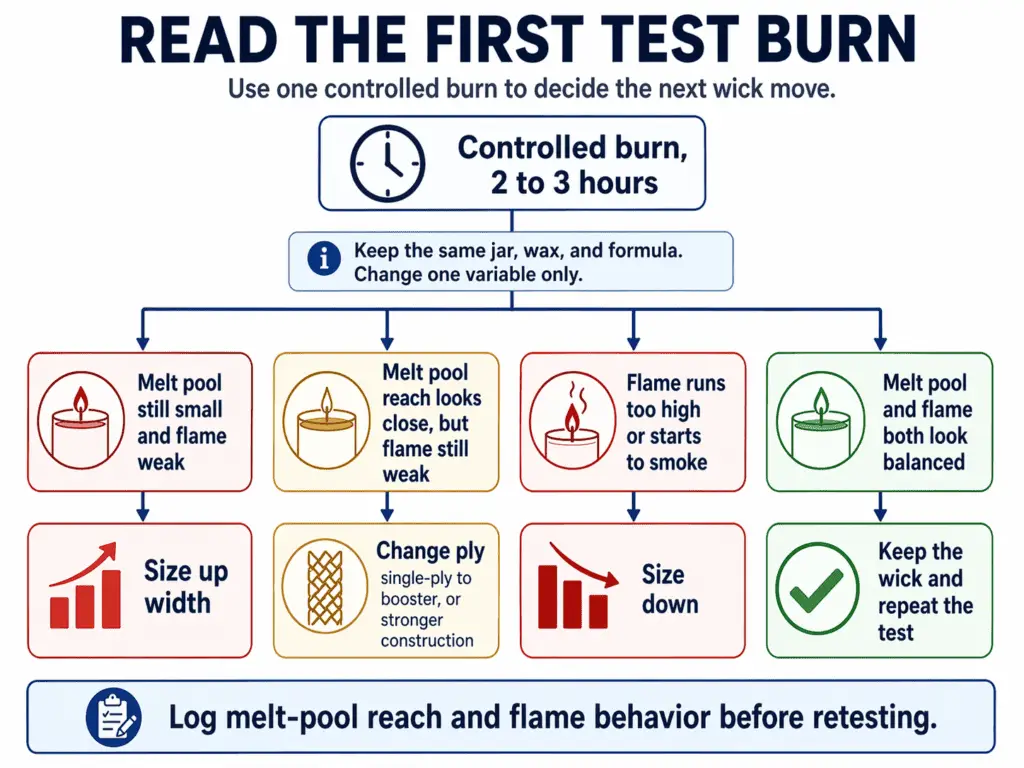
| First-burn cue | What it usually means | Next move |
| Melt pool is still small after 2 to 3 hours and the flame looks weak | The wick is likely undersized for the jar or formula | Size up width |
| Melt pool reach looks close, but the flame still seems weak | Width may be close, but construction may be too light | Change ply |
| Flame runs too high, looks too aggressive, or starts to smoke | The wick is likely too large for the jar or formula | Size down |
| Melt pool and flame both look balanced | The starting choice looks sound | Keep the wick and repeat the test |
Use the same jar, wax, and formula for the first check, log melt-pool reach and flame behavior, change one variable only, and then retest the same setup. That sequence keeps the result tied to the wick change instead of mixing several causes together.
Use this as a decision ladder, not a symptom pile. If the wick will not stay lit consistently, review how to prime and install wood wicks before changing multiple sizing variables. If the signs do not fit a simple size-up, change-ply, or size-down call, move to fix common wood wick problems instead of stacking guesses.