
Wick centering and securing is the candle setup process of fixing the wick tab at the base and holding the wick upright at the rim until the wax sets. To center a candle wick, attach the tab first, support the top with a holder or DIY bridge, then make small alignment adjustments while the wax is still fluid.
This page covers wick placement methods, base adhesives, top supports, DIY holders, and cooling stability. It does not replace wick sizing, full multi-wick layout testing, mold-specific wicking, or finished-candle repair guides.
Here, safety means avoiding wick positions that send flame heat toward the vessel wall; it does not mean formal candle safety certification, legal compliance, or labeling guidance.
A centered wick is the difference between a clean burn and a smoky, uneven mess. Most crooked wicks come from two failures: the tab slips at the bottom, or the wick isn’t held straight at the rim while wax sets. Once you treat centering as a simple stack—layout first, then base adhesion, then top support—your batches get dramatically more consistent. The sections ahead cover the tools, DIY tricks, spacing patterns, vessel-specific setups, and safety-first fixes that keep wicks where they belong.
Why centering and securing wicks matters
A wick that stays centered at the top and firmly attached at the base helps a candle burn more evenly and reduces avoidable safety risks.
When a wick drifts off-center, you can get an uneven melt pool, hotter spots near the wall, more soot, and “tunneling” where wax stays unmelted on one side. When the base isn’t secured, the wick tab can tilt, float, or slide—sometimes mid-pour—creating a crooked flame path that’s hard to correct later. For a bigger-picture foundation on wick behavior, start with **Candle Wicks: Complete Guide** and treat this section as the practical “why” behind **wick centering basics and safety**.
A practical conservative rule is to treat a wick as unsafe when it is visibly leaning toward the container wall or close enough that the flame could track the glass during a burn. If you use a specific shop cutoff, label it as your internal testing rule and validate it during controlled burn tests. Apply the same mindset you’d use with **Candle safety & test-burn basics**: avoid “maybe it’s fine” test burns when the setup already points toward the wall.
It helps to think of this as two separate jobs you’re solving at once: **top support** (keeping the wick centered and under light tension while wax sets) and **base adhesion** (keeping the wick tab locked to the container so it can’t lift or wander). If you’re still dialing in your first few container batches, **Beginner’s guide to container candle making** makes the “setup before you pour” part feel a lot less mysterious.
**A quick pre-pour check that prevents most crooked wicks**
- Confirm the tab is stuck (a gentle tug-test should not move it).
- Confirm center from two angles (straight down from above and at rim level from the side).
- Confirm the wick is upright (not pulling, not bowed, not slack).
- Confirm the candle won’t be bumped (level surface, no drafts, no vibration).
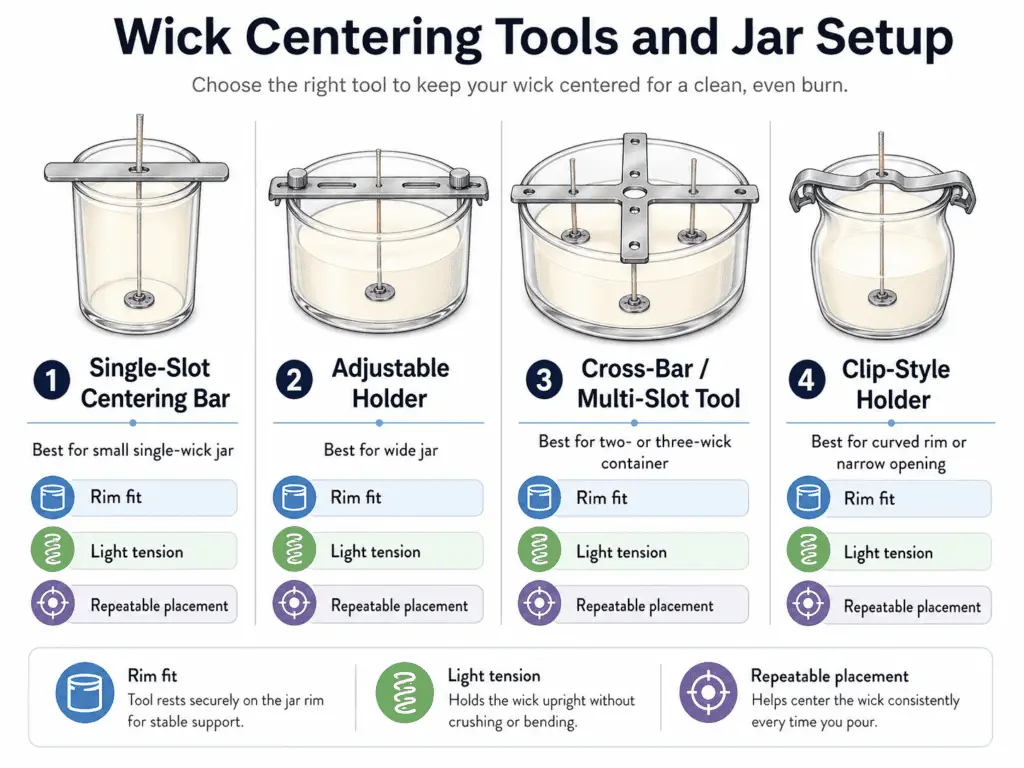
Wick centering tools: bars, holders, clips & cross-bars
Wick centering tools are small holders that span the top of a container and keep the wick straight, centered, and lightly tensioned while the wax cools and cures.
They’re most worth using when you want repeatable results across multiple candles, you’re working with wider jars, or you’re placing more than one wick and need consistent positioning. Many makers first encounter them while searching for **wick centering tools for container candles**, then realize the real benefit is fewer “almost perfect” candles that still burn unevenly.
In this section, the **best** centering tool means the holder that fits the rim, keeps light tension without pulling the tab, and repeats the same placement across the batch. The **right** method is the one that keeps this wick stable during pour and cooling, not the one that solves wick sizing, wax choice, or full candle safety.
Quick picker: match the tool to your jar + wick setup
| Your situation | Tool type that usually fits best | Why it works |
| Small-to-medium container, single wick, straight rim | Centering bar (single-slot) or simple holder | Fast, stable, enough tension to keep a wick upright |
| Wide container, single wick, rim varies or jar sizes vary | Adjustable bar/holder | One tool can fit multiple diameters without bending or slipping |
| Two or three wicks in one container | Cross-bar / multi-slot tool | Locks multiple wicks into a repeatable layout |
| Curved rim, narrow opening, or tricky lip | Clip-style holder (if it grips reliably) | Can hold tension where flat bars don’t sit well |
| You’re making many candles in one session | Reusable holders you can align quickly | Speed + consistency beats “eyeballing” each one |
How to choose (the 3 checks that prevent most “drift”)
1) **Vessel diameter:** wider jars magnify small placement errors, so sturdier or adjustable tools help.
2) **Rim shape:** a tool that can’t sit flat or grip evenly will rotate and pull the wick off-center.
3) **Wick count:** single-wick jars can tolerate simple bars; multi-wick layouts need fixed spacing, so multi-slot tools or cross-bars are easier to repeat.
If you’re building out multi-wick products, keep the layout logic consistent with **Multi-wick candle spacing and sizing** so your placement and your burn tests stay aligned. And if you’re assembling a basic workstation, **Candle making tools checklist** is a useful setup check so you’re not improvising tension with whatever’s nearby.
A simple, repeatable setup routine
- Prep the container and place your wick tab (base adhesion is the “can’t skip” part).
- Thread the wick through the tool and pull it just taut enough to remove slack—too tight can lean the tab.
- Confirm center from **two angles**: straight down from the top and from the side at rim level.
- Pour, then do a quick micro-adjustment while the wax is still fluid but starting to thicken.
- Leave the tool in place until the surface is firm enough that a gentle tap won’t shift the wick.
Bars vs adjustable holders (and when DIY is “good enough”)
- **Simple bars** are quick and cheap, but they’re easiest to knock out of alignment on curved rims or odd jar sizes.
- **Adjustable/more rigid holders** cost more up front, but they reduce rework when you’re making a batch or using multiple vessel sizes.
- DIY centering can be fine for one-off gifts—tools start paying off when you want the same result ten times in a row.
A simple way to verify your tool choice with one test
Pick one jar and one wick setup, then make three identical candles in a row. If the tool is working for you, you should see (a) the wick staying centered without repeated nudges while cooling, and (b) similar burn behavior across the three test burns. If you keep “correcting” the wick every few minutes, that’s a sign the tool is wobbling on the rim or your top tension is inconsistent—both are fixable with a different holder style or a more stable DIY support.
Pro/batch wick centering jigs & fixtures
Pro/batch fixtures are larger centering setups designed to align multiple containers at once or to repeat a signature multi-wick layout across a product line. They make sense when you’re consistently producing higher volume and need every helper to set wicks the same way.
A practical way to think about upgrading is to connect it to workflow and documentation: **upgrade to pro wick centering jigs** when you’re spending more time fixing alignment than pouring, and pair that shift with **Scaling your candle production workflow** plus **Wick testing and documentation templates** so your “centered” setup stays consistent across batches.
Wick stickers & adhesives: keeping the wick base locked in place
Wick adhesives secure the wick tab to the container base so the tab cannot slide, lift, or float while wax is poured and cooled.
Wick stickers, glue dots, and adhesive tabs are purpose-made adhesives that keep the wick tab stuck to the container so it can’t slide, float, or tilt as wax heats and cools. For a broader foundation on wick hardware and assembly, **Candle Wicks: Complete Guide** is the best “big picture” reference, while this section focuses on what actually prevents failures in real batches. If you want your setup to feel repeatable, think of this as learning **how to attach candle wicks securely**—not just “getting it to stick once.”
A decisive selection rule (choose once, then refine)
- If you want the fastest clean setup for most containers, start with wick stickers or glue dots.
- If your jar base is slightly uneven or you’re prototyping and need something immediately available, hot glue can work, but treat it as a test-only option because it can soften.
- If you want an all-wax workflow and you already use a heat tool, wax “glue” can work when you melt enough wax under the tab to form a real bond.
- If nothing else holds in a high-heat environment (or your vessels run hot), a high-temp RTV-style product can be strong, but only after it fully cures—rushing cure time is the most common failure with that route.
Quick comparison: common ways to secure a wick tab
| Option | Heat handling | Ease/cleanup | Best use | Most common failure |
| Wick stickers / glue dots | Stable when paired with good prep | Clean, fast | Most container candles, especially batching | Jar base wasn’t truly clean/dry; sticker was old or softened |
| Hot glue | Can soften in warm wax environments | Messier; strings | Emergency fixes or prototypes | Glue softens and tab drifts during pour or early burns |
| Wax glue (wick wax) | Good compatibility with wax system | Moderate; needs heat | When you already work with a heat tool | Not enough melt/coverage; tab pops loose later |
| High-temp RTV-style gasket products | Strong hold when fully cured | Slow; needs cure time | High-heat or “nothing else holds” situations | Not cured long enough; applied to dusty/oily glass |
If adhesion fails, decide fast (before you waste a whole pour)
- **Tab slides during wick setup** → Remove it, clean again, re-apply adhesive, then re-center.
- **Tab lifts when you tug-test** → Assume the base is contaminated (oil, dust, alcohol residue) and restart prep.
- **Tab shifts during pour** → Stop, let wax cool slightly, re-set if possible; if it won’t hold, don’t keep pouring into a moving wick.
- **Tab loosens after the candle is finished** → Treat it as a safety issue and follow **Troubleshooting floating or detached wicks**.
The “no-surprises” process (works with most adhesives)
1) Wipe the inside base until it’s squeaky-clean, then let it fully dry at room temperature. A lot of “mystery failures” are really prep failures, so **Candle jar preparation and cleaning** matters more than people expect.
2) Place the adhesive first (sticker/dot/tab), then press the wick tab onto it with steady, even pressure—don’t just tap it.
3) Do a gentle tug-test: hold the tab down with a fingertip and pull the wick upward lightly; if it shifts, restart now rather than hoping wax will “lock it in.”
4) Once the base is solid, use top support to keep the wick straight (adhesive holds the bottom; tools hold the top). A full “locked-in” setup pairs adhesives with **Wick centering tools: bars, holders, clips & cross-bars**.
5) Pour with a calm, steady hand and avoid bumping the container while the wax is still fluid—movement plus soft adhesive is the classic drift combo.
Why “the same sticker” works in one batch and fails in the next
In forums, makers often blame the product first, but the pattern is usually conditions: warm jars, dusty glass, damp basements, oily fingerprints, or pouring too aggressively and washing the tab sideways. Wax system and fragrance load can also change how much heat the base sees during early burns, which is why a “holds fine” sticker can later loosen in a hotter-burning combo. If you notice wicks leaning as the candle sets, the fix isn’t only adhesive—your cooling environment and stability matter too, which is where **How to stop wicks moving while the wax cools** becomes the next lever.
Once the wick base is truly locked, centering gets much easier—especially if you’re starting with household hacks instead of dedicated holders.
DIY ways to center wicks without special tools
To center a wick without tools, use household items like pencils, tape, or cardboard templates to hold the wick straight over the jar center.
DIY centering is absolutely workable for small batches, testing new jars, or learning the craft without buying gear on day one. If you’re still building your core workflow, **Beginner’s guide to container candle making** helps you spot the handful of “setup moments” that actually decide whether a wick stays straight. For deeper variations and common fixes, you’ll also see plenty of practical **DIY candle wick centering methods** collected across maker guides and troubleshooting threads.
Quick DIY menu (pick one that fits your jar and wick style)
| DIY technique | How it works | Best for | Watch out for |
| Pencil/chopstick bridge | Wick wraps lightly around a stick laid across the rim | Single-wick jars | Over-tight wrapping can tilt the tab |
| Taped straw support | Wick is taped to a straw or skewer held across the rim | Narrow openings | Tape can slip if the rim is dusty or curved |
| Ruler crosshairs | Two rulers (or straight sticks) form a “+” over the center point | Finding center fast | Can wobble on rounded rims |
| Cardboard template | Cut a disk that fits the rim; punch centered holes | Multi-wick or repeat batches | Must be cut accurately for each jar |
| Clothespin/peg clamp | Wick is clamped and rested on the rim | Short jars | Can pull the wick off-center if unbalanced |
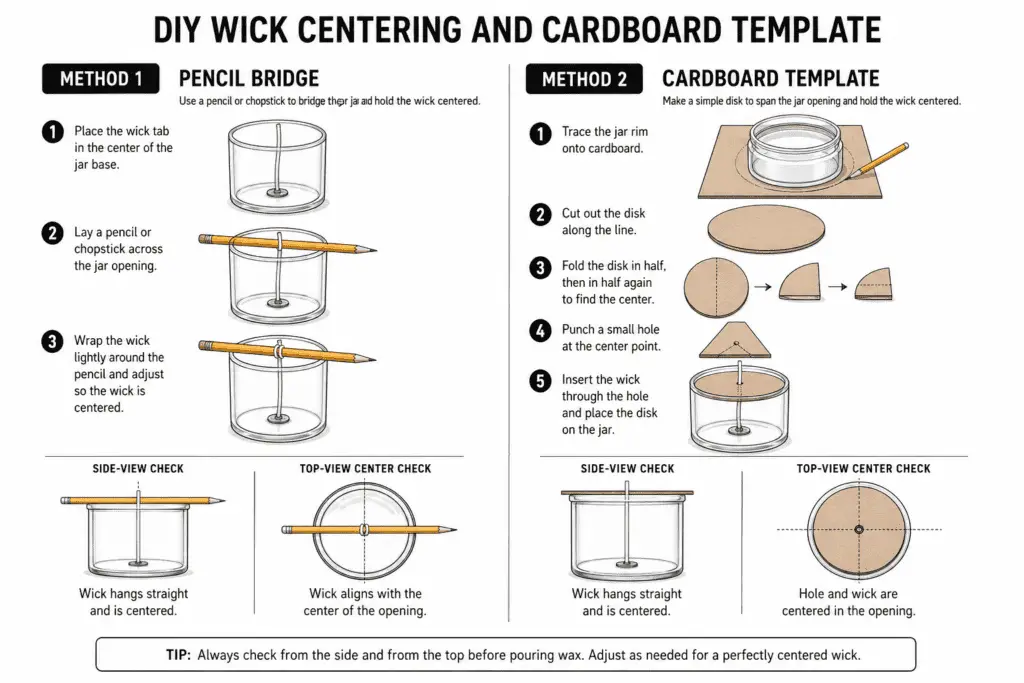
Method 1: the pencil (or chopstick) bridge
1) Set the wick tab firmly in the center of the base first—DIY top support can’t compensate for a sliding bottom.
2) Lay a pencil across the jar opening. Bring the wick up and wrap it once around the pencil, just tight enough to remove slack.
3) Look straight down from above: the wick should pass through the jar’s visual center, not “near center.”
4) Check from the side at rim level: if the wick is leaning, loosen and re-wrap so it stands upright.
5) After you pour, do one gentle micro-adjust while wax is still fluid but thickening—then stop touching it.
Practical tip: If you have to keep re-centering every few minutes, it’s usually because the wick is under uneven tension, or the pencil is rolling on the rim.
Method 2: the cardboard template (the DIY upgrade for repeatability)
1) Trace the jar rim onto sturdy cardboard and cut a disk that sits snugly without rocking.
2) Fold the disk in half twice to find the center point, then punch a small hole for a single wick—or lay out multiple holes in a simple pattern you can repeat.
3) Thread the wick(s) through, set the disk on the rim, and pull each wick just taut enough to stand straight.
4) Re-check center from above and from the side; adjust before wax goes in.
5) Label the template with the jar name/size so you can reuse it without guessing next time.
This is the method that turns “kitchen-table” into “consistent enough to test burns,” especially if you’re planning multi-wick layouts.
When DIY starts costing you more than it saves
DIY tricks are great until they become the bottleneck: too much time nudging, too many crooked resets, or too many jars where the rim shape makes balancing impossible. At that point, **Wick centering tools: bars, holders, clips & cross-bars** aren’t about being fancy—they’re about removing variability so you can focus on testing and refining. If you’re intentionally keeping costs low, **Low-budget candle-making setups** can help you choose what’s worth spending on first (and what can stay DIY for longer).
Once you can hold a wick straight reliably, the next decision is placement—whether one wick is enough, or you need a balanced multi-wick layout.
How spacing affects wick centering
Spacing affects wick centering because each wick needs a stable path that stays away from the container wall and stays balanced with any other wick in the same vessel.
Use this section only as a centering check. Full wick count, wick series, jar-diameter, and burn-test decisions belong in **Multi-wick candle spacing and sizing**, **Wick Size Chart by Jar Diameter & Wax Type**, and **Candle Wicks: Complete Guide**.
| Setup | Centering check on this page | Route for full decision |
| Single wick | Confirm the wick is upright and visually centered before the pour. | Use the parent wick guide for wick size and burn behavior. |
| Two or more wicks | Confirm the wicks are symmetrical, evenly tensioned, and not pulling toward the wall. | Use the multi-wick spacing guide for wick count, distance, and test-burn planning. |
| Wide or unusual container | Confirm placement with a template before securing tabs. | Use the jar and wick-sizing pages before treating the layout as final. |
For this page, the practical rule is simple: mark the intended wick path first, secure each tab without shifting it, then use a holder or template that preserves the layout while the wax cools. If a test burn shows one side running hotter or a flame tracking the glass, treat that as a spacing or wick-size issue and route to the dedicated sizing or troubleshooting page instead of expanding the repair here.
How vessel type changes wick-centering setup
Vessel type changes wick centering because jars, tins, pillars, tealights, and molds hold the wick from different points.
A jar candle centers from the base and rim, while a pillar or mold centers from the wick path, seal point, and top tension. Use this section as a short setup map, then route to **Vessel types & wicking**, **Pillar candle how-to guide**, or **Tealight/mold-specific tutorials** when the vessel needs a full procedure.
Use this quick reference to pick the “main lever” for each vessel type:
| Vessel type | Main centering challenge | Best centering approach | Helpful setup helper |
| Jars / tins | Wick leans at the top while wax is liquid | Strong base adhesion + top support at the rim | Holders/bars, or stable DIY supports |
| Pillar molds | Wick exits through a hole that can leak and shift | Thread/pin the wick + seal the exit + maintain tension | Wick pins, mold seal putty, steady clamping |
| Tealights | Tiny tolerances in shallow wax | Use pre-tabbed tealight wicks + a small upright holder | Tealight cups + simple clips/holders |
| Silicone / novelty molds | Mold flexes and distorts wick path | Brace the mold + seal exit + keep top tension | Bracing box, bars/jigs, careful leak checks |
If adhesion is the weak link in any vessel—especially jars and molds—revisit **Wick stickers & adhesives: keeping the wick base locked in place** and treat clean, dry surfaces as non-negotiable. If spacing is the root cause, go back to **How spacing affects wick centering** before you change tools.
When a vessel-specific attempt still produces a flame that favors one side or a wick that leans into the wall, treat it as a test result. If the candle looks unsafe or the defect is severe, route to the appropriate troubleshooting page rather than trying to make this centering guide carry the full repair process.
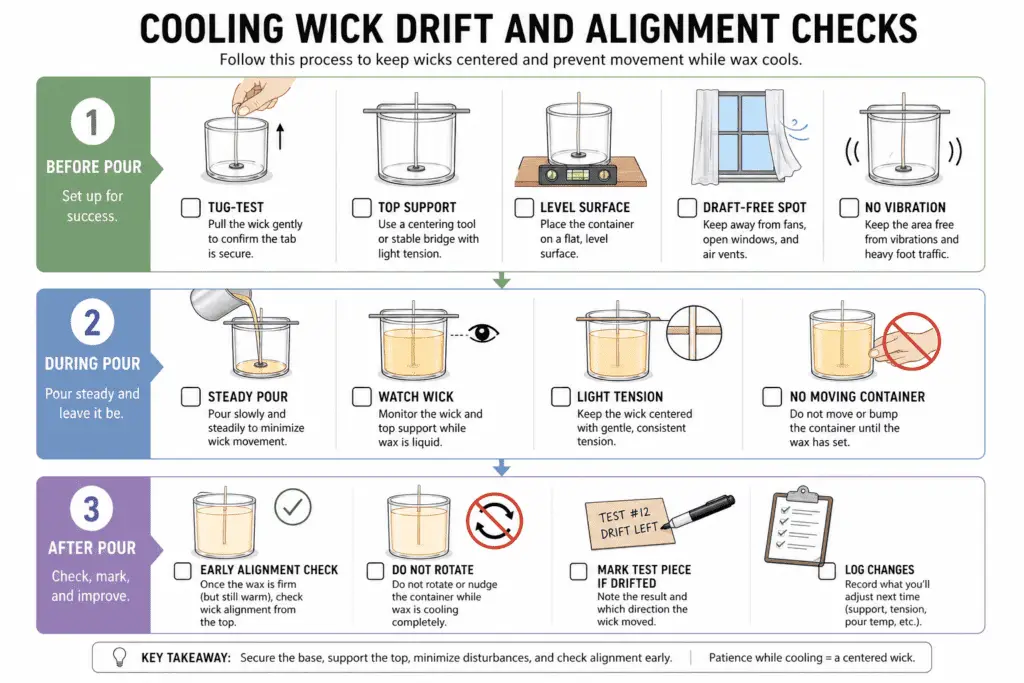
How to stop wicks moving while the wax cools
To stop wicks moving as wax cools, combine strong base adhesion, firm top support, stable pour temperature, and a level, vibration-free work surface.
In practice, wick drift usually comes from one weak link: the tab wasn’t truly locked down, the wick wasn’t held under light tension at the top, or the pour/cool-down environment let things shift. If you treat alignment like a quick routine instead of a “hope it stays” moment, you’ll catch problems while the wax can still be corrected.
Here’s a fast bench routine inspired by **Candle troubleshooting: pour & cure issues** and broader checklists in **Troubleshooting candle making problems**, with the deeper “why” covered in **Candle Wicks: Complete Guide** and the specific intent behind **prevent candle wick from moving while cooling**.
Before pour
- Do a gentle “tug test” on the wick to confirm the tab is actually bonded to the base.
- Set up top support so the wick is held straight and centered before you touch the pitcher.
- Check that the jar or mold is sitting on a level surface (shim if needed).
- Choose a cooling spot that’s draft-free and won’t be bumped for several hours.
- Keep anything that causes vibration (closing drawers, washing machines, heavy foot traffic) away from the curing area.
During pour
- Pour steadily and avoid knocking the container as you reposition your hand.
- Watch the wick for the first few seconds; if it starts to lean, correct immediately while wax is fully fluid.
- Keep the wick under light tension from the top support so it doesn’t bow or slack.
- Avoid moving the candle to “make room” mid-pour—set the spot first.
After pour
- Re-check alignment once the surface starts to thicken; make tiny corrections early, not late.
- Don’t pick up or rotate the candle “just to look” during the initial set.
- If the wick drifts noticeably, mark the candle as a test piece and plan a controlled rework rather than hoping it burns fine.
- Log what changed (wax, fragrance load, adhesive method, room conditions) so the pattern is obvious next time.
If you didn’t catch movement in time—or you’re staring at a finished candle with a visibly crooked wick—the next step is deciding what’s safely fixable and what should be retired.
What to do if a wick is crooked or loose after the candle sets
Some crooked or loose-wick candles are safe to adjust for personal testing, but candles with a wick near the glass or a detached tab should not be burned normally.
In this section, safe means the wick path is not visibly tracking toward the vessel wall, the tab still feels attached, and the candle is treated as a test item rather than a sellable product. Full repair steps belong in **Troubleshooting floating or detached wicks**, **Candle troubleshooting: finished candle defects**, and **Candle safety & test-burn basics**.
| What you see | What this page should do | Route if more help is needed |
| Slightly off-center wick, still away from the wall | For personal testing only, soften the top layer and nudge the wick back toward center. | Use a finished-defect troubleshooting guide. |
| Wick leaning toward the wall or flame likely to track the glass | Do not treat it as a normal burn test. | Use candle safety and test-burn guidance. |
| Loose tab or detached wick assembly | Do not rely on surface adjustment. | Use detached-wick troubleshooting or discard the candle. |
Keep this triage short in this article: mild surface correction belongs here only as a safety note, while re-wicking, full remelt decisions, and repair workflows belong to the troubleshooting branch.
Summary: building a reliable wick-centering workflow
A reliable wick-centering workflow is: choose spacing, secure the base, hold the top centered, control cooling, then evaluate and troubleshoot.
Run those steps in the same order every time so each failure points to a specific stage you can change and re-test. If you want the bigger wick context beyond centering, **Candle Wicks: Complete Guide** is the most useful umbrella reference for sizing, burn behavior, and safety framing.
This is the simple stack to repeat at your bench, even when you swap jars or waxes:
- Choose spacing that fits the container and wick count.
- Secure the wick tab so it cannot slide or lift.
- Center and tension the wick at the top so it sets straight.
- Keep the candle level, calm, and vibration-free while it cools.
- Review the result with a safety-first mindset, then adjust one variable at a time.
A helpful way to make this stick is to keep one short “recipe card” for each vessel you use, and treat it like **Candle wicks: complete workflow summary** for your own jars. DIY holding methods can be enough for one-offs, while dedicated holders reduce drift when you’re making multiple candles in a row. Pro-style jigs start making sense when your real problem is speed and repeatability, not “knowing what to do.”
If you like a quick check before every pour, keep a one-page **wick centering workflow checklist** near your tools and mark off the steps until the routine becomes automatic. Consistent notes and careful test burns will do more for your results than any single trick.
FAQ
Why does my wick lean after I pour?
The most common causes are a tab that wasn’t fully bonded, uneven top tension, or the candle being nudged while the wax is still fluid. If you need to keep re-centering every few minutes, the top support is wobbling on the rim or the wick isn’t held evenly.
How do I find the jar center quickly without measuring?
Use a cardboard template (trace the rim, fold twice, punch the center hole), or lay two straight edges as crosshairs across the opening and center the wick where they intersect. The goal is repeatability more than perfection.
Can I re-wick a finished candle?
If the tab is detached or the wick is dangerously off-center, the safest choice is usually to discard the candle. For test-only candles, you can sometimes re-melt, remove wax, reset a new tab securely, and repour—but treat the result as a fresh test burn, not a “fixed” product. For full repair steps, route to the dedicated crooked, leaning, or detached-wick troubleshooting page.
Do I need a wick centering tool?
Not always. DIY supports work fine for small batches and experimentation, but tools help when you want consistent results across multiple candles, wider containers, or multi-wick layouts.
Why did my wick sticker hold yesterday but fail today?
Most “same sticker, different result” problems come from conditions: dusty or oily glass, damp air, warm jars, or a pour that pushes the tab sideways before the wax thickens. Clean, dry prep and a quick tug-test catch most failures before you waste a pour.