Candle UV additives can reduce some light-related yellowing or fading, but they do not reverse existing discoloration or fix every cause of color change.
This page covers when to use, test, or skip a candle UV additive for light-related discoloration control, while full non-UV discoloration diagnosis belongs on separate pages.
A candle UV additive is a formula additive used to slow visible light-driven color change in candles under meaningful exposure. Here, discoloration control means slowing or reducing visible yellowing or fading from light, not promising full prevention or correcting every brown or yellow candle. This page stays focused on exposure risk, start-low dosage logic, control-batch testing, formula variables, and realistic expectations for white, pastel, and display candles. If the main cause sits in fragrance browning, safety handling, or storage as a standalone topic, that belongs on a different page.
What UV additives for candles actually do — and what they do not do
A candle UV additive slows some light-related discoloration, but it does not undo existing color change or solve every yellowing problem.
A UV additive is a candle formula additive used to reduce visible color shift caused by light exposure. On this page, that means light-related fading or yellowing in finished candles that sit in meaningful light. It does not mean total prevention, reversal of existing discoloration, or a fix for every brown or yellow candle.
Within Additives & Enhancers, UV additives are only one part of the formula picture. Their job is narrow: help some candles hold color better when light is the real problem.
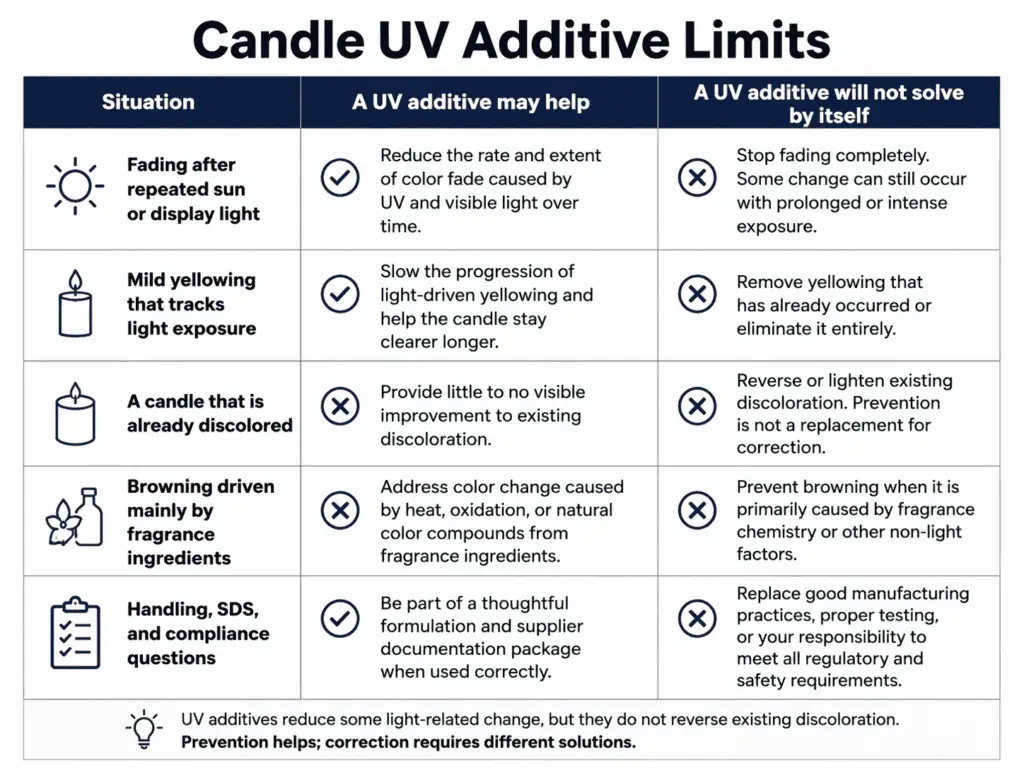
| Situation | A UV additive may help | A UV additive will not solve by itself |
|---|---|---|
| Fading after repeated sun or display light | Yes | No |
| Mild yellowing that tracks light exposure | Often | No |
| A candle that is already discolored | No | It does not reverse the change |
| Browning driven mainly by fragrance ingredients | Little to none | The main cause has to be handled elsewhere |
| Questions about handling, SDS, or compliance | No | That belongs under Additive Safety / Compliance |
The easiest way to judge a claim is to ask one question first: did the visible shift follow light exposure, or did it show up without that exposure? If the answer is unclear, do not treat the additive like a universal fix.
A UV additive should earn credit only when the candle, the formula, and the exposure pattern point to light as the main driver. If browning shows up even when the candle stays out of strong light, the better route is often Vanillin Discoloration in Candles rather than a higher UV dose.
Do UV additives stop all yellowing?
No. They can reduce some light-related change, but they do not stop every formula from shifting and they do not correct non-light causes.
That limit matters because the next decision is not which additive to buy first, but whether the candle sees enough real light exposure for the additive to matter.
When light exposure makes UV protection worth considering
UV protection becomes worth considering when the candle faces enough light, enough time in view, or enough visibility risk for a color shift to matter.
A candle does not need UV protection by default. It needs it when light exposure becomes meaningful enough to create visible risk, especially in display candles or formulas where small shifts show easily. On this page, worth considering means visible-risk justification, not a universal rule for all candles.
Within Additives & Enhancers, the practical test is simple: what kind of light hits the candle, how long does that happen, and how easy will it be to notice a shift?

| Exposure setting | Visible-risk level | Usual next move |
|---|---|---|
| Direct sun or repeated bright light | High | Use or test first |
| Bright window light over time | Medium to high | Test or use |
| Repeated market or shelf display light | Medium to high | Test or use |
| Normal indoor room light with short home use | Low | Often skip |
| Boxed or dark-stored candles | Low from light alone | Skip for light risk, then check other causes |
A high-risk case is a candle that spends real time in bright view and has a color family that shows change quickly. A low-risk case is a candle with short life, low exposure, and little chance of visible complaint. That split keeps the page focused on real exposure instead of broad preservation advice.
Why white and pastel candles show discoloration sooner
White and pastel candles often show color change sooner because there is less color in the formula to hide a small shift.
That does not mean white candles are always chemically less stable than darker candles. It means they are often more visibly sensitive, so a small change becomes noticeable faster. In practical terms, they are stronger candidates for testing first when the candle will sit near a window, on display, or on a shelf for longer.
This is where Coloring/Dyes matters as a support topic. The same amount of shift can look minor in a darker candle and obvious in a white or pastel one.
Retail display vs home use: which candles need UV protection first
Display candles usually need UV protection before quick home-use candles because they stay in view longer before they are burned.
A candle that sits under repeated shop, market, or window-facing display conditions has more time to show a visible shift than a candle that is poured, gifted, and burned soon after purchase. That makes display-heavy inventory a stronger testing target than fast-turn candles.
This is still an appearance question, not a retail operations question. If the real issue becomes turnover planning or broader shelf strategy, route that work to Retail Display / Shelf-Life instead of stretching this page into business operations.
How storage and packaging support — but do not replace — UV protection
Storage and packaging help reduce exposure, but they do not replace UV additive use when the candle will still spend real time in bright view.
Dark holds, covered storage, and less idle time in direct light can reduce visible-risk before sale. That support matters, especially for white and pastel candles. But once the candle goes back into display conditions, storage alone cannot do the whole job.
This is why Storage and Packaging belongs here only as a support layer. It helps lower exposure between pouring and sale, but it does not replace additive use in higher-risk display cases.
Once exposure looks real enough to matter, the next step is using a controlled starting dose instead of guessing.
How to start with UV additive dosage without guessing
Start at the low end of the supplier guidance, compare it against a control batch, and increase only when the treated candle shows too little visible benefit under the same exposure.
This dosage logic applies to candle UV additives used for light-related discoloration control. It is not a single magic number for every formula. On this page, start-low means beginning with a modest test level, keeping the rest of the formula steady, and changing the dose only after a matched comparison.
Use the low end of the supplier guidance as the starting test rate, then raise only after a matched control comparison shows too little visible benefit.
Copying one rate into every wax and fragrance system creates false confidence. A cleaner method is to treat dosing as a hold, raise, or remove decision instead of assuming there is one perfect rate for every candle.
| What you see after matched exposure | Best next move |
|---|---|
| Clear benefit in the treated candle | Hold the rate and repeat once |
| Small benefit, but still visible shift | Keep the formula steady and test again |
| No visible difference | Check exposure and formula variables before raising |
| Worse appearance or no cleaner result | Stop chasing higher dose and recheck the cause |
A start-low approach saves more than material. It keeps you from reading every weak result as “not enough additive” when the real issue may be low exposure, wrong-cause diagnosis, or a formula variable that changed the outcome.
How to test a treated batch against a control
A Control-Batch Testing setup is the simplest proof path for deciding whether a UV additive is doing enough to keep, raise, or remove.
Use one no-additive control batch and one treated batch. Keep the wax, fragrance load, dye plan, container style, cure conditions, and exposure setup the same. When too many things change at once, the test stops answering the real question.
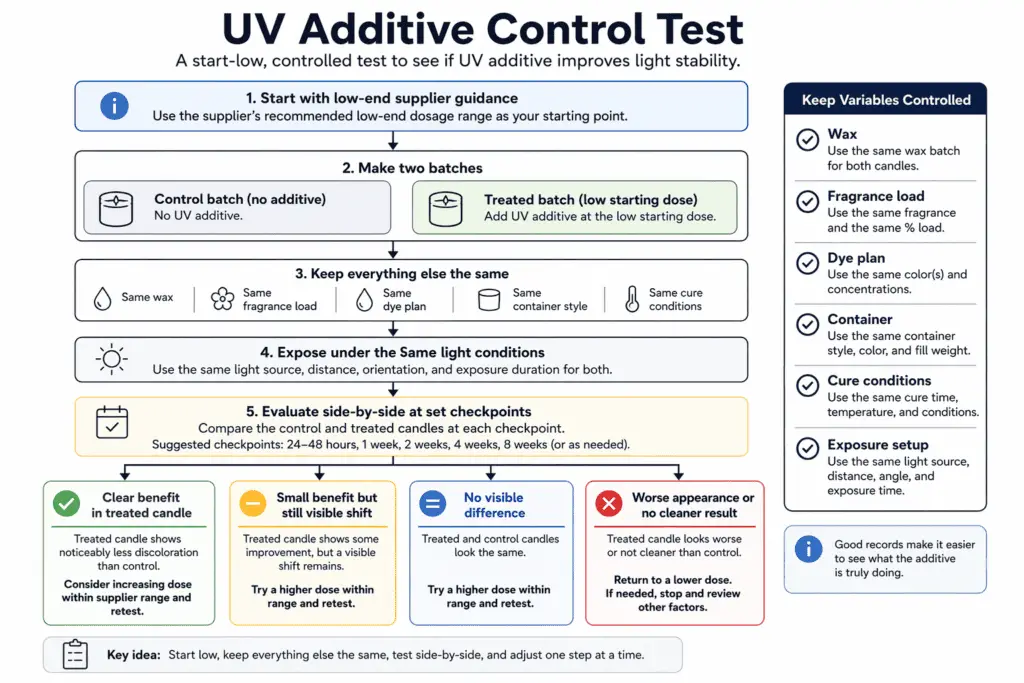
- Pour a small control batch with no UV additive.
- Pour a second batch with the same formula and a low starting dose.
- Cure both batches the same way.
- Expose both batches to the same light conditions.
- Compare them side by side at the same checkpoints.
- Change only one variable for the next round.
That side-by-side step matters more than people think. Memory is a weak testing tool. A control gives you something visible to compare against when the shift is subtle.
A practical review checklist looks like this:
- Check both candles under the same room light.
- Compare the most visible side first.
- Look for yellowing, fading, or browning, not just overall “looks better.”
- Note whether the treated candle stayed cleaner enough to matter.
- Stop the test if the cause no longer looks light-related.
Can too much UV additive hurt the result?
More additive is not automatically better.
If the test setup is weak, a higher dose can waste time and make the real problem harder to spot. A disappointing result may come from low exposure, formula differences, or a non-UV cause, not from starting too low. If the question turns into handling limits, label language, or safety paperwork, move that part to Additive Safety / Compliance.
Once the dose logic is under control, the next thing to check is why one formula responds differently from another.
Why results change across wax, fragrance, dye, and container choices
UV additive results change across formulas because the candle system changes how discoloration appears and how much of the visible shift the additive can actually reduce.
On this page, works means a visible reduction in light-related discoloration under that specific formula and exposure setup. It does not mean the same additive will behave the same way in every wax, every fragrance, every dye load, or every vessel.
A clean reading starts by checking the main variables in order:
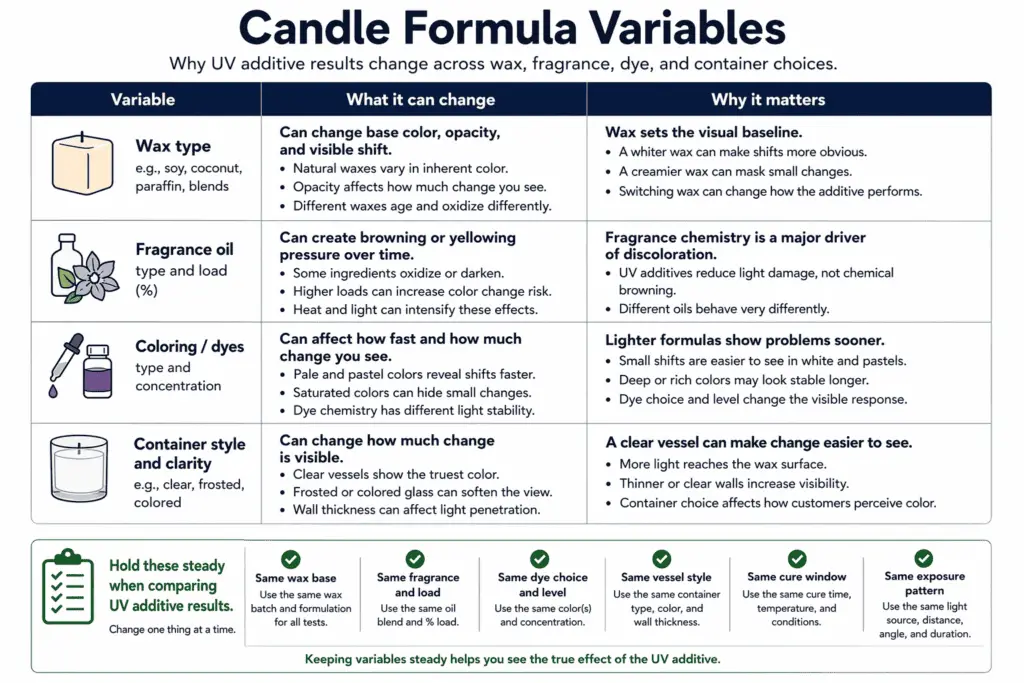
| Variable | What it can change | Why it matters |
|---|---|---|
| Wax Type | Base color, opacity, and visible shift | Some wax systems show yellowing sooner than others |
| Fragrance Oil | Browning or yellowing pressure | Fragrance can create non-UV color change |
| Coloring/Dyes | Visibility of small shifts | Pale formulas reveal change faster |
| Container style | How clearly you see the shift | A clear vessel may make change easier to spot |
This is why a UV additive can look helpful in one formula and weak in another without changing the actual product. A pale wax with a visible fragrance tint can make a small shift look large. A darker candle can hide the same amount of change. A clearer container can make the whole issue look worse than it would in a different vessel.
That does not mean the additive failed. It means the formula changed the visible outcome.
What to hold steady before blaming the additive
If a result looks disappointing, check these variables before changing the dose:
- the same wax base
- the same fragrance and load
- the same dye choice
- the same vessel style
- the same cure window
- the same exposure pattern
When those pieces move around from batch to batch, the additive becomes the easiest thing to blame even when it is not the main reason for the difference.
Why did UV additive work in one formula but not another?
Because formula variables change both the cause and the visibility of discoloration.
If the fragrance is driving browning, the UV additive may look weak because light is not the main cause. If the candle is white or pastel, a small shift may look much larger than it does in a darker system. If the vessel makes the color easier to see, the formula may look less stable than it really is.
When the browning follows fragrance more than light, Fragrance Oil and Vanillin Discoloration in Candles are better next checks. When the issue turns into base selection rather than UV response, route deeper wax questions to Wax Type instead of turning this section into a full wax guide.
If the result still looks wrong after you check formula variables, the next question is whether UV is even the main cause.
Why your candle may look discolored even when UV is not the main issue
Not every yellow, brown, faded, or cloudy candle has a UV problem, so diagnosis has to come before you change the formula.
On this page, discoloration means visible color change that may be light-related, but this section only separates likely UV cases from lookalikes and routes full diagnosis outward.
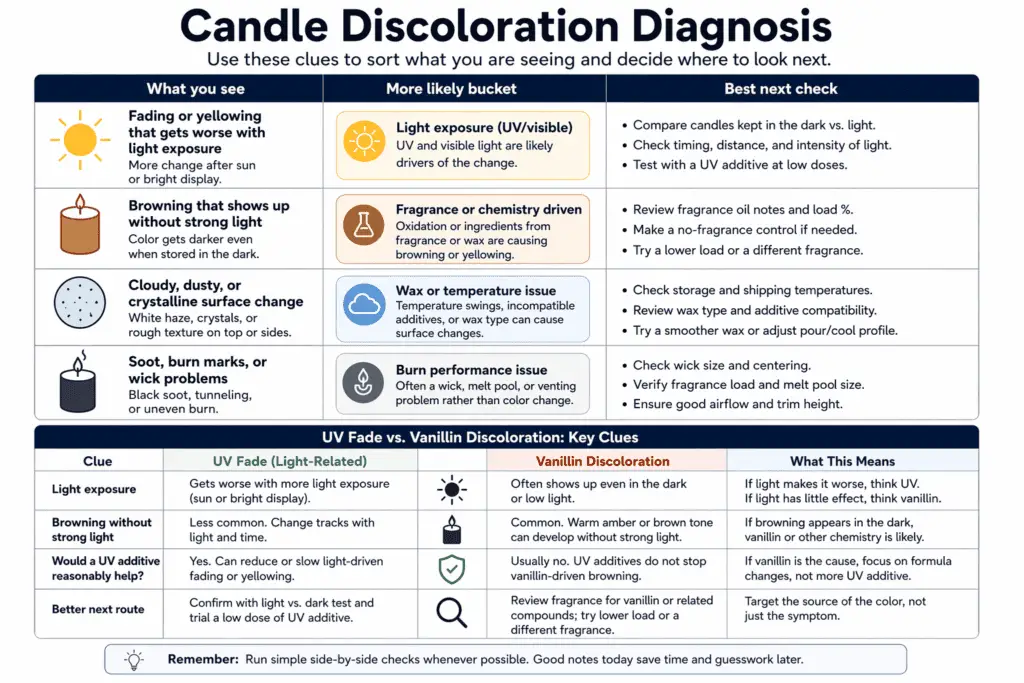
| What you see | More likely bucket | Best next check |
|---|---|---|
| Fading or yellowing that gets worse with light exposure | Light-related discoloration | Stay on the UV path |
| Browning that shows up without strong light | Fragrance-driven discoloration | Check fragrance clues first |
| Cloudy, dusty, or crystalline surface change | Surface lookalike | Check bloom or frosting first |
| Soot, burn marks, or wick problems | Different defect family | Route away from UV troubleshooting |
Symptom color alone is not enough. A yellow candle is not automatically a UV case, and a brown candle is not automatically a vanillin case. The cause has to match the exposure story.
UV fade vs vanillin discoloration: how to tell the difference
UV fade and vanillin discoloration are separate cause paths, so they should not be treated like one problem with one fix.
If the candle changes mainly after real light exposure, stay on the UV path. If it browns without much light, move to the fragrance path instead of treating this as a higher-dose UV problem.
| Clue | More consistent with UV path | More consistent with vanillin path |
|---|---|---|
| Visible change follows sun, bright window light, or display time | Yes | Not required |
| Browning appears without strong light | Less likely | More likely |
| UV additive would reasonably help | Sometimes | Not as the main fix |
| Better next route | Stay on UV diagnosis | Route to Vanillin Discoloration in Candles |
This is a routing aid, not a full vanillin fix page. If the problem clearly belongs to fragrance browning, keep the summary short and move that deeper work to Vanillin Discoloration in Candles.
Is it discoloration, bloom, or frosting?
A cloudy or dusty surface does not always mean the candle has changed color from light.
If the change looks more like a film, crystals, or a pale surface cast, check Wax / Frosting / Appearance Defects before you treat it as UV failure. That keeps a lookalike issue from hijacking the whole page.
Once the likely cause is clearer, the last step is deciding whether the additive is worth using at all.
When UV additives are worth using — and when they are not
UV additives are worth using when likely visible benefit is strong enough under the candle’s exposure, visibility, and duration profile.
On this page, worth using means enough likely visible benefit to justify the step. It does not mean profitability, product quality, or a broad buying verdict. It also does not mean every candle should get a UV additive by default.
The strongest use cases usually share four conditions:
- meaningful light exposure
- enough time in view
- a color family that shows small shifts easily
- a diagnosis that still points to light as the main cause
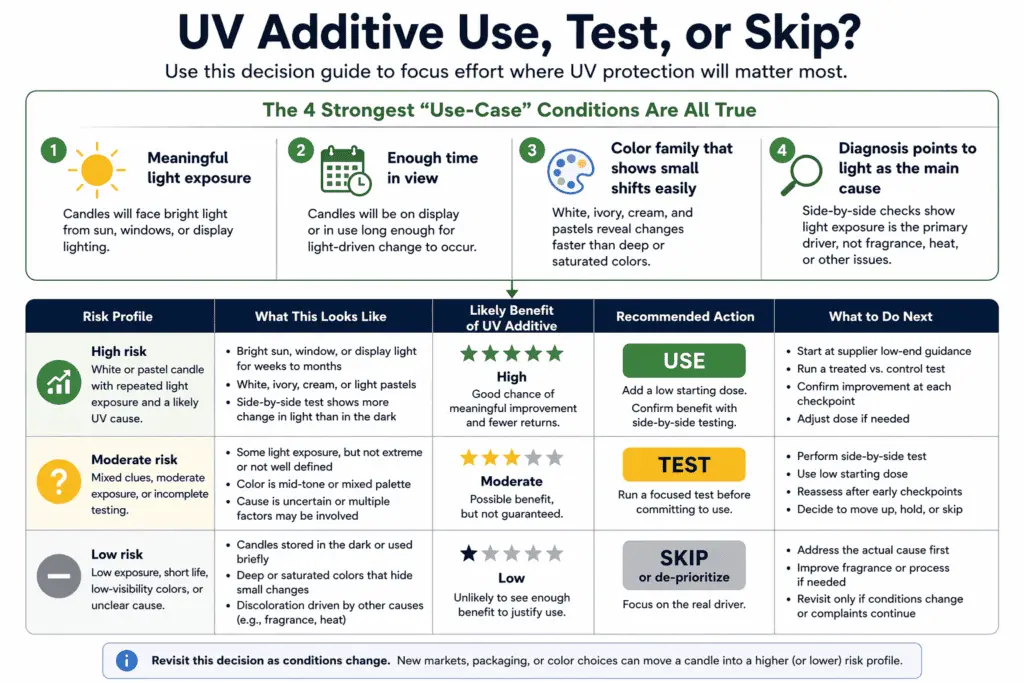
A weak use case usually lacks one or more of those conditions.
| Risk profile | Best call | Why |
|---|---|---|
| White or pastel candle with repeated light exposure and a likely UV cause | Use | The visible-risk profile is strong |
| Mixed clues, moderate exposure, or incomplete testing | Test | The candle may benefit, but proof still matters |
| Low exposure, short life, low-visibility color, or unclear cause | Skip or de-prioritize | Likely visible benefit is too small or too uncertain |
That use/test/skip split is the cleanest way to close the page without drifting into product rankings or business analysis.
Do all candles need UV additive?
No. Many candles do not need it.
Quick home-use candles in low light often do not justify the extra step. White, pastel, and display-heavy candles move toward use sooner because they are more likely to show visible complaints. Middle cases belong in test, not in automatic yes or automatic no.
When can you skip it?
You can often skip UV additive when the candle has low light exposure, short time in view, low visibility risk, or a cause that no longer looks UV-related.
Skip does not mean the additive is bad. It means the likely visible benefit under that risk profile is too small to matter much.
Why did I see little or no visible difference?
The usual reasons are low exposure, weak diagnosis, formula changes between batches, or a candle that was never visually sensitive enough for the gain to show clearly.
That is why not worth using has to be defined carefully. It means insufficient likely visible benefit under the current risk profile, not proof that the additive never works.
If the main uncertainty is still the cause, go back to the diagnosis split before making a final keep-or-skip call.
Candle UV additives fit a narrow job: reduce some visible light-related discoloration in candles that actually face meaningful exposure.
The safest way to use them is to qualify the exposure first, start low, test against a control, hold the formula steady, and separate UV issues from fragrance browning or surface lookalikes before changing the dose. White, pastel, and display candles usually rise to the top of the test list because they show small shifts sooner and stay in view longer. If your real question shifts into handling rules, go to Additive Safety / Compliance. If it shifts into fragrance-driven browning, go to Vanillin Discoloration in Candles.