
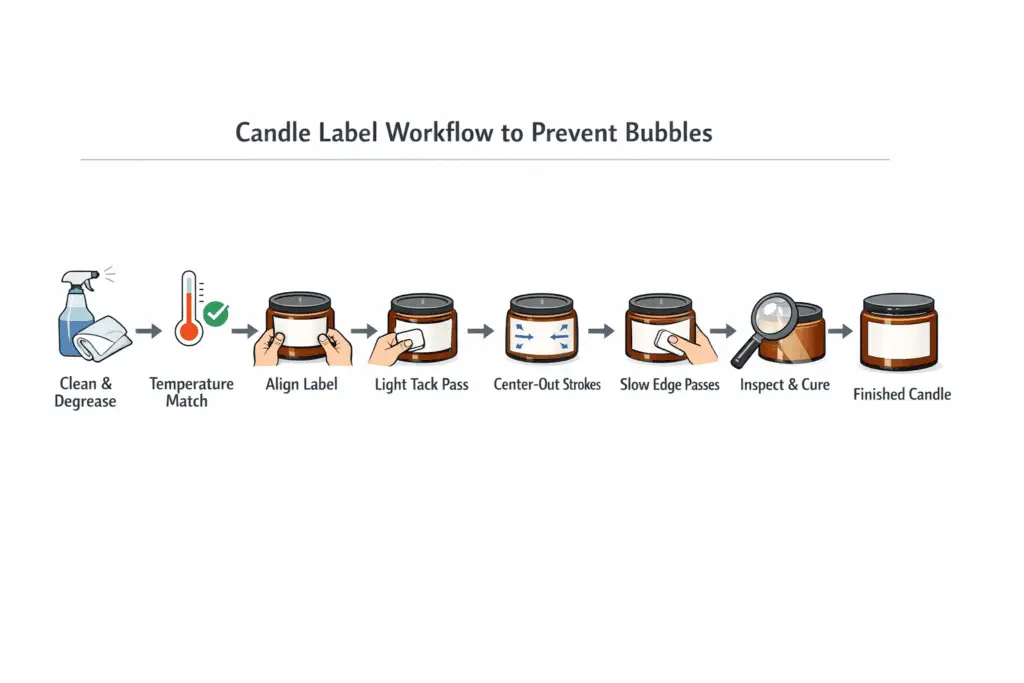
Apply labels to a room-temperature, degreased container using a light tack pass first, then firm center-out pressure and a careful edge seal. That gives trapped air a path to escape before the adhesive fully wets out.
Most label bubbles come from trapped air, dust, static, oil, or adhesive that cannot flow into the surface texture. A clean workspace, the right application order, and a short dwell period solve most failures. The goal is full adhesive contact without milky patches, tunnels, or silvering. Once your setup is consistent, the process becomes repeatable even on frosted jars and tins.
For the broader workflow, see candle labels and packaging.
One-screen workflow
- Clean and degrease the container, then avoid touching the label area.
- Let labels and containers reach the same room temperature.
- Align the label and make one light tack pass to set position.
- Press from the center outward in overlapping strokes.
- Seal the perimeter with two slower passes, especially near the seam side.
- Check under angled light and correct only when needed.
- Let the label dwell, then re-burnish once if needed and leave it to cure.
Set up your labeling station so bubbles cannot start
A bubble-free station is clean, stable in temperature, and easy to inspect. Use a flat work surface, strong lighting, and a defined no-touch label zone. The biggest upgrade is angled inspection light. A bright light placed low helps reveal microbubbles as silver or milky patches.
A simple, repeatable station should include:
- A lint-free wipe
- A clean mat or work surface
- A squeegee or small roller
- A trash bin for peel liners
- One bright inspection light
Quick setup checks
- Wipe the label zone, then run a strip of tape over it. If the tape lifts lint, clean again.
- Hold the container under angled light and look for haze, fingerprints, or wax residue.
- Touch the container with the back of your hand. If it feels cooler than the room, let it sit longer before labeling.
Clean and degrease the container first
Bubbles often form because oils, wax residue, and dust create tiny high spots that trap air. Clean the surface thoroughly, let it dry fully, and do not touch the label zone again.
Simple cleaning routine
- Dry wipe first to remove loose dust.
- Degrease with a lint-free wipe and a residue-free cleaner.
- Let the surface flash dry completely.
- Keep fingers off the label area.
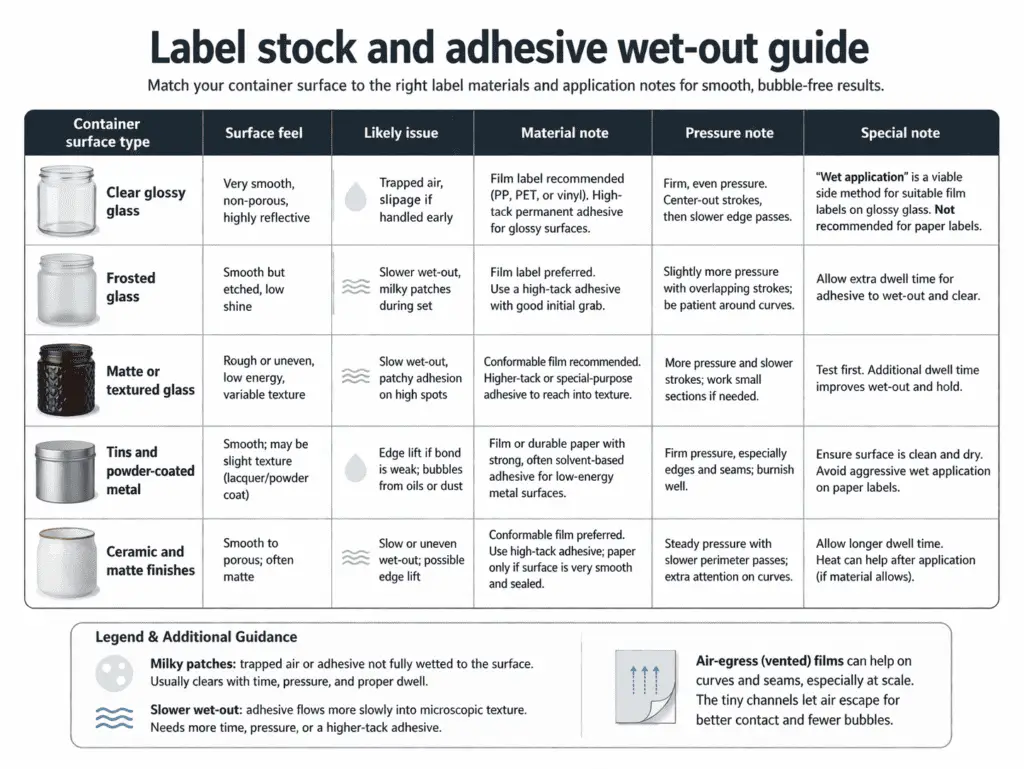
What changes by container type
Clear glossy glass
Oil and fingerprints are the main problem. Thorough degreasing prevents micro-voids under the label.
Tins and powder-coated metal
Texture, seams, and rims make pressure less even. Clean the flat zone carefully and keep pressure consistent.
Ceramic and matte finishes
These surfaces often have more pores and texture. Expect slower wet-out and plan for a stronger edge seal.
Choose label stock and adhesive that can wet out properly
Even good technique fails if the label stock is too stiff or the adhesive cannot flow into the surface. Some surfaces, especially frosted, matte, or powder-coated containers, need more forgiving materials and more pressure.
Practical rules
- If you need a short repositioning window, use a label and adhesive that allow brief adjustment.
- If you label textured or frosted surfaces, expect micro air and plan for extra pressure.
- If you do full wraps at scale, air-egress films can help vent air on curves and seams.
Wet application is a side method for suitable film labels on glossy glass, not the default path for most candle labels, and it is not suitable for paper labels.
Fast compatibility test
Apply one test label, burnish it, and inspect it after 2 to 5 minutes.
- If milky patches disappear, wet-out is happening normally.
- If milky patches remain after firm burnishing, the surface is either contaminated or the adhesive is too stiff for that surface or temperature.
On frosted or textured jars, expect slower wet-out, inspect under angled light, and avoid repeated peeling because it can make haze worse.
Apply labels dry with a hinge and center-out method
Dry application is the most reliable method for most candle labels. It pushes air outward instead of trapping liquid underneath the label.
Repeatable dry application method
- Align the label using a hinge or a steady hand position.
- Make one light tack pass to lock placement.
- Press from the center outward in overlapping strokes.
- Push air toward the nearest edge.
- Finish with two slower perimeter passes to seal the edges and corners.
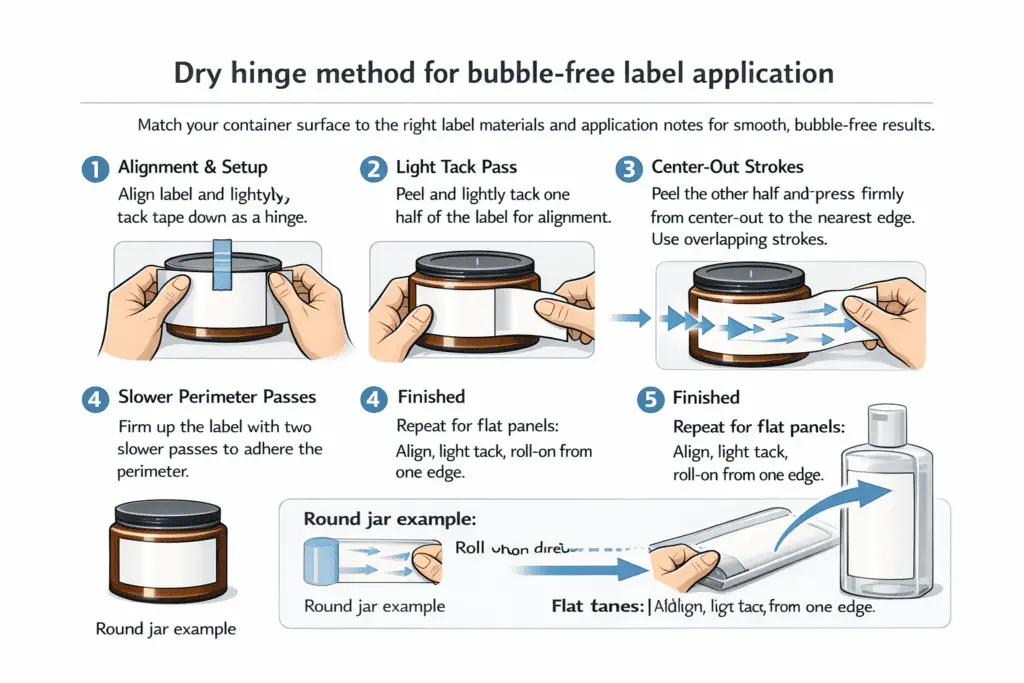
On round jars and tins, start at the center and work outward with the curve. On flat lids, boxes, or flat tin panels, start from one edge and roll the label on so air can escape ahead of the adhesive.
Pressure guide
First pass
Use light pressure, just enough to set position. You should still be able to lift and reposition within a few seconds if needed.
Second pass
After 2 to 5 minutes, apply firmer pressure until the label looks uniformly wetted out, with no silvering or milky patches.
If a small bubble appears, use a card or squeegee first and push it toward the nearest edge. If it still stays put and the label material allows it, make one tiny pinprick and press the air out.
Control temperature and humidity
Many bubble problems are not material problems at all. They are temperature and humidity problems. Cold containers, cold labels, and high humidity can slow wet-out or cause invisible condensation.
Better application conditions
- Keep labels and containers in the same room until both feel neutral to the touch.
- Apply and let the labels set at normal room temperature, not in a cold or damp area.
Do not apply labels to containers that feel cooler than the room. Even slight temperature differences can create moisture and poor adhesion.
If the candle was just poured or the jars came from cold storage, wait until the container is fully cool and let it settle in the labeling room before you apply the label.
Two quick checks
Condensation check
If the container feels noticeably cool against your skin, wait until it matches room temperature.
Wet-out check
After burnishing, inspect under angled light. Milky patches mean the adhesive has not fully contacted the surface yet. Re-burnish once, then let it dwell.
Use pressure and dwell time to activate the adhesive
Pressure-sensitive adhesive needs both pressure and time. Pressure starts contact, and dwell time lets the adhesive flow into micro texture and strengthen the bond.
Simple dwell schedule
- Immediately after application: burnish center-out, then seal the perimeter.
- After 10 to 30 minutes: avoid squeezing, stacking, or sliding containers.
- After 1 to 2 hours: re-burnish the perimeter once if the surface is textured or near a seam.
- Full cure: many adhesives continue strengthening for 24 to 72 hours.
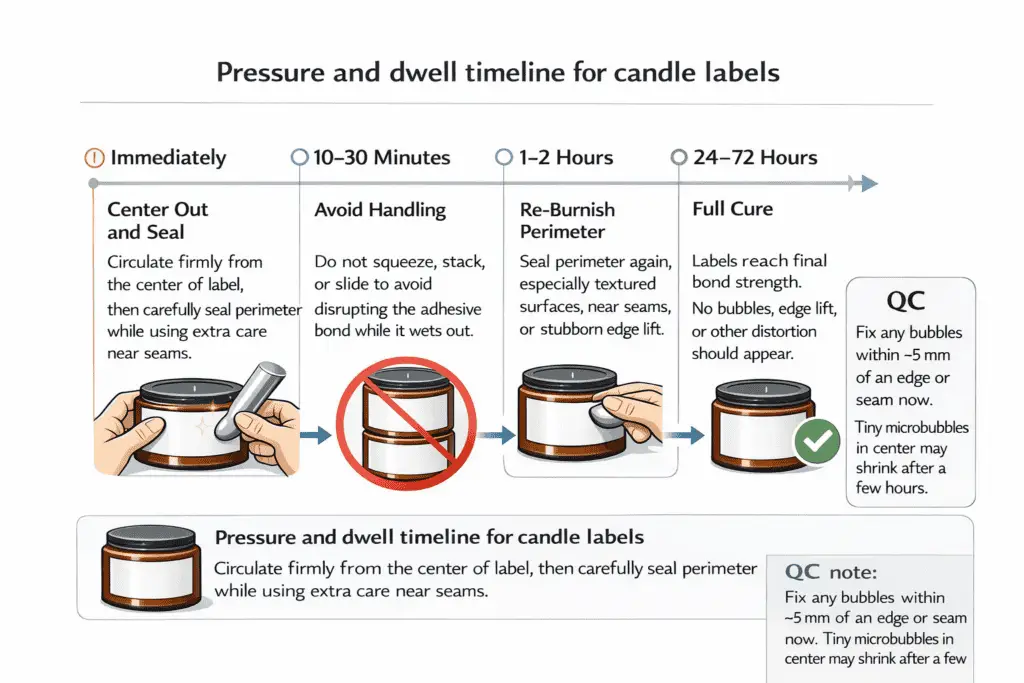
Practical QC rule
- If a bubble is within about 5 mm of an edge or seam, fix it right away.
- If a bubble is in the center and smaller than a pinhead, leave it alone for a few hours first. Many microbubbles shrink as the adhesive wets out.
Match label geometry to the container
Container shape affects where air gets trapped. If the label fights the container geometry, you will keep seeing the same failure points.
If the container has curved top or bottom edges, keep the label about 1/8″ to 1/2″ away from those curves. On full wraps, leave a very small seam gap and seal the seam-side edge last so trapped air still has a path out.
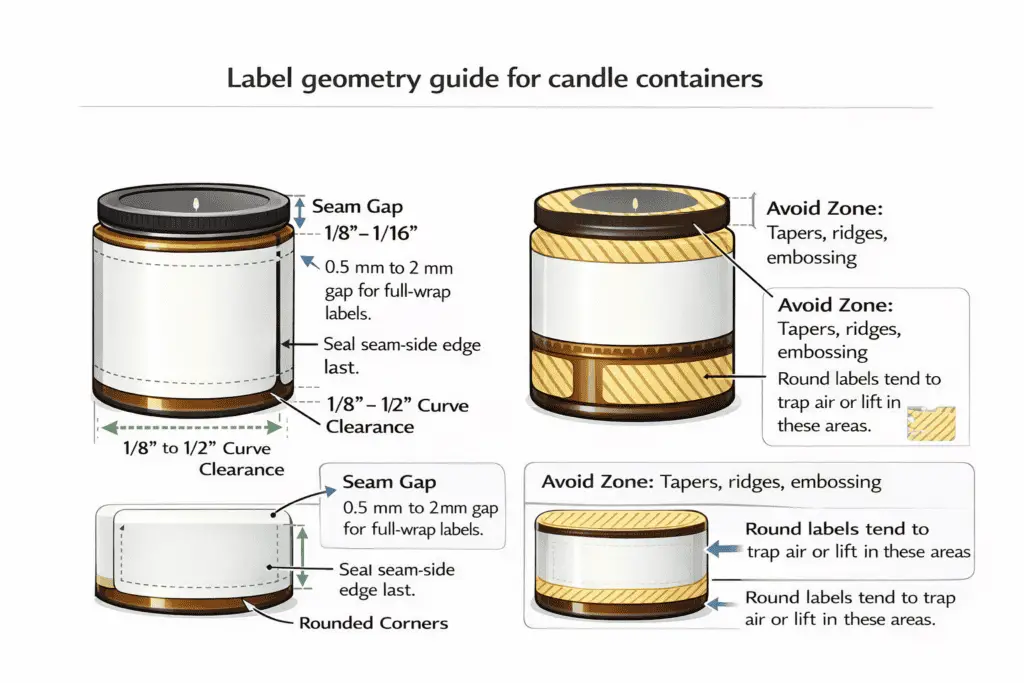
Common fixes
- Leave a small non-overlap gap at the seam for full wraps.
- Round label corners to reduce edge stress.
- Keep label height away from sharp tapers, ridges, and embossed areas.
The simplest win is giving trapped air a path out instead of sealing it in.
Use tools and jigs for consistent alignment and pressure
Freehand application varies too much from one container to the next. The right tool makes good technique repeatable.
Useful tools
- Felt-edge squeegee for matte films and textured jars
- Small roller for wraps and seam areas
- Simple jig or stop block for consistent label placement
Fast calibration trick
Apply one label and count your strokes. Keep the same number, direction, and overlap pattern on every container. If your hand gets tired, your pressure is changing, which means your results will change too.
Reduce static and dust before you start
Dust often looks like trapped air because it creates tiny tent points under the label. Static makes the problem worse by pulling particles back onto the surface after cleaning.
Low-effort controls
- Keep labels covered until the moment you apply them.
- Use a compatible anti-static wipe or tack cloth if needed.
- Label away from open wax, fragrance oil, and loose packing materials.
Diagnosis tip
If a defect does not move when you press on it, it may be dust, not air. Do not keep burnishing it. Lift once, clean the area, and reapply.
Seal edges so bubbles do not turn into lift
Edge bubbles often become edge lift during cure or handling. A short, deliberate edge-seal routine prevents a lot of later failures.
If bubbling has already turned into lift or repeated rework, see candle label fixes before you keep peeling the same label.
Reliable edge-seal routine
- Burnish center-out first.
- Make two slow perimeter passes.
- Focus on corners, seams, and curved areas.
- If needed, re-burnish once after about an hour.
- Stop touching the label after that.
Final takeaway
If you want bubble-free candle labels, stop treating it like a sticker problem. It is a process-control problem. Most failures come from one of five things: dirty surfaces, cold containers, poor wet-out, bad geometry, or inconsistent pressure.
For the full production flow, see candle making.
The repeatable formula is simple:
- Clean and degrease thoroughly
- Match labels and containers to room temperature
- Use a light tack pass first
- Press center-out in overlapping strokes
- Seal the edges deliberately
- Inspect under angled light
- Let the adhesive dwell and cure
Do that consistently, and bubbles stop being a daily annoyance and become a rare, fixable exception.