
Vanillin discoloration in candles is a fragrance-driven color shift that can turn light wax cream, tan, or brown during cure or later display. It usually cannot be fully prevented, so the fix on this page is to predict the risk early, reduce how obvious the shift looks, and separate vanillin browning from other color problems.
Vanilla and bakery fragrance oils can cause this shift even when the wax looked clean on pour day. The visible result still depends on wax color, opacity, dye choice, fragrance load, and storage, which is why two candles with a similar scent can cure into different shades. The goal is not forcing a permanent bright white result, but choosing a formula and finished shade that still look intentional on the shelf.
Read the fragrance oil first: vanillin % predicts browning risk
Vanillin discoloration is usually predictable from the fragrance oil note, but wax and color choices decide how obvious the browning becomes.
Here, “predictable” means the supplier note can flag browning risk early, not that the listed vanillin % can tell you the exact cured shade by itself.
Read the listed % and the warning language together. A fragrance with 0% vanillin and no discoloration note is a different planning case from one that lists a % or says it may discolor. For the broader color side of the craft, Candle Dye & Coloring helps you separate a fragrance-risk problem from a purely visual one.
A simple planning screen looks like this:
| Supplier note on the bottle or spec sheet | What to assume before pouring | First move |
|---|---|---|
| 0% vanillin and no discoloration warning | Lower planning risk, not zero risk | Test once if you want white or pastel |
| Vanillin % is listed | Warm drift is possible | Plan a cured color check |
| “Contains vanillin” or “may discolor” | Treat the scent as a browning risk even if the name sounds clean | Skip blind full-batch pouring |
| Vanillin % plus a strong warning | Expect visible shift in light wax | Test color, wax appearance, and cure checkpoints together |
When the finished goal is white or pastel, the cleanest prevention step is choosing a lower-vanillin or vanillin-free fragrance when that option exists.
Simple test method: sort the fragrance by supplier wording first, then pour one small sample before changing dye, load, or storage. Check the color in wet wax, after cure, and under normal shelf light so one stage does not fool you.
In maker forums, people often report tan wax from bakery or dessert scents that never use the word vanilla in the product name. That pattern matters because a fragrance name is branding, while the supplier note is the useful clue.
Vanillin is an aroma compound that can push light wax toward cream, tan, or brown during cure. The note does not promise the final look, because wax appearance, dye choice, fragrance load, and storage still shape what your eye sees in the finished candle.
On this page, that shift is mainly a visual problem unless another burn or safety symptom points to a different issue.
That is why the next step is to match wax opacity and base color to the risk level before you call a fragrance unusable. If the color change shows up after hard heat, sunlight, or repeated burning instead of during cure, diagnose vanillin browning vs overheating, UV, and other color problems before you reformulate. When the pattern points to age or display exposure more than formula chemistry, How to prevent general candle color fading is the better next branch.
Match wax opacity and base color to the risk level
Lighter, whiter, less opaque waxes usually reveal vanillin browning faster than creamier or more visually forgiving bases.
Opacity means how much the wax blocks light instead of letting light pass through. A bright white soy candle often shows the same warm drift more sharply than a creamier blend, because the contrast is stronger on the shelf. The fragrance chemistry may be unchanged, but the visible shift can look much harsher in a pale, clean-looking base.
Use this quick shelf-view check when you compare waxes:
- Bright white, low-cream waxes show tan drift fastest.
- Naturally creamy or slightly ivory bases soften the contrast.
- More visually dense or forgiving systems can make the same shift look less severe.
Judge the color after full cure, not while the wax is still warm. A warm pour can look cleaner than the candle will look a few days later.
Compensate the final color with a realistic dye strategy
High-vanillin candles look better when you plan the final cured shade, not when you force a bright white result.
Pick the finished look first, then choose a starting shade that can drift warmer without looking wrong. For the broader color side of the craft, Candle Dye & Coloring is useful when you need to decide whether the answer is a new shade target, a different wax look, or a tighter test plan.
Target-shade compensation means choosing the starting color with the cured shift in mind, not matching only the fresh-poured wax. In practice, cream, tan, amber, and deeper tones usually age better than white or pastel when the fragrance already signals warm drift.
A simple shade-planning table looks like this:Intended finished look Better starting direction Likely cured direction Bright white Rarely forgiving with high-vanillin scents Can turn cream or tan Soft cream Start cream, not white Usually stays believable Warm beige or tan Start slightly lighter Often lands close to target Amber or honey Start close to target Usually keeps the warm look intentional Mid-tone or deeper color Start a touch deeper only after a cured swatch Warm drift is less obvious
Simple swatch method: keep the same wax, vessel, and fragrance load, then pour three small samples aimed at light, medium, and warm targets. Let them cure fully before you judge the winner.
Forcing white usually creates the most disappointment. A UV inhibitor may help with light-driven yellowing, but it does not stop built-in vanillin browning, so full additive guidance belongs on the UV branch rather than on this page.
When the poured batch already cured darker than planned, move the target shade warmer before you rebuild the whole recipe. Accepting a warmer finished shade often gives a better-looking result than piling more pale dye into the same formula. Dark or frosted vessels and covered packaging can make the shift look less obvious without changing the underlying formula.
Adjust fragrance load before you rework the whole formula
Lowering fragrance load can reduce visible browning in some candles, but only when wax and dye stay exactly the same.
Test one load against another under the same wax, dye, wick, vessel, and cure schedule. The goal is not to guess whether less oil might help. The goal is to prove whether more oil is deepening the color enough to justify the scent tradeoff.
Use a tight A/B check like this:
- Keep the wax, dye, vessel, and cure time fixed.
- Pour one sample at your current load and one at a lower load.
- Label each cup with the exact % and check both on the same cure days.
- Judge color first, then decide whether the scent loss is worth it.
This is where to adjust fragrance load before you rework the whole formula instead of changing wax, dye, and additives all at once. If the result is still unclear, run a small-batch comparison test before scaling production so the next batch isolates one variable at a time.
Run a small-batch comparison test before scaling production
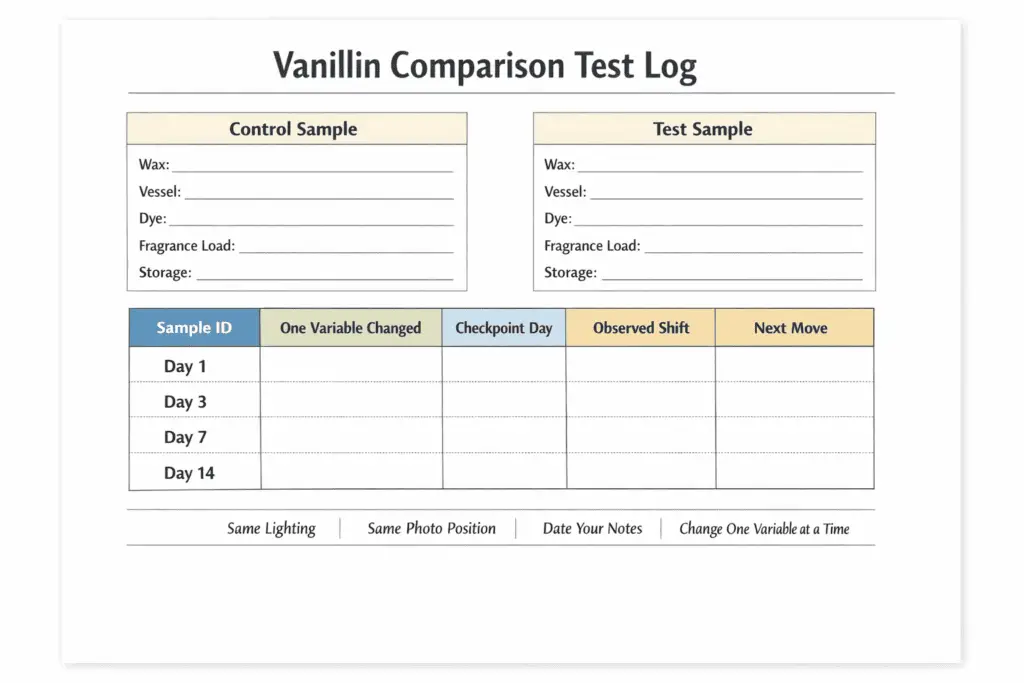
A small control-versus-variable test is the fastest way to prove whether vanillin, dye choice, fragrance load, or storage is driving the visible color shift.
Pour one control candle and one changed sample under the same wax, vessel, dye, and photo conditions. Log the same checkpoints on each cure check so the change shows up in the record, not only in memory.
For the bigger color picture, Candle Dye & Coloring helps you decide whether the next lever is shade choice, wax look, load, or diagnosis.
A side-by-side log works because it isolates one cause at a time. Memory is weak, warm wax can look cleaner than cured wax, and one random shelf photo rarely tells you what changed or when it changed.Sample ID One variable changed Checkpoint day Observed shift Next move Control A None 1 Fresh pour, no useful read yet Keep all later checks matched Test B Fragrance added 3 Slight cream drift Keep watching cure-stage shift Test B Fragrance added 7 Tan edge at top surface Review fragrance risk note Test C Deeper starting shade 7 Warm drift looks less harsh Compare final shelf look Test D Lower fragrance load 7 Lighter body color Check whether scent loss is worth it
Use the log to answer one question per batch. Are you testing fragrance risk, starting shade, load, or shelf conditions? When the goal is supplier-risk review, go back to Read the fragrance oil first: vanillin % predicts browning risk before you change anything else.
Keep the workflow tight:
- Pour one control and one changed sample.
- Hold wax, vessel, wick, dye condition, and pour routine steady.
- Label each sample with the exact change you made.
- Take photos in the same place and light each time.
- Write one decision note after every check.
When the test is about dosage, Adjust fragrance load before you rework the whole formula gives the cleaner next comparison. When the cause still looks mixed after a matched test, Diagnose vanillin browning vs overheating, UV, and other color problems is the right gate before you rebuild the formula.
How the check works:
- This is a maker workflow, not a lab claim.
- Change one variable at a time.
- Use dated notes and fixed photo conditions.
- Judge the result after cure checks, not by memory.
A short planning shortcut can help once the first test question is clear. The tool section later in the page turns those risk notes and checkpoint choices into one tighter plan.
Store and display high-vanillin candles to slow visible darkening
Cool, shaded, stable storage can slow visible darkening, but it cannot erase the built-in browning risk of a high-vanillin formula.
Storage changes the speed and visibility of the shift more than the underlying fragrance chemistry. A candle in a dim box often looks better longer than the same candle on a bright market table or in a warm window display.
Treat storage as a visibility control, not a formula fix. Keep the full storage and exposure strategy on the linked storage page or the broader fading path when the shift is driven more by display conditions than by vanillin alone.
Diagnose vanillin browning vs overheating, UV, and other color problems
If the color shift appeared during cure, suspect vanillin first; if it worsened after heat, burning, or bright light, check other causes next.
Timing is the fastest filter. A candle that darkens before the first burn points to fragrance chemistry more often than one that changes after display, heat, or repeated use.
This section sorts the likely cause only; detailed UV, broad fading, and all-cause color-fix guidance stay on sibling pages so this page keeps vanillin ownership tight.
For the broader color picture, Candle Dye & Coloring gives the full map of shade choice, wax appearance, and troubleshooting paths.
UV means ultraviolet light from sun or strong display lighting that can yellow or fade candle color over time.
UV inhibitors can help with light-driven fading or yellowing, but they do not remove built-in vanillin browning.
| Symptom | When it appeared | Likely cause | Next action |
|---|---|---|---|
| Pale wax turns cream or tan during cure | Before first burn | Vanillin browning | Check supplier note and fragrance risk |
| Top looks darker after overheating wax or harsh heat | During making or soon after pour | Heat-related discoloration | Review melt and pour handling |
| Candle yellows after window display or bright shelf light | After storage or display | Light-driven yellowing | Review storage and packaging exposure |
| Color shifts after repeated burns more than during cure | Post-burn | Burn heat or mixed causes | Separate burn history from fragrance risk |
| Uneven color or unstable shade without a clear vanillin note | During cure or later | Dye issue or mixed variables | Isolate dye and formula changes |
When the change starts during cure, begin with Read the fragrance oil first: vanillin % predicts browning risk because that is the fastest clue. When several variables changed at once, Run a small-batch comparison test before scaling production gives a cleaner answer than guessing from the finished jar.
In forums, makers often blame vanillin for every brown shift. Post-burn darkening and bright-display yellowing often point somewhere else.
Use this quick sort before you reformulate:
- During cure: check the fragrance note first.
- After bright display: check light, heat, and packaging.
- After burning: separate burn history from cure-stage change.
- Mixed timeline: do not guess from one candle.
How this diagnosis works:
- Start with when the shift appeared.
- Compare that timing with fragrance notes and exposure history.
- Treat mixed-cause cases as unconfirmed until a controlled retest narrows the cause.
If the evidence points to sunlight, shelf age, or a broader color-stability issue instead of fragrance browning, How to Keep Candle Color from Fading is the better next branch. If the cause still feels split between formula and exposure, go back to a matched test instead of changing wax, dye, and additives in one move.
Vanillin Discoloration Test Planner
Use this planner to turn fragrance risk, wax appearance, shade goal, load, checkpoints, and storage notes into one clear test path before you pour a larger batch.
Start with the few inputs that change the result most. The planner will not remove browning by itself. It helps you choose the next test, the most realistic color direction, and the first thing to recheck if the candle still cures darker than expected.
This planner is a next-test decision aid, not a universal fix, so use it to choose the next controlled comparison without reopening broader color-stability topics here.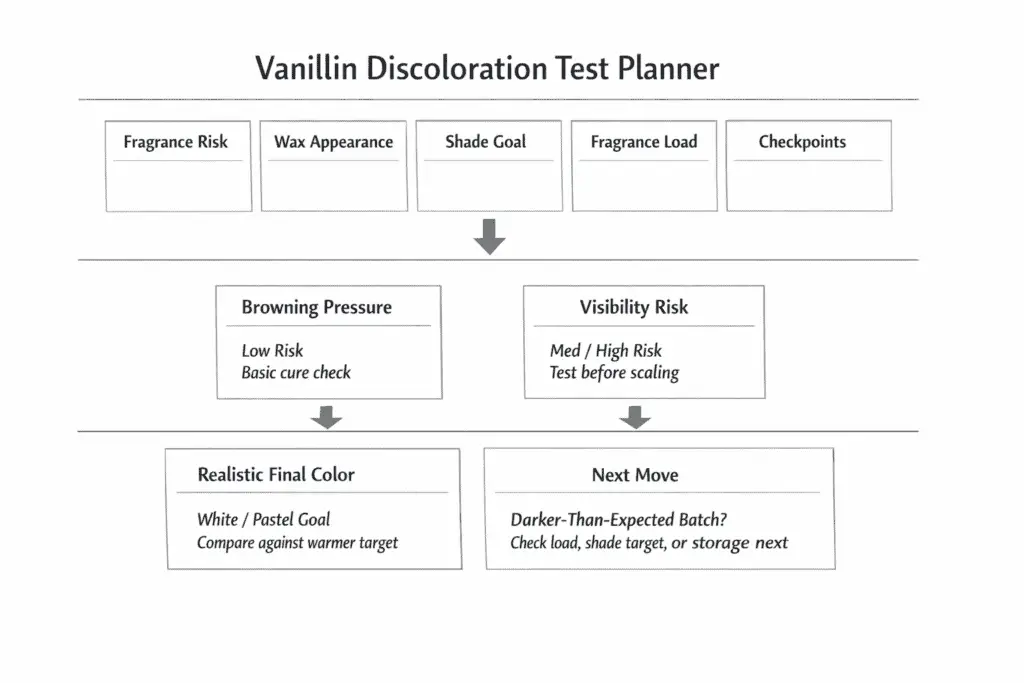
For the wider color picture, Candle Dye & Coloring helps when you need the full map of wax look, shade choice, and cause-checking before you lock a formula.
A checkpoint is a planned day when you inspect and record the candle under the same light and viewing conditions. Use the same shelf, the same room, and the same note format each time so the record stays useful.
| Input | What to record | Planner output | Next move |
|---|---|---|---|
| Fragrance risk | 0% vanillin, listed %, or discoloration warning | Low, medium, or high browning pressure | Decide whether the batch needs a simple check or a full comparison test |
| Wax appearance | Bright white, creamy, or more visually forgiving base | High-visibility or lower-visibility setup | Decide how obvious warm drift will look |
| Shade goal | White, cream, tan, amber, or deeper color | Realistic final-color direction | Decide whether to keep, warm up, or darken the target |
| Fragrance load | Current % and any lower test % | Tradeoff note between scent and appearance | Decide whether to keep load steady or run an A/B load test |
| Checkpoints | Day 1, Day 3, Day 7, Day 14, or your own schedule | Test rhythm | Decide when to compare photos and notes |
| Storage conditions | Boxed, shelf display, bright light, warm area, clear packaging | Storage risk note | Decide whether appearance is being pushed by display conditions |
Use the table in order. First sort the fragrance into a risk band. Then judge how visible that risk will look in the chosen wax. Then decide whether the final look still makes sense for the target shade.
This quick decision path keeps the next move simple:
- If fragrance risk is low and the wax is not bright white, run a basic cure check.
- If fragrance risk is medium or high and the wax is bright or pale, test color direction before scaling.
- If the shade goal is white or pastel, compare that plan against a warmer target before buying more supplies.
- If the batch already cured darker than expected, check whether load, shade target, or storage is the next clean variable.
- If the timeline still looks mixed, go back to a control-versus-variable test instead of guessing.
Keep one rule throughout the whole plan: change one variable at a time. When wax, dye, fragrance load, and display conditions all change together, the notes stop helping.
A short sample plan can look like this:
- Fragrance risk: high
- Wax appearance: bright white soy
- Shade goal: soft cream instead of white
- Load: current load plus one lower test sample
- Checkpoints: Day 1, Day 7, Day 14
- Storage: boxed cure, then one shelf-light check
That kind of setup does not promise a perfect result. It gives you a cleaner answer faster, with less wasted wax and fewer blind reformulations.