
Measure a candle jar from the inside, set the fill line and headspace, then use that usable fill basis—not the jar label size or overflow volume—to estimate wax per jar and batch totals.
A candle jar is a fill vessel for candle making, so its inside width, usable depth, fill line, and headspace set the basis for planning. On this page, capacity means usable fill at the chosen fill line and headspace, not the jar label size and not overflow volume. The workflow is linear: measure the inside, set the fill line, separate label language from usable capacity, estimate wax per jar, scale that basis for matching jars, and save the setup for repeat pours. Good measurement helps fill planning, but it does not prove that a jar is safe for candle heat performance. For the wider container category, use Candle Containers & Jars.
Measure the candle jar from the inside first
Measure the candle jar’s usable inside width where wax will sit, not the outside glass width, the widest decorative point, or the labeled jar size.
Within Candle Containers & Jars, the number that matters first is the inside width that matches the wax-bearing zone. For this article, diameter means usable inside width, not outer span, not the mouth alone, and not the product label.
Quick check before you write down the number
- Inside width = the distance between the inner walls where wax will sit
- Outside width = the glass-to-glass span on the outside
- Opening width = the mouth at the top only
- Label size = a naming shortcut, not a planning measurement
How to measure the inside width
- Put a ruler or caliper inside the jar, not around the outer wall.
- Measure across the inside where the body of the candle will sit.
- Record the number in one unit system and keep that same unit for the rest of the page.
- If the jar shape changes as it rises, do not assume one point tells the whole story.
Measure the usable fill depth, not just the jar height
Usable fill depth is the inside height that will actually hold wax after the intended headspace is left.
Measure from the inside bottom to the planned wax stop-point, not all the way to the rim and not to the outside edge. Usable fill depth and total jar height are different numbers, and the fill-depth number is the one that belongs in planning notes. If the jar will have a lid, keep that in mind when you set the stop-point, but leave the full lid discussion for the fill-line section.
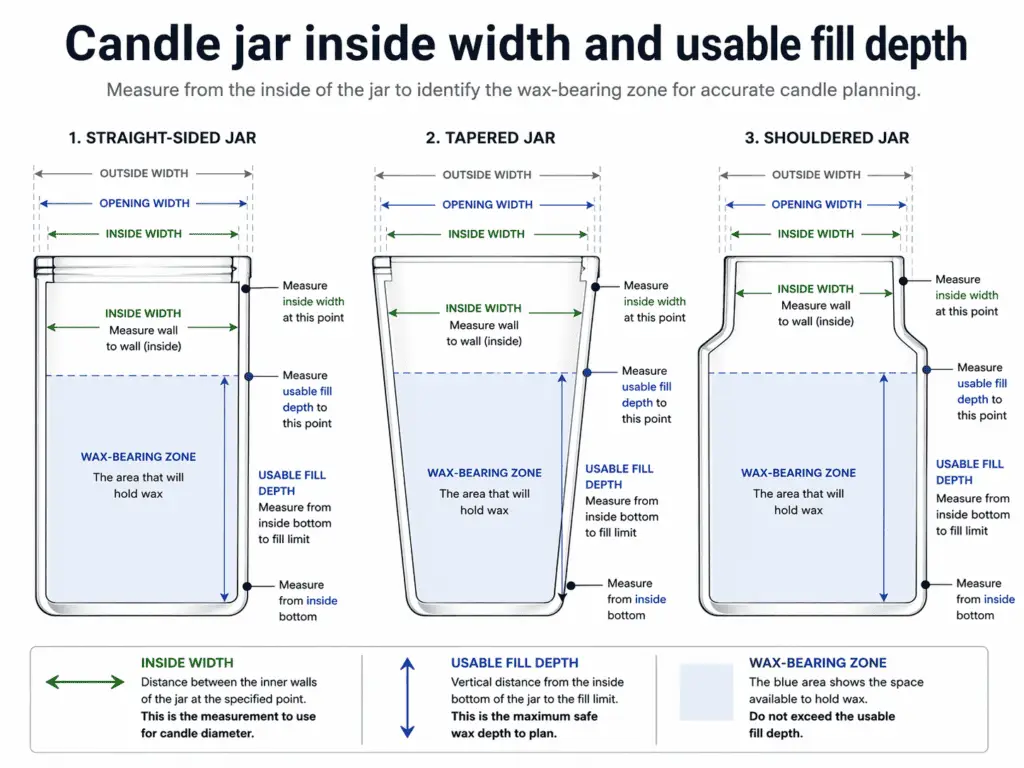
Measure the wax-bearing zone, not the jar’s widest decorative point
Use the inside width and depth that match the zone where wax will sit, not the widest decorative span.
A straight-sided jar is usually measured wall to wall at the inside body. A tapered jar may need the width taken lower than the mouth if most of the wax sits below that point. A shouldered jar should be measured at the zone that will actually hold the candle body, not at the flare or widest outside point.
A simple rule helps here:
- Straight-sided jar: measure the inside body where the wax column will stay even
- Tapered jar: measure the inside zone that matches the main wax body
- Shouldered jar: measure below the shoulder where the wax body will actually sit
After the inside diameter is confirmed, move wick-selection questions to Jar Geometry, Wicking & Performance. Questions such as When Does a Candle Jar Need Two Wicks? belong after the jar has been measured, not before.
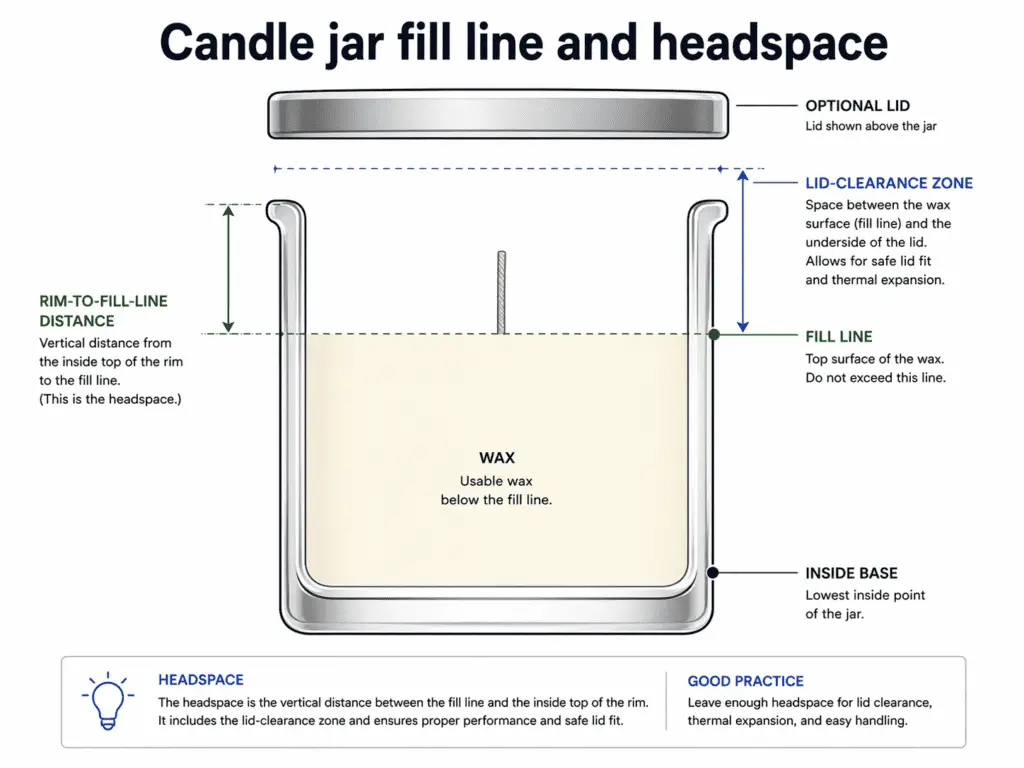
Set the fill line and headspace before calculating capacity
The fill line is the intended wax stop-point below the rim, and headspace is the empty top space above it.
On this page, usable capacity starts at that chosen line, not at fill-to-brim and not at overflow. A jar can look full and still have headspace, because visual fullness and planning capacity are not the same thing.
Set the fill rule in order
- Measure the inside height from the base to the rim.
- Decide where the wax should stop below the rim.
- Record that rim-to-fill-line distance in the same unit system you used for the jar measurement.
- Treat the empty space above that line as planned headspace.
- Reuse the same rule for every matching jar in that batch.
A lid adds a clearance condition to the fill rule; it does not create a new capacity definition. A jar that will be closed still needs enough top space for that closure, so “full” does not mean filled to the rim.
Use this small check when setting the line:
| Question | What to do |
|---|---|
| Will the jar have a lid? | Leave the clearance the lid needs |
| Is the jar unlidded? | Keep the same fill-line logic, just without lid clearance |
| Is the jar being compared to supplier specs? | Match your note to the same fill basis before comparing |
A usable fill line improves planning consistency, but it does not certify that a container is safe for candle heat performance. For that question, use Container Safety & Heat Qualification. Once the line is fixed, move to Separate jar label size from usable fill capacity, then to Estimate wax per jar from the chosen fill line.
Separate jar label size from usable fill capacity
A jar’s label size is shorthand, while usable fill capacity is the amount it holds at the chosen fill line.
These numbers often get mixed because suppliers may show a size label, an overflow-style number, and a fill-line-related number on the same product. They are not interchangeable, and this section is not a shopping or brand-comparison page.
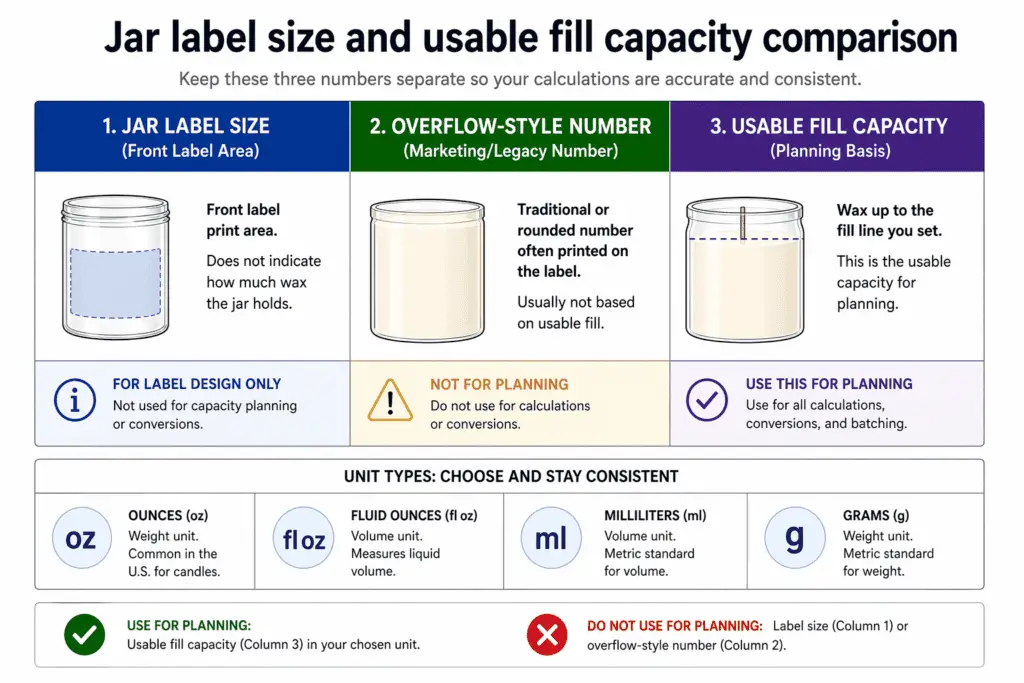
Keep the three numbers separate
| Number you see | What it means here | Should it be your planning basis? |
|---|---|---|
| Label size | A naming shortcut for the jar | No |
| Overflow-style number | What the jar may hold when filled higher than the planned wax line | No |
| Usable fill capacity | What the jar holds at the chosen fill line and headspace | Yes |
Once the correct capacity basis is identified, use that value—not the label size—to estimate wax per jar.
Separate label language from the unit you use for planning
Oz, fl oz, ml, and g cannot be treated as interchangeable shorthand without naming what each number means.
That unit mismatch has to be cleared up before any wax math starts. Similar-looking numbers may belong to different systems, so the basis has to be declared before use.
Use this quick unit note:
| Label style | What it may mean | Planning caution |
|---|---|---|
| fl oz or ml | Volume-style number | Do not treat it as wax weight by default |
| oz or g | Weight-style number | Name it as weight before using it |
| “8 oz jar” | Product naming shorthand | Do not treat it as the real fill basis without checking |
Units and naming mismatch: oz, fl oz, ml, and g
Oz and g are weight-style labels, while fl oz and ml are volume-style labels, so the planning basis has to state which unit type you are using before you estimate wax per jar.
On this page, a jar label such as 8 oz still needs a declared fill basis and a declared unit basis before it becomes a planning number.
Use common jar-size bands as examples, not as universal capacity rules
Familiar jar-size bands are examples for interpretation, not universal fill rules.
One 8 oz jar can differ from another in usable fill basis because jar shape, wall thickness, and the chosen fill line can all change the planning number. That is why common size bands should stay as examples, not promises.
A bounded example looks like this:
| Label band | Safe interpretation | Unsafe interpretation |
|---|---|---|
| 8 oz | A common label that needs a real fill basis | “This jar always takes 8 oz of wax” |
| 10 oz | A size band for comparison | “All 10 oz jars share one usable fill number” |
| 12 oz | A label that still needs fill-line context | “The label alone is enough for batch planning” |
If the question shifts from fill planning to product choice, use Best Candle Jar Sizes for Beginners and Sellers. After the label language is cleared up, move to the Estimate wax per jar from the chosen fill line section on this page.
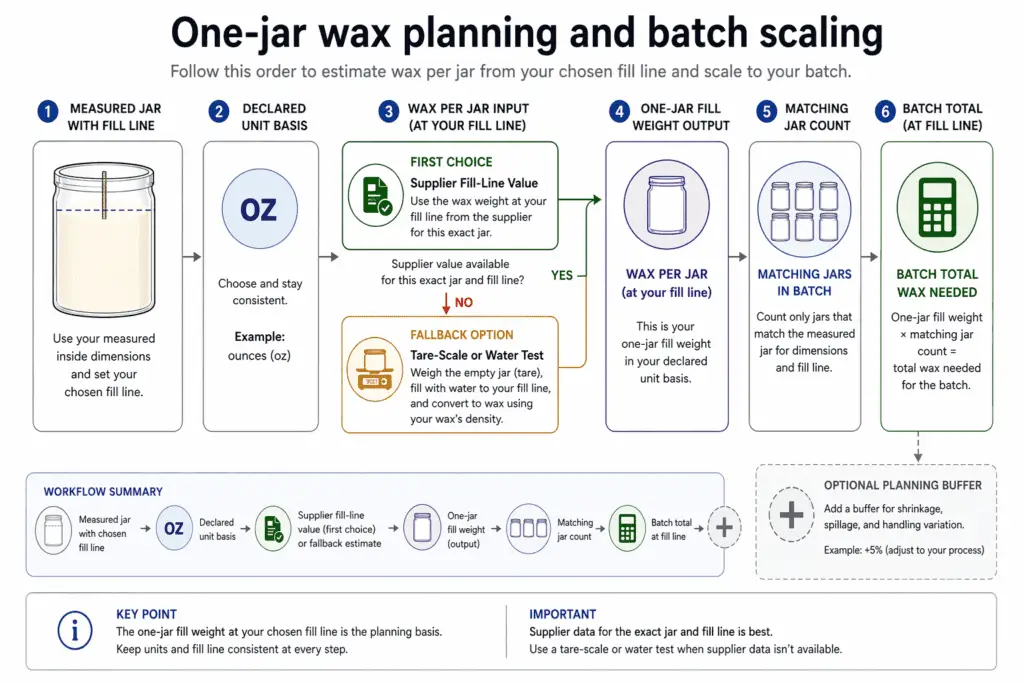
Estimate wax per jar from the chosen fill line
Fill weight per jar is the amount of wax by weight needed to fill one measured candle jar to the chosen fill line.
Use the planning basis in this order: supplier fill-line wax value first, a measured estimate second, and never the jar label size or overflow volume as the default planning basis.
This is not the jar’s label size or overflow volume. The planning basis is one measured jar plus one chosen fill line plus one declared unit basis.
One-jar planning tool
Use this simple structure after the fill line is fixed:
| Input | What to enter |
|---|---|
| Jar basis | One measured jar |
| Fill basis | The chosen fill line and headspace |
| Unit basis | Weight or volume, named clearly |
| Supplier field | Fill-line value, if supplied |
| Fallback | Your tare-scale or water-test estimate |
| Output | What it means |
|---|---|
| Fill weight per jar | The wax needed for one jar at that one fill line |
| Batch total | The one-jar basis multiplied by matching jar count |
| Optional buffer | A clearly labeled extra amount for planning, not a new capacity rule |
Methods note: if a supplier gives a wax-weight-to-fill-line value, use that first. If that field is missing, estimate from your chosen line and record how the estimate was made.
When to use supplier fill-line data vs a home estimate
Use supplier fill-line data when it matches your jar and chosen fill line, and use a home estimate only when that supplier value is missing, unclear, or based on a different fill basis.
If you estimate at home, mark the chosen fill line first, measure the water weight to that line, then convert that same fill-line basis into the one-jar wax planning weight you will use for matching jars. Record which method produced the number.
That is why the Units and naming mismatch: oz, fl oz, ml, and g section on this page has to stay tied to the planning number. For fragrance-load or broader formulation math, use Candle Wax Calculator. For the multi-jar handoff, use the Scale one-jar fill into a batch wax plan section on this page.
Use a tare-scale or water test when supplier fill data is missing
Tare the empty jar, fill to the intended line, weigh the added amount, and record the basis clearly.
The fill line has to be chosen first, or the test result has no stable meaning. The result is a practical estimate for that jar at that line, not a universal wax rule.
A short method looks like this:
- Weigh the empty jar and tare the scale.
- Fill the jar to the chosen fill line.
- Record the added amount.
- Label the method you used.
- Keep that method note with the jar record.
If your supplier already gives a clear fill-line value, use that instead of rebuilding the number from scratch.
Scale one-jar fill into a batch wax plan
Multiply the one-jar wax estimate by the number of matching jars, then add only a clearly labeled optional planning buffer if needed.
Batch total scales the one-jar basis; it does not redefine capacity. The fill line, jar type, and unit basis need to stay the same across the batch, or the total stops matching the jar basis it came from.
A small example:
- one-jar fill weight: 6.5 oz by weight
- jar count: 12
- batch total before buffer: 78 oz
- optional planning buffer: 2 oz
- labeled planning total: 80 oz
The buffer is a planning add-on, not part of the jar’s capacity. Use the same one-jar basis from start to finish. For fragrance-load, cost, or broader formulation math beyond the one-jar fill basis, use the dedicated wax calculator.
Save the measurement basis so the jar can be reused consistently
Save the jar’s inside measurements, fill-line rule, unit basis, and any lid or method notes so the same setup can be reused later.
This is a repeatability checklist, not a full operations system. The basis of the number matters as much as the number itself.
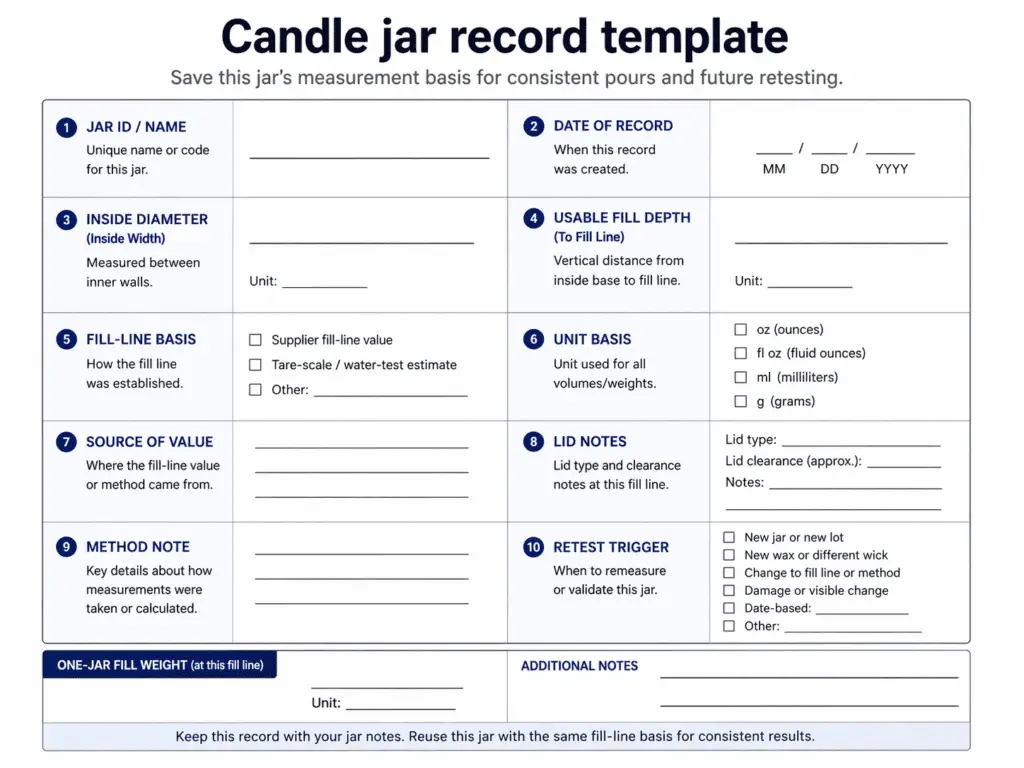
What to record for each new jar
- jar ID or jar name
- inside diameter
- usable fill depth
- chosen fill line
- unit basis
- whether the value was measured, supplier-listed, or estimated
- lid notes or clearance notes
- method note, such as direct measurement or tare-scale test
- date of the record
- retest trigger if something changes later
Simple jar record template
| Field | Example entry |
|---|---|
| Jar ID | Straight tumbler A |
| Inside diameter | 3.00 in |
| Usable fill depth | 3.25 in |
| Fill-line basis | 0.50 in below rim |
| Unit basis | oz by weight |
| Source | measured |
| Lid notes | metal lid, keep top clearance |
| Method note | direct measurement + fill-line mark |
| Retest trigger | recheck if jar supplier, lid, or fill line changes |
A label such as 8 oz is not enough by itself because it does not tell you the fill line, the unit basis, or whether the number came from a measurement, a supplier field, or an estimate. That missing basis is where repeat errors start.
Use the Scale one-jar fill into a batch wax plan section on this page when the saved one-jar basis becomes the input for future multi-jar pours. Move to Candle Batch Record Sheet Template when you want a wider batch log, and use Candle Wax Calculator when the work goes beyond one-jar planning and repeatability logging.