
To make wax melts for wax warmers, weigh melt-appropriate wax, add fragrance oil by wax weight, pour into molds or clamshells, cure, then test in your warmer.
Wax melts are wickless scented wax pieces made for electric or tealight warmers, not candles with flames. This guide helps beginners make a repeatable first batch, choose practical wax and fragrance settings, and troubleshoot scent or surface problems without changing every variable at once. The process stays focused on home making, testing, storage, packaging, and light selling preparation where relevant. Start by understanding how wax melts release fragrance in a warmer, because warmer heat affects every recipe decision that follows.
What are wax melts and how do wax warmers work?
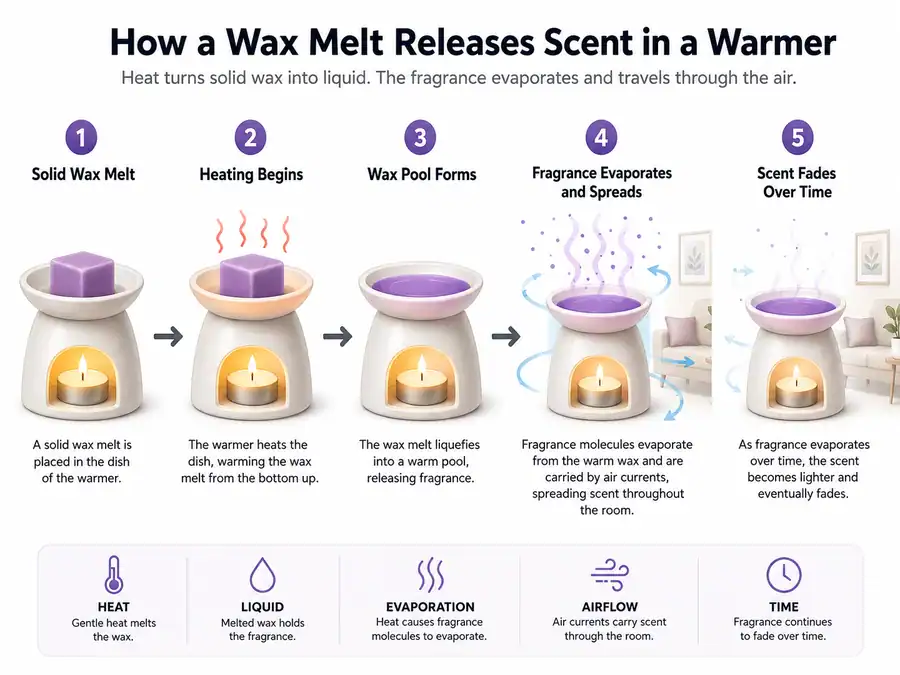
Wax melts are small pieces of scented wax that release fragrance when a warmer heats them until the wax pools.
Unlike candles, wax melts do not need a wick or flame inside the wax. An electric warmer heats the dish with a heating element, while a tealight warmer uses a small flame under the dish. The warmer type changes how fast the wax melts, how quickly scent builds, and how soon the fragrance fades.
Before choosing wax or fragrance load, treat the warmer as part of the recipe. A cooler electric warmer may make a melt seem weak even when the wax formula is fine. A hotter tealight warmer may give a faster scent release, but it can spend the fragrance sooner.
How scent leaves a wax melt
| Stage | What happens | What it changes |
|---|---|---|
| Solid melt warms | Heat moves from the dish into the wax | Melt speed |
| Wax pool forms | Wax turns liquid in the dish | Surface area for scent release |
| Fragrance evaporates | Scent molecules leave the warm wax | Hot throw strength |
| Air carries scent | Room airflow moves fragrance | Room coverage |
| Fragrance runs out | Less fragrance remains in the wax | Time to replace the melt |
Safe warmer setup
- Follow the warmer maker’s instructions before adding wax.
- Start with a small amount of wax so the dish does not overflow.
- Keep the warmer on a flat, heat-safe surface.
- Keep warmers away from children, pets, fabric, and drafts.
- Treat tealight warmers like any open flame.
- Let the wax cool before moving the warmer or removing spent wax.
For the recipe side of the process, plan your wax melt formula before you pour. For the testing side, test your wax melts in different warmers and rooms so you do not blame the wax for a warmer problem.
Supplies and setup for making wax melts at home
Making wax melts at home requires melt-suitable wax, wax-safe fragrance oil, molds or clamshells, a scale, a thermometer, and dedicated heating and pouring tools.
Fragrance oil is a scent concentrate made for wax or soap projects, not the same as perfume or essential oil. The scale controls fragrance load by wax weight, while the thermometer controls repeatable melt and pour temperatures. Without those two tools, the same recipe can behave differently each time.
Starter supply checklist
| Supply | Why it matters | Beginner tip |
|---|---|---|
| Wax suitable for melts | Holds shape and releases scent in a warmer | Choose tart, pillar, or melt-specific wax rather than soft container candle wax |
| Fragrance oil made for wax | Gives scent while staying within supplier limits | Check the supplier’s wax-use guidance before adding it |
| Clamshells or silicone molds | Shapes the wax into usable portions | Choose clamshells for easy storage and labeling |
| Digital scale | Measures wax and fragrance by weight | Use grams for cleaner batch notes |
| Thermometer | Tracks melt and pour temperature | Record the temperature that gives the best finish |
| Heat-safe pouring jug | Makes pouring cleaner and safer | Keep this tool for wax only |
| Stirring tool | Blends fragrance into the melted wax | Use slow, steady stirring to reduce mess |
| Controlled heat source | Melts wax without scorching it | Avoid direct high heat on the wax |
| Labels or batch notes | Tracks what worked and what failed | Write down wax type, fragrance load, pour temperature, and cure time |
Set up the workspace before melting anything. Place molds on a level tray, cover the surface, open light ventilation, and keep paper towels nearby for drips. Keep wax tools separate from food tools because fragrance can cling to pitchers, spoons, and containers.
A clean setup prevents the most common beginner problem: changing the recipe while trying to fix a workspace issue. Once the tools are ready, the next decision is the format you want to pour into: clamshells, silicone molds, or warmer liners.
Clamshells vs silicone molds vs liners: which format should beginners choose?
Clamshells are the easiest first format, silicone molds give more shape options, and liners mainly make warmer cleanup easier.
The container or mold changes how the melt looks, stores, unmolds, and gets portioned. It does not fix a poor wax formula by itself. A soft wax may bend in a silicone mold, while a harder wax can snap cleanly but may need a warmer strong enough to melt it well.
| Format | Best for | Main advantage | Main tradeoff |
|---|---|---|---|
| Clamshells | Beginners, gifting, simple selling | Easy portioning, stacking, and labeling | Less custom-looking |
| Silicone molds | Snap bars, shapes, decorative melts | More design control | Wax can stick, frost, or break |
| Warmer liners | Testing scents or avoiding cleanup | Easier wax removal after use | Not a main packaging choice |
| Small cube molds | Recipe testing | Good for comparing batches | Less polished for gifting |
| Snap bar molds | Premium-looking melts | Easy to break into pieces | Needs wax firm enough to snap |
| Cups or deli pots | Soft wax blends | Simple filling and storage | Less common for decorative melts |
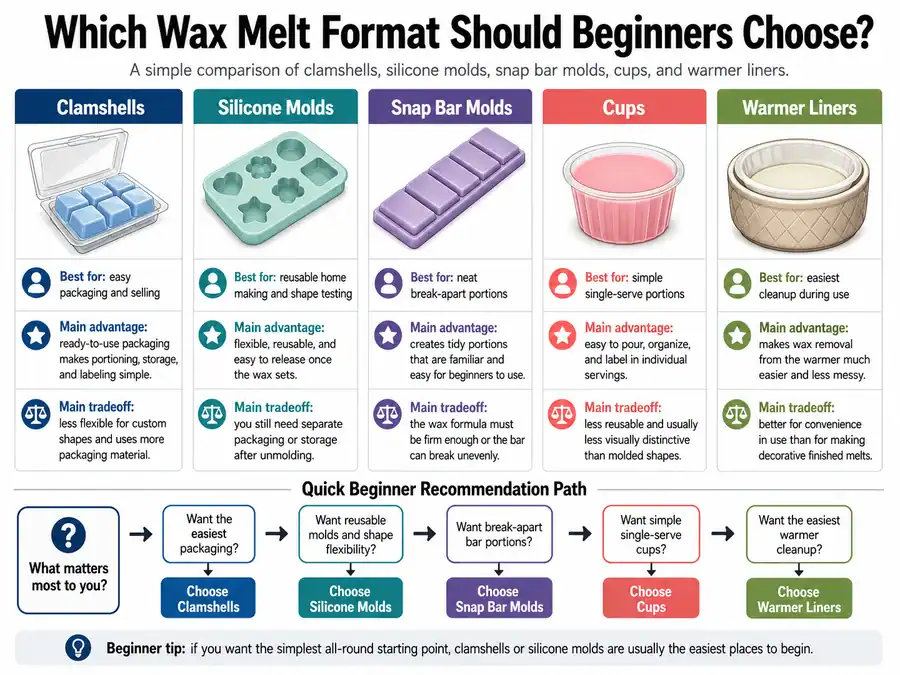
Choose clamshells when consistency matters more than design. Choose silicone molds when appearance matters and you are ready to test wax hardness. Choose liners when your main problem is cleaning the warmer dish after testing several scents.
For beginner batches, clamshells usually reduce variables. The cavity size controls portions, the lid protects the wax, and the label can stay with the product. Silicone molds become easier after you know your wax, fragrance load, and pour temperature.
Plan your wax melt formula: wax, fragrance, temperature, and cure time
A wax melt formula sets the wax weight, fragrance percentage, melt temperature, pour temperature, cure time, and test notes for one batch.
The formula is the repeatable part of the process. If you only write down the scent name, you cannot tell whether a weak melt came from fragrance load, wax choice, warmer heat, pour temperature, or cure time.
Basic wax melt formula fields
| Formula field | What to record | Why it matters |
|---|---|---|
| Wax type | Brand, wax name, or blend | Different waxes hold and release scent differently |
| Wax weight | Total wax before fragrance | Fragrance is calculated from this number |
| Fragrance load | Fragrance as a percentage of wax weight | Controls scent strength and safety limits |
| Fragrance weight | Actual grams of fragrance added | Prevents guessing by drops or spoonfuls |
| Melt temperature | Temperature before adding fragrance | Helps fragrance bind into melted wax |
| Pour temperature | Temperature when wax goes into the mold | Affects finish, shrinkage, and unmolding |
| Cure time | Time before testing | Gives the wax and fragrance time to settle |
| Warmer used | Electric, tealight, wattage if known | Separates warmer performance from recipe performance |
| Test result | Scent strength, melt pool, surface issues | Shows what to change next |
A simple fragrance calculation is:
Wax weight × fragrance load = fragrance weight
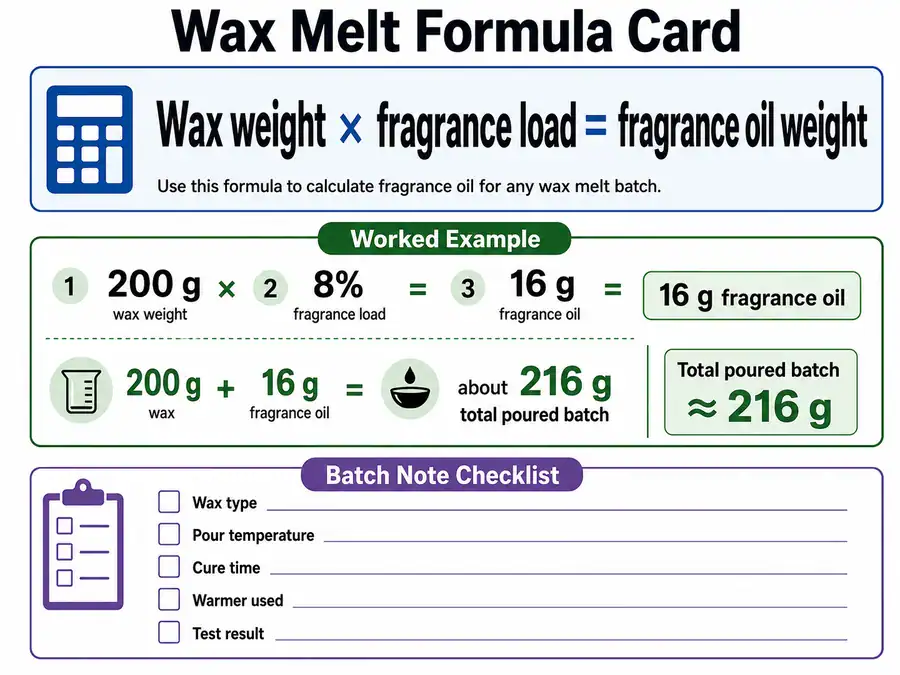
For example, 200 g of wax at 8% fragrance load needs 16 g of fragrance oil. The total poured batch becomes about 216 g because the fragrance is added on top of the wax weight.
Change one variable per test batch. If you change wax, fragrance load, pour temperature, and cure time at once, the result may improve, but you will not know which change helped.
Choose a wax for wax melts: soy, paraffin, and blends
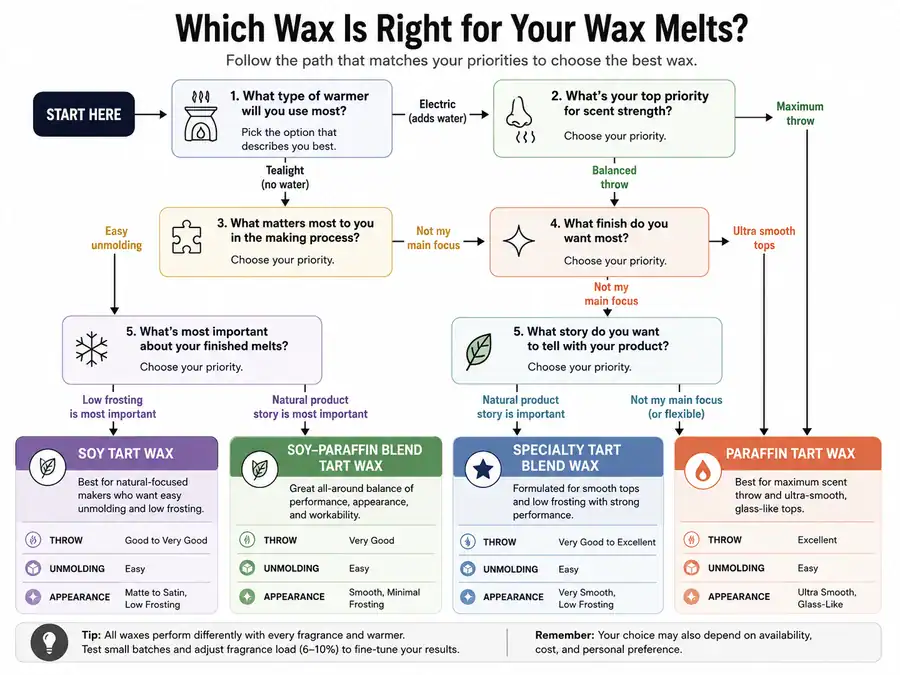
The best wax for beginner wax melts is a tart, pillar, or melt-specific wax that sets firm, unmolds cleanly, and releases scent well in your warmer.
Here, “best” does not mean best for container candles, luxury branding, or legal selling requirements; it means best for making firm wax melts that work in warmers.
Container candle wax can work for testing, but many container waxes are softer than waxes made for melts. Soft wax can dent, feel greasy, stick in silicone molds, or soften in warm rooms. A melt-specific wax or tart wax gives you a cleaner starting point because it is usually made to release from molds and hold shape.
| Wax type | Hot throw potential | Ease of unmolding | Appearance | Best fit |
|---|---|---|---|---|
| Soy tart or pillar wax | Medium to high | Medium | Can frost or look creamy | Electric warmers and softer-looking melts |
| Paraffin tart wax | High | High | Smooth and glossy | Tealight warmers or stronger throw testing |
| Soy-paraffin blend | High and balanced | High | Often smooth | General-purpose testing across warmers |
| Specialty tart blend | Varies by supplier | High | Usually smooth | Specific snap, finish, or mold-release goals |
Choose wax by the result you need, not by the wax name alone. Pick soy tart wax if you want a plant-based story and do not mind possible frosting. Pick paraffin tart wax if scent throw and easy unmolding matter most. Pick a soy-paraffin blend if you want a balanced first test.
Simple wax choice path
- Identify your warmer type: cooler electric warmer or hotter tealight warmer.
- Pick your priority: scent strength, easy unmolding, smooth tops, low frosting, or a natural product story.
- Buy small amounts of one or two waxes.
- Test the same fragrance at the same fragrance load in each wax.
- Keep the wax that gives the best mix of throw, surface finish, and mold release.
Method: This table is a starting point, not a universal ranking. Wax behavior changes by brand formula, additives, dye, fragrance oil, room temperature, and warmer heat, so compare test batches in your own warmer before choosing a main wax.
Once the wax is chosen, fragrance load becomes the next control point because the same wax can behave very differently at 6%, 8%, or 10% fragrance.
Fragrance oils and fragrance load for wax melts
Fragrance load is the percentage of fragrance oil added by wax weight, often tested around 6% to 10% if the wax and fragrance allow it.
On this page, a strong wax melt means noticeable hot throw after cure in your reference warmer and room. It does not mean cold-sniff strength, perfume strength, candle throw, or room-freshener strength. A safe fragrance load means staying within the lower limit from the wax supplier and fragrance supplier, not adding as much oil as possible. It does not guarantee medical safety, indoor-air safety, legal compliance, or selling approval.
Fragrance oil (FO) is scent concentrate made for wax projects. Essential oil (EO) is plant-derived aromatic oil, but it may not throw as strongly or behave as predictably in melts. Many makers use fragrance oil for wax melts because scent strength, stability, and supplier usage guidance are usually easier to compare.
More fragrance oil does not always make a stronger wax melt. Too much oil can cause sweating, soft spots, oily tops, poor setup, or weak binding in the wax. The real ceiling is the lower limit between your wax supplier’s recommended fragrance load and the fragrance oil’s safe-use guidance.
Fragrance load formula
Fragrance oil weight = wax weight × fragrance load
| Wax weight | Fragrance load | Fragrance oil needed |
|---|---|---|
| 200 g | 6% | 12 g |
| 200 g | 8% | 16 g |
| 200 g | 10% | 20 g |
| 500 g | 8% | 40 g |
| 1,000 g | 8% | 80 g |
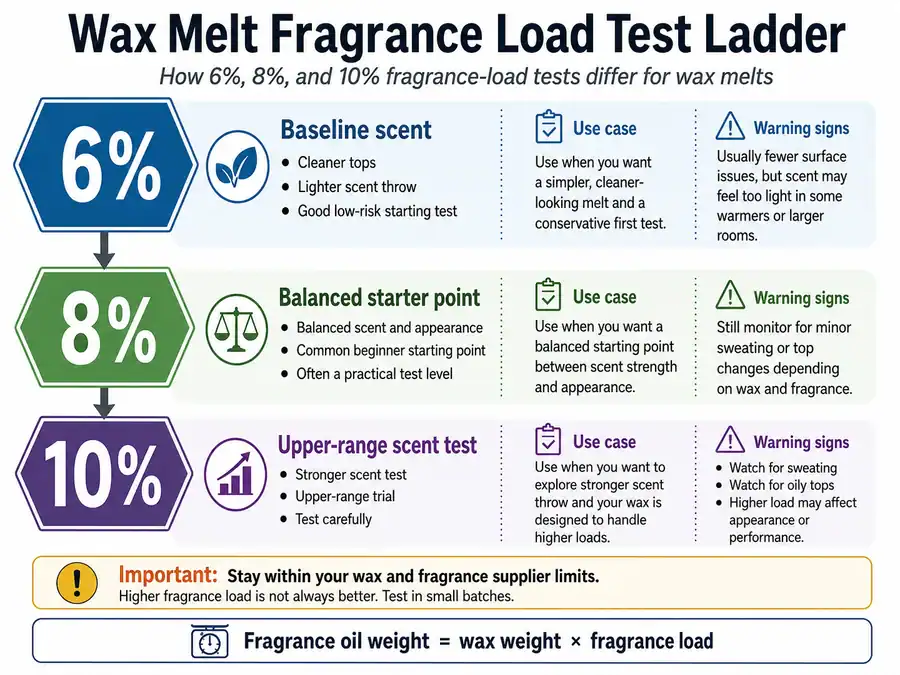
Mini benchmark for testing fragrance load
| Test load | What it checks | Watch for | Best use |
|---|---|---|---|
| 6% | Baseline scent and clean setup | Mild throw, cleaner tops | Small rooms or subtle scents |
| 8% | Balanced starter point | Good throw without too much oil | Most beginner test batches |
| 10% | Upper-range scent test | Sweating, softness, oily tops | Strong throw testing only if allowed |
Method: The 6% to 10% band is a working test range, not a legal or universal limit. Check the current wax supplier documentation and fragrance safe-use guidance before using the upper end or scaling batches.
Three myths cause most fragrance-load mistakes. First, cold sniff does not prove hot throw. Second, sweating does not always mean the wax needs more wax; temperature and cure can be involved. Third, a higher percentage can smell weaker if the wax cannot hold the extra oil well.
Once the fragrance percentage is selected, temperature and cure time decide whether that oil blends cleanly and sets into the finished melt.
Melt temperature, pour temperature, and cure time for wax melts
Wax melts set better when you melt fully, add fragrance at a steady temperature, pour at a controlled temperature, and cure before testing.
Temperature controls how the fragrance oil blends into the wax and how the wax sets as it cools. Cure time controls when you judge the finished melt. If you test too early, a melt can seem weak even when the formula only needed more resting time.
| Wax type | Melt temperature | Fragrance-add temperature | Pour temperature | Typical cure before testing |
|---|---|---|---|---|
| Soy tart or pillar wax | 70–80°C / 158–176°F | 65–70°C / 149–158°F | 55–60°C / 131–140°F | 48–72 hours |
| Paraffin tart wax | 80–90°C / 176–194°F | 75–80°C / 167–176°F | 65–75°C / 149–167°F | 24–48 hours |
| Soy-paraffin blend | 75–85°C / 167–185°F | 70–75°C / 158–167°F | 60–65°C / 140–149°F | 24–48 hours |
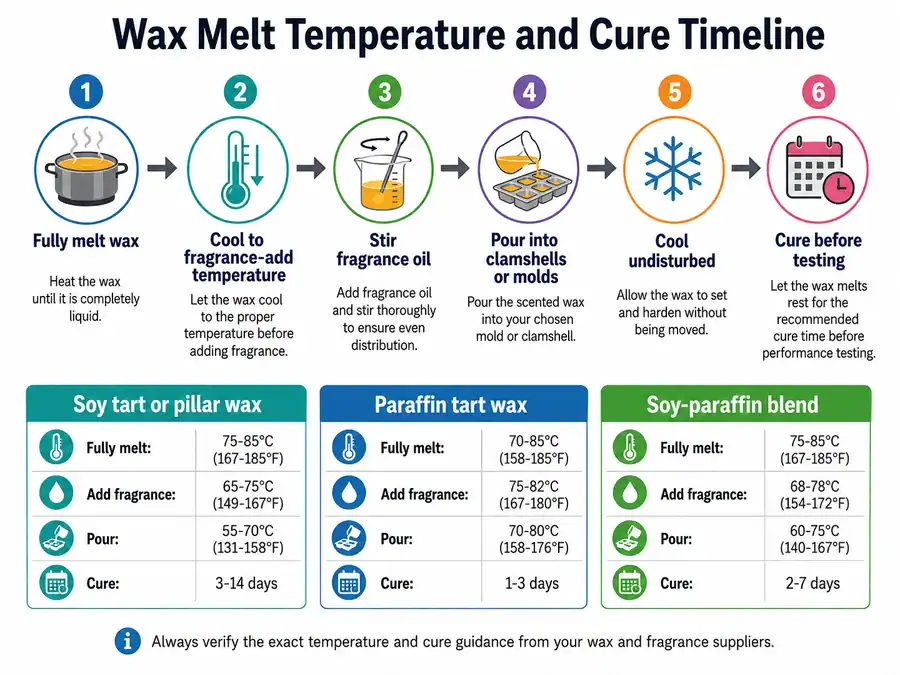
Method: These ranges are working starting points for melt-suitable waxes, not universal rules. Start near the middle of the range, write down the real temperatures, then change one checkpoint by about 5°C / 9°F per test batch.
Temperature terms
- Melt temperature is the temperature used to fully liquefy the wax.
- Fragrance-add temperature is when fragrance oil goes into the melted wax.
- Pour temperature is when the scented wax goes into the clamshell or mold.
- Cure time is the resting period before testing scent throw in a warmer.
Environment can change the result even when the recipe is the same. Drafts and cold countertops can cool wax too fast and cause rougher surfaces. Very warm rooms can make melts feel soft or oily. Thick silicone molds cool slower than shallow clamshells.
One-change temperature fixes
| Problem | First check | One next-batch change |
|---|---|---|
| Frosting or white haze | Cooling surface and drafts | Pour 5°C / 9°F warmer or cooler |
| Oily tops | Fragrance load and mixing temperature | Lower fragrance load or keep fragrance-add temperature steadier |
| Weak scent | Cure time and warmer heat | Finish the cure before changing the formula |
| Sink marks or craters | Cooling speed and mold depth | Pour slightly warmer or slow the cool-down |
| Sticky unmolding | Wax hardness and room temperature | Use a harder tart wax or cool longer before unmolding |
Once the temperature plan is set, the full making process becomes a repeatable batch sequence instead of a guessing loop.
Step-by-step: how to make wax melts for electric and tealight warmers
Make wax melts by weighing wax, melting it, adding fragrance oil, pouring into molds or clamshells, cooling, curing, and testing.
This beginner batch uses 500 g wax and 8% fragrance load, which equals 40 g fragrance oil. Use the wax-specific temperature range from the previous section rather than forcing one temperature onto every wax.
| Batch size | Wax | Fragrance load | Fragrance oil amount | Fragrance-add temperature | Pour temperature | Cure |
|---|---|---|---|---|---|---|
| Small test batch | 500 g / about 1.1 lb | 8% | 40 g | 65–75°C / 149–167°F | 55–65°C / 131–149°F | 24–72 hours |
| Double test batch | 1,000 g / about 2.2 lb | 8% | 80 g | Same range | Same range | Same range |
Method: The recipe uses ranges because soy, paraffin, and blended tart waxes do not behave identically. Pick a midpoint for your wax, keep it steady, then adjust only after testing.
Before melting
- Place clamshells or molds on a level tray.
- Pre-weigh the fragrance oil in a small cup.
- Write a batch note with wax type, fragrance name, percentage, date, and target temperatures.
- Clear the work surface so the poured molds can cool without being moved.

Making steps
- Weigh the wax into a heat-safe pouring jug.
- Melt gently until the wax is fully liquid, then hold it briefly so hidden chunks finish melting.
- Cool to fragrance-add temperature before adding fragrance oil.
- Add fragrance oil and stir slowly for 1–2 minutes, scraping the sides and bottom.
- Add dye if used, then stir until the color looks even.
- Pour into clamshells or molds at the target pour temperature.
- Let the wax cool undisturbed on a level surface.
- Close clamshells or unmold bars only after the wax is fully set.
- Cure before testing so the scent result is not judged too early.
Format adjustments
| Format | Adjustment | Reason |
|---|---|---|
| Clamshells | Avoid overfilling and let tops cool flat | The lid needs room to close cleanly |
| Silicone molds | Use a firmer wax and unmold only when fully cool | Soft wax can bend, stick, or break |
| Tealight warmers | Test a firmer or higher-melt-point blend | Tealight heat can run hotter and less evenly |
| Electric warmers | Test scent before raising fragrance load | Cooler warmers can make good melts seem weak |
After the batch cures, the recipe still needs warmer testing before you decide whether the wax, fragrance load, or temperature should change.
How to test wax melts in warmers and room sizes
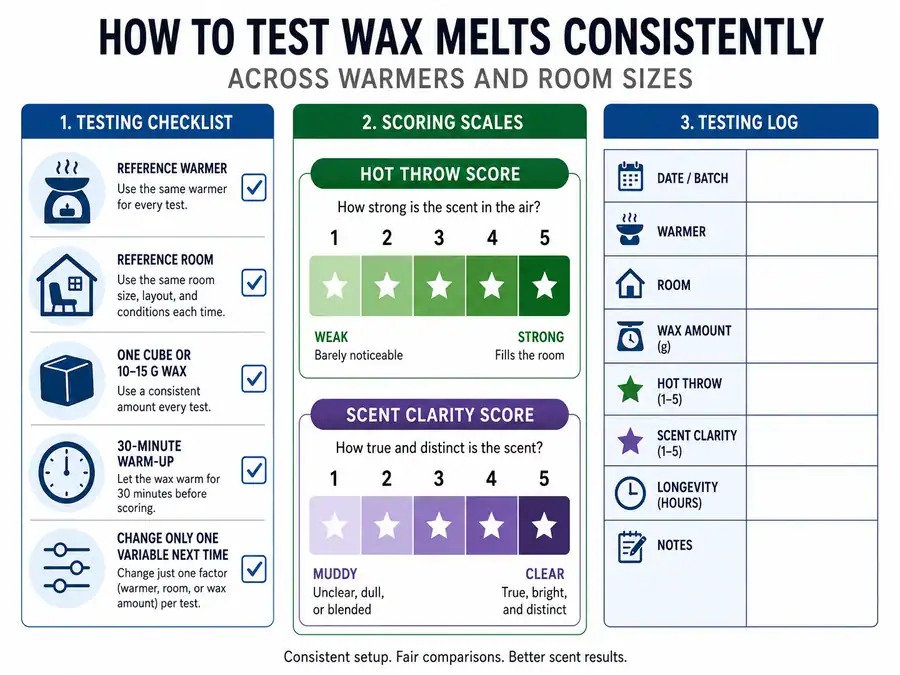
A good wax melt test uses the same warmer, room, wax amount, warm-up time, and scoring system for each batch.
Hot throw is how strongly a wax melt smells while it is warm. The same wax melt can smell strong in a small bedroom, moderate in a kitchen, and weak in an open-plan living room. That difference does not always mean the formula failed; room size, airflow, warmer heat, and wax amount all affect the result.
Reference warmer means the warmer you use for every batch comparison. It should be a warmer you know well, not a new warmer you are still judging. Start with one cube or about 10–15 g of wax, let it warm for 30 minutes, then score the scent instead of judging it cold.
Wax melt testing protocol
- Choose one reference warmer.
- Test in one reference room first.
- Use one cube or about 10–15 g of wax.
- Let the warmer run for 30 minutes before scoring.
- Score hot throw from 1–5.
- Score scent clarity or pleasantness from 1–5.
- Record longevity in hours.
- Change only one variable in the next test.
| Test setting | What it tells you | What not to change yet |
|---|---|---|
| Reference warmer in reference room | Baseline scent strength | Wax or fragrance load |
| Same warmer in a larger room | Room-size effect | Formula |
| Same melt in a hotter warmer | Heat-output effect | Cure time |
| Same melt in a cooler warmer | Low-heat performance | Fragrance oil |
| Same melt after longer cure | Cure-time effect | Wax type |
| Same formula with one changed variable | Whether that variable helped | Other variables |
| Score | Hot throw meaning | Practical result |
|---|---|---|
| 1 | Barely noticeable | Formula, warmer, or cure needs review |
| 2 | Light scent nearby | May suit small rooms only |
| 3 | Noticeable in the room | Usable baseline result |
| 4 | Strong room scent | Good target for many melts |
| 5 | Very strong scent | Check that it is still pleasant over time |
Testing log template
| Batch ID | Wax | Fragrance | Fragrance load | Warmer | Room size | Warm-up | Throw | Longevity | Notes |
|---|---|---|---|---|---|---|---|---|---|
| WM-001 | Soy tart wax | Vanilla amber | 8% | Electric | Small bedroom | 30 min | 3/5 | 5 hrs | Good in small room |
| WM-001 | Soy tart wax | Vanilla amber | 8% | Electric | Open living room | 30 min | 2/5 | 4 hrs | Room may be too large |
| WM-002 | Soy tart wax | Vanilla amber | 9% | Electric | Small bedroom | 30 min | 4/5 | 5 hrs | One-variable retest |
Room size changes how the same score feels. A 3/5 throw can feel full in a small bedroom but too light in an open living area. Test the reference room first, then test the rooms where the wax melts will actually be used.
Method: A 1–5 score and a 30-minute warm-up reduce nose bias and make small batch changes easier to compare. The goal is useful repeatability, not lab-grade testing.
Troubleshoot weak scent, sweating, frosting, and other wax melt problems
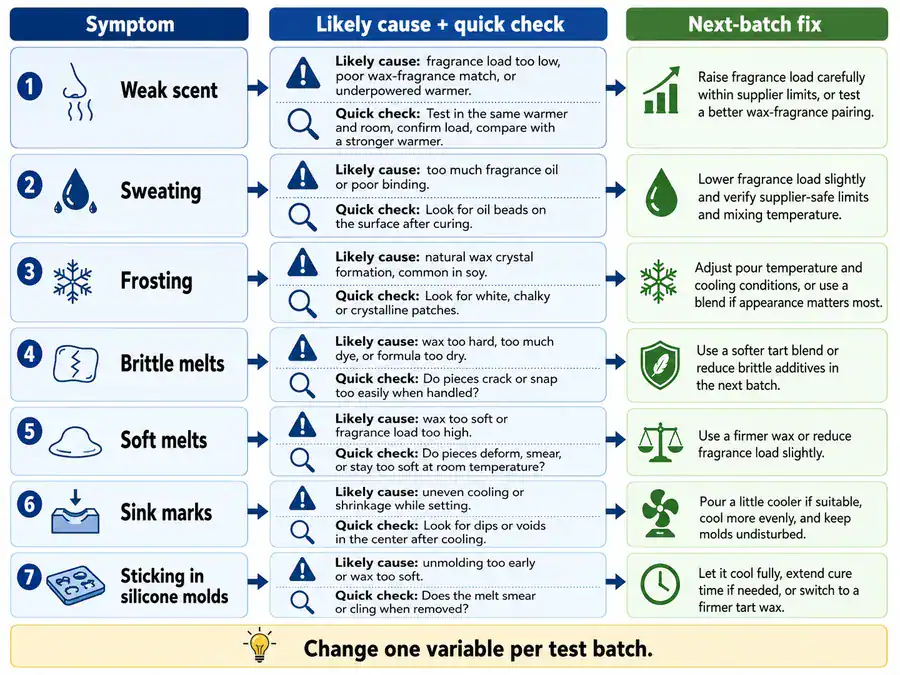
Most wax melt problems come from wax choice, fragrance load, temperature, cure time, storage, or warmer heat.
Troubleshooting works best when you find the likely variable and retest one change at a time. If you change wax, fragrance percentage, pour temperature, and warmer type in the same batch, you may fix the melt but lose the reason why it improved.
Wax melt troubleshooting matrix
| Symptom | Likely cause | Quick check | Next-batch fix |
|---|---|---|---|
| Weak scent or low throw | Low fragrance load, cool warmer, short cure, poor wax-fragrance fit | Test in your reference warmer after full cure | Raise fragrance by 1–2% within allowed limits, adjust pour temperature, or test another wax |
| Sweating or oily tops | Too much fragrance, poor binding, warm storage, unstable pour temperature | Blot the top and check storage temperature | Lower fragrance load, mix at a steadier fragrance-add temperature, or store cooler |
| Frosting or white haze | Soy crystallization, fast cooling, drafts, cold counter | Check airflow and cooling surface | Pour 5°C / 9°F warmer or cooler and slow the cool-down |
| Crumbly or brittle melts | Wax too hard, low fragrance, brittle additives | Snap-test one cube or bar | Use a softer blend or reduce brittle additives |
| Soft or sticky melts | Wax too soft, high fragrance load, warm room | Press the surface and check room heat | Switch to harder tart wax, lower fragrance percentage, or store cooler |
| Sinks or craters | Fast cooling, air pockets, uneven mold surface | Look for drafts and thin mold spots | Pour slightly warmer, cool more slowly, or tap the mold after pouring |
| Sticking in silicone molds | Wax too soft, unmolded too early, detailed mold shape | Let the mold cool fully before release | Use a firmer melt wax or chill briefly before unmolding |
Fast diagnosis path
- Confirm the batch was weighed correctly.
- Confirm the wax cured before testing.
- Test the melt in your reference warmer.
- Compare the same melt in a warmer you know runs hotter or cooler.
- Pick one variable to change in the next batch.
- Record the result before changing anything else.
Before-and-after retest example
| Batch | Wax | Fragrance load | Pour temperature | Cure | Throw score | Change made |
|---|---|---|---|---|---|---|
| First test | Soy tart wax | 8% | 55°C / 131°F | 48 hrs | 2/5 | Baseline |
| Retest | Soy tart wax | 8% | 60°C / 140°F | 72 hrs | Compare again | Temperature and cure only |
This example keeps fragrance load the same so the retest can show whether pour temperature and cure helped before adding more oil. If the same melt is weak only in one warmer, the warmer may be the issue rather than the wax formula.
How to store and package wax melts safely
Good storage and packaging protect wax melts from heat, scent loss, leaks, cross-scenting, and unclear use instructions.
For home use, packaging can stay basic: keep the scent name, pour date, and batch notes with the wax. For selling, packaging needs more structure because customers need product identity, safe-use wording, net weight, and a way to trace the batch if a question comes back later.
| Packaging need | Home or gifting | Selling baseline |
|---|---|---|
| Container | Closed box, jar, bag, or clamshell | Clamshell, bag, or box that protects from crushing and leaks |
| Label | Scent name and pour date | Scent name, net weight, batch ID, and safe-use wording |
| Storage | Cool, dry place away from sun | Cool storage plus stock rotation |
| Scent separation | Keep strong scents apart | Separate strong scents so products do not cross-scent |
| Traceability | Optional batch note | Batch or lot code for customer questions |
| Contact details | Usually not needed | Business name or contact details where required locally |
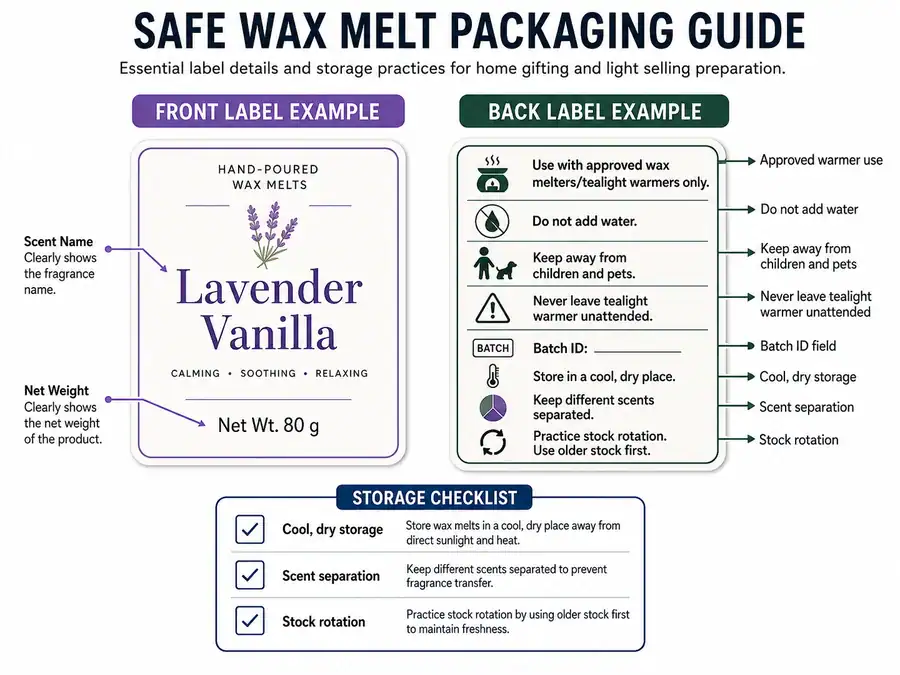
Label example
| Label area | Example text |
|---|---|
| Front | Vanilla Amber Wax Melts • Net wt. 75 g |
| Back | Use in approved wax warmers only. Do not add water. Keep away from children and pets. Never leave a tealight warmer unattended. Batch: VA-2026-01 |
Storage affects scent more than many beginners expect. Warm shelves, hot cars, and open containers can make fragrance fade before the melt reaches a warmer. Closed packaging, cool storage, and scent separation help the melt smell closer to the batch you tested.
For selling, treat this section as a starting point rather than a full compliance checklist. Labeling, consumer-safety, tax, and business rules vary by location, so confirm the current rules for your market before selling beyond casual gifting.
Optional next steps for calculators, pricing, labels, and candle testing
Calculators, pricing, label rules, and candle testing are useful next steps, but they should not replace the basic wax melt making process on this page.
- Use a fragrance-load calculator only after choosing the wax weight and target fragrance percentage.
- Build a separate pricing sheet if you plan to sell wax melts, because material cost, packaging, overhead, labor, and margin need their own calculation.
- Check local label and safety rules before selling, because legal requirements vary by market and product format.
- Use wax melts to screen whether a fragrance smells good warm, but test candles separately because wicks, jars, flames, and burn safety add different variables.
Keep those next steps separate from the first-batch process. The main recipe should still answer one question: whether your wax, fragrance load, temperature, cure time, and warmer test produce a wax melt that works in real use.