
Treat any cracked candle jar as a safety decision: identify the crack, lower heat and temperature shock, and discard structural damage before you light it again. This page covers structural container cracks and break risk in the jar itself, not cosmetic wax-top cracks that do not break the vessel wall.
If you spotted a hairline line after pouring or a chip at the rim after the first burn, start with one question: is the jar itself damaged, or is the mark only in the wax. On this page, safe means safe to relight or safe for heat use—not cosmetic appearance, ease of repair, general vessel quality, or buyer preference. The goal is to keep candle containers & jars in the correct use category: relight only intact vessels, repurpose damaged ones for non-heat use, and use the linked pages when you need deeper prevention or material guidance.
Use this quick triage before you inspect in detail: if the candle is burning and the jar is cracked, extinguish it and let it cool completely; if the mark is only in the wax surface, confirm the jar wall and base are intact; if the jar itself is cracked, chipped, leaking, or star-cracked at the base, do not relight it.

Can you relight a cracked candle jar?
No—if the jar itself is cracked, chipped, or star-cracked at the base, do not relight it. Only surface cracking in the wax is potentially cosmetic, and you should verify that the container wall is smooth and unbroken before using the candle again.
Use this quick troubleshooting guide to separate cosmetic wax issues from unsafe container damage before you decide what to do next.
| What you see | Likely cause | What to do |
| Hairline mark only in the wax surface | Normal wax shrinkage or uneven cooling | Check the jar wall and base carefully; if the container itself is intact, correct your pour and cooling process before the next batch |
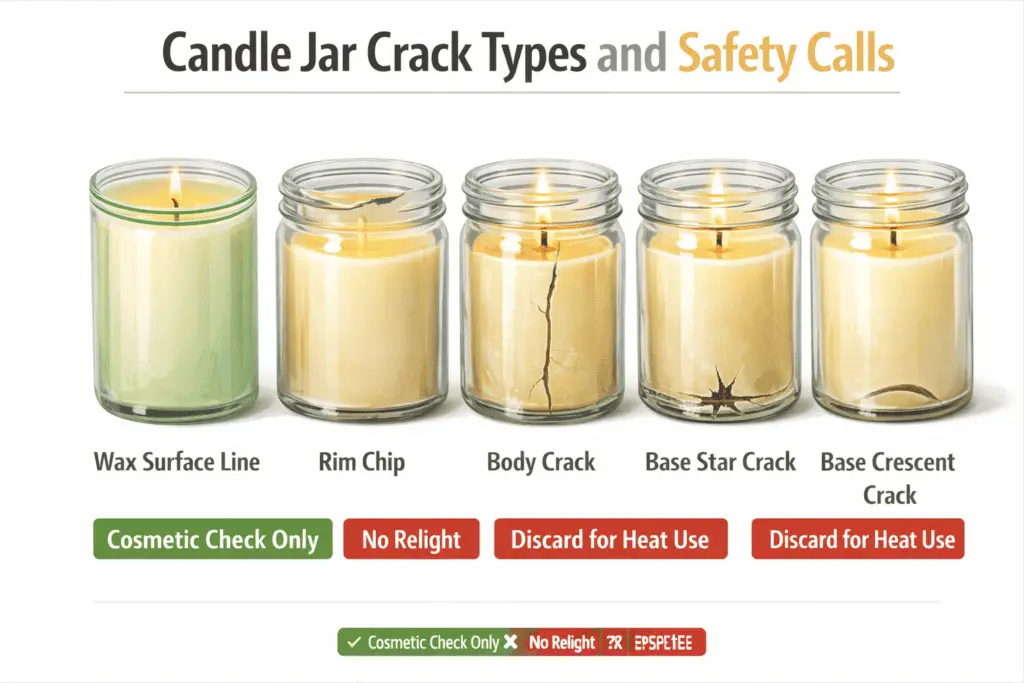
| Chip or crack at the rim | Impact damage or a stress riser that can spread under heat | Do not relight; move the jar to repurpose-only or non-heat use |
| Vertical body crack or any line you can catch with a fingernail | Thermal shock, hotspot heating, or a structural defect | Discard for heat use; do not burn again |
| Base star crack or base crescent crack | Bottom heat concentration, cold-surface shock, or hidden glass stress | Discard for heat use immediately |
| Crack appears while the candle is burning or wax begins to leak | Active structural failure | Extinguish the candle, let it cool completely, do not move it while hot, and do not relight |
If the candle is already burning when you notice the crack, extinguish it, keep it away from anything flammable, and wait until it is completely cool before you inspect or handle it.
What crack type you’re seeing (hairline vs structural: rim, body, base)
Treat hairline marks as a warning, but discard any base star crack or spreading body crack because they can leak wax or fail while burning.
Start with diagnosis before action: identify where the crack is (rim, body, base) and whether it’s stable or growing before you decide on any next step. A surface line in the wax is not the same as a crack in the container wall, so check the jar itself in strong light before you assume the vessel is damaged. Make a quick crack “photo atlas” so your calls stay consistent:
- Photograph the crack in three views: straight-on, angled with glare, and backlit with a flashlight.
- Mark the crack ends with a fine-tip marker on the outside of the jar so you can tell if it grows after handling or cooling.
- Note location and shape: hairline surface line, rim chip, long vertical line, or base “star” pattern.
Use this action guide to decide salvage vs discard without guessing:
- Hairline surface line that doesn’t catch a fingernail, not at the base → may be cosmetic, but don’t relight until you’ve confirmed the jar wall itself is intact.
- Rim chip or small rim crack → high risk for crack growth; no relight.
- Body crack you can feel with a fingernail or that runs vertically → structural; discard for heat use.
- Base “star” crack, base crescent crack, or any crack that spreads → structural; discard for heat use.
If you’re still unsure whether the mark is cosmetic or structural, treat it as structural and do not relight the candle.
Steps to decide when to discard a damaged candle jar
If a candle container has a crack you can feel, a base star pattern, or any leak path, don’t burn it again—discard it for heat use and salvage wax only if you can do it without stressing the jar.
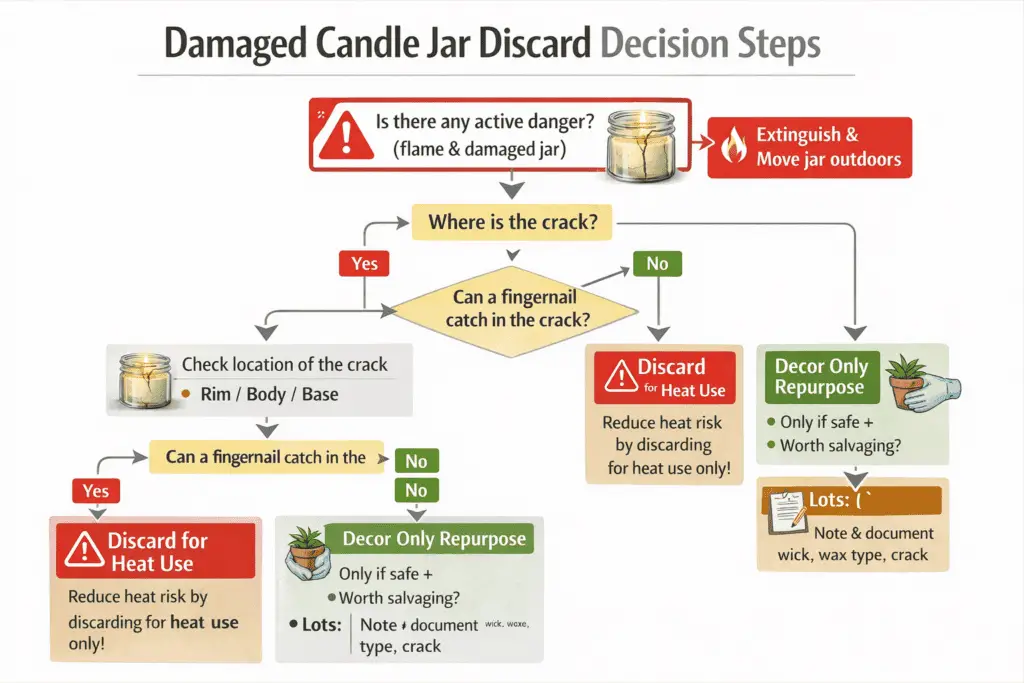
Start with a clear discard safety policy so you’re not making risky calls mid-batch or mid-burn. Use this quick decision ladder (top to bottom):
- Stop immediately if there’s active danger
If the jar is hot, sweating wax, or the crack is spreading, extinguish the flame, don’t move it until it cools, and keep it away from anything flammable. - Name the crack and location
Use your phone light and a fingernail test to identify structural cracks: anything you can catch with a nail, any crack that crosses the base, any star/crescent at the bottom, or any line that reaches the rim counts as structural. - Choose the outcome category
- Discard for heat use (most common): structural cracks, base stars, rim chips, any leak line, any crack that grew after cooling.
- Decor-only repurpose: tiny cosmetic marks that don’t catch a nail but still make you uneasy about heat cycles.
- Return/segregate batch: repeated failures from the same lot, especially near seams or bases.
- Discard for heat use (most common): structural cracks, base stars, rim chips, any leak line, any crack that grew after cooling.
- If you want the wax back, use low-stress removal
- Let the candle cool completely.
- Wear gloves and eye protection.
- Do not heat a cracked jar directly or try to pry wax out against the damaged wall.
- Only remove wax if it releases without stressing the container; otherwise discard the whole item for heat use.
- Let the candle cool completely.
- Document and prevent repeats
Log jar type, supplier lot, wick series/size, dye/fragrance load, and where the crack appeared (rim/body/base). If failures cluster around the same geometry (shoulder, base seam), treat it as a container-spec issue, not a “one-off.”
Do not heat a cracked jar to melt wax if removal would stress the damaged wall. If the wax does not release without forcing the container, discard the whole unit for heat use.
If the jar is damaged but you still want to keep it, repurpose chipped rims as desk storage, brush holders, or decor-only containers after the wax is removed and the glass is cleaned—never as a relit candle.
Why candle jars crack during pouring or burning
Candle jars usually crack because part of the vessel heats or cools much faster than the rest: thermal shock, wick hotspots, vessel defects, cold surfaces, and reuse fatigue are the main causes.
Use the timing of the crack to narrow the cause. If it formed during pouring or cooling, check jar temperature, cold-surface contact, drafts, and the cooling curve. If it formed during burning, check wick heat, flame position, sidewall hotspotting, and any sign that the base or rim was already weak.
- Thermal shock: the jar, wax, and room move through heat too unevenly. Use thermal shock and annealing guidance for the deeper material side.
- Wick hotspotting: one side of the vessel runs too hot because the wick is oversized, off-center, or pushed by airflow. Use wick sizing problems, symptoms, and fixes when you need the full correction workflow.
- Cold-surface or draft exposure: the base or one wall cools faster than the rest and creates a stress line.
- Hidden vessel defects: uneven walls, weak seams, inclusions, or rim damage can turn normal heat cycles into structural failure.
- Reuse fatigue: a jar that survived one burn can still fail on the next if it already carries chips or microfractures. Use reused-jar guidance for the approval rules that belong on that page.
How to prevent thermal shock in candle jars (ΔT control)
Prevent thermal shock by keeping jars warm, controlling drafts, and limiting wick heat so glass and ceramic don’t stress-crack.
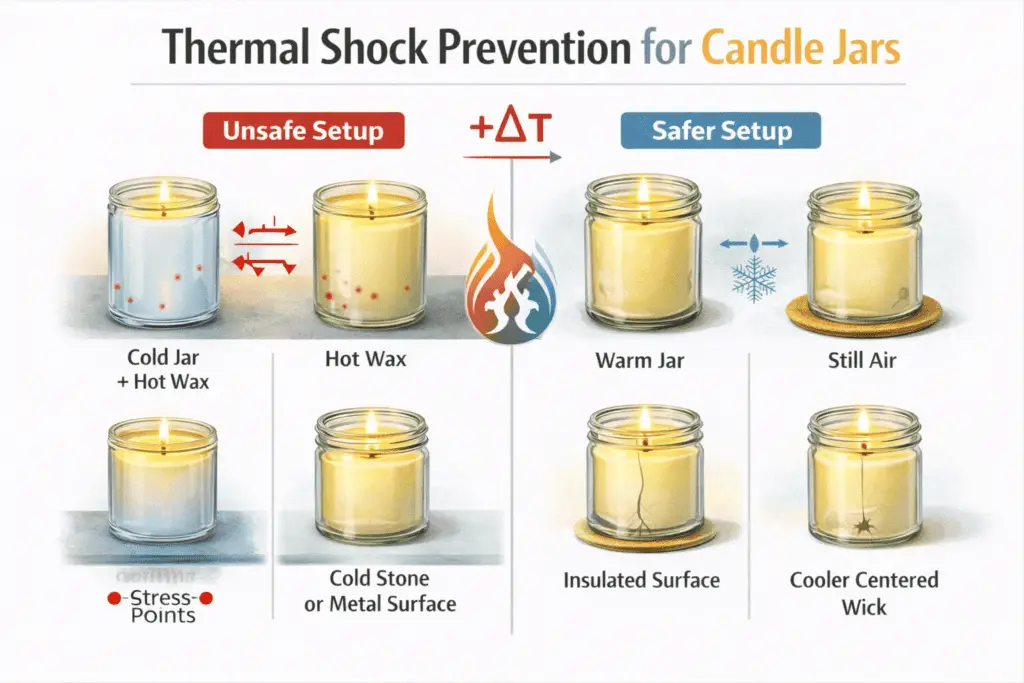
On this page, the main use of thermal shock is diagnostic: if a crack followed a cold jar, a cold counter, a draft path, or rapid cooling, treat uneven temperature change as the likely cause and do not relight the damaged vessel.
For the full container-conditioning and heat-stress workflow, use the thermal shock and annealing page. Keep this page focused on identifying the cracked jar, removing it from heat use, and preventing the same failure in the next test.
How to size and center your wick to avoid hotspot cracks
Size and center the wick to avoid one-sided heat bands that crack containers.
On this page, wick guidance is a cause check rather than a full setup workflow: if the crack appeared after a tall flame, a one-sided melt pattern, unusual rim heat, or a hard edge-to-edge melt on one side, treat wick heat or wick position as part of the failure.
For the full sizing workflow, use wick sizing problems, symptoms, and fixes and the wick size chart by jar diameter and wax type. Here, the action stays narrow: do not relight the cracked jar, and correct wick heat on the next controlled test.
Steps to set pour temperatures by wax type (to avoid cracks)
Set a conservative pour window for your wax, then match jar temperature to reduce ΔT stress.
Use pour temperature on this page as a cause check, not as a full wax-process chart. If the crack formed during pouring or early cooling, compare the wax temperature, the jar temperature, and the surface under the jar before you assume the vessel itself was the only problem.
For the deeper temperature workflow, use the recommended pour temperatures chart and pour-range guidance. This page only needs the threshold: a damaged jar does not go back into heat use, even if you later correct the pour setup.
Steps to preheat jars before pouring
Preheat jars gently so wax doesn’t hit cold glass and create stress cracks.
Preheating belongs here only as a short prevention bridge. If the crack appeared during pouring, ask whether the jar started too cold for the wax you used and whether the vessel was dry, intact, and evenly warmed before the pour.
Use container-preparation guidance when you need the full preheat routine. Keep this page limited to crack diagnosis, discard rules, and the shortest route to the deeper setup page.
How to control the cooling curve (drafts, surfaces, airflow)
Cool candles in still air on insulating surfaces so the base and walls shrink evenly.
Cooling control stays short on this page: if the crack followed a draft, a cold stone or metal surface, or one-sided airflow during cure, treat the cooling setup as part of the failure pattern rather than as a separate repair track.
For deeper heat-stress and vessel-tolerance guidance, use the thermal shock page. This article only needs enough cooling detail to explain why the crack happened and why the damaged jar should stay out of burn rotation.
Other container factors that can raise crack risk
Material labels matter less than heat-safe vessel quality, uniform walls, and the absence of chips, inclusions, or other stress risers.
Use best candle jars and types of candle containers when you need a broader vessel-selection view. On this page, the rule is narrower: any chip, pit, uneven base, visible inclusion cluster, or suspect seam is a reject for heat use because structural defects can turn a crack into a leak path or a break event.
If the failure points to heat tolerance rather than a one-time impact, use the thermal shock and annealing page for the deeper material side instead of expanding this article into a full material-testing guide.
What reuse microfractures look like—and when to stop reusing jars
Repeated burns and harsh cleaning can create microfractures; stop reusing any jar with chips, base stars, or crack lines.
On this page, reuse damage is a stop signal, not a full approval workflow. If a jar shows chips, faint base stars, rim damage, or any crack you can feel after cleaning or refilling, retire it from heat use instead of testing it again in a live burn.
Use recycled candle jars and reused-jar safety guidance when you need the deeper inspection rules. This article only needs the boundary: once structural damage is visible, the jar leaves candle duty.