
Color candle wax by adding candle-safe dye to fully melted wax, stirring until the color is even, testing a small cooled sample, adjusting the shade, and pouring only after the dye is fully blended.
Candle wax is the meltable candle base that holds the candle’s shape, color, and burn structure. Candle-safe dye is a wax-compatible colorant made to tint that melted wax without separating, clumping, or creating obvious burn problems.
Coloring candle wax means tinting the wax itself. It does not mean painting the outside of a candle or adding random craft colorants. Food coloring, paint, ink, crayons, and unsuitable craft pigments can fail because they are not made to dissolve or behave properly in candle wax.
This beginner guide covers the basic wax-coloring workflow: dye choice, timing, mixing, cooled testing, and simple mistakes. Exact dye percentages, dye-temperature ranges, persistent clumping, bleeding, mica use, and natural colorants belong in narrower guides.
How to Color Candle Wax Step by Step
To color candle wax, melt the wax fully, add candle-safe dye before pouring, stir until the color is even, test a cooled sample, adjust the shade, then pour the batch.
This process keeps the focus on wax color, not the full candle-making setup. For the full wax choice and candle base comparison, use the Candle Wax Types guide before choosing a dye format.
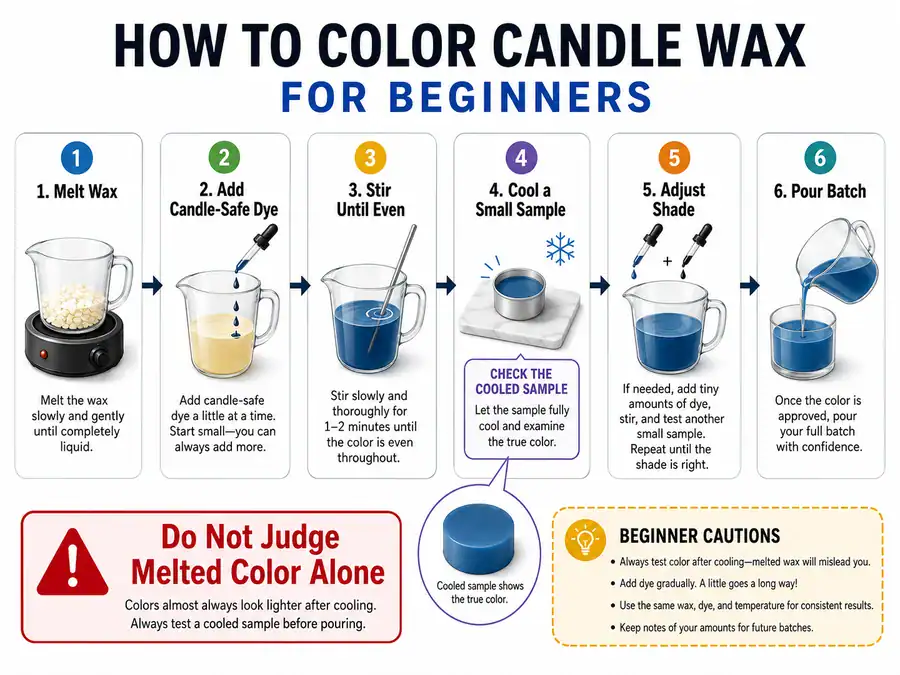
- Melt the candle wax until no solid pieces remain.
- Add a small amount of candle-safe dye to the melted wax.
- Stir slowly and steadily until the dye is fully blended.
- Check the melted color, but do not judge the final shade yet.
- Place a small amount of colored wax on a spoon, wax paper, or sample cup.
- Let the sample cool so you can see the finished color.
- Add more dye only if the cooled sample is too pale.
- Stir again before pouring the full batch.
The main goal is even, stable color. A pale shade can often be corrected with more dye, but too much dye can make the wax look muddy, stain surfaces, or affect how cleanly the candle burns.
Beginner batches are easier to control when you add dye in small steps instead of trying to reach a dark color all at once.
Beginner Wax Coloring Checklist
Use this checklist before pouring colored candle wax.
| Step | What to Check | Good Result |
|---|---|---|
| Choose the dye | Use candle-safe dye, not food coloring or paint | Dye is made for wax |
| Melt the wax | Heat until the wax is fully liquid | No unmelted wax remains |
| Add dye | Add dye before the wax is poured | Dye has time to blend |
| Stir | Mix slowly and thoroughly | No streaks or specks |
| Test | Cool a small sample | Final shade is visible |
| Adjust | Add more dye only if needed | Shade improves without overload |
| Pour | Pour after the color is even | Candle sets with consistent color |
After changing dye type or dye amount, burn-test the finished candle formula before repeating the batch. This guide covers color control; wick sizing and full burn testing belong in the candle-making and wick guides.
If the color shows specks, clumps, or bleeding during testing, treat it as a wax-and-dye compatibility problem before making the full candle.
The beginner correction is to check dye type, wax temperature, dye amount, and mixing time first. If the same problem keeps happening, use a focused guide such as How to Color Candle Wax Without Clumping or Bleeding.
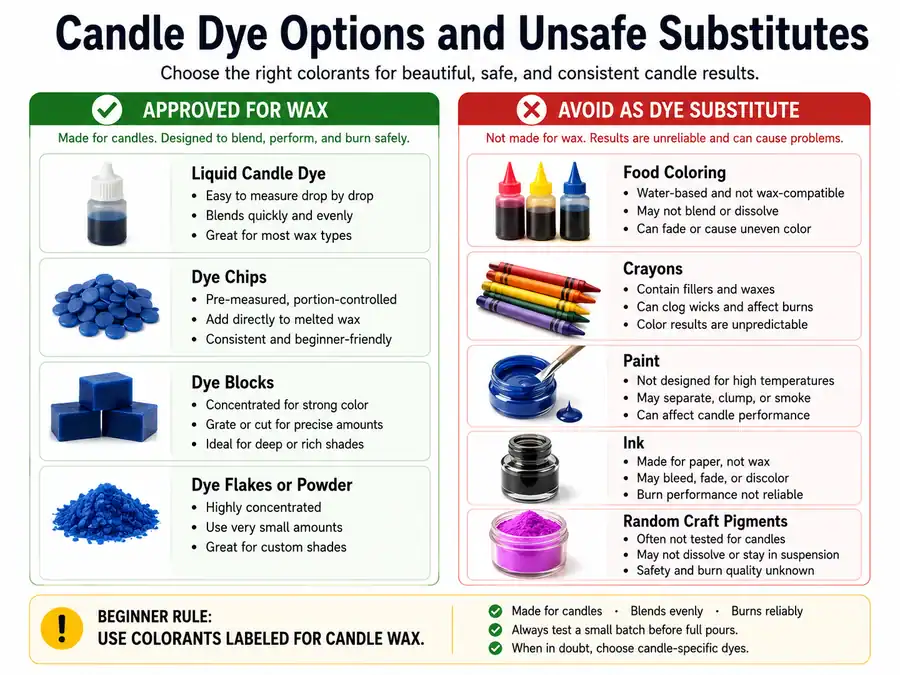
What Can You Use to Color Candle Wax?
You can color candle wax with candle-safe liquid dye, dye chips, dye blocks, or dye flakes made for wax. These colorants are designed to blend into melted candle wax.
Candle wax needs wax-compatible color because it is melted, poured, cooled, and burned. A colorant that works for soap, frosting, paint, or paper may not dissolve into wax or stay stable in a wicked candle.
For a broader dye comparison, use the Candle Dye & Coloring guide after you understand the beginner options here.
Liquid Dye vs Dye Chips vs Dye Blocks
Liquid dye is usually the easiest candle wax colorant for beginners because it mixes quickly and can be added in small amounts. Dye chips and dye blocks are useful when you want pre-measured pieces, but they need enough heat and stirring to dissolve fully.
| Dye Type | Best For | Beginner Advantage | Main Caution |
|---|---|---|---|
| Liquid candle dye | Small batches and easy shade changes | Simple drop-by-drop adjustment | Easy to over-darken the wax |
| Dye chips | Repeatable beginner batches | Pieces are easier to portion | Must fully melt into the wax |
| Dye blocks | Stronger or larger color batches | Concentrated color | Can be too strong for pale shades |
| Dye flakes or powder | Specific formulas where the supplier allows wax use | Can create strong color | More risk of specks if not dissolved well |
Choose the dye format based on control. Liquid dye gives the fastest adjustment, while chips and blocks can be easier to repeat if you use the same wax weight and same dye amount each time.
The outcome should be the same: fully colored wax with no visible particles, streaks, or separated color.
What Not to Use Instead of Candle Dye
Do not use food coloring, crayons, paint, ink, or random craft pigments to color candle wax. These materials are not reliable substitutes for candle-safe dye.
Food coloring is water-based in many forms, so it does not blend well with wax. Crayons can contain additives that are not made for candle burning. Paint and ink are surface-color products, not wax-coloring materials.
Mica can decorate wax, but mica alone is not a dependable choice for solid color in many wicked candles because it may settle, shimmer unevenly, or create visible particles.
A safe beginner rule is simple: use colorants labeled for candle wax. That rule prevents most early mistakes before they become weak color, clogged-looking wax, clumps, bleeding, or poor burn behavior.
How Wax Type Changes Candle Color
Wax type changes candle color because each wax has its own natural shade, opacity, and dye response. The same dye can look different in soy, paraffin, beeswax, coconut wax, or blended wax.
Candle wax is not a neutral background in every formula. Soy wax often softens color into a creamier shade, while paraffin can show brighter and clearer color. Beeswax already has a natural yellow tone, so light colors may shift warmer.
Coconut wax and blends can vary because the final result depends on the full wax mixture, not one ingredient alone.
For a full wax comparison, use the Candle Wax Types guide. In this article, wax compatibility only means how the wax affects dye strength, shade, opacity, and visible color results.
| Wax Type | Common Color Behavior | Beginner Note |
|---|---|---|
| Soy wax | Softer, creamier, often more pastel | Use a cooled test before adding more dye |
| Paraffin wax | Brighter and clearer color in many batches | Easier to judge strong colors |
| Beeswax | Naturally yellow or golden | Pale blues, whites, and cool tones may shift |
| Coconut wax | Often smooth but formula-dependent | Test because blends vary widely |
| Wax blends | Depends on the blend ratio and additives | Treat every new blend as a new color test |
A dye that looks too weak in soy wax may not be weak dye; it may be the wax softening the shade. A dye that looks warm in beeswax may be reacting visually with the wax’s natural color.
The comparison is important because the fix is not always “add more dye.” Sometimes the better fix is changing the wax type, changing the target shade, or accepting a softer color for that wax.
If the wax type question turns into choosing the best wax for the entire candle, move to Candle Wax Types instead of expanding that decision here. This section only explains how wax changes the color result.
How Much Dye Should You Add to Candle Wax?
Add candle dye by wax weight, dye strength, dye format, and desired shade. Start with the dye supplier’s lowest suggested amount, test the cooled wax, then add more only if needed.
There is no single dye amount that works for every candle wax. A liquid dye drop, a dye chip, and a dye block can have different color strength. Soy, paraffin, beeswax, coconut wax, and blends can also show the same dye differently after cooling.
Use this starter tool to decide how to adjust dye without overloading the wax.
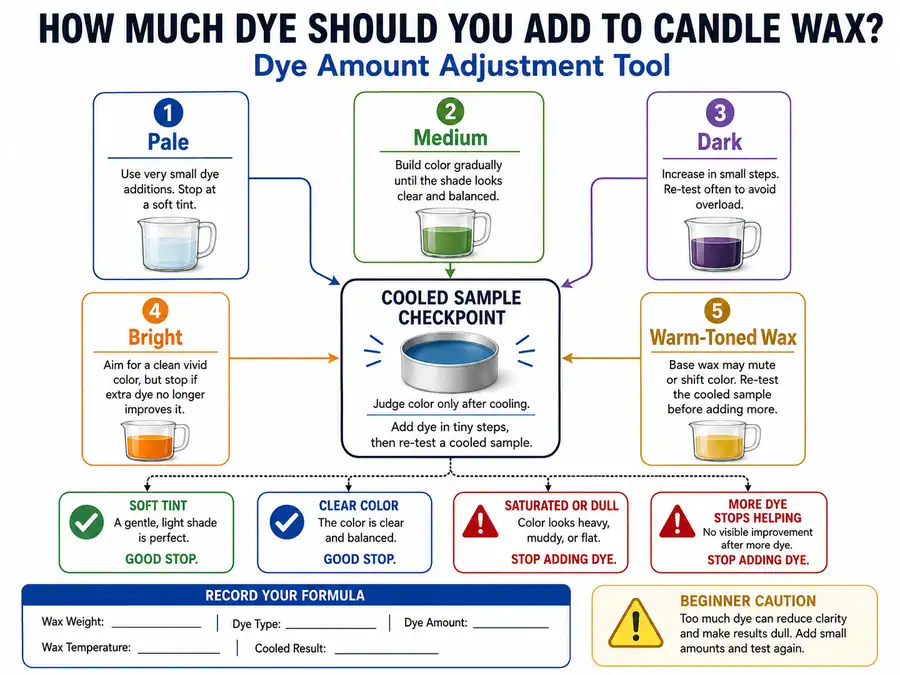
| Desired Shade | Starting Approach | When to Add More | When to Stop |
|---|---|---|---|
| Pale color | Use the smallest practical amount | Cooled sample is almost uncolored | Sample reaches a soft tint |
| Medium color | Add dye in small steps | Cooled sample is lighter than planned | Color is clear but not muddy |
| Dark color | Build color gradually | Sample still looks thin after cooling | Wax looks saturated or dull |
| Bright color | Use a dye suited to strong color | Wax type makes the shade look muted | More dye stops improving the shade |
| Warm-toned wax | Test before increasing dye | Natural wax color changes the shade | Added dye cannot correct the undertone |
| New wax or dye | Make a small test batch first | Result is too pale after cooling | Repeatable shade is reached |
The best beginner habit is to record the wax weight, dye type, dye amount, wax temperature, and cooled result. That note turns one test into a repeatable formula for the next batch.
Exact dye amounts vary because dye concentration, wax type, target color, batch size, and supplier directions all change the result. For exact liquid dye, chip, block, or percentage ranges, use the dedicated dye amount guide instead of expanding the formula here.
More dye does not always mean better color. Too much dye can make wax look dull, create staining, leave visible particles, or contribute to uneven burn behavior.
The safer beginner outcome is a clean, repeatable shade rather than the darkest possible candle.
When to Add Dye to Melted Candle Wax
Add dye after the candle wax has fully melted and before the final pour. The wax should be hot enough to dissolve or blend the dye without scorching the wax.
For exact temperature ranges by dye format and wax type, use the dedicated dye-temperature guide. This section only explains the beginner timing order.
This timing matters because solid wax cannot take color evenly, and cooled wax gives dye too little time to spread through the batch. For wax-specific melting behavior, use Candle Wax Types before changing wax formulas or pour methods.
A good beginner order is simple: melt the wax, check that it is fully liquid, add candle-safe dye, stir until blended, test the cooled color, then pour.
Do not add dye after the candle has started setting because the color will sit unevenly in the wax instead of spreading through it.
Basic Dye Timing Checklist
Use this checklist to decide whether the wax is ready for dye.
| Timing Check | Ready for Dye? | Why It Matters |
|---|---|---|
| Wax is partly solid | No | Dye cannot spread through unmelted wax |
| Wax is fully liquid | Yes | Dye can blend through the full batch |
| Wax is overheated or smoking | No | Heat can damage wax quality and color control |
| Dye pieces sink and stay solid | Not yet | Wax may be too cool or mixing may be weak |
| Color looks streaky after stirring | Not yet | Dye has not fully blended |
| Wax is already poured | Too late | Color correction becomes uneven |
The best timing is not “as hot as possible.” It is the workable stage where the wax is fully melted, the dye can blend, and you still have time to test and adjust before the pour.
For deeper heat control, use Candle Science & Temperatures rather than turning this color guide into a full temperature lesson.
How to Mix Candle Dye Evenly Into Wax
Mix candle dye by stirring melted wax slowly and steadily until the color looks uniform from top to bottom. Even mixing prevents streaks, specks, clumps, and patchy candle color.
The dye must move through the whole melted wax batch, not just the surface. Scrape the sides and bottom of the melting container while stirring because dye can collect there, especially when using chips, blocks, or flakes.
If you are still choosing between dye formats, use Candle Dye & Coloring for the broader comparison.
Signs the Dye Is Fully Mixed
Dye is fully mixed when the melted wax has one consistent shade, no visible dye pieces, no darker streaks, and no color collecting on the bottom of the pot.
Check the wax under steady light before pouring. Stirring too briefly can make the top look colored while the lower wax remains lighter. This is why a small cooled test is safer than judging the color only in the melting pot.
Good signs include:
- one even color across the full wax surface
- no specks on the spoon or stirring tool
- no darker trails when you lift the stirrer
- no dye sitting at the bottom of the container
- cooled sample matches the intended shade closely enough to pour
What Streaks, Specks, or Undissolved Dye Pieces Mean
Streaks, specks, or undissolved pieces usually mean the dye was not fully blended, the wax was too cool, the dye amount was too high, or the dye type did not match the wax well.
A beginner fix is to keep the wax at a workable melted stage, stir longer, and test a small cooled sample before pouring. Do not keep adding more dye to fix specks. More colorant can make clumping worse if the real problem is mixing, temperature, or compatibility.
If the same problem keeps happening after you adjust timing and stirring, move the issue to How to Color Candle Wax Without Clumping or Bleeding. That page can handle ongoing defects without turning this beginner workflow into a troubleshooting-only guide.
How to Test Candle Wax Color Before Pouring the Full Batch
Test candle wax color by cooling a small sample before pouring the full batch. Cooled wax often looks lighter, creamier, or less glossy than melted wax.
Melted candle wax can mislead beginners because heat makes the color look deeper and more fluid. A small cooled sample shows the shade closer to the finished candle.
For the full candle process after the color is set, use the How to Make Candles beginner guide rather than expanding into wicks, containers, or curing here.
A simple test works well:
- Stir the dyed wax until the color looks even.
- Place a small spoonful on wax paper, a white plate, or a sample cup.
- Let the sample cool until it turns solid.
- Check the shade in normal room light.
- Add more dye only if the cooled color is too pale.
- Stir again before testing or pouring.
Melted Wax vs Cooled Wax Color
Melted wax usually looks darker, shinier, and more transparent than cooled wax. Cooled wax can look softer, cloudier, or more pastel, especially with soy wax.
This difference is normal. The mistake is judging the batch from the melting pot alone. Soy wax can cool into a creamier shade, beeswax can keep a warm undertone, and paraffin may hold a clearer color.
For wax-specific color behavior, use Candle Wax Types when the wax base is the main decision.
The useful comparison is the cooled sample against the target candle color. If the cooled sample is close, pour the batch. If it is too pale, add a small amount of dye, mix fully, and test again.
How to Adjust Color Before the Final Pour
Adjust candle wax color in small steps before the final pour. Add a little dye, mix until even, cool another sample, and stop when the cooled shade matches the target.
Do not add large amounts of dye at once. A pale candle can be darkened, but an over-dyed candle is harder to correct.
Too much dye can make the wax look dull, uneven, or stained. It can also make troubleshooting harder because the cause may be excess dye rather than wax type or mixing.
If the color is too warm, too muted, or too creamy after cooling, more dye may not fix the issue. The wax type may be changing the shade. In that case, choose a different target color, test a different wax, or use a dye made for stronger color in that wax.
How to Fix Common Candle Wax Color Problems
Most candle wax color problems come from the wrong dye type, too little or too much dye, poor mixing, low wax temperature, or wax-and-dye mismatch.
Troubleshooting should start with the simplest cause. Check whether the colorant is labeled for candle wax, whether the wax was fully melted, whether the dye dissolved, and whether the cooled test matched the planned shade.
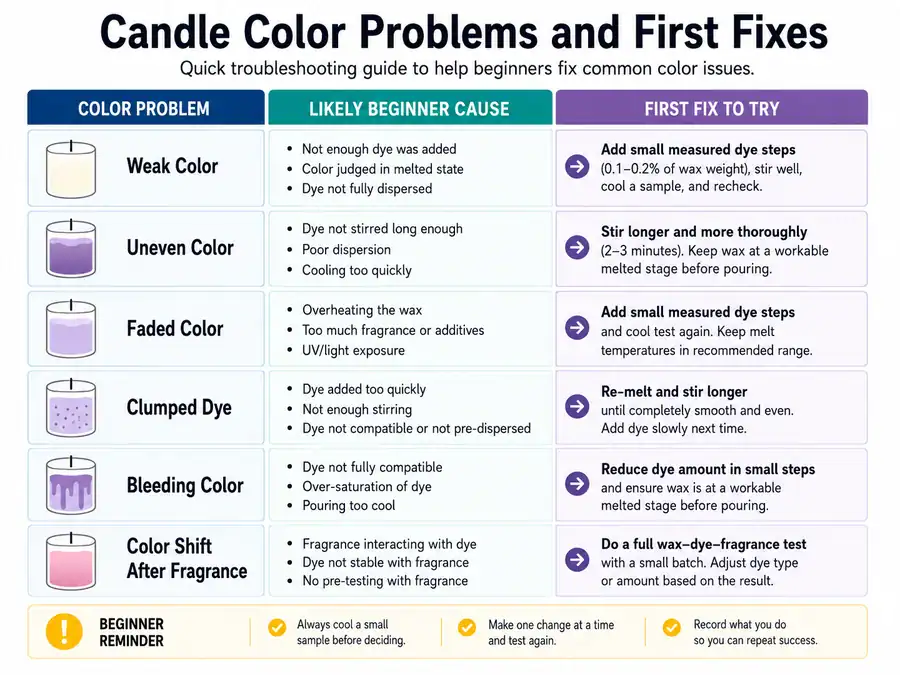
For recurring clumps, bleeding, fading, or fragrance-related color shifts, use the narrower troubleshooting guides instead of treating this beginner guide as a defect manual.
| Problem | Likely Beginner Cause | First Fix | Read Next |
|---|---|---|---|
| Weak color | Too little dye, low-strength dye, or wax softening the shade | Add dye in small measured steps and test cooled wax | Dye amount guide |
| Uneven color | Dye was not mixed through the full wax batch | Stir longer and scrape the sides and bottom | Mixing or troubleshooting guide |
| Faded color | Low dye load, wax cooling lighter, or light and heat exposure | Test cooled wax and store candles away from strong light and heat | Fading or discoloration guide |
| Clumped dye | Dye did not dissolve or disperse fully | Use candle-safe dye, warm the wax to a workable melted stage, and stir longer | Clumping and bleeding guide |
| Bleeding color | Too much dye, incompatible colorant, or separation | Reduce dye amount and test a small batch | Clumping and bleeding guide |
| Color shifted after fragrance | Fragrance oil or vanillin changed the finished shade | Test the full wax, dye, and fragrance combination before scaling | Discoloration guide |
Beginner FAQs About Coloring Candle Wax
Beginner candle wax coloring works best when you use candle-safe dye, add it while the wax is fully melted, mix until even, and test the cooled color before pouring.
Can you use food coloring in candle wax?
No, food coloring is not a good choice for candle wax. Many food colorings are water-based, so they do not blend evenly into melted wax.
Use candle-safe dye instead. Candle wax needs a wax-compatible colorant that can blend into the melted base and remain stable after cooling.
Can you color candle wax with crayons?
Crayons are not a reliable candle wax dye. They can contain binders and pigments made for drawing, not for melting into wax and burning in a candle.
A candle may still appear colored with crayon, but the result can be uneven, smoky, clogged-looking, or inconsistent. Use candle dye chips, liquid candle dye, or dye blocks made for wax.
Can you use mica powder to color candle wax?
Mica can add shimmer or decorative effects, but mica alone is not the most predictable beginner choice for solid color in wicked candles.
Mica does not behave like wax dye. It can settle, leave specks, or create uneven shimmer instead of a clean dyed wax color. Use candle dye for the main color, then treat mica as a separate decorative topic.
Why did my candle wax color look darker when melted?
Melted wax often looks darker because it is hot, liquid, and more glossy. Cooled wax can look lighter, creamier, or more opaque.
Always test a cooled sample before pouring the full batch. This prevents over-dyeing when the melted wax looks weaker or darker than the finished candle will be.
Why is my candle color uneven?
Uneven candle color usually means the dye did not fully dissolve or spread through the melted wax before pouring.
Stir longer, scrape the sides and bottom of the melting container, and check for streaks before the pour. If the problem continues, review dye type, wax temperature, and wax compatibility.
How do you make candle wax color stronger?
Make candle wax color stronger by adding candle-safe dye in small measured amounts, mixing fully, and checking a cooled sample after each change.
Do not keep adding dye once the shade stops improving. At that point, the wax type or dye strength may be limiting the result.
Why is my candle dye clumping?
Candle dye clumps when the dye does not dissolve or disperse fully in the melted wax. The wax may be too cool, the dye amount may be too high, or the dye may not match the wax.
Do not pour wax with visible clumps. Rewarm to a workable melted stage, stir longer, and test a small sample before making the full batch.
What to Read Next
Use the next guide based on the problem you are trying to solve.
- Candle Wax Types — read this when wax choice is changing the color, opacity, or final shade.
- Candle Dye & Coloring — read this when you want a wider comparison of dye formats and colorant choices.
- How to Color Candle Wax Without Clumping or Bleeding — read this when color defects keep appearing after basic mixing and timing fixes.
- How to Color Candles Naturally — read this when you want plant-based or natural color options instead of standard candle dye.
- Candle Science & Temperatures — read this when dye problems seem tied to heat control, melting, or pouring temperature.
- How to Make Candles — read this when you need the full beginner candle-making process beyond coloring the wax.