Use functional wax additives as a tested percentage of wax weight, starting low by additive type and wax family so you adjust wax behavior without overcorrecting the formula.
Candle additives here are functional wax additives such as Vybar, stearic acid, and UV inhibitors that change how the wax burns, looks, or holds fragrance. Here, additive percentage means a wax-additive percentage based on wax weight, not fragrance load or dye amount. The right starting point depends on the additive’s job, the wax family, and whether you are working with a base wax or a prepared blend. Start with additive purpose, choose a cautious range, calculate from wax weight, then confirm the rate in a small batch before scaling.
Calculate How Much Additive to Use in Candle Wax
Enter wax weight, additive type, usage rate, fragrance load, dye load, and wax limit. The calculator estimates additive amount, total additive load, batch totals, test ladders, and cost impact.
Additive Amount from Wax Weight
Use this when you know your wax weight and want to calculate one additive by percentage of wax weight.
Additive Dose Result
Total Additive Load Checker
Use this to check whether your formula is asking too much from the wax before you pour a batch.
Total Load Result
Small Batch Additive Test Ladder
Use this to test low, middle, and high additive levels before changing your main recipe.
Test Ladder Result
Additive Cost Impact
Use this to see whether an additive is cheap enough to justify using in a batch.
Cost Result
On this page, a safe or safest starting point means a cautious formula-testing rate, not toxicology, labeling, SDS handling, or fire-safety guidance.
What Candle Additives Mean Here (and What They Do)
Candle additives here are functional wax modifiers added to the wax itself, not fragrance oil or dye.
A functional additive changes wax behavior or wax appearance for a specific reason, such as hardness, opacity, surface finish, or light stability. The candle additives guide covers the wider additive category, but the focus here is dosage by wax weight and how to keep that dosage tied to a clear purpose. Handling, storage, and SDS details belong on the additive safety page rather than inside percentage math.
The safest way to choose a starting percentage is to identify the additive’s job first. A hardness additive, a finish additive, and a UV additive do not solve the same problem, so they should not share one default rate.
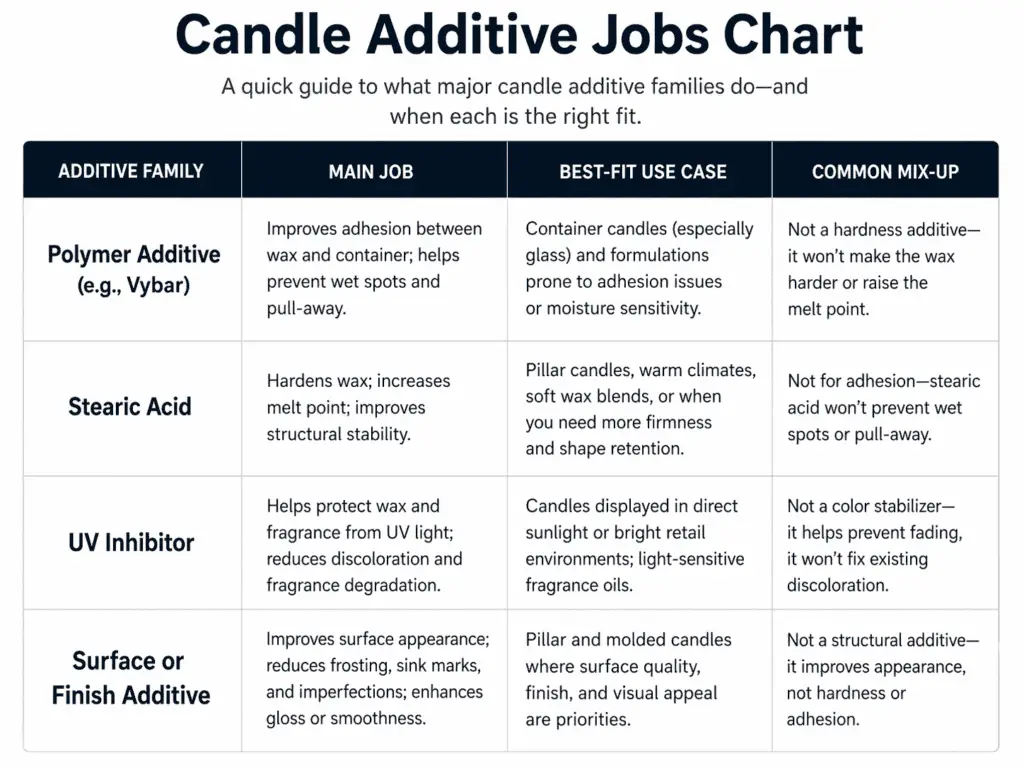
| Additive type | Main job | Best-fit use case | Common mix-up |
| Polymer additive such as Vybar | Adds structure, opacity, and support for fragrance and color hold | Paraffin or blends that need a firmer body or cleaner finish | Using it as a fix for every weak candle |
| Stearic acid | Hardens wax, adds opacity, and can slow burn rate | Paraffin pillars or votives that need a firmer body | Treating it as a scent-strength tool first |
| UV inhibitor | Slows color fade from light exposure | Colored candles that may sit in light | Using it to fix burn or throw issues |
| Surface or finish additive | Helps with smoother appearance in the right formula | Wax that needs a visual correction | Adding it when the wax itself is the real issue |
When you already know the additive family, the Vybar guide and stearic acid guide are where product-level details belong. The goal here is not to rank products or compare brands. The goal is to keep additive purpose clear before any percentage gets attached to the batch.
Additive % vs Fragrance Load vs Dye Amount
Additive %, fragrance load, and dye amount are separate recipe lines even when they use the same wax-weight denominator.
A shared denominator does not make them interchangeable concepts. The recipe math guide helps keep each formula line separate, while the fragrance load guide stays focused on scent percentage and the dye guide stays focused on color dosage. In practice, all three lines may appear on the same batch card, but each line answers a different question.
| Recipe line | What it measures | What it changes | Do not merge it with |
| Additive % | Functional wax modifier compared with wax weight | Structure, finish, opacity, color hold, light stability | Fragrance load or dye amount |
| Fragrance load | Fragrance oil compared with wax weight | Scent strength and scent hold | Additive % |
| Dye amount | Colorant amount in the formula | Color depth and shade | Additive % or fragrance load |
A simple recipe card shows the difference:
- Wax: 500 g
- Additive: 0.5%
- Fragrance: 8%
- Dye: separate measured color line
Those numbers can all sit on one formula card, but they are not one merged total. The additive line still answers the additive question only.
When You May Not Need an Additive. Some formulas do not need a separate additive at all. That is common with certain prepared blends and in many beeswax projects, where the wax itself may already provide the structure or finish you wanted. The prepared wax guide, beeswax guide, and wax-type guide help sort out whether the wax already does the job before you add another formula line.
Pick the additive job first, because the next step is a starting range by additive type rather than one number for every formula.
Use product or supplier directions first when they set a narrower rate for the exact additive, and treat prepared blends as possible pre-modified systems rather than blank starting wax.
Starting Additive Rates by Type (% of Wax Weight)
Starting additive rates are test ranges by additive type, measured against wax weight rather than fixed final percentages.
Begin at the low end unless a supplier gives a narrower starting point for the exact product you are using. A structural additive, a finish additive, and a UV additive are not interchangeable, so their starting bands should not be treated as interchangeable either. The candle additives guide is useful when you need to confirm the additive family before you weigh the batch.
These ranges are testing bands, not final formulas for every wax, wick, or additive brand.

| Additive type | Common purpose | Start % of wax weight | Cautious upper test band | Notes |
| Vybar-type polymer additive | Hardness, opacity, fragrance support, color support | 0.25%–0.5% | 1.0% | Start low because small changes can alter burn behavior |
| Stearic acid | Harder wax, slower burn, more opacity | 1%–3% | 5% | Often tested in low single digits first |
| UV inhibitor | Light protection for color | 0.2%–0.5% | Follow product directions | Product-specific; use only when light stability is the goal |
| Finish or texture aid | Smoother surface or visual correction | 0.25%–0.5% | 1.0% | Confirm the wax really needs it before adding more |
Keep two limits in view.
The percentage always refers to wax weight only, and the table gives a starting band rather than a promise that the upper end will work better than the lower end. In many formulas, a small amount helps and a larger amount starts pushing the wax too far.
That difference matters most with polymer-style additives. The Vybar guide belongs on the deeper product path because exact behavior can shift by product and formula. The same is true for higher-end stearic use, which is why the stearic acid guide is a better place for additive-specific edge cases than this starting-range table.
Using More Than One Additive Without Overcorrecting the Wax
When you use more than one additive, treat the combined additive load as one total reviewed against the wax.
Two additives can be used in the same formula, but their percentages still stack into one combined load. That does not make the formula wrong, but it does mean the wax is being pushed by more than one modifier at the same time. The additive calculator is the cleanest way to total those lines before weighing the batch.
A quick combined-load example makes the rule easier to see:
| Additive line | Rate |
| Polymer additive | 0.5% |
| Stearic acid | 2.0% |
| Combined additive load | 2.5% |
The practical question is not only “Can these two additives exist together?” The practical question is “What is the total correction load on this wax?” If the wax starts losing the behavior you wanted, the answer may be to lower one line rather than add a third.
Keep this part practical. Deep additive-pair logic, product-by-product pairing, and chemistry-heavy compatibility rules belong in the advanced formulation guide. If one line needs deeper follow-up, return to the Vybar guide or the additive-specific child page instead of turning the batch into a chemistry project.
Count additive against wax weight or total candle weight? Use wax weight only, then turn the percentage into a measured amount for the batch.
How to Calculate Additive Weight from Wax Weight
By wax weight means the wax-only mass is the denominator for additive math.
Use the weight of the wax in the batch only. Do not include the vessel, label, lid, or total finished candle mass. Do not merge additive percentage into the fragrance line either. The recipe math guide keeps the formula structure clean, the fragrance load guide stays on the scent line, and the candle additives guide stays on additive choice and rate.
The formula is simple:
Additive weight = wax weight × (additive % ÷ 100)
The unit does not matter as long as the wax weight and the result stay in the same unit.
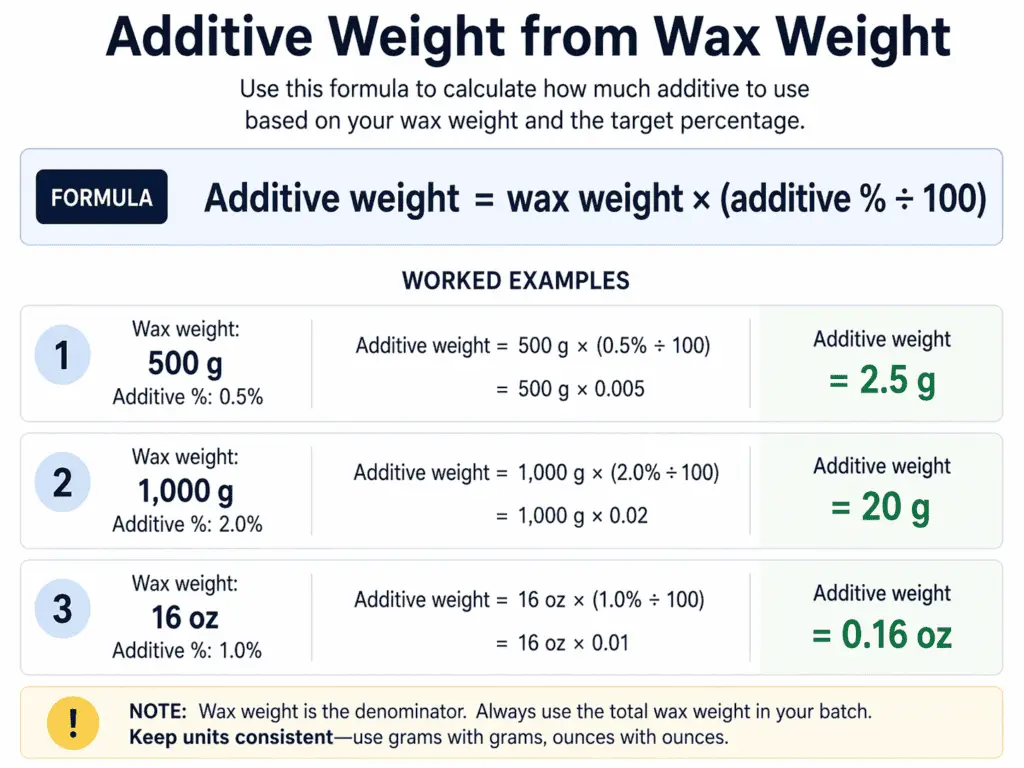
| Wax weight | Additive rate | Additive weight |
| 500 g | 0.5% | 2.5 g |
| 500 g | 1.0% | 5 g |
| 1,000 g | 0.25% | 2.5 g |
| 1,000 g | 2.0% | 20 g |
| 16 oz | 0.5% | 0.08 oz |
| 16 oz | 1.0% | 0.16 oz |
A few worked examples make the pattern easier to reuse.
- 454 g wax at 1% additive = 4.54 g additive
- 908 g wax at 0.5% additive = 4.54 g additive
- 10 lb wax at 0.1% additive = 0.01 lb additive
The rule stays the same every time. Choose the additive, choose the starting rate, weigh the wax, multiply by the formula, and write the result on the batch card. The additive calculator is useful when you want a fast grams-to-ounces check or when you are reviewing several small test batches at once.
If the batch has fragrance too, keep the lines separate:
- Wax = 1,000 g
- Additive at 0.5% = 5 g
- Fragrance at 8% = 80 g
Both lines can use wax weight as the denominator, but they remain separate formula lines. Log each line in the testing worksheet so the batch can be repeated without guesswork.
Test Small Batches Before You Scale Up
The first chosen rate is a test baseline, not a locked production formula.
A clean test batch changes the additive rate while the other main variables stay fixed long enough to judge the result. Keep wax, wick, vessel, fragrance, and pour routine steady so the additive line is the only meaningful change. Then record what happened in the testing worksheet and confirm the result again with the burn test guide before moving large-batch steps to the operations/SOP page.
A simple validation loop looks like this:
- Pick one additive and one starting rate.
- Weigh the wax and calculate the additive line from wax weight only.
- Make one small batch with the rest of the formula unchanged.
- Label the batch with wax type, additive %, additive weight, wick, and fragrance line.
- Let the batch cure as normal for that wax system.
- Test the result and record what changed.
- Adjust one variable only for the next round.
- Scale up only after the result repeats.
A short batch log keeps the process tight:
- Wax type
- Wax weight
- Additive name
- Additive %
- Additive weight
- Wick
- Fragrance %
- Surface result
- Burn result
- Next adjustment
A useful pattern is one batch at the low end of the range and one follow-up batch after a small adjustment. That gives you a controlled comparison instead of a guess based on one pour.
The last variable to solve is wax type, because the same additive percentage can behave differently in different wax systems.
How Wax Type Changes Your Starting Additive Rate
Additive rates are conditional on wax family and on whether the wax is a base wax or a prepared blend.
A base wax and a prepared blend do not start from the same point. Some prepared blends already include modifiers, and some naturally firm waxes may not need a separate additive at all. The candle additives guide keeps the category clear, while the soy wax guide, prepared wax guide, and beeswax guide help sort out whether the real issue is wax choice or additive need.
The safest first move is to read the wax system before changing the additive rate.
| Wax system | Separate additive need | Starting approach |
| Base soy wax | Conditional | Start low and test only for a clear purpose such as hardness, finish, or light stability |
| Base paraffin wax | More common for structure-focused additives | Start low, but structural additives may fit more often than they do in beeswax |
| Beeswax | Often little or none for hardening | Test only when a specific problem remains after normal wax and wick choices |
| Coconut or soft blend | Conditional | Check whether softness is already part of the blend design before adding more |
| Base blend | Conditional | Treat blend behavior, not the front-label name, as the real starting point |
| Prepared blend | Maybe none | Follow the blend directions first before adding a separate modifier |
The key exception is prepared wax. If a prepared blend already targets smooth tops, scent hold, or easier burn balance, adding more structure without a clear reason can work against the blend rather than help it. A separate additive is not a default requirement just because the formula can technically accept one.
The next question is whether to change the additive rate or change the wax.
Change wax first when:
- the prepared blend already targets the result you want
- the wax is naturally firm enough and the problem is somewhere else
- the defect appears tied to wick choice rather than wax behavior
- the issue looks more like scent balance than additive need
Change additive rate first when:
- the additive job is clear
- the wax is otherwise suitable
- the test batch showed a partial improvement
- one small adjustment can be isolated and measured
If the symptom points more clearly to wick behavior, review the wick troubleshooting page before raising the additive line. If the symptom points more clearly to scent balance, return to the fragrance load guide instead of pushing the additive line higher. Broader defect diagnosis belongs in the troubleshooting hub.
Signs You Used Too Much or Too Little
Too much and too little are additive- and wax-specific, not universal defect labels.
One additive can be too high for a given wax while another is still too low for the same batch goal. That is why symptoms should be read against additive purpose and wax type rather than treated as one-size-fits-all defect codes.
| Symptom after testing | Likely direction | Next cautious move |
| Melt pool gets sluggish after more hardness additive | Too much | Step down on the next batch |
| Surface looks better but hot throw seems weaker | Too much or wrong additive for the goal | Lower the additive and review the scent line separately |
| Hardness or finish barely changes | Too little or wrong additive type | Raise slightly or rethink the additive choice |
| Prepared blend performs worse after extra additive | Unneeded additive | Test the same wax without the extra modifier |
| Problem appears only with one wick setup | Not additive first | Check wick choice before changing additive again |
| Scent issue shifts while structure stays fine | Fragrance variable more likely | Keep additive steady and check the scent math separately |
A few practical thresholds help keep the next move simple.
- If one small increase creates a new burn problem, step back down.
- If one small increase changes nothing, the additive may be too low or the additive type may be wrong.
- If a prepared blend gets worse after the additive line is added, remove the additive before adding more.
- If the symptom changes with wick swaps but not with additive changes, stop blaming the additive first.
The target result is the lowest additive rate that solves the wax-specific problem without creating a new one.