Fix smudged or peeling candle labels by matching label stock and adhesive to your container, applying labels to clean, room-stable surfaces with firm pressure, and letting the bond settle before handling or packing.
A label can look perfect on the sheet and still fail once it meets warm glass, fragrance residue, or winter shipping. Smudging usually means the ink never fully set or the finish is too soft to resist abrasion. Peeling is usually caused by poor surface prep, temperature problems, weak pressure during application, or not enough dwell time for the adhesive to grip. With a few practical checks, you can make labels that stay crisp from pour day to customer shelf.
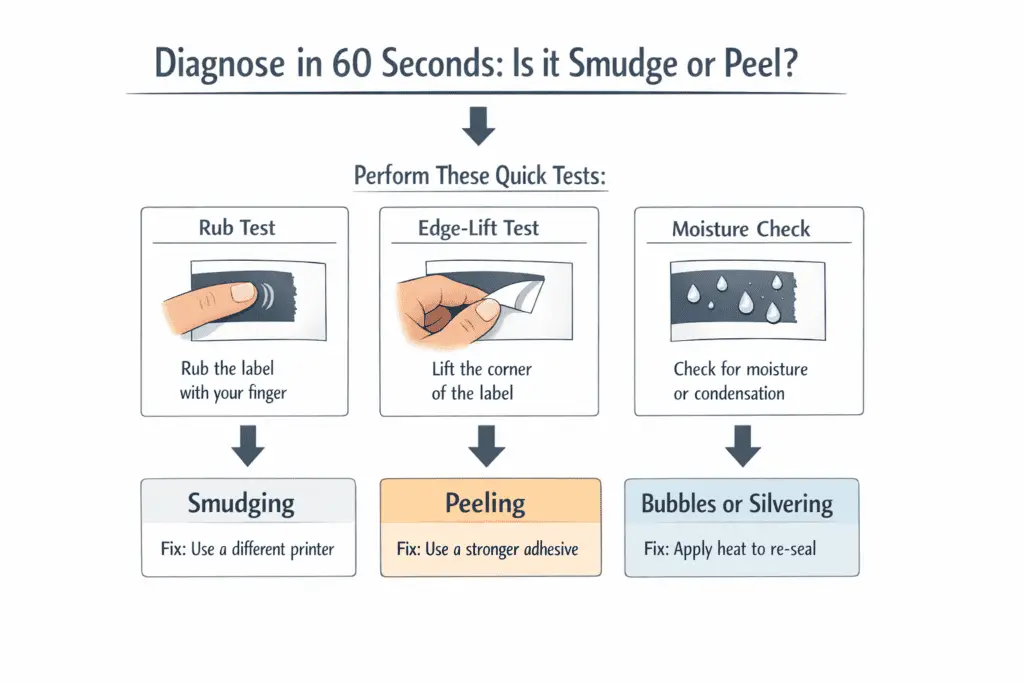
Diagnose in 60 seconds: is it smudge or peel?
Run these three quick tests first so you know which problem you are actually solving.
| What you see | Likely cause | First fix |
|---|---|---|
| Ink transfers, haze, or scratches | Print durability or finish failure | Fix print setting, ink or toner match, or protective finish first |
| Edges lift, flag, or curl | Surface prep, temperature, pressure, or adhesive mismatch | Clean the jar, label only when room-stable, and burnish again |
| Bubbles, fogging, or silvering | Moisture or trapped air | Wait for the jar to dry and reapply with center-out pressure |
Rub test
Rub a freshly printed label with a clean, dry cloth. If color transfers or the print hazes, the problem is print durability or smudging.
Edge-lift test
After a label has sat for a few hours, press an edge firmly and check it again the next day. If edges lift or flag, the problem is usually surface prep, temperature, pressure, or a mismatch between label and adhesive.
Moisture check
Touch the label area. If it feels cooler than the room, or if you see fogging or sweat, do not label yet. Moisture blocks adhesive contact.
Before changing anything, make sure the label still includes all required safety and handling information, and that it remains readable after any material, finish, size, or placement changes.
Choose the right label material for candle jars
Use film labels or protected paper when smudging, oil staining, humidity, or repeated handling are driving failure. Plain paper works best only on dry, low-touch jars that stay away from wax and residue.
Film stocks, often sold as BOPP or similar, resist oil, water, and scuffs better than plain paper. Laminated paper is the middle ground when you want a paper look with more surface protection. If the print looks hazy, scratches easily, or never feels fully set, the real issue may be the match between the printer, ink, and label coating.
If the print rubs clean but still scuffs later, a matte laminate usually adds more abrasion protection than varnish, while varnish stays thinner and more flexible on a gentle curve.
Use the real conditions your candle will face to decide:
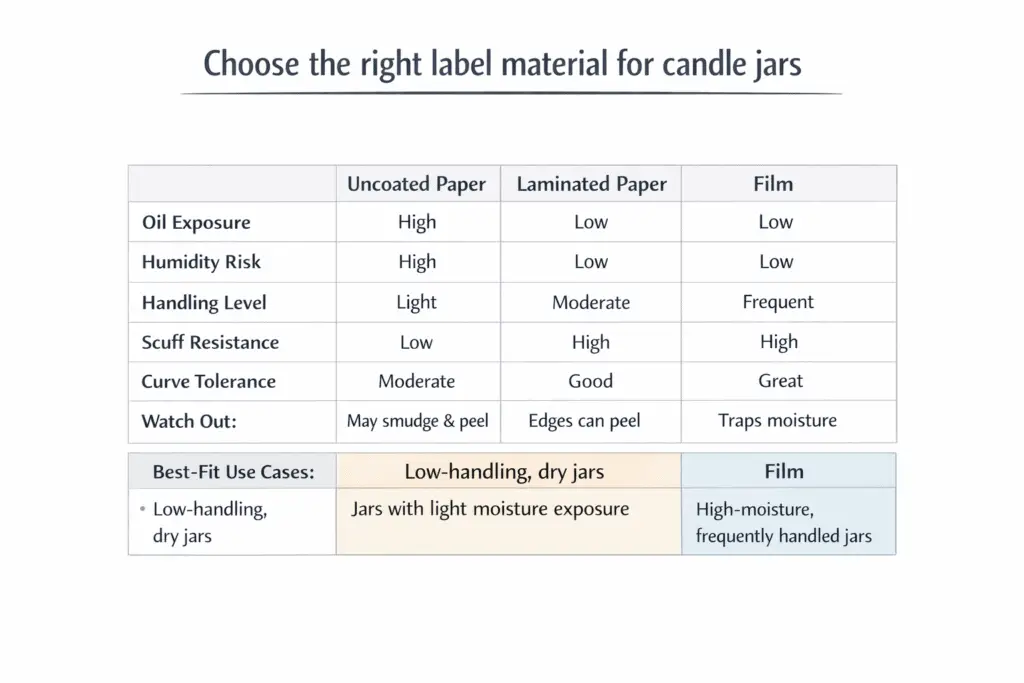
- Oil exposure or oily hands: film is the safer choice because it does not absorb oil easily.
- Humidity or condensation risk: film or laminated paper usually performs better.
- Low handling and dry shelves: plain paper can work well if you want that softer look.
| Label material | Best when | Common wins | Watch-outs |
|---|---|---|---|
| Uncoated paper | Dry shelves, minimal handling | Soft, textured look | Spots, scuffs, and wrinkles more easily |
| Laminated paper | You want a paper feel with more wipeability | Better abrasion resistance | Edge lifting can happen on tight curves if prep is poor |
| Film | Oils, humidity, frequent handling | Strong water and oil resistance | Needs the right printer and settings for sharp results |
Before buying in bulk, test one paper label and one film label on cleaned jars. Photograph both right after burnishing. Then place a tiny drop of fragrance oil near, not on, the label edge, wait, wipe, and compare them the next day.
Fix smudged ink on printable candle labels
Stop smudging by letting prints fully set, reducing ink load, and adding a compatible protective finish only after the print passes a rub test.
Smudging usually means the ink never bonded properly to the label coating, the coating is not compatible with the ink or toner, or the label face is getting scuffed harder than the print system can handle. Fix the problem in order, one variable at a time.

Practical fix order
Let the print set fully
Print one sheet and leave it flat and unstacked. If it smears when handled right away, you may just be stacking too soon.
Change the media setting
Use a label or matte setting that reduces ink laydown and improves dry behavior.
Reduce ink density
Drop print quality one notch if the sheet feels wet or tacky.
Match ink to stock
Pigment inks usually resist rubbing better than dye inks once dry. If you are using dye ink and smearing continues, test pigment ink or a more compatible label coating.
For laser printers
Use media rated for laser printers and try a thicker-media setting. Flaking on bends often means the toner did not bond properly.
Protect only after the print is stable
Add a matte laminate or clear topcoat only after the label survives a dry cloth rub without haze or transfer.
| Printer type | Typical failure | Best first change | Next best change |
|---|---|---|---|
| Inkjet, dye | Smears on touch, especially on films | Reduce ink load or change media setting | Test pigment ink or a more compatible coating |
| Inkjet, pigment | Light scuffing with handling | Add a protective top layer after full dry | Test a tougher coating or film stock |
| Laser | Flaking on bends or edges | Use label-rated media and a thicker setting | Switch to media designed specifically for laser |
Apply labels without bubbles or silvering
Apply the label from the center outward with steady, even pressure so air can escape and the adhesive can fully contact the jar.
A simple hinge method works well. Tack one edge lightly, use that as your anchor, then lay the label down in a smooth arc instead of slapping it flat.
Set the correct application temperature and pressure
Label only on dry, room-stable containers and use firm, even pressure across the entire label so the adhesive can wet out and grip the surface fully.
Temperature affects initial tack. Pressure determines whether the adhesive actually reaches every small low spot on the jar. A simple rule works well: if the label zone feels noticeably cooler than the room, wait. If a label looks fine at first but lifts the next day, the adhesive usually never fully wetted out because the jar was too cool, too warm, damp, or handled before the bond settled. Room-stable means the jar feels neutral to the room, not cool, cold, or freshly warm.
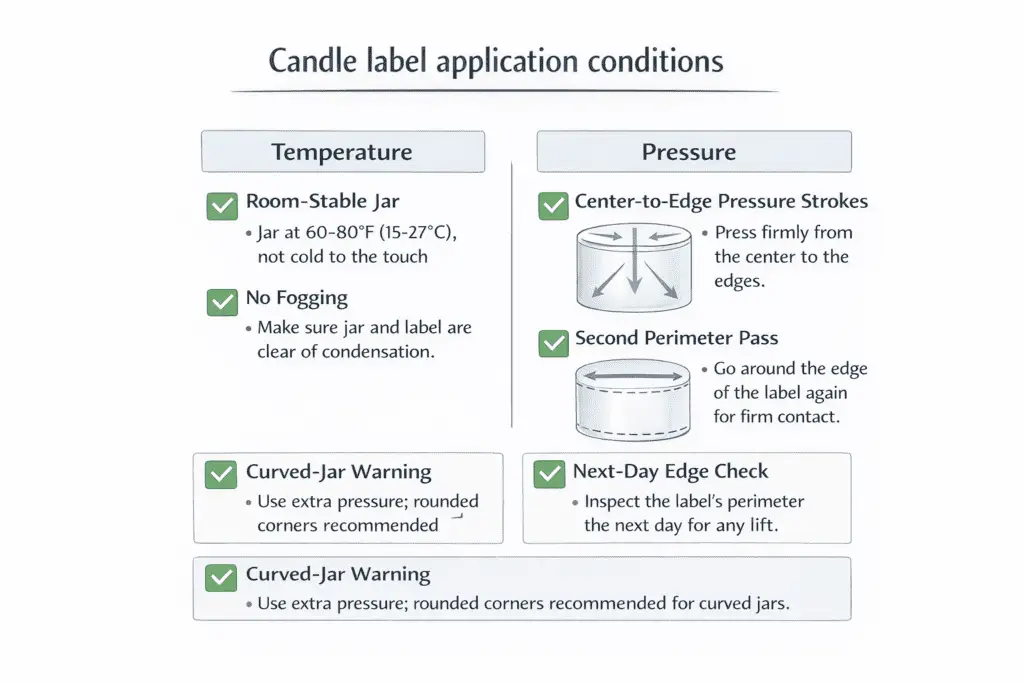
Temperature checks
- Do not label jars that feel cold or show any fogging.
- Do not label jars that are still warm from pouring or heat exposure. Warm glass can release trapped air later and create bubbles.
Pressure checks
- Press from the center to the edge.
- Do two slow passes, one to seat the label and one to seal the perimeter.
- The label face should look uniformly set, with no lighter patches or edge gaps.
Curved or textured jars: reduce edge stress and improve contact
Frosted, etched, and tightly curved jars reduce actual contact area and concentrate stress at edges, so a label that works on smooth glass can still lift here.
- Clean thoroughly and let the jar fully dry.
- Warm the jar until it feels neutral to slightly warm, not hot.
- Use rounded corners and keep the label on the flattest band of the container when possible.
- Use a shorter, more conformable label if the curve is tight.
- Apply from the center outward in overlapping strokes and burnish edges firmly.
- Let the jar rest before packing and check the edges again the next day.
Extend dwell time for a permanent bond
Give the adhesive time to settle so labels stop lifting at edges and seams.
Even if a label feels stuck right away, most pressure-sensitive adhesives get stronger over time as they flow into the surface texture. If edges lift the next day, the problem is often not a lack of force. It is weak contact plus not enough settling time.
Better dwell habits
- Apply from the center outward and burnish edges thoroughly.
- Let labeled jars rest undisturbed before packing or heavy handling.
- Avoid tight dividers, shrink wrap, or label-against-label friction right away.
- If you must pack sooner, use smooth, low-friction dividers and keep labels from rubbing.
- Track results by container type and season. Humidity and surface coatings change outcomes more than most people think.
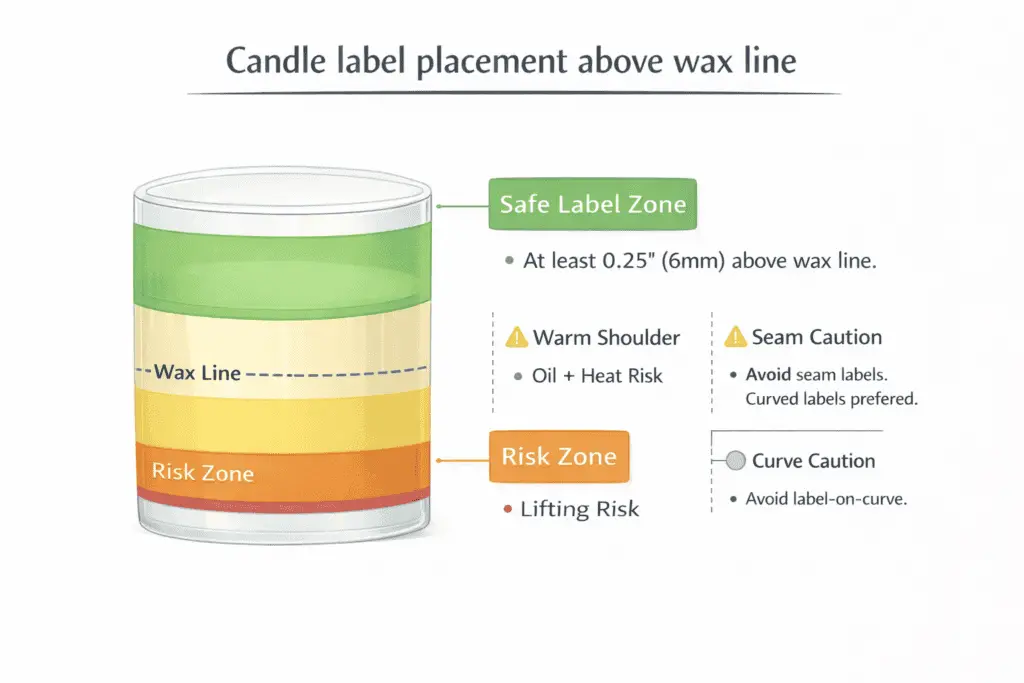
Position labels away from the wax line
Place labels above the wax line and away from the warmest parts of the container so heat and oil cannot creep into the label edge and stain or lift it.
The risk zone is not just the wax surface. It also includes the warm shoulder of the jar and any area handled with fragrance residue. Keep the bottom edge of the label comfortably above the highest wax line the jar might reach in heat or shipping.
Better placement habits
- Mark your intended fill level and estimate the highest wax line the jar might show on a hot day.
- Place the bottom edge of the label above that area.
- Test one jar through warm storage or a short shipping simulation.
- Avoid seams, sharp curves, and textured bands when possible.
If labels keep staining or lifting near the bottom edge, treat that as oil migration, not just poor pressure. Move the label higher, switch to film or protected paper if needed, and wipe fragrance residue before it reaches the edge.
If you keep seeing oily halos, a better placement plus a barrier surface such as film or protected paper usually works better than pressing harder.
Rework or remove failed labels cleanly
Remove failed labels with gentle heat, slow peeling, and an adhesive-safe cleaner so the container is ready for a clean re-label.
Rework only when the label is slightly crooked or one edge has just started to lift. Replace the label instead of reworking it once you see stretching, whitening, deep wrinkles, or dirt on the adhesive side.
Better removal process
- Warm the label slightly with a hair dryer so the adhesive releases more cleanly.
- Peel low and slow, pulling the label back over itself.
- If residue remains, apply adhesive remover to a cloth, not directly to the jar, and rub until the tack is gone.
- Use a plastic scraper or an old card for stubborn spots. Avoid metal blades that scratch.
Stop reworking if the jar finish gets scuffed, the label area stays slick after cleaning, or the container was labeled warm or oily the first time. In those cases, a full clean and a fresh label usually gives a better result.
Clean glass properly before labeling
Clean glass until water sheets evenly over the label area. If water beads, residue is still present and can cause sliding or edge lift.
Alcohol wipes remove fingerprints, but they do not always remove polish or silicone films. A water-break test is a simple way to confirm that you have actually removed barriers instead of just spreading them around.
If labels still slide during application or lift at the edges even after normal cleaning, assume silicone or polish residue is still present. Soft-touch coatings, glass polishes, and certain shop rags can leave an invisible barrier.
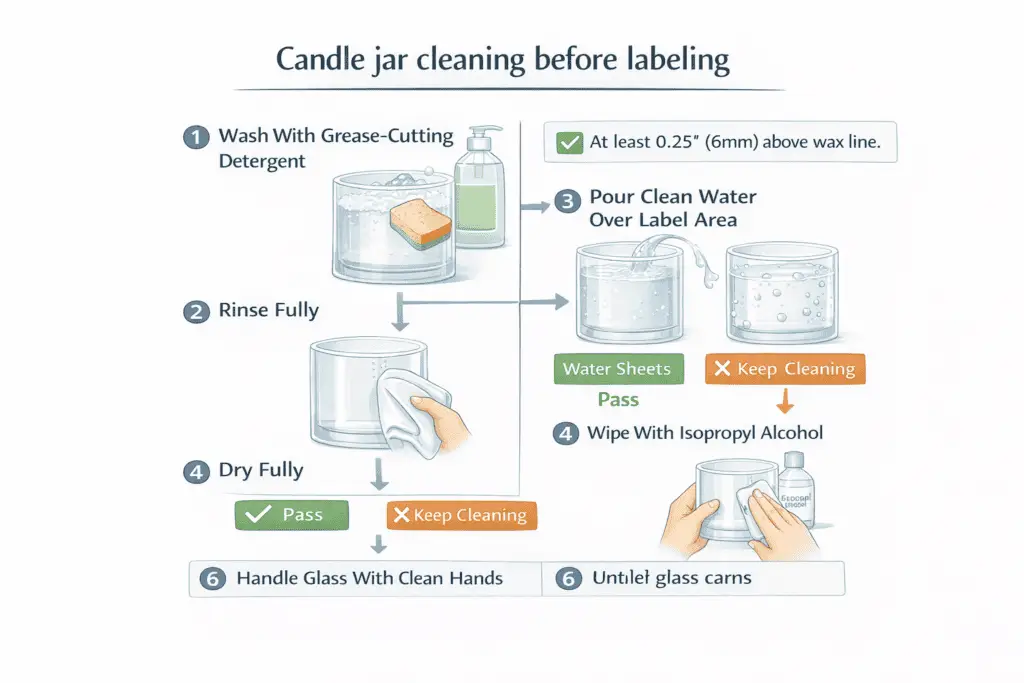
Better cleaning process
- Wash the jar with a grease-cutting dish detergent and warm water using a clean sponge reserved for containers.
- Rinse thoroughly.
- Pour clean water over the label area.
- If water sheets in a smooth film, the surface is likely ready.
- If water beads into droplets, keep cleaning.
- Let the jar dry fully.
- Finish with an isopropyl alcohol wipe and air-dry.
- Handle by the base or wear clean gloves so you do not add oils again.
Control heat and humidity to prevent label failure
Keep labels from failing by labeling only on fully dry, room-stable containers and storing finished candles in a steady environment so humidity swings do not create condensation or soften adhesives.
If jars came in cold, let cartons warm closer to room temperature before opening them. Opening too soon can create hidden condensation, and that thin moisture film can turn into bubbles, creep, or edge lift later.
Match conditions to common failures
- Cold jar into a warm room can create a condensation film, then later bubbles and edge lift.
- Warm storage or direct sun can soften adhesive and cause label creep or flagging.
- High humidity during curing can slow adhesive settling and cause edges to lift overnight.
A practical rule is simple: if the container can sweat, do not label it yet.
Final takeaway
Smudged or peeling candle labels are rarely random. They usually come from one of five failures: poor print compatibility, wrong material choice, contaminated surfaces, bad application conditions, or not enough time for the adhesive to settle.
The fix is usually not complicated:
- Match the label material to the real conditions
- Clean the container properly
- Apply only on dry, room-stable surfaces
- Use firm, even pressure
- Keep labels away from heat and oil zones
- Let the bond settle before packing or heavy handling
If you control those basics, your labels stop looking good only at the moment of application and start staying good through storage, shipping, and customer use.