
Blending soy with beeswax suits makers who want more structure than pure soy without moving to a fully beeswax candle. The main choices are ratio, wick, scent load, and whether the candle goes in a jar or needs to stand on its own. A small test batch shows faster than guesswork whether the blend burns cleanly, holds scent, and sets the way you want. The next sections move from the direct answer into ratios, wick testing, mixing steps, and a simple test log.
Can You Mix Soy and Beeswax for Candles?
Yes, you can mix soy and beeswax for candles, but the best blend depends on candle type and needs testing.
A soy-beeswax blend can burn well, smell good, and set with more body than pure soy, but it is not a plug-in swap. More beeswax often makes the wax firmer and changes wick choice, jar behavior, and scent results. Early on, it helps to keep one broad wax reference in mind, so start from the Candle Wax Types / wax-selection hub and treat the blend as its own wax system.
The starter ranges below are working tests, not fixed formulas. Wax lines, fragrance loads, vessels, and wick lines vary enough that the same blend can behave differently from one setup to another. The point is to start with a small, sensible batch and compare what changes.
| Candle type | First test blend | What it usually gives you | First thing to watch |
|---|---|---|---|
| Jar candle | 80/20 soy-beeswax | Keeps more soy character with a bit more firmness | Burn pool and jar adhesion |
| Jar candle | 70/30 soy-beeswax | Firmer set and more structure | Wick strength and pull-away |
| Firmer candle or test for more body | 60/40 soy-beeswax | Noticeably firmer feel | Hardness, shrinkage, and wick demand |
People blend these waxes for a few practical reasons.
- They want a firmer candle than pure soy.
- They want more structure for warm rooms or handling.
- They prefer a natural-wax blend.
- They want to compare finish and burn behavior across two wax systems.
A few performance shifts are common when beeswax is added.
- Hardness usually rises.
- Wick needs often change.
- Jar behavior can change, which may include pull-away or wet spots.
- Scent can shift in both cold and hot use.
A beginner can do this. Start with one small batch, keep the ratio simple, and change one variable at a time.
You should not use one ratio for every candle type. A jar candle and a firmer self-supporting candle do not ask the wax to do the same job.
The next choice is the blend ratio. After that, wick testing and the test log make the results easier to compare without guessing.
Best Soy-to-Beeswax Ratios for Jars and Pillars
The best soy-to-beeswax ratio depends on the candle type, so test small jar and pillar ranges instead of copying one formula.
Jar candles and firmer candles should not start from the same default blend. A jar usually needs easier melt behavior and steadier glass contact, while a firmer candle can tolerate more beeswax if the wick and finish still behave well. Keep the wider wax picture in view with the Candle Wax Types / wax-selection hub, then build a short ratio ladder that fits the candle you are making.
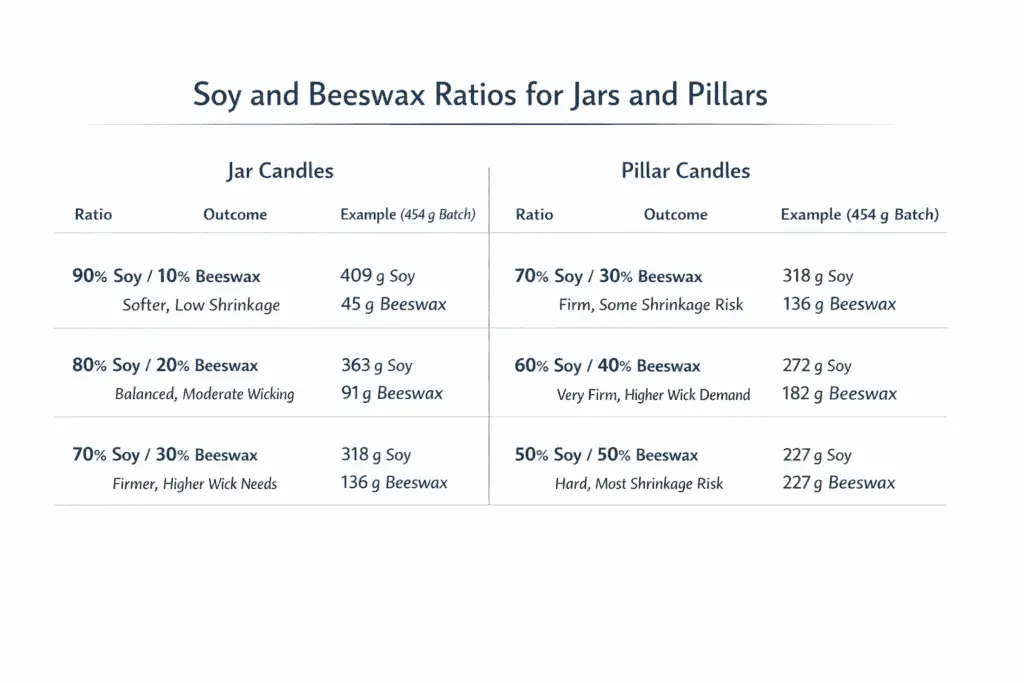
These starter ranges are working tests, not fixed formulas. They are grouped by candle type so you can compare like with like, and the one-pound examples are simple percentage conversions for 454 g batches. Round the weights to the nearest gram and judge each batch only after cure.
| Candle type | First three ratios to test | What usually changes | One-pound batch examples |
|---|---|---|---|
| Jar candle | 90/10, 80/20, 70/30 | More beeswax usually means more firmness and more wick demand | 90/10 = 409 g soy + 45 g beeswax; 80/20 = 363 g + 91 g; 70/30 = 318 g + 136 g |
| Firmer candle or pillar-style test | 70/30, 60/40, 50/50 | More beeswax usually means more structure, more shrinkage risk, and slower jar forgiveness | 70/30 = 318 g + 136 g; 60/40 = 272 g + 182 g; 50/50 = 227 g + 227 g |
In forums, makers often ask whether 70/30 is really better for jars. The repeating pattern is that the wax line, fragrance, vessel size, and wick line matter enough that one ratio can behave well in one setup and poorly in another, so a short ladder beats a copied recipe.
Lower-beeswax and higher-beeswax blends usually separate into two different jobs.
- Lower-beeswax blends tend to keep more of the softer soy feel and are often the safer place to start for jars.
- Higher-beeswax blends tend to add body and edge hold, which can help firmer formats.
- A higher beeswax share can ask more from the wick and can change how the wax sits in glass.
- A lower beeswax share may be easier to manage in a jar, though it may not give the firmness some makers want.
Use this order when choosing your first three tests.
- Pick the candle type first: jar or firmer self-supporting format.
- Pick the goal second: more structure, better jar behavior, or better scent balance.
- Start with the middle ratio for that candle type.
- Test one step lower and one step higher.
- Keep wick, fragrance load, jar, and cure window the same while you compare.
Do not drop a pillar-style ratio straight into a jar candle and expect the same result. The jar may show the problem before the flame does.
How Beeswax Changes Hardness and Structure
Yes, beeswax usually makes a soy blend firmer, but that only helps when the firmer blend still suits the candle format.
For this topic, melt pool means the ring of liquid wax that forms around the flame. More firmness can help a candle hold shape, resist dents, and feel less soft in a warm room. More firmness can still create new problems if the flame cannot feed well enough to make a full melt pool.
This quick check gives “firmer” a visible meaning.
| Check after cure | Lower-beeswax blend | Higher-beeswax blend |
|---|---|---|
| Dent resistance | Softer under thumb pressure | Firmer under the same pressure |
| Edge retention | Corners and edges soften faster | Corners and edges usually hold longer |
| Slump risk in warmth | More likely | Less likely |
| Wick demand | Lower starting demand | Higher starting demand |
Do not read a smoother top as proof of better structure. A candle can look neat and still burn poorly.
If your aim is more body, start with How Beeswax Changes Hardness and Structure as the reason for the test, then move straight into Wick Sizing and Melt-Pool Testing for Blends before calling the firmer ratio a success.
Jar Adhesion, Shrinkage, and Wet Spots
Adding beeswax can change how a container candle behaves against the glass, but it does not promise better adhesion.
Here, wet spots means small pale gaps where wax looks separated from the glass. Ratio matters, though cooling speed, jar temperature, and pour conditions matter just as much. That is why Jar Adhesion, Shrinkage, and Wet Spots is a process question as much as a wax question.
This failure log keeps the first fix simple.
| Symptom | Likely cause | First fix to test |
|---|---|---|
| Pull-away from glass | Cooling too fast or blend too firm for the setup | Warm the jar a little and keep the pour more consistent |
| Small wet spots | Cosmetic glass separation during cooling | Keep conditions steady before changing the ratio |
| Deep shrinkage sink | Blend set too hard for the vessel or pour conditions shifted | Check pour conditions first, then test a lower beeswax share |
| Overnight separation line | Batch cooled unevenly | Repeat the batch with tighter process control |
Not every glass mark is a performance failure. A minor wet spot may be cosmetic, while heavy pull-away or deep shrinkage is worth logging and retesting.
Change variables in this order.
- Jar temperature
- Pour conditions
- Cooling conditions
- Ratio
If the glass behavior stays poor after those checks, go back to Best Soy-to-Beeswax Ratios for Jars and Pillars, then run the next clean batch in How to Mix Soy and Beeswax Step by Step.
Scent Throw and Fragrance-Load Trade-Offs
A soy-beeswax blend can smell different when cold and hot, but mixing two waxes does not promise a stronger scent.
Cold throw is how the candle smells before burning. Hot throw is how it smells while burning. Fragrance load is the percentage of fragrance oil in relation to the wax weight. Those three pieces can shift together when the ratio changes.
This comparison makes the trade-off easier to see.
| Scent check | Lower-beeswax blend | Higher-beeswax blend |
|---|---|---|
| Cold throw | Often easier to notice early | May smell cleaner or lighter at rest |
| Hot throw | Can be easier to build with the right wick | May need more careful wick matching |
| Oil risk on top | Usually lower at moderate loads | Can rise if the system is pushed too hard |
| First change to test | Wick or cure | Wick, then ratio, then load |
Check these variables before you blame the ratio alone.
- Cure time
- Wick choice
- Fragrance load by weight
- Pour consistency
For scent math and repeatable notes, move the percentage work into Starter Blend Calculator and Test Log instead of doing rough guesses in the middle of a pour. If scent still feels off, compare it against Scent Throw and Fragrance-Load Trade-Offs in your notes, then tie the next change back to How to Mix Soy and Beeswax Step by Step rather than changing three things at once.
A short ratio ladder is easier to share with other makers than one fixed recipe, since the same blend can act very differently from one wax line to the next.
Wick Sizing and Melt-Pool Testing for Blends
Soy-beeswax candles often need wick retesting because added beeswax changes how the blend feeds the flame and forms a melt pool.
Once the wax system changes, the old wick setup stops being a safe default. Treat the first wick as a starting guess, then test it against flame shape, melt pool, soot, and top condition before you settle on it. Start from the wider Candle Wax Types / wax-selection hub only when you still need to compare this blend against other wax options.
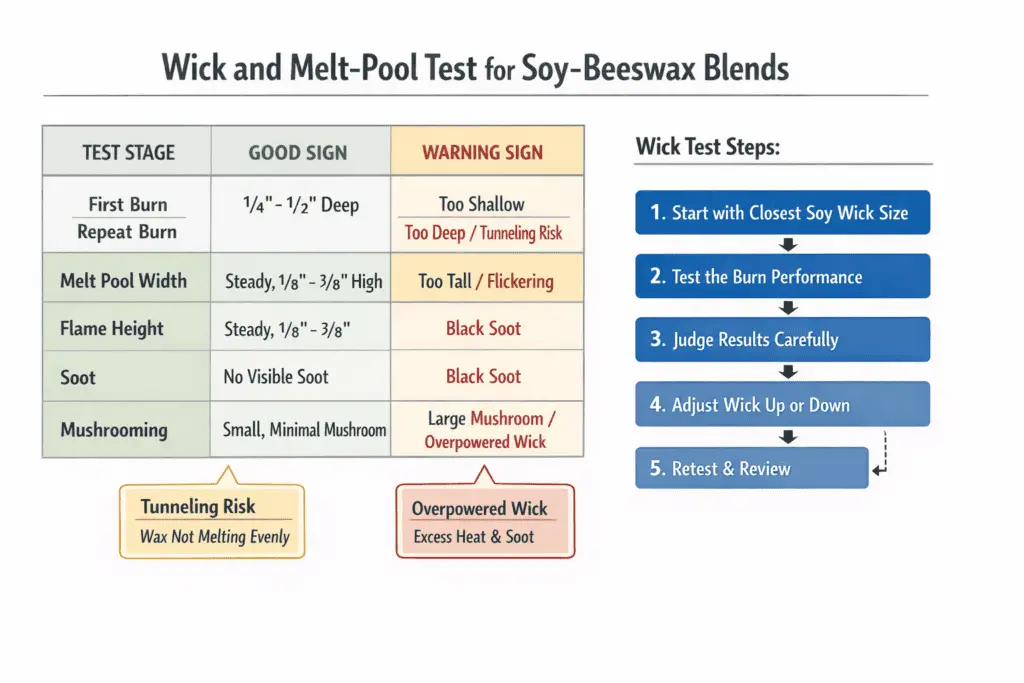
| Test stage | What to watch | Good sign | Warning sign |
|---|---|---|---|
| First burn | Melt pool width | Pool begins to spread evenly | Narrow ring stays tight around the wick |
| First burn | Flame height | Steady flame without racing | Very small flame or a tall, jumpy flame |
| Repeat burn | Soot | Little or no soot at the jar rim | Dark rim or visible smoke |
| Repeat burn | Mushrooming | Small, manageable carbon cap | Large cap that distorts the flame |
Methods note: use the same jar, same fragrance load, same cure window, and the same room setup across each wick test. That makes the result easier to read and keeps the wick change from getting mixed with other changes.
A simple way to start is to choose the wick size that fits your container width in your closest soy setup, then test that wick before you step up or switch series. The key is not to assume the old soy result still holds. The blend can burn slower, hold a tighter pool, or ask for a different wick even when the ratio only changed a little.
Use this order for the first wick test.
- Pick the wick that is closest to your last workable soy setup.
- Burn one full test candle under steady conditions.
- Write down flame shape, melt pool spread, soot, and any mushrooming.
- Compare that result against Best Soy-to-Beeswax Ratios for Jars and Pillars so the wick decision stays tied to the blend you are actually testing.
- Run the next test only after you decide whether the wick, not the ratio, is the first thing to change.
A wick that stays the same is not always wrong. A wick that moves up is not always right. What matters is the burn result, not the shortcut.
These signs help sort the next move.
- Tunneling usually means the melt pool stays too small for the setup.
- A weak melt pool can point to an underpowered wick, a firmer blend, or both.
- Soot can mean the wick is too aggressive for the wax and fragrance system.
- Mushrooming often means the flame is feeding too heavily and needs retesting.
When the wick result looks unclear, go back to How to Mix Soy and Beeswax Step by Step and check that the process stayed steady from batch to batch. A wick test is only useful when the pour, cure, and ratio stayed controlled.
Do not rely on memory once the combinations start to stack up. Put every wick, ratio, and fragrance change into Starter Blend Calculator and Test Log so one bad burn does not send you in the wrong direction.
How to Mix Soy and Beeswax Step by Step
To mix soy and beeswax, weigh a small batch, melt safely, combine fully, pour consistently, and test one variable at a time.
The cleanest first batch is a measured batch by weight with stable process variables from start to finish. That keeps the result readable and stops a process mistake from looking like a wax problem. Use the Candle Wax Types / wax-selection hub if you still need the wider wax picture before you commit to this blend.
Use the handling temperatures for your exact soy wax, beeswax, and fragrance oil, because the workable melt, mix, and pour points can change from one wax line to another.
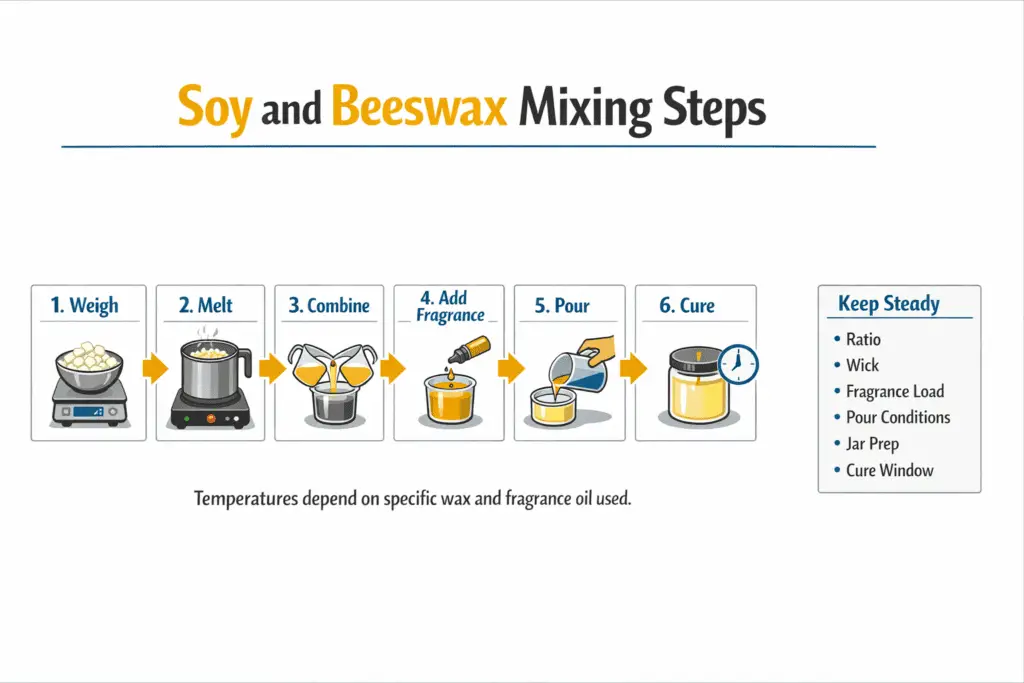
Process checklist
| Step | What to do | What to keep steady |
|---|---|---|
| 1. Weigh | Weigh soy and beeswax by batch ratio | Total batch weight |
| 2. Melt | Melt the waxes safely using the handling notes for your waxes | Heat source and pacing |
| 3. Combine | Stir until the blend looks fully uniform | Stir time and method |
| 4. Add fragrance | Add fragrance at the stage recommended for your wax and oil | Fragrance load |
| 5. Pour | Pour into the prepared container or mold the same way each time | Vessel prep and pour routine |
| 6. Cure | Let the batch finish setting before judging it | Cure window |
Methods note: keep ratio, wick, fragrance load, pour conditions, jar prep, and cure window fixed for the first comparison set. Change one variable at a time or the result becomes hard to trust.
The ratio gives you the wax mix, and the wick test tells you whether the flame can handle it. The process is what lets you tell which change caused the result.
A clean first run usually looks like this.
- Weigh a small test batch.
- Melt the waxes with a steady setup.
- Combine until the blend is even.
- Add fragrance according to the wax and oil handling notes you are using.
- Pour the batch the same way each time.
- Let it cure before you judge the top, scent, or burn.
Changing several things at once creates noise. If you change the ratio, wick, fragrance load, and pour routine in the same batch, you lose the chance to tell which one caused the shift.
Keep this short variable check beside your first tests.
- Ratio
- Wick
- Fragrance load
- Pour routine
- Jar or mold prep
- Cure window
Fix Frosting, Cracking, and Rough Tops
Fix frosting or cracking by stabilizing the process first, then checking cooling conditions before changing the blend ratio.
A soy-beeswax blend can look imperfect on top without being a failed batch. Different surface marks point to different first fixes, so the goal is diagnosis, not panic.
| Symptom | Likely cause | First fix to test |
|---|---|---|
| Light frosting | Cooling pattern or surface set | Repeat the batch with a steadier cooling setup |
| Cracking around the wick | Uneven set or local stress near the wick | Review pour and cooling consistency first |
| Rough top | Wax settled unevenly as it cooled | Keep the pour routine and cooling space more steady |
| Minor surface variation | Cosmetic finish change | Log it first before changing the ratio |
A smooth top is nice, but it is not the whole result. Some marks are mostly visual. Others are worth retesting because they can point to a process issue or a batch that did not set evenly.
Use this first-fix order before you touch the blend again.
- Stabilize the process.
- Check cooling conditions.
- Repeat the batch once.
- Retest the ratio only if the same defect keeps showing up.
If the defect is only visual, log it and move on. If it keeps repeating with the same process, compare it against Jar Adhesion, Shrinkage, and Wet Spots and check whether the surface problem is tied to the way the candle cooled rather than the ratio alone.
When a top issue starts to look like a burn issue instead of a finish issue, circle back to wick testing instead of chasing the surface only. Then move the full batch notes into Starter Blend Calculator and Test Log so the next retest is based on records, not guesswork.
Starter Blend Calculator and Test Log
Use this calculator and test log to turn soy-beeswax blending from guesswork into a controlled series of small tests.
This tool does two jobs: it converts blend percentages into grams and gives you one place to record what happened in each batch. It gives you starting math and a clean record, not a promise that one ratio will work in every wax line, room, or jar. Use the broader Candle Wax Types / wax-selection hub only when you still need wider wax context; most of the time, the next decisions come from Best Soy-to-Beeswax Ratios for Jars and Pillars, Scent Throw and Fragrance-Load Trade-Offs, and Wick Sizing and Melt-Pool Testing for Blends.
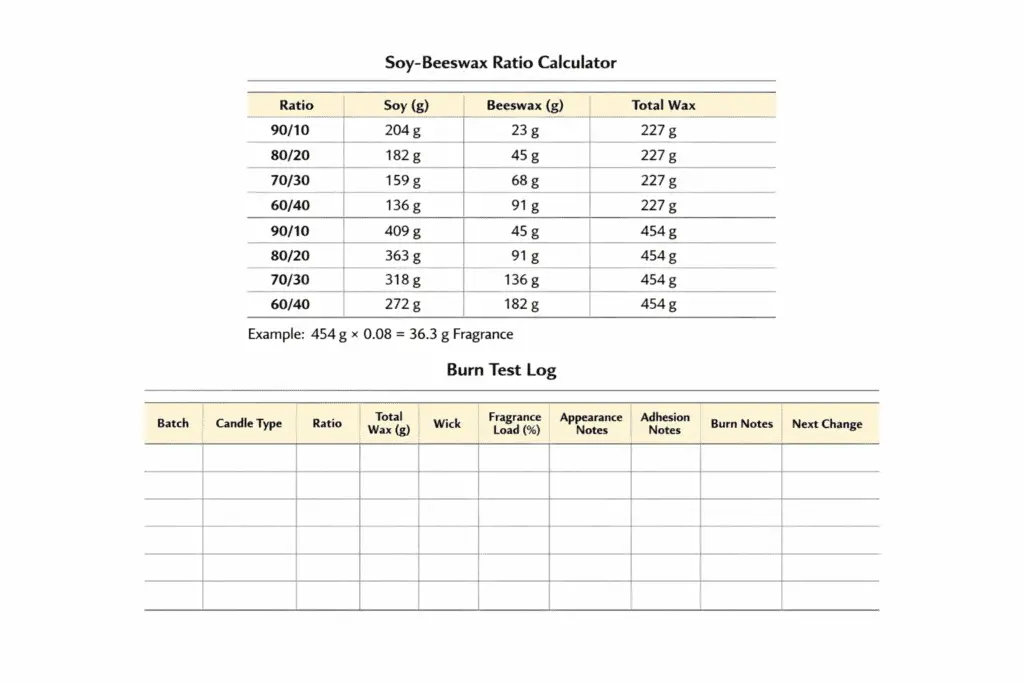
| Ratio | Total wax | Soy wax | Beeswax | Good first use |
|---|---|---|---|---|
| 90/10 | 227 g | 204 g | 23 g | Soft jar-first test |
| 80/20 | 227 g | 182 g | 45 g | Balanced jar test |
| 70/30 | 227 g | 159 g | 68 g | Firmer jar or crossover test |
| 60/40 | 227 g | 136 g | 91 g | Firmer format test |
| 90/10 | 454 g | 409 g | 45 g | Soft jar-first test |
| 80/20 | 454 g | 363 g | 91 g | Balanced jar test |
| 70/30 | 454 g | 318 g | 136 g | Firmer jar or crossover test |
| 60/40 | 454 g | 272 g | 182 g | Firmer format test |
Fragrance load means the fragrance oil percentage based on wax weight. If you test an 8% fragrance load with 454 g of wax, multiply 454 by 0.08, which gives 36.3 g of fragrance oil. That is starter math for a test batch, not proof that 8% is the right load for every wax line.
Use the log the same way every time.
| Batch | Candle type | Ratio | Total wax (g) | Wick | Fragrance load (%) | Appearance notes | Adhesion notes | Burn notes | Next change |
|---|---|---|---|---|---|---|---|---|---|
| 1 | Jar | 80/20 | 227 | _ | _ | _ | _ | _ | _ |
| 2 | Jar | 70/30 | 227 | _ | _ | _ | _ | _ | _ |
| 3 | Jar | 90/10 | 227 | _ | _ | _ | _ | _ | _ |
| 4 | Firmer format | 60/40 | 227 | _ | _ | _ | _ | _ | _ |
A short log works better than a perfect-looking one. The useful part is not neat handwriting. The useful part is that each batch shows one ratio, one wick, one fragrance load, and one clear next move.
Use it in this order.
- Pick a small ratio ladder from Best Soy-to-Beeswax Ratios for Jars and Pillars.
- Run one controlled batch at a time and keep the pour routine the same.
- Record wick, fragrance load, top finish, glass behavior, and burn result.
- Change one variable for the next batch, not three.
When the flame result is the main problem, compare your notes against Wick Sizing and Melt-Pool Testing for Blends before changing the ratio again. When the scent result shifts faster than the burn result, go back to Scent Throw and Fragrance-Load Trade-Offs and check whether wick, cure, or load should move first. If the trouble starts during pouring or cooling, review How to Mix Soy and Beeswax Step by Step before you blame the blend itself.