
Tin and glass can both be safe for candles when you match the wick to the container, test for heat and airflow, and reject any setup that overheats or behaves unpredictably.
Tins usually tolerate bumps and drops better, which lowers shipping and handling failures. Glass can be just as safe in use when it’s heat-appropriate, undamaged, and protected from rapid temperature swings. The “safer” option is the one that stays stable in your real conditions: room drafts, typical burn times, customer handling, and seasonal delivery. A few repeatable tests turn this choice from opinion into a decision you can defend.
| Safety factor | Tin | Glass |
| Drop and shipping damage | Usually dents before it fails | Can chip, crack, or shatter |
| Rapid temperature swings | Usually warps or dents rather than failing suddenly | More vulnerable to thermal shock if cold, chipped, or damaged |
| Exterior heat behavior | Can run hotter to the touch with the same wick | Can stay stable when candle-rated and undamaged, but hot spots still matter |
| Inspection before use | Watch for dents, seam issues, and lid-fit changes | Watch for chips, hairline cracks, base flaws, and stress points |
| Safer in practice when… | Breakage risk and shipping abuse are the main concern | The jar is heat-appropriate, undamaged, and fully test-burned |
Choose tin when… breakage, portability, and shipping damage are the biggest risks, and you can wick conservatively to control exterior heat.
Choose glass when… you want visibility or a premium look, and you can control thermal shock, reject damaged jars, and confirm stable burn behavior in repeated tests.
For the wider framework, start with candle safety and compliance before you lock a vessel for sale. Whatever material you choose, stop burning before the flame reaches the bottom, keep burning candles spaced apart, and retire any container that is chipped, cracked, badly dented, or overheating.
X-vs-Y: cost vs safety—when to choose tin over glass
The cheapest container isn’t always the safest or lowest-cost overall—compare total cost by adding unit cost to damage, retesting, and returns.
Choose tins when breakage and shipping loss dominate your costs, and choose glass when your handling is controlled and your tested heat behavior is stable. If you want a defensible decision, model risk-adjusted cost instead of comparing unit prices.
Simple method (scenario model)
- Inputs: unit_cost, packaging_cost, damage_rate_%, retest_hours, return_rate_%, average_claim_cost
- Output: risk-adjusted total cost per unit (compare scenarios, not one guess)
Decision matrix (template)
| Factor | Tin tends to win when… | Glass tends to win when… |
| Shipping | dents are cheaper than breakage | damage rates are low and packaging is stable |
| Heat behavior | you can control heat via conservative wicking | your jar line tests stable with low hot-spot risk |
| Branding | durability is the story | clarity/premium look is the story |
| Retesting | you standardize one tin system | you standardize one jar system |
For a fair comparison, compare container materials as “container + packaging + retest time + returns.” To keep it grounded, log failure/return incidents with what failed and what it cost.
What is thermal shock in candle containers (tin vs glass)?
Thermal shock is damage caused by rapid temperature change—glass can crack or shatter, while tins more often dent or warp rather than fail suddenly.
Avoid sudden hot→cold or cold→hot moves: let containers and wax reach the same room temperature before pouring or lighting. If you want to understand container basics, focus on where stress concentrates—bases, corners, rims, embossing, and any chips, and use glass-cracking guidance when failures repeat.
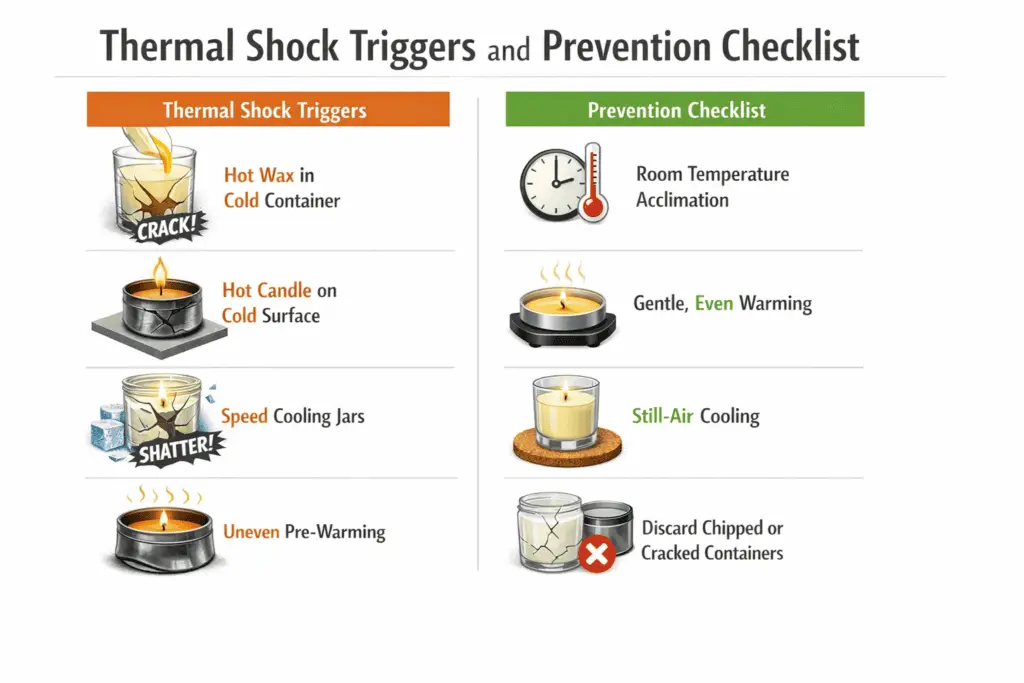
Common thermal-shock triggers
- Pouring hot wax into a container that still feels cold from storage or delivery
- Setting a hot candle on a cold surface (stone, metal, a cold windowsill)
- Speed-cooling jars (fridge, sink bath, strong drafts)
- Uneven pre-warming (heating one side or only the rim)
Prevention checklist
- Let containers acclimate to room temperature all the way through.
- Warm gently and evenly if you pre-warm—no hot spots.
- Cool candles in still air on an insulating surface (wood board or folded towel).
- Discard any container with a rim chip or hairline crack—don’t “test burn to see.”
When you choose container types, consider how likely your process is to create big temperature swings. If winter shipping is part of your workflow, fix cold-delivery problems before you pour or light anything. Tempered glass and thicker tinplate can improve robustness, but only when supplier specs stay consistent and your own incoming checks confirm real performance.
What temperature limits apply to glass vs tin containers?
Practical “temperature limits” are about hot spots and exterior touch temperatures, not the container melting, so the safest setup is the one with a stable heat trend during repeat test burns.
If the outside temperature keeps rising after the first hour—or labels/finishes soften or discolor—treat it as overheating and adjust wick or container. Start by reviewing container specs like wall thickness, base thickness, seams, coatings, and shape transitions.
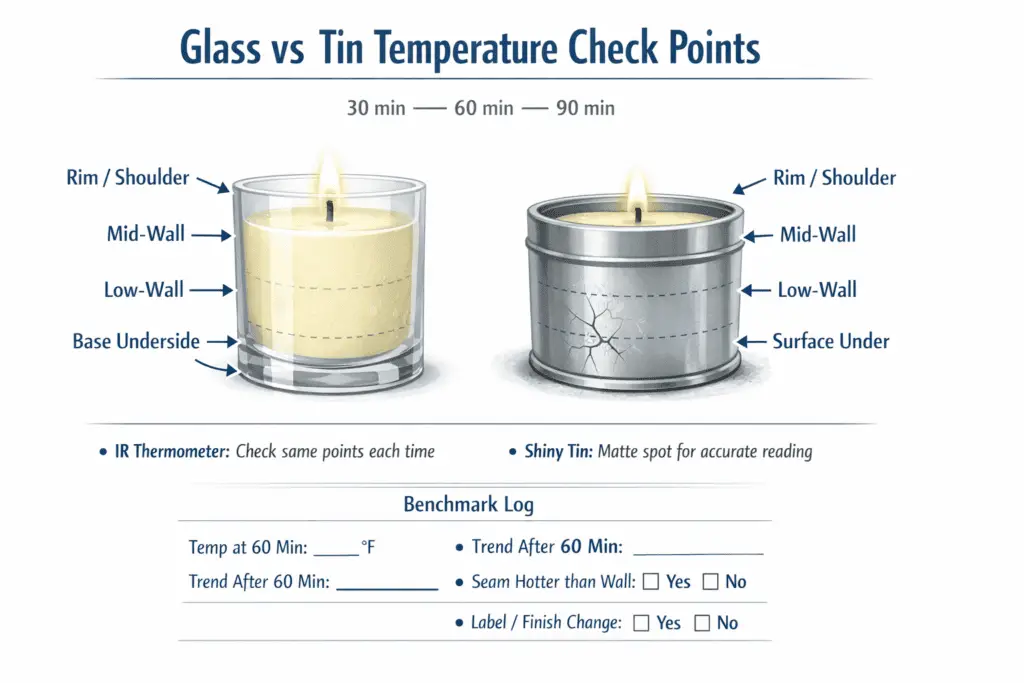
Quick method (repeatable)
- Burn in a still room on a typical surface.
- Use an IR thermometer for fast scans, but keep distance and angle consistent.
- Measure the same points at 30/60/90 minutes: rim/shoulder, mid-wall, low-wall, base underside, and the surface under the candle.
- Repeat at least 3 burns per setup and compare trends, not one-off peaks.
- For shiny tins, measure on a small matte spot (tape or marker) so IR tools don’t under-read.
- Confirm suspicious spikes with a contact probe after cooling if you’re troubleshooting.
Benchmark table (template)
| Container | temp@60m | temp trend after 60m | seam hotter than wall? | label/finish change? | Notes |
| Glass (same diameter) | rising / flat | ||||
| Tin (same diameter) | rising / flat |
To compare container materials fairly, hold everything else constant (wax, fragrance, wick series, burn time, room conditions). If you see persistent “too hot to handle” behavior or a steadily climbing base, spot overheating issues with a logged burn test and change one variable at a time—usually wick size first.
How opening size, material, and lids affect flame containment & self-extinguish
Opening size changes oxygen access and rim proximity, so wide openings need tighter wick control, while narrower openings often contain the flame better and can self-extinguish more predictably near end of life.
Match wick and flame behavior to the opening: if the flame leans, flickers hard, or licks the rim, reduce wick or change geometry before you change wax. To set safe container geometry, think “airflow + distance to rim,” not just diameter.
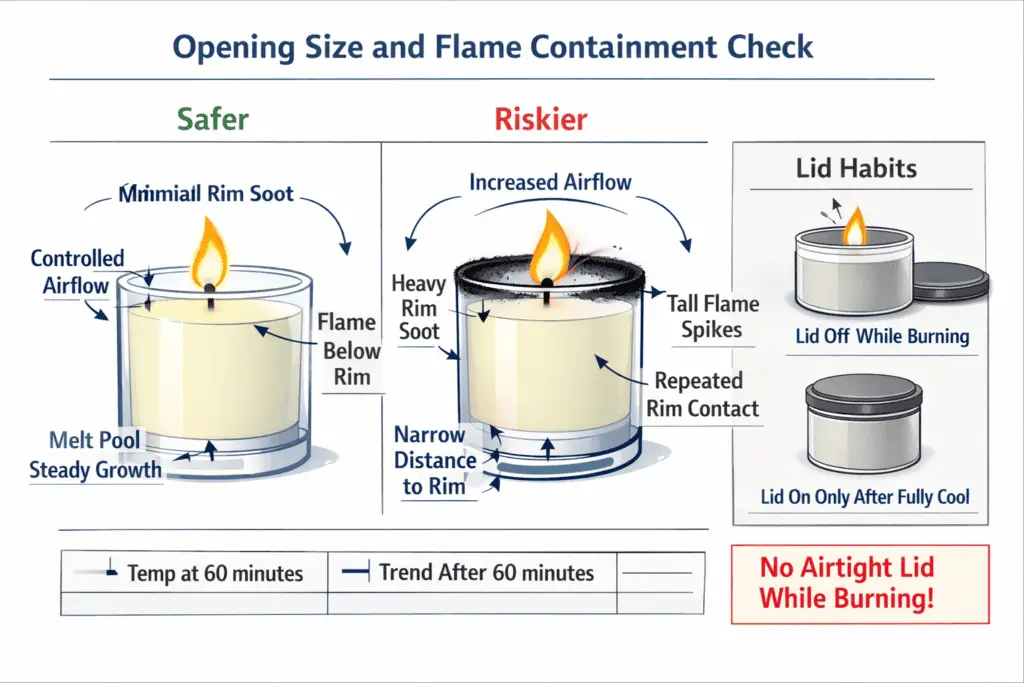
What “safe vs unsafe” looks like
- Safer: flame stays centered, below the rim, with minimal rim soot and steady melt pool growth.
- Riskier: repeated rim contact, persistent soot ring, tall flame spikes, or unstable dancing flame in normal room conditions.
Containment check (simple)
- Measure inner opening (mm) at the rim.
- Run a 60-minute test burn and observe flame height, lean, and rim soot.
- If rim sooting appears: downsize the wick first and re-test.
- If tunneling appears in a narrower opening: increase wick cautiously in small steps and keep logs.
Never burn a candle with an airtight lid attached; lids are for storage, and any topper or accessory that changes airflow must be tested as part of the candle system.
Keep it simple: lid off while burning, lid on only after fully cool. Use a clear set lid policy so “tested without accessory” doesn’t become “sold with accessory” by accident.
Safe lid habits
- Extinguish first, then wait before placing a lid loosely (if you use it to reduce smoke).
- Never screw down a lid on a warm jar; liners and cooling can tighten the seal.
- Don’t store with the lid on until the wax surface is fully set and cool.
- Retire dented tin lids that fit unpredictably (too tight or uneven).
Before ordering in bulk, compare container openings across the sizes you plan to sell. If you’re fighting rim flames specifically, fix edge-licking by re-centering the wick, controlling drafts, and downsizing wick before changing wax or fragrance.
How to prevent hot-spots: thickness, base spread, labels
Hot spots form when heat can’t spread evenly—thin walls, uneven bases, seams, and insulating labels can create localized overheating.
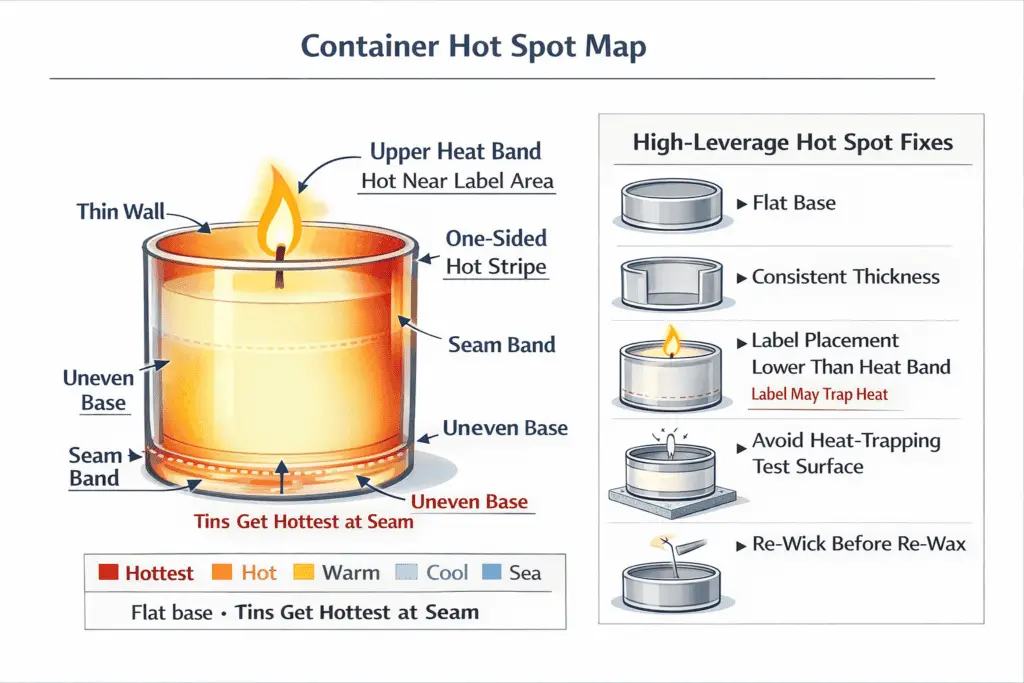
If one area runs noticeably hotter, downsize the wick and improve heat spreading before you approve that container for sale. To improve heat distribution, treat the vessel like a heat-path problem: thickness and base geometry matter as much as material.
High-leverage fixes
- Choose containers with flat bases and consistent thickness (avoid rocking and thin spots).
- Watch seams on tins; a seam that becomes the hottest band is a warning sign.
- Keep labels away from the upper “heat band” and avoid thick wraps on small vessels.
- Don’t test on surfaces that trap heat (thick fabric coasters can distort results).
- Re-wick before re-wax; wick is the fastest way to reduce peak heat.
If you want fewer surprises, choose safer wall profiles (consistent walls, sturdier bases, fewer sharp transitions). When you see scorched labels, softened adhesive, or a one-sided hot stripe, fix overheating issues by checking wick centering, wick size, and airflow first.
How container material changes wick × wax melt-pool behavior
Container material changes how heat moves, so the same wick often runs “hotter” in tins than in glass, affecting melt pool width, flame height, and exterior temperature.
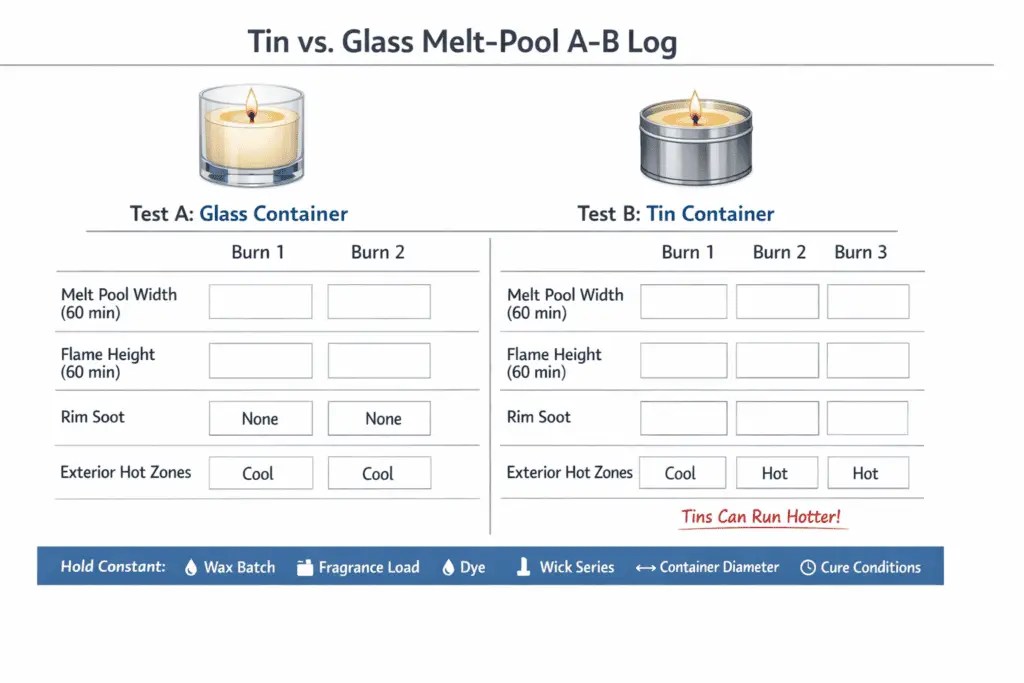
Start conservative in tins and verify with a logged 60-minute melt-pool width and flame-height check. To tune wick by material, treat the container as part of the wick system, not just a shell.
A/B method you can trust
- Hold constant: wax batch, fragrance load, dye, wick series, container diameter, pour/cure conditions.
- At 60 minutes, record: melt pool width (mm), flame height (mm), soot, and exterior hot zones.
- Repeat across at least 3 burns per setup.
Benchmark table (template)
| Material | Wick series/size | pool_width_mm@60m | flame_height_mm@60m | Rim soot? | Notes |
| Glass | |||||
| Tin |
To compare wick starting points fairly, change only wick size (not wax and fragrance at the same time). If results are mixed, record A/B results across multiple units so you aren’t chasing a one-off pour or an off-center wick.
What candle safety standards apply (ASTM F2417, ASTM F2179, EN 15493/15494)?
Safety standards don’t choose tins or glass for you, but they shape the testing mindset, failure criteria, and labeling expectations that make either container safer.
ASTM F2417 covers general candle fire safety, while ASTM F2179 focuses on glass candle containers. EN 15493 covers fire safety, and EN 15494 covers product safety labels. Use candle safety standards as a structured checklist: what to test, what to watch for, and when to reject a setup—then apply it the same way to every container type.
Practical standards mindset
- Standardize your test conditions (surface, burn window, still air vs typical draft).
- Document observations and reasons for pass/fail.
- Re-test after any change to container, wick, wax, fragrance, dye, or supplier lot.
- Keep user-facing warnings consistent with how the product is actually used.
Whatever material you choose, don’t burn a candle all the way down, keep burning candles spaced apart, and stop using any container that chips, cracks, warps, or develops an unstable flame.
If you’re building a product line, choose containers with testing in mind so fewer variables change across SKUs. If you sell across regions, prepare labels for compliance early so a late test tweak doesn’t force a full rework.