
Yes, you can mix fragrance oils and essential oils in candles if the total load stays within your wax and supplier limits and the finished blend passes burn testing.
Candle makers usually do this to pair fragrance-oil performance with essential-oil character. The main rule is to treat FO and EO as one combined fragrance load, not as separate allowances. Most blends work best when FO carries the backbone and EO stays a small accent. The next sections show when mixing makes sense, how to set a starting ratio, and what to test before you scale.
Can you mix fragrance oils with essential oils in candles?
Yes, you can safely mix fragrance oils and essential oils in candles as long as the total scent load stays within your wax and supplier limits and you test how the blend burns and smells.
Fragrance oils and essential oils behave like one combined fragrance system once they are in wax, so the practical rule is simple: calculate one total load, not two separate allowances. Many candle makers use FO+EO blends to get the reliability of fragrance oils with the character of essential oils, especially for spa, herbal, or natural-leaning scent profiles. The main constraint is that the total fragrance percentage must stay inside the lower of your wax limit and the usage guidance for the most restrictive oil in the blend.
Most container waxes are designed to handle roughly 6–10% total scent load by weight, with some paraffin and hybrid blends going a bit higher; always check the datasheet for your specific wax. A simple rule is that FO + EO together must not exceed the maximum load or the IFRA usage level for the most restricted ingredient in your blend. For example, if your 300 g soy candle uses an 8% load, you have 24 g total to “spend” on scent, whether that is 100% FO, a FO+EO mix, or EO-only. Treat each oil’s IFRA certificate and SDS as your safety guardrails.
In practice, most makers get the best results from FO-dominant blends. Fragrance oil usually carries the hot throw and consistency, while essential oil works better as a smaller accent that adds realism or a sharper top note. Once the EO share climbs too high, you are more likely to run into weak throw, odd combustion smells, or wick instability.
Before you ship or sell a FO+EO candle, run a simple four-step check:
- Confirm the wax’s maximum fragrance load and stay under it with your combined FO+EO.
- Check each oil’s IFRA category and maximum use level for candles or “room fragrance” products.
- Make a small test batch and record exact grams, pour temperature, and cure time.
- Burn-test multiple times in realistic conditions, watching for soot, tunneling, mushrooming, and any change in how the scent smells compared with the cold throw.
Why (and when) to blend FO + EO — and when you shouldn’t
Blend FO + EO when you want fragrance oil to provide most of the performance and essential oil to add a smaller botanical accent, and skip it when the blend creates safety, compliance, or positioning problems you do not need.
Fragrance oils shine at giving strong, reliable throw and staying consistent from batch to batch, while essential oils contribute familiar plant identities and subtle complexity. Combining them lets you build scents that feel both “perfumey” and botanical: a citrus FO supported by a little real lemon or orange EO, or a spa blend where FO carries the base and lavender EO adds a recognisable top note. Done well, FO+EO blends can last longer in the room than EO-only candles and cost less than heavy essential oil formulas while still supporting a wellness-leaning positioning.
However, essential oils are not magical and they are not automatically safer. Some suppliers argue that many essential oils perform poorly in candles, with weak diffusion, higher risk of irritation, or instability under heat, while others show that EOs can be used safely if you respect usage levels and product category limits. On top of that, any scented candle—FO, EO, or both—can trigger headaches or allergy-like symptoms in sensitive people, so “all natural” does not guarantee “no reaction.”
There are strong reasons to say no to FO+EO blends in specific lines. If you promise “100% essential oil candles” or lean heavily on aromatherapy claims, adding fragrance oils would undermine that promise and could confuse customers once they read your ingredient listing. If your audience includes pregnant people, those with asthma, or households with pets, you may choose a simpler system—either very conservative essential-oil use with excellent documentation, or carefully selected, IFRA-compliant fragrance oils with clear safety messaging.
A useful way to decide is to map the goal before you touch the formula:
| Goal or constraint | Best default approach | Notes |
| Maximum possible hot throw in regular home spaces | FO-only or FO-dominant FO+EO | Use FO for strength, EO only as a small realism accent if desired. |
| Strong “natural-leaning” story with good performance | FO+EO blend | Keep FO as the base, EO for character, and be transparent on labels. |
| Strict “100% essential oil” or aromatherapy claims | EO-only and often non-candle formats | Consider diffusers or oils; candles rarely meet aromatherapy expectations. |
| Very sensitive audience (kids, asthma, pregnancy) | Conservative FO-only or very light EO use | Prioritise documented safety, lower loads, and clear usage guidance. |
| Heavy regulatory or retail scrutiny | FO-only with strong documentation | Easier to support with IFRA, SDS, and consistent test data. |
How to design FO:EO ratios (with example splits by note family)
Design FO:EO ratios by starting FO-heavy, matching the EO share to the scent family, and testing the blend before you scale it.
You can build on scenting fundamentals you already use for straight fragrance oils by treating FO as the main structure and EO as a small accent. Think of FO as providing body, solvency, and reliability, while EO brings nuance, realism, and “sparkle.” A 95:5 or 90:10 FO:EO split keeps the fragrance stable and predictable, whereas EO-heavy ratios are more volatile and prone to smelling muddy or flashing off too quickly. The goal is not to chase the highest EO percentage, but to hit the smallest EO dose that makes the blend smell more lifelike.
In practice, FO:EO ratio sits on top of the scenting principles you already follow: build a solid base, then tweak top and heart notes. Start with the fragrance oil that best matches your target profile and use EO to correct or enhance it—maybe a touch of true lavender on top of a spa FO, or a little sweet orange EO over a creamsicle FO. For your very first FO+EO experiments, keep EO at 5–10% of the total fragrance load; only explore 15–30% EO once you know how your wax and wicks behave.
A simple FO:EO ratio workflow:
- Define the role of EO in this blend: realism booster, herbal edge, or subtle complexity.
- Pick a conservative starting split (95:5 for delicate waxes or intense EOs, 90:10 for more forgiving systems).
- Pour two or three test jars at the same fragrance load but with slightly different FO:EO splits, such as 95:5, 90:10, and 85:15.
- Compare cold throw, hot throw, and how the character evolves over a full burn cycle.
- Keep notes on which split best supports your scent goal and performance target.
Different scent families tolerate different EO fractions. For bright citrus and other fast-fading tops, start around 90:10 and only test 85:15 or 80:20 if your FO base is very light and your wax handles volatility well. Herbal and spa profiles often sit comfortably between 90:10 and 85:15, because many EOs in that family have medium volatility and share chemistry with common FO accords. Gourmand blends usually prefer FO-heavy splits like 95:5 or 90:10 so the dessert base stays creamy instead of turning bitter or medicinal. Woody and resinous profiles often benefit from a hint of EO (5–10%) mainly for realism and complexity, not power.
As EO fraction increases, your blend can thicken, and the fuel your wick pulls up the candle changes. That’s why you may need to choose the right wick when viscosity changes, especially if you push EO past 10–15% of the fragrance portion. A blend that behaved perfectly at 95:5 might tunnel or soot at 80:20 because the wick is now pulling a different fuel mix. Rather than assuming one FO:EO split will work everywhere, log each test with exact percentages, wax type, wick series, and performance notes so you can reuse successful patterns by scent family and season.
Calculating fragrance load % and batch grams (without exceeding wax max)
To calculate fragrance load and batch grams, multiply your wax weight by your chosen load percentage, then split that total scent between FO and EO without going over your wax supplier’s maximum.

Before you do any math, check your supplier documentation or any scenting fundamentals notes you keep so you know the recommended max load for each wax system. Different blends of soy, paraffin, coconut, and beeswax have different ceilings, and those limits always win against whatever the internet says. Treat this as a quick way to review scenting fundamentals in number form: your wax can safely hold only so much fragrance, and FO+EO together must stay under that total. The FO:EO split you choose is always nested inside that limit, never on top of it.
The core formula is simple. First, pick a fragrance load percentage that is at or below your wax’s maximum—for example, 6%, 8%, or 10%. Then calculate:
fragrance_g = wax_g × (load% ÷ 100)
That number is the combined mass of FO+EO you’re allowed in that batch. Finally, apply your FO:EO ratio to divide that fragrance_g total into FO_g and EO_g. If your EO fraction is 0.10 (10% of the fragrance), then:
EO_g = fragrance_g × 0.10
FO_g = fragrance_g − EO_g
Here’s a worked example. Say you have 300 g of wax and you choose an 8% fragrance load. First, calculate total fragrance: 300 g × 0.08 = 24 g. If you want a 90:10 FO:EO split, EO_g = 24 × 0.10 = 2.4 g and FO_g = 24 − 2.4 = 21.6 g. For a lighter 95:5 split, EO_g = 24 × 0.05 = 1.2 g and FO_g = 22.8 g. As you tweak ratios or loads, recalculate rather than eyeballing; small errors stack up fast across a whole batch.
Always keep safety and performance in the same conversation as math. Standards such as ASTM F2417 and guidance from national candle associations exist to remind you that more fragrance does not automatically mean more throw. If your wax lists 10% as an absolute maximum, you might decide to work at 1–2 percentage points below that number for most blends, especially if you’re adding potent or solvent-rich oils. Weak throw at 8% is a sign to revisit wicking, FO choice, and FO:EO ratio, not to jump straight to 12%.
To make your studio life easier, build a small notebook or spreadsheet where you keep fragrance load explained in plain language, alongside example calculations for your most common jar sizes and waxes. Include each wax type, its max load, your usual working load, and one or two sample math lines for “at 6%,” “at 8%,” and similar. When you start working with FO+EO blends, add columns for EO fraction and have your sheet automatically output FO and EO grams for given loads. Over time, this becomes your personal reference for safe, repeatable FO+EO candle math.
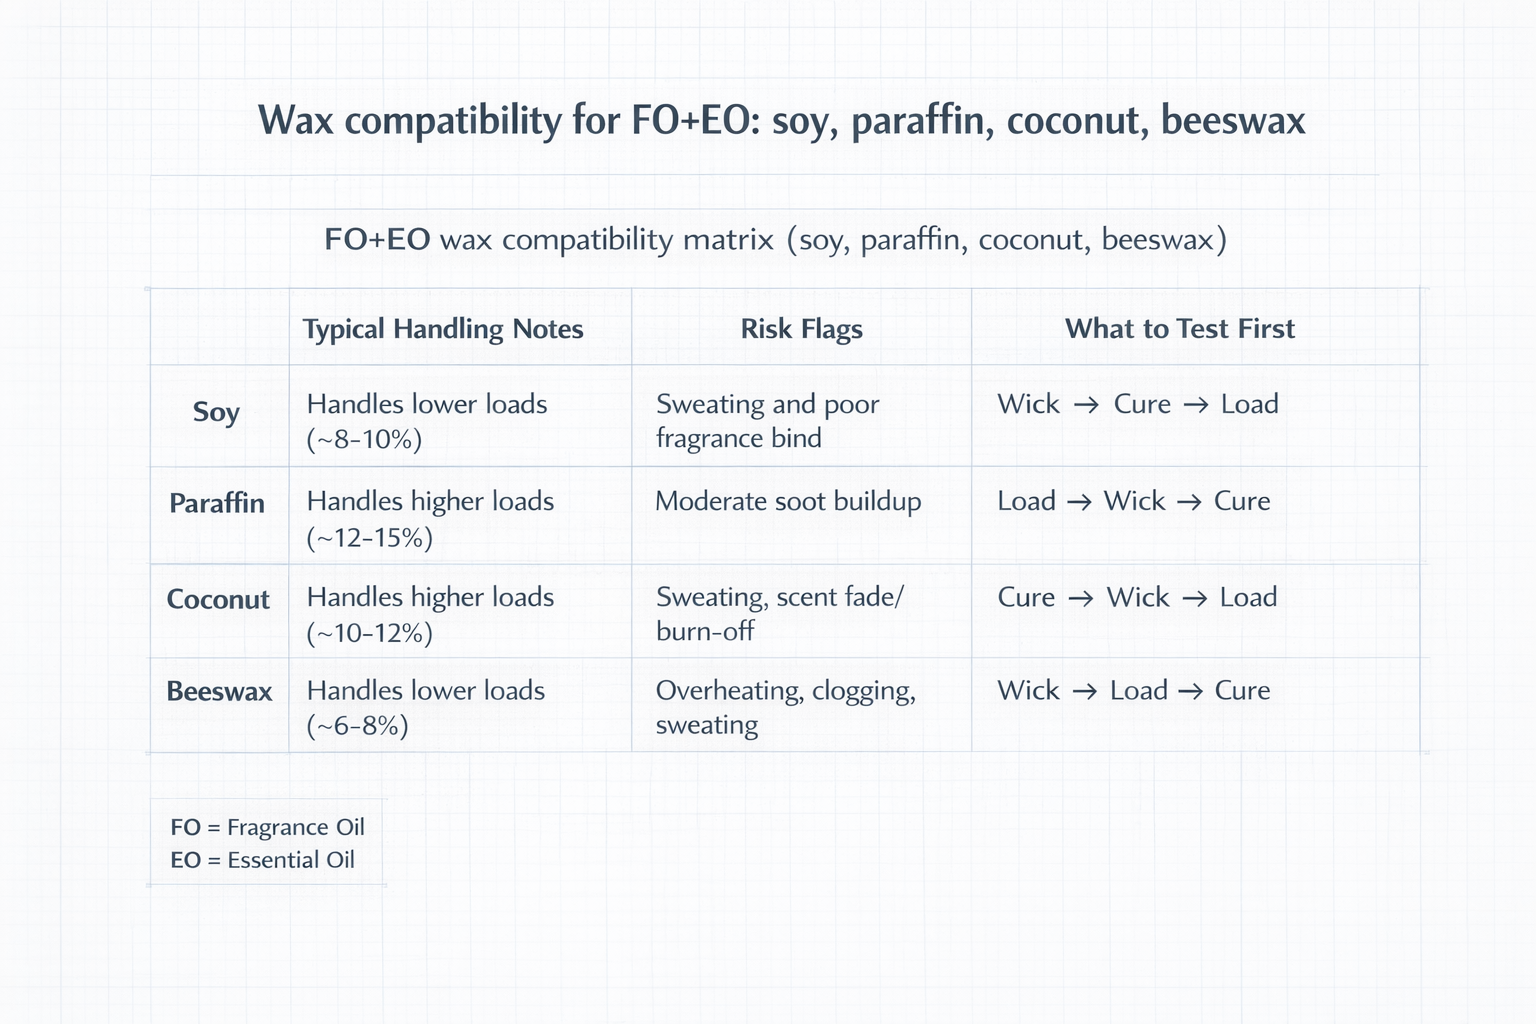
Wax compatibility for FO+EO: soy, paraffin, coconut, beeswax
All four major candle waxes can work with FO+EO blends, but paraffin and coconut blends usually tolerate higher fragrance loads, soy is more temperamental, and beeswax often gives the weakest throw with mixed aromatics.
Think of wax as the fuel and solvent for your scent. Its polarity, crystal structure, and melt point decide how well FO+EO dissolve, how much load they can hold, and whether they stay bound after cure. When you return to scenting fundamentals, you’re really asking three questions for each wax: how much fragrance can it safely hold, how easily does it bind FO and EO, and how much troubleshooting are you willing to do for the scent style you want? Safety standards like ASTM F2417 focus on flame behavior, stability, and labeling, not on choosing a “right” wax, so any of these systems can be safe if you formulate and wick them properly.
Soy wax is popular and reasonably forgiving, but its polarity and crystallisation mean it’s more prone to frosting, wet spots, and visible sweating if you push load or pour too cool. Many soy container waxes list a maximum fragrance load around 6–10% by weight, and higher loads can encourage migration or seeping, especially with lighter, volatile essential oils. In FO+EO blends, keep soy on the conservative side of its max, warm both wax and fragrance well, and stir thoroughly; otherwise, the EO portion may partly separate or dull your hot throw.
Paraffin wax tends to dissolve aromatics more easily and often tolerates higher fragrance loads than straight soy, which is why it still dominates many “big throw” container lines. Typical guidance puts paraffin somewhere around 5–10%, with some blends formulated to hold up to about 12% under ideal conditions. In practice, that extra headroom mainly helps FO-heavy blends; if you push EO volume too high, you can still wind up with smoke, odd combustion smells, or sweating, even though the wax itself is capable of more load on paper.
Coconut and coconut-blend waxes often sit in a sweet spot: they behave more like paraffin in terms of solubility but appeal to makers chasing a softer, “luxury” feel. Many coconut and coco–soy blends are rated for roughly 8–12% total fragrance, but they can become very soft or even slushy if you max that out with low-viscosity oils. For FO+EO mixes, coconut blends are a good candidate when you want richer spa or gourmand scents with a little EO realism on top, as long as you still treat the supplier’s max load as a hard ceiling.
Beeswax, finally, is the most stubborn of the four for FO+EO. Its natural aroma competes with delicate top notes, and typical guidance keeps fragrance loads lower—often in the 3–6% range—both to respect the wax’s own scent and to avoid tunneling or sooting. That’s why beeswax is notorious for restricting throw with light EOs, especially citrus and airy florals; it simply dominates the blend unless you accept very subtle performance. If you do experiment with FO+EO in beeswax containers, test tiny batches with conservative loads, hotter wicks, and long cures.
When you zoom out, it helps to revisit your scenting fundamentals log: max load for each wax, your usual working load, and notes on performance at different FO:EO ratios. Over time, you’ll see patterns—soy liking moderate loads, paraffin and coconut rewarding careful testing at higher loads, beeswax preferring restrained, resinous, or spicy profiles. There is no single best wax for strong throw; there are only wax–scent–wick combinations that work better for a given fragrance style, room size, and price point. A simple four-wax test matrix (same FO+EO blend across soy, paraffin, coconut, and beeswax at one load and wick series) will teach you more about compatibility than any generic “best wax” claim on the internet.
Safety & flashpoint myths for FO+EO: what actually matters
Flash point is a storage and handling number for your oils, not a rating of how safe your finished candle is to burn; wick choice, usage rate, and real burn testing matter far more than a single spec-sheet value.
To ground in scenting fundamentals, start with what flash point actually is: the lowest temperature at which an oil’s vapours can ignite in lab conditions when exposed to a flame or spark. That test is performed on the straight fragrance or essential oil, not a finished candle, and it says nothing about how tall your flame will be, how much soot you’ll see, or whether the candle will self-extinguish near the bottom. Fire-safety standards such as ASTM F2417 focus instead on flame height limits, tip-over behavior, and end-of-life self-extinguish, while the National Candle Association emphasises that properly made and used scented candles—FO or EO—burn safely when made to standard.
Myth 1: “If I heat wax above the oil’s flash point, the scent will just burn off.”
In reality, adding FO or EO to wax a bit above its flash point doesn’t make the fragrance instantly vanish; flash point is about ignition risk in open air, not about all aroma molecules evaporating at once. The bigger issues are worker comfort (heavier vapours in a small room can cause headaches) and thermal stress on delicate components. The safer, smarter move is to follow your wax supplier’s recommended mixing temperature and stir thoroughly, rather than cranking the heat “for extra safety” or obsessing over matching add temp exactly to the flash point.
Myth 2: “Higher flash point oils are automatically safer candles.”
A high flash point might change how a loose liquid is classified for shipping, but by the time that fragrance is properly dosed into wax and wicked inside a container, overall fire safety depends on the whole system: wax type, container, wick size, and user behavior. A well-wicked candle that passes standard fire-safety tests can use low- or high-flash-point oils; a poorly wicked candle can misbehave regardless of the numbers on your SDS. That’s why safety guidance always circles back to robust burn testing and conservative loads rather than chasing “safe flash point” labels.
Myth 3: “Low flash point means I can’t use that FO or EO in candles.”
Many candle-safe fragrances and some essential oil blends list flash points well below common wax mixing temps, yet they are widely used in compliant candles because suppliers have tested them in the right IFRA category and set usage limits accordingly. What matters is whether the supplier explicitly lists the oil as suitable for candles or “home fragrance” and what maximum level they give for that product type, not the raw flash point alone. When you review candle safety & compliance documentation, you’ll see that flash point sits alongside other data like IFRA usage levels, hazard pictograms, and storage instructions rather than replacing them.
So what actually protects people around your FO+EO candles? Process discipline and testing. Weigh accurately, stay within the lower of your wax’s max load and the fragrance’s IFRA usage level for candles, and follow the add-temperature ranges recommended by wax and fragrance suppliers. Use sensible ventilation when heating and mixing oils. Then, for every new blend or major change in FO:EO ratio, run a proper burn test in the intended container, through multiple full burns, logging flame height, self-extinguish behavior, sooting, and any unusual smoke or smell. Those test notes, far more than the flash point line on your SDS, tell you whether a FO+EO candle is truly ready for customers. Nothing here replaces formal regulatory advice, but thinking this way keeps your focus on the controllable factors that really move the safety needle.
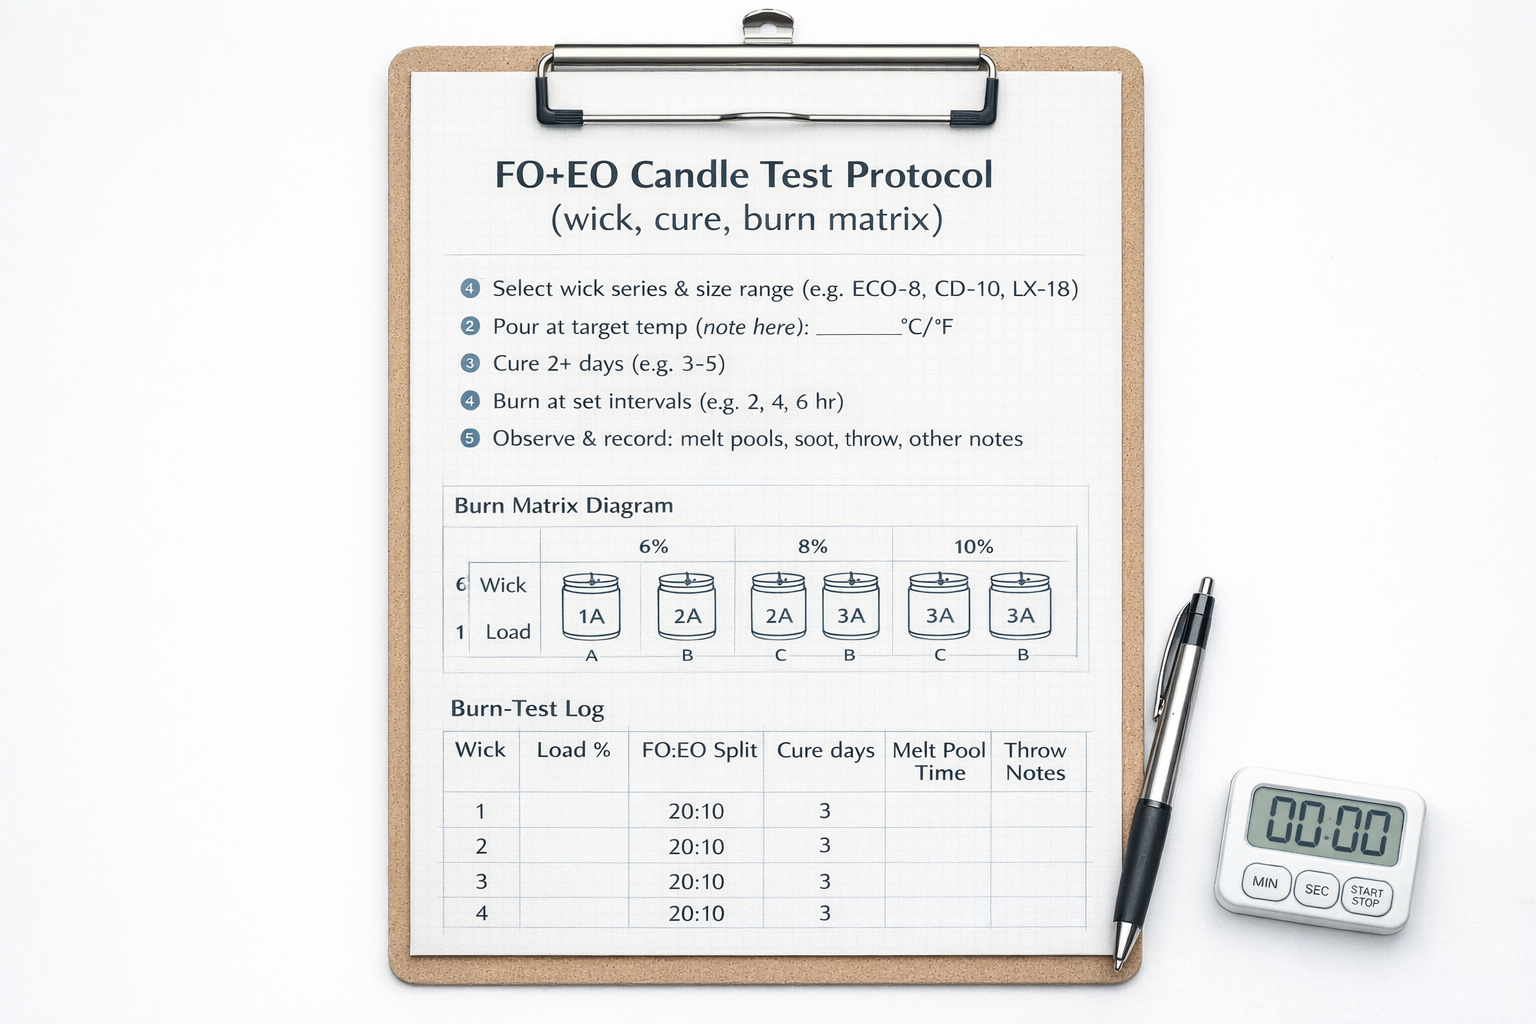
Steps to test FO+EO candles (wick, pour temp, cure & burn matrix)
Test FO+EO candles with a simple 3×2 matrix: three wick sizes by two FO:EO ratios, cured for set days and scored for melt pool, soot, and throw.
Instead of guessing, treat testing as the place where you anchor to scenting fundamentals and answer one clear question at a time. Pick a single wax, jar, and total fragrance load, then design your matrix around them so you’re only changing wick power and FO:EO ratio. This keeps your notes readable and makes it obvious which variable actually fixed a problem instead of burying you in conflicting results.
Before you light anything, revisit safety & compliance basics. Label every test jar with wax, load %, FO:EO split, wick series and size, pour temperature, and cure days so you can trace any issue back to its cause. Trim wicks, follow the usage limits from your supplier documentation, and burn on a heat-safe, draft-free surface. That way your matrix reveals what’s happening in the candle, not random noise from sloppy conditions.
A simple 3×2 matrix looks like this:
- Choose three wick sizes (for example, one you expect to work, one size down, one size up).
- Choose two FO:EO ratios (for example, 90:10 and 80:20 at the same total load).
- Pour six identical jars (3 wicks × 2 ratios) at the same wax temperature and stir time.
- Cure them for planned checkpoints—commonly day 3, day 7, and day 14.
- At each checkpoint, burn in pairs and log melt pool diameter, flame height, soot or mushrooming, and perceived hot throw after set times (30, 60, 120 minutes).
During burns, think like a tester, not a fan of the scent. The matrix should show you whether a hotter wick fixes weak throw or simply creates soot, and whether a richer EO fraction helps realism or just makes the candle fussier. Over a few rounds you’ll start to understand wick series differences—for example, which series tends to tunnel in your wax and which copes better with thicker FO+EO blends. That knowledge, plus disciplined logging, turns your testing days from “random burning” into a repeatable protocol you can trust for future launches.
How to improve cold & hot throw with FO+EO blends
Improve FO+EO throw by adjusting wick power, cure time, FO:EO ratio, and total load—in that order—before changing wax or rewriting the whole scent.
Start by stepping back to review scenting basics: throw isn’t just about the fragrance itself. Wax type, wick series, jar diameter, load %, and room conditions all decide how far the scent travels. If any one of those is wildly off, no amount of extra essential oil will save the candle, and piling on fragrance can actually make smoking or sweating worse.
At the scent fundamentals level, cold throw comes mostly from molecules evaporating off the solid surface, while hot throw depends on how much scented fuel the wick can pull, vaporise, and combust cleanly. A too-small wick starves the melt pool and traps aroma in the wax; a too-hot wick can scorch delicate notes and create soot before throw ever feels stronger. FO typically provides the backbone of diffusion, while EO accents tweak realism and perceived freshness.
When you’re tuning a FO+EO candle, use a simple order of operations:
- Wick first: test one size hotter (and occasionally one cooler) before touching the formula. If throw is weak and the melt pool never reaches the edge, wick up; if you see sooting or big flames, wick down or switch series.
- Cure second: extend cure (especially for soy and blends) from 3 to 7 to 14 days before judging hot throw. Some FO+EO blends simply need more time for the wax and fragrance to settle.
- Ratio third: if CT is great but HT is thin, consider nudging FO higher inside the same load—say from 90:10 to 95:5—so more of the blend is engineered for diffusion.
- Load last: only raise total fragrance % if you’re under the wax’s max and tests show clean burns; often dropping from a stressed 10% to a tidy 8% with a better wick gives better throw.
FO+EO adds one more lever: EO volatility. Very light citrus or herbal tops can smell gorgeous cold but fade quickly once the flame is going. In those cases, rely on FO to carry the throw and use EO as a small realism accent instead of the main driver. Use this structured sequence any time you want to fix weak scent throw without wasting jars—log what you changed, how it burned, and how the room smelled at set time marks. Over a few cycles, you’ll have a personal playbook for turning “nice but weak” FO+EO ideas into confidently strong, clean-burning candles.
Room size, airflow & climate: realistic throw expectations
Room size, airflow and climate determine how far your candle’s scent travels, so large drafty spaces need more output than a single candle can provide.
In a small, enclosed room like a bathroom or compact bedroom, one well-formulated FO+EO candle can feel rich because the air volume is low and air changes are slow. Medium rooms such as standard bedrooms or home offices often need either a slightly stronger wick or a longer burn to feel evenly scented. Large living rooms and open-plan spaces disperse aroma quickly, so expect a softer, background scent rather than wall-to-wall perfume from one jar. Safety guidance from standards such as ASTM F2417 and organisations like the NCA still comes first: comfortable fragrance should never override safe burning and ventilation.
Think in terms of air changes, not just square footage. When windows are open or HVAC and ceiling fans are running, airflow constantly dilutes your hot throw, so the scent will feel lighter even if the candle formula hasn’t changed. Closing doors, turning fans to low, or moving the candle out of a direct draft usually improves perceived strength more than simply pouring more fragrance into the wax. In very tight rooms, a little ventilation actually prevents the fragrance from feeling heavy or stuffy.
Climate and humidity also shape perception. Cooler rooms often make wax harder and slow evaporation, so it may take longer for the melt pool to reach the edges and for scent to bloom. Warm but very humid environments can make air feel thick while still pulling scent away towards open windows or vents. That’s why a blend that feels perfect in a small winter bedroom can seem weak in a breezy summer living room, even at the same fragrance load.
To turn these ideas into something you can act on, use a few simple scenarios:
- Small bathroom or box room (door mostly closed): 1 x 6–8 oz jar, standard wick, 30–60 minute burn often feels strong.
- Medium bedroom or home office (door partly open, gentle airflow): 1 x 8–10 oz jar or 2 smaller jars on opposite sides of the room for even coverage.
- Large living room or open-plan area (ceiling fan or HVAC running): 2–3 jars spaced around the space or one larger multi-wick candle, accepting a softer, background scent.
Before assuming your formula is “bad,” sanity-check the environment. Note the room type, approximate size (small, medium, large), how many doors or windows are open, and whether HVAC or fans are running, then adjust only one variable at a time. Whenever you upsize wicks or add more candles to chase scent in a big room, anchor wick testing in scenting fundamentals, review testing safety & compliance, and follow safety & compliance basics first so added heat doesn’t create soot, excessive container temperatures or other hazards. Jotting simple notes like “small bedroom, low airflow, strong; open-plan lounge, high airflow, light background only” gives you a practical, testable map of realistic throw expectations.
Shelf life & oxidation control for EO-heavy blends
EO-heavy candle blends oxidise faster than FO-only formulas, so you extend shelf life by limiting air, heat and light and adding antioxidants within supplier guidelines.
Oxidation shows up as colour shifts, top notes that fade, or off-notes that creep in even when your wicking and loads haven’t changed. Citrus and other terpene-rich essential oils are especially prone to smelling dull or pithy over time, while some base-heavy blends can turn thick or slightly cloudy. These changes don’t automatically make a candle unsafe, but they can ruin the carefully balanced aroma you started with. Building a simple habit of dating bottles, rotating stock, and test-burning older blends keeps surprises to a minimum.
Antioxidants such as ROE (rosemary oleoresin extract) or mixed tocopherols slow oxidation; they don’t freeze time. Start with the ranges your supplier suggests rather than copying a universal “magic” percentage, because the right dose depends on the specific oil and base you’re using. Supplier SDS and technical sheets often explain practical handling limits and incompatibilities, and broader safety guidance from ASTM F2417 and the NCA reminds makers to test any changed formula before sale. Treat antioxidants as a support act: they help a good storage routine, but can’t rescue oils that are already badly degraded.
Storage is where most shelf-life wins happen. Decant EO-heavy blends into smaller, well-filled amber glass bottles so there’s minimal headspace above the liquid. Keep them in a cool, dark cupboard away from radiators, sunlit windowsills, or wax melters that warm the surrounding air. If you produce seasonal lines, set a simple rotation rule—for example, using older stock in tests first and only moving it into production if it still smells clean and balanced after a fresh burn. Noting “dark cupboard, six months, still bright” versus “desk drawer, three months, citrus flat” quickly shows which storage habits are working.
When you reopen last year’s FO+EO bottles, don’t just sniff and hope. Pour a small test candle, label it with date, wick and load, and compare it against a fresh control if possible. For seasonal relaunches, tie variability planning to scenting fundamentals, lean on your supplier documents to use SDS/IFRA documentation correctly, and follow a burn-test protocol for revalidation before committing to a full batch. If a stored blend shows strong discolouration, harsh or rancid notes, or behaves unpredictably in burn tests, retire it and remake from fresh components rather than chasing fixes in finished candles.
“Natural” claims with FO+EO mixes: what it means and what it isn’t
“Natural” claims on FO+EO candles should mean clear, honest ingredients and limits, not a promise of essential-oil-only formulas or zero risk.
From a customer’s point of view, “natural” often feels like “no chemicals, no headaches, totally safe.” In reality, both fragrance oils and essential oils are made of chemicals, and either can irritate sensitive people if overused or badly formulated. A fair approach is to describe what the candle does contain (“made with a blend of fragrance oils and essential oils”) instead of implying what it doesn’t (“chemical-free” or “non-toxic”) when you can’t actually prove or regulate those terms.
Think in layers of honesty. Ingredient-level honesty means you don’t hide fragrance oils behind vague language once you start mixing them with essential oils. Claim-level honesty means you avoid stretching aromatherapy language to candles, where heat and combustion change the oil profile compared with a diffuser. Brand-level honesty means you keep your own promises: if one line is “100% essential oils,” don’t quietly slip FO into that range just to fix a weak throw problem.
A simple sanity check before printing any “natural” wording is to ask three questions: Would a reasonable customer understand what I mean by this phrase? Am I implying a safety guarantee I can’t actually test or certify? And does this wording still make sense if someone reads the ingredient list right after it? If any answer feels shaky, dial the claim back to plain, accurate language about what’s in the jar and how to use it safely, instead of chasing buzzwords.
Steps to build starter FO+EO blends by scent family (citrus, gourmand, woody, spa)
Build starter FO+EO blends by picking a fragrance-oil base you like, adding a small essential-oil accent, and testing one scent family at a time with conservative ratios.
Work in four simple families so you don’t drown in options. For citrus, start with a bright citrus FO (like generic “lemon zest” or “citrus clean”) at your chosen load and add 5–10% of that fragrance portion as real lemon, orange, or grapefruit EO for sparkle. For gourmand, use a vanilla, bakery, or caramel FO as the backbone and add just 5% of something like sweet orange or spice EO so the blend feels more “kitchen” than candy.
For woody blends, start with sandalwood, cedar, or amber FO and add 5–10% of a matching EO (cedarwood, patchouli, or a tiny hint of vetiver). This is where FO does the heavy lifting for throw, while EO adds realism and depth. In spa profiles, pair a fresh spa FO with 5–15% of lavender, eucalyptus, or peppermint EO inside the fragrance portion, keeping total load within your wax and supplier limits.
Turn these into repeatable recipes by writing them as simple rules: “Citrus: 90:10 FO:EO,” “Gourmand: 95:5,” “Woody: 90:10,” “Spa: 85–95:5–15 depending on EO strength.” For each, pour a tiny test batch in one wax and jar, keep wicks consistent, and adjust only one variable at a time—usually the EO fraction—until you like the balance of realism, strength, and burn behaviour. Once a combo passes your burn tests and smells right in a real room, promote it from “experiment” to “house blend” and log it so you can reproduce it on demand.