
For this page, the best wick for a beeswax candle means the better first wick-family starting point for the candle format: square braid usually starts better in thicker beeswax candles, while flat braid usually starts better in narrower ones.
Beeswax rewards a good starting assumption and punishes a lazy one. The first real choice is wick family, because square braid and flat braid do not pull fuel the same way in thick pillars, narrow tapers, rolled sheets, or simple blends. After that, finished diameter and early burn results decide whether you stay put, wick up, or wick down. The cleanest path is family first, format second, size band third, and burn test last.
This page compares the better first family start point for beeswax candles. Exact wick numbers, full rolled-beeswax setup, and full burn-test workflow belong on separate pages.
Square Braid vs Flat Braid for Beeswax Candles
For thicker beeswax candles, square braid is usually the stronger starting test, while flat braid often suits narrower candles better.
That is a family choice, not a final size promise. In beeswax, the better first pick depends on how much fuel the candle has to feed, how narrow or thick the format is, and what the first few burns show after trimming and normal use.
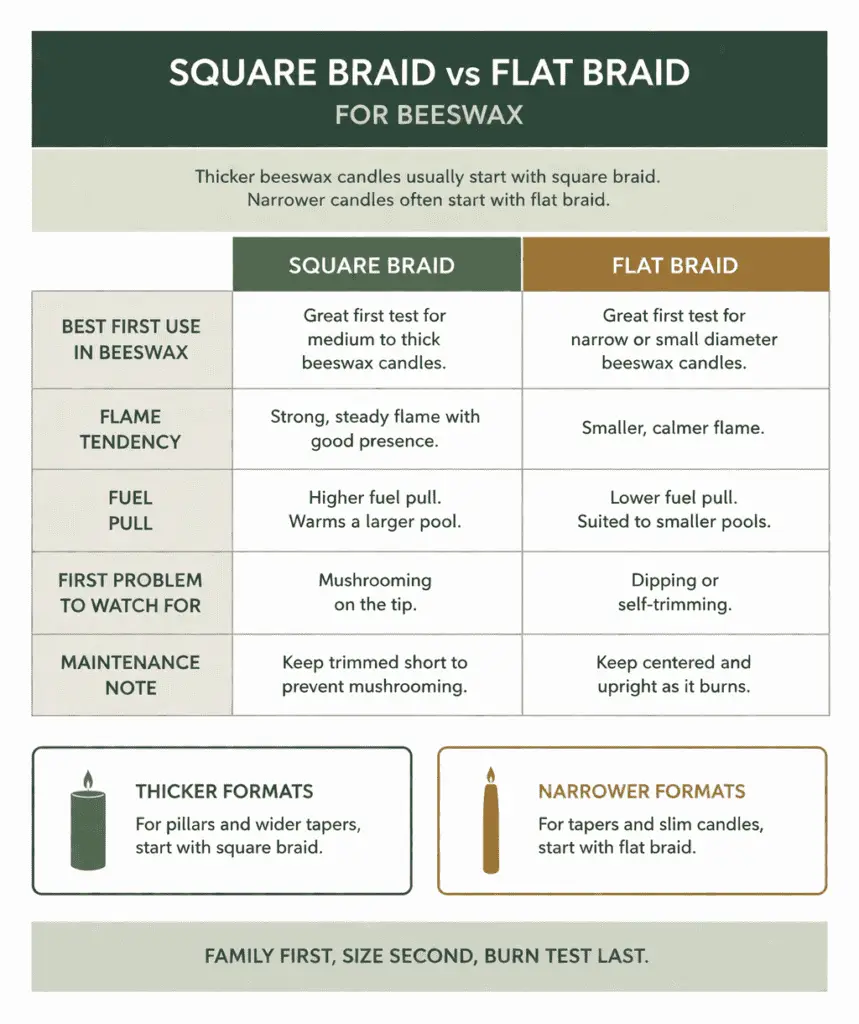
Start with Wick Types and Sizing when you want the wider framework for how wick families behave before you narrow the choice to beeswax. In practical terms, square braid usually pulls a little harder and suits thicker, fuel-hungry candles, while flat braid usually gives narrower candles gentler control and a cleaner first test.
| Braid family | Best first use in beeswax | Flame tendency | Fuel pull | First problem to watch for | Maintenance note |
|---|---|---|---|---|---|
| Square braid | Thicker pillars and other larger free-standing formats | Stronger | Higher | Flame runs big for the diameter | May need closer trim control |
| Flat braid | Tapers, slimmer candles, and narrower formats | Gentler | Lower to moderate | Flame stays too small or tunnels | Often favored where a smaller flame is easier to manage |
Use this quick start rule before size testing:
- Thick pillar or other wider free-standing beeswax candle: start with square braid.
- Narrow taper or other slim beeswax format: start with flat braid.
- Rolled beeswax: treat it as an exception case and test it separately.
- Blend or formula change: keep the family tentative until repeat burns confirm it.
This table gives working start points, not fixed rules. Final choice still depends on supplier guidance and repeat burn tests.
Use this table as a starting lens, not as a final verdict. The family comes first, the size comes second, and the burn test decides whether the first guess was right.
Can flat braid still work in a thicker beeswax candle? Yes, if testing shows it can hold the burn without repeated tunneling. Can square braid still work in a narrow beeswax candle? Yes, when flatter options underfeed and the flame still stays controlled.
Why Beeswax Changes the Starting Point
Beeswax often benefits from a stronger wick start-point in testing than many softer waxes.
That is why the first real question on this page is square braid versus flat braid, not a one-size-fits-all chart number. If a wick is only barely adequate in a softer wax, the same setup can show a weak flame, shallow melt, or early tunneling once the candle is 100% beeswax.
| Wax type | Starting assumption | What often happens with a weak wick |
|---|---|---|
| Softer beginner waxes | A milder wick can still look acceptable early | The candle may still form a usable melt area |
| Beeswax | The wick often needs a stronger family or size assumption | Weak flame and tunneling show up sooner |
Here is the practical decision order:
- Confirm the candle is pure beeswax or a blend.
- Pick the family that fits the format.
- Pick the first size band for that family.
- Burn test before buying deeper stock.
A short compare helps here. In testing, beeswax usually looks less forgiving than soy or paraffin when the first guess is too weak, but that does not mean every beeswax candle needs the biggest wick available. It means underpowered choices tend to show their problems sooner.
When a candle keeps tunneling, the answer is often not “beeswax is hard.” The answer is that the wick family, the size, or both are too weak for the wax and format. That is why How to Burn Test Candle Wicks matters after the first pick, and why How to Size a Candle Wick (Correctly, the First Time) becomes the next filter once the family is plausible.
Self-Trim, Curl, and Carbon Buildup by Braid Type
Self-trim, curl, and carbon buildup help break a tie between workable braid families, but they should not override format fit or size testing.
Self-trimming means the wick tip curls and sheds part of its carbon instead of building a large cap every burn. In real beeswax candles, flat braid is often chosen for narrower formats partly because makers want that gentler, easier-maintenance pattern, while square braid is often chosen when the candle needs a stronger start and a more assertive flame.
| Behavior | Flat braid tendency | Square braid tendency | What to do |
|---|---|---|---|
| Curl at the tip | Often more noticeable in narrower formats | Can be less pronounced or behave differently by size | Watch the flame, not just the curl |
| Carbon buildup | Can stay moderate when the wick is matched well | Can rise fast if the wick is too aggressive | Trim first, then judge the next burn |
| Mushrooming | Usually points to too much fuel or poor match | Often points to oversized delivery for the format | Wick down before changing everything |
| Trim frequency | Often steady in narrow candles | Can need tighter control in thick candles | Keep trim routine consistent |
This is where makers often ask a boolean question: does flat braid always self-trim better than square braid? No. Maintenance behavior shifts with diameter, formula, burn length, and how closely the wick matches the candle. A braid family can look cleaner in one beeswax taper and still be the wrong first family for a thicker pillar.
Repeated mushrooming gives you a simple action path:
- Trim to your normal height and repeat the burn under the same conditions.
- If the flame is still oversized, wick down within the same family.
- If the candle still behaves wrong, reconsider the family itself.
That is why How to Size a Candle Wick (Correctly, the First Time) matters after the first family decision. If you are still unsure after a clean trim and one size adjustment, a burn-test checklist gives better answers than guessing from one hot or messy burn.
Match the Wick Family to Your Candle Format
Candle format comes before exact size because tapers, pillars, rolled sheets, and blends can need different wick-family start points.
Equal diameter does not guarantee equal wick choice when the format changes. A narrow taper, a thick pillar, a rolled sheet candle, and a simple beeswax blend in a container can all behave differently even when the finished width looks close on paper.
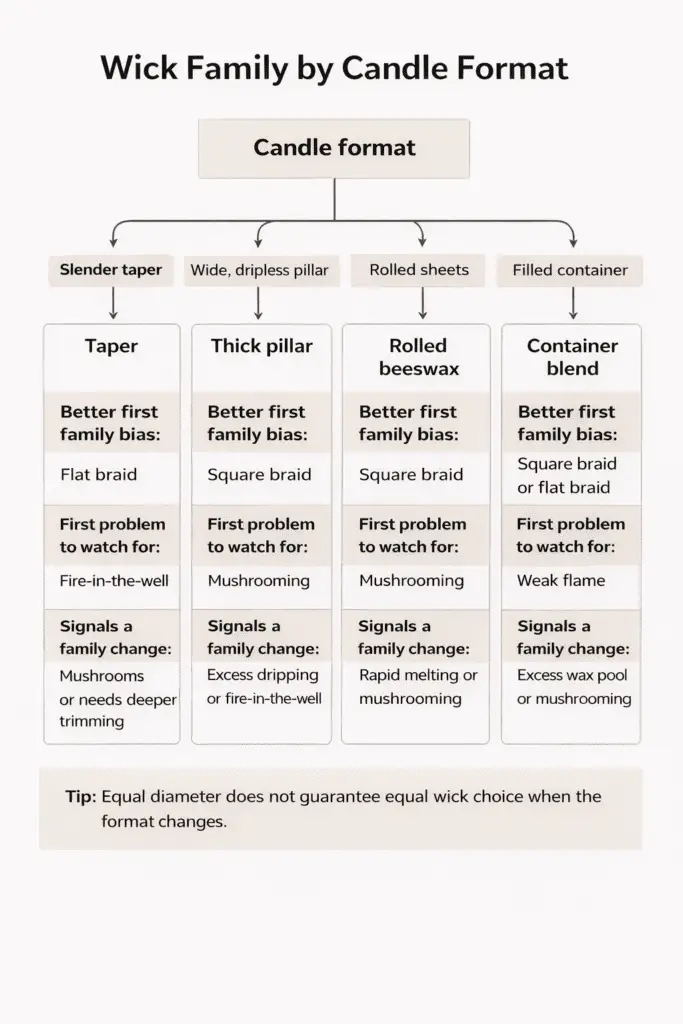
Keep Wick Types and Sizing in mind here, because this is the point where family choice branches by use case instead of by one generic chart. The fastest way to sort the choice is to look at format first, then note the first failure to watch for, then move into diameter-based wick sizing.
| Format | Better first family bias | First problem to watch for | What signals a family change |
|---|---|---|---|
| Taper | Flat braid is often the cleaner first look | Weak flame or drip pattern | The flame stays too small or the candle cannot hold a stable burn |
| Thick pillar | Square braid is often the stronger first look | Oversized flame or soot if too aggressive | The wick runs hot and messy even after trimming |
| Rolled beeswax | Often starts differently from poured candles of similar width | Burning too hot or tunneling from setup mismatch | The finished diameter looks right but behavior stays wrong |
| Container blend | Depends on the blend, but the assumption can shift fast | Drowned wick or weak surface melt | The wick that worked in a free-standing candle stalls in the blend |
As a fast first pass, tapers usually start with flat braid, thick pillars usually start with square braid, rolled beeswax needs its own test path, and blends make the first answer provisional.
Container beeswax blends: when the start point shifts
Simple beeswax container blends still start from format first, but the answer stays more provisional than it does in a free-standing candle. If a blend keeps drowning the wick or shows a weak surface melt, recheck the blend and retest nearby sizes before treating the family itself as wrong.
Taper versus pillar is the cleanest short compare. Tapers usually lean flatter because the format is narrower and less forgiving of an oversized flame, while thicker pillars usually lean squarer because the wick has to support more fuel. Rolled versus poured is the other useful compare, because rolled sheet candles can behave differently even when the finished size looks similar.
Use this order when the format is known:
- Confirm whether the candle is taper, pillar, rolled sheet, or blend.
- Pick the family bias that usually fits that format.
- Watch for the first likely failure.
- Move to the first size band only after the family looks sensible.
This is where Rolled Beeswax Candle Wick Guide becomes useful for the exception cases, while How to Size a Candle Wick (Correctly, the First Time) handles the next measurable step. If a blend keeps drowning the wick, do not assume the family is wrong first. Recheck the formula and then run a full burn-test checklist before changing multiple variables at once.
Rolled Beeswax Is the Main Exception Case
Rolled-sheet beeswax should not automatically inherit the same wick assumptions as poured or molded beeswax.
Many makers see the finished diameter and assume the wick choice should match a pillar. Rolled candles can need a different first family bias, so equal diameter does not guarantee equal wick.
| Format type | First assumption | What can go wrong first | Next move |
|---|---|---|---|
| Rolled-sheet beeswax | Start from rolled-format logic, not pillar logic | Candle burns too hot or tunnels from a poor first assumption | Recheck setup, then retest from finished diameter |
| Poured or molded beeswax | Start from free-standing pillar or taper logic | Family or size mismatch shows in normal burn behavior | Adjust size first if the family still fits |
The simplest rolled-sheet workflow is short:
- Confirm it is a rolled sheet candle, not a poured pillar.
- Measure the finished rolled diameter.
- Follow any maker note about wick orientation or setup.
- Test from that finished diameter instead of copying pillar assumptions.
Do not transfer pillar logic to rolled beeswax without testing. Use the finished rolled diameter as the start point here, then move to a dedicated rolled-format guide when you need full setup detail.
Pick a Start-Point by Diameter and Thickness
After choosing the braid family, use diameter to pick a start band, then test one size down and one size up.
That gives you a realistic first test instead of a false sense of precision. In beeswax, diameter and thickness set the opening size band only after the family is already chosen, which is why Wick Types and Sizing still starts the process and why Match the Wick Family to Your Candle Format comes before any size chart.

A simple rule keeps the first test honest. Wider candles usually need a stronger start than narrower ones, and a 3-inch pillar usually needs a stronger opening test than a 2-inch pillar in the same wax and family. Height matters less than width when you are choosing the opening band.
| Candle width or thickness | What to do first | Start-band habit | Extra tests to run |
|---|---|---|---|
| Narrow taper or slim free-standing candle | Confirm the family suits a narrow format | Start in the lighter end of that family’s range | Test one step down and one step up |
| Medium pillar | Measure the finished diameter and confirm the family | Start in the middle band that matches the width | Test one step down and one step up |
| Thick pillar | Use the finished diameter, not a guess from height | Start in a stronger band than a slimmer candle would use | Test one step down and one step up |
| Rolled beeswax | Measure the finished rolled diameter after the build is done | Start from the rolled format assumption, then band by width | Test one step down and one step up |
| Simple beeswax blend | Confirm the blend before trusting the old chart answer | Start from the family that suits the format, then treat the band as provisional | Test one step down and one step up |
Use this order every time:
- Measure the finished diameter or thickness.
- Confirm the braid family.
- Pick the first size band for that family.
- Prepare one smaller and one larger nearby size.
- Judge the first burns before buying deeper stock.
That order matters because people often reverse it. They hunt for an exact wick number first, then try to force the candle to agree with it. A better path is diameter-based wick sizing after the family is already plausible, then a burn-test checklist that proves whether the band was close enough to keep testing.
These start-band rules are working test habits, not exact wick numbers. Use supplier ranges as the opening band, change one step at a time, and judge repeat burns before treating one result as final.
A narrow versus thick comparison makes the point fast. Two candles can both be beeswax and both look simple, yet the thicker one will often call for a stronger start in testing. That is why a size chart is a start line, not a verdict.
When the first burn disagrees with the chart, trust the candle. If the flame stays weak and the melt lags, move up one size within the same family first. If the flame is too large, sooty, or unstable, move down one size first. If the behavior still looks wrong after one sensible size change, go back to How to Burn Test Candle Wicks and check whether the issue points to family choice rather than size alone.
When to change size first and when to change braid family
Change size first when the family still matches the format and the candle is simply burning a little weak or a little hot. Change family when one sensible size move still leaves the candle tunneling, sooting, or behaving wrong for the format.
When Fragrance, Dye, or Blends Change the Answer
A recipe change can reset the wick answer even when the diameter stays the same.
That matters most when a candle once burned well and then starts acting wrong after a formula change. Fragrance, dye, and blend changes can shift burn behavior, so an old wick result may stop being useful even if the mold and width did not change.
| Formula change | Common first symptom | First retest move |
|---|---|---|
| Added fragrance | Smaller melt area or uneven burn | Retest the same family one size up |
| Added heavy dye | Soot or unstable flame after a formerly clean burn | Retest one step within the same family, then judge again |
| Changed to a beeswax blend | The old wick suddenly drowns or stalls | Recheck format logic, then rebuild the start band |
| Changed wax ratio | The old chart answer no longer matches the burn | Treat the candle as a new baseline and retest nearby sizes |
Treat any formula change as a new baseline. Retest the same family and nearby sizes before you treat the old wick answer as transferable, then use How to Size a Candle Wick (Correctly, the First Time) for the next size step.
Burn-Test Pass/Fail Signals Before You Reorder
A beeswax wick fails the test if repeated burns show persistent tunneling, heavy soot, mushrooming, or an oversized flame.
Picking a start-point and judging that start-point are two different jobs. The first few burns tell you whether to stay put, move one size, or admit that the family may be wrong.
Use the same scoring habit for the first three burns:
- Trim to the same starting height each time.
- Burn under similar room conditions.
- Watch flame size, melt progress, soot, and mushrooming.
- Record one next move only after the burn ends.
| What you see | Fast read | Next move |
|---|---|---|
| Small flame, slow melt, repeated tunneling | Underwicked is more likely | Wick up one step |
| Large flame, soot, fast fuel use | Overwicked is more likely | Wick down one step |
| Mushrooming with a too-large flame | Wick is likely too aggressive for the candle | Wick down one step |
| Weak flame after a formula change | The old answer may no longer apply | Retest from the new baseline |
| Size change does not fix the problem | Family choice may be off | Change family |
| Obviously unsafe flame or runaway heat | Stop the test | Do not continue that setup |
An underwicked candle and an overwicked candle fail in opposite ways, but the next move stays narrow: wick up one step, wick down one step, or reconsider the family after one sensible size change. Use a dedicated wick burn-test page for the full repeat-burn workflow before you reorder deeper stock.
Beeswax Wick Start-Point Test Planner
Use a simple record to choose the first beeswax wick test and isolate one next move after each burn.
The planner does not promise the final wick number. Record the candle format, whether it is 100% beeswax or a blend, the finished diameter or thickness, the chosen braid family and test size, and the first-burn result before you change anything else.
- Candle format
- 100% beeswax or blend
- Finished diameter or thickness
- Chosen braid family and test size
- First-burn result and next move
If the first burn looks weak, move one size up in the same family. If it looks too aggressive, move one size down. If nearby sizes still fail, go back to family choice before changing everything else.