
Mica powders can be safe for candle coloring only in carefully tested, low-load setups, and they are usually better suited to no-flame wax melts than to burning container candles.
If you love shimmer in your candles, it is natural to wonder whether mica powders belong anywhere near an open flame. This page is for hobby makers and small brands who want eye-catching Candle Dye & Coloring effects without creating soot, sparks, or weak, struggling flames. You will learn how mica behaves in common waxes, how it interacts with wicks, and how simple tests reveal whether a specific setup stays within safe limits. First, you will get a clear answer on whether mica is safe to use in candles at all, then each section builds into testing, dosing, and safer alternatives.
Quick verdict
- Best use: wax melts, wickless candles, and light decorative use away from the wick path.
- Test-only use: low-load wicked candles, but only when the wax, jar, fragrance, and wick already burn cleanly without mica.
- Avoid: using mica as the main colorant in wicked candles, using heavy shimmer loads near the wick, and adding mica to any setup that already shows soot, mushrooming, or a weak flame.
If your goal is strong, reliable candle color, candle dye is usually the better primary tool. If your goal is shimmer, treat mica as a visual effect that has to earn its place through burn tests.
Is mica powder safe to use in candles?
Mica powder is not inherently candle-safe; it can clog wicks and increase soot, so treat it as experimental and prefer it for no-flame wax melts.
The safest way to judge mica is to see it as one option inside a broader candle dye and coloring guide, not a universal shimmer that works in every setup. Mica is a particulate pigment, which means it is made of tiny solid platelets that stay suspended in wax instead of dissolving fully into the fuel like most liquid dyes. When too many particles travel up the wick and collect near the flame, they can disrupt fuel flow and air flow, which raises the chance of soot, flicker, or brief spark events.
Imagine two test jars side by side: one tinted only with liquid dye and one heavy with mica shimmer; the overloaded jar often shows a darker halo and small sparks. Fire-safety standards and industry safety guidance focus on how the finished candle burns, not on approving one pigment in isolation. Many makers decide to use mica only in wax melts, where there is no open flame and the platelets never have to pass through a wick at all. If you still use mica in burning candles, treat every batch as a trial and keep notes beside your labeling and SDS basics, with SDS meaning safety data sheet, the document that lists hazards, safe handling advice, and emergency information for a product.
Use a short burn-test checklist before you sell or give a mica-colored candle to anyone.
- Pour at least one control candle with the same wax, fragrance, jar, and wick but no mica, so you know how a clean burn should look.
- Pour a matching test candle with a very low mica load, keep everything else identical, and burn both on a heat-safe surface away from drafts.
- Watch the first few multi-hour burns for stable flame height, minimal soot on the jar, and no sparks; if issues appear, stop the test and lower pigment load or change the wick.
A simple rule of thumb is that mica belongs only in setups where you are willing to do extra test burns and possibly reject whole batches that misbehave. Later in this page you will see a cautious starting framework for mica load, but any number still needs real burn tests. Communities like r/candlemaking often respond well to myth-busting Candle Dye & Coloring posts that compare a clean dye-only burn against an overloaded mica jar, because the contrast makes the safety point clear.
When to avoid mica: wick & flame mechanics explained
Avoid mica in any candle where the wick already struggles, the flame sits low, or you see soot, sparks, or repeated self-extinguishing.
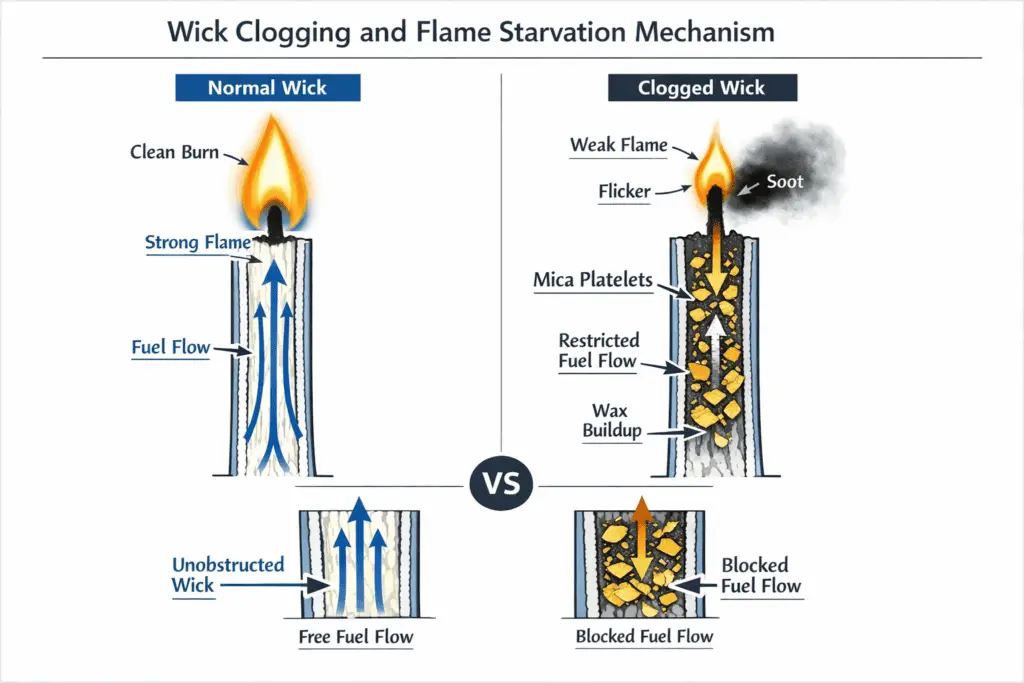
Those symptoms point to wick clogging, so it helps to understand colorant mechanisms instead of blaming fragrance oil or wax alone. Wick clogging means that solid particles or thickened fuel block the tiny channels inside the wick and starve the flame of fuel and air. Mica platelets and fines can lodge inside that lattice and at the flame front, while dissolved liquid dyes pass through without adding extra solids at the same color depth.
Use a simple failure log whenever you test mica in new jars.
- Symptom: shrinking or drowning flame → Likely cause: pigment-heavy fuel can’t climb the wick fast enough → Quick check: burn a dye-only control candle for comparison.
- Symptom: steady but sooty flame → Likely cause: load is too high for that wick and wax → Quick check: drop mica percentage and re-test with the same fragrance.
- Symptom: tiny sparks or brief flares → Likely cause: platelets gathering at the flame → Quick check: stir more thoroughly, then test at a lower load or change wick family.
Safety guidance focuses on controlled burn testing, which means you judge mica by how the full candle behaves over several burns. If a basic test candle already struggles, adding pigment is likely to make the wick more fragile. That is why sensitive wick families often need extra caution with particulates, and many makers compare CD, ECO, and wooden wicks to see which structures tolerate solids better.
Mechanically, a healthy wick pulls liquid fuel upward by capillary action, mixes it with air near the flame, and burns it cleanly. When mica platelets and fines stack up inside that channel, they change fuel flow and temperature, which can lead to mushroom caps, rolling soot, or a flame that shrinks after each relight. If you confirm pigment-related issues in your log, reduce mica in small increments, keep all other variables fixed, and repeat the same burn schedule. Your notes matter more than any generic rule.
In short, avoid mica in candles that already have marginal wicking, very high fragrance loads, narrow jars with deep melt pools, or customers who need the cleanest possible burn. Keep your failure log close, because patterns across several tests show where mica belongs in your Candle Dye & Coloring work and where a plain dye or no-flame shimmer is the better choice.
How mica behaves in soy, paraffin, coconut, and beeswax
Mica behaves differently in soy, paraffin, coconut, and beeswax because each wax has its own melt point, opacity, and viscosity, so shimmer, suspension, and settling change even at the same load.
If you want consistent, repeatable shimmer, your first move is to choose the right dye for your wax instead of assuming a universal mica will look and burn the same in every base. Soy is more opaque and can mute sparkle, paraffin is clearer and tends to show shimmer more dramatically, coconut blends are softer and more prone to settling, and beeswax has its own thick, golden character.
- Soy: Opaque and creamy; shimmer is softer, and heavy loads can look chalky.
- Paraffin: Clearer and glossier; mica usually looks brighter and more metallic at low loads.
- Coconut and coconut blends: Soft and low-melting; platelets can settle more easily, especially when particle size is coarse.
- Beeswax: Naturally colored and more viscous; many micas look duller in it and can move unevenly through the melt.
Before you scale anything, run the same burn schedule across the waxes you use and log flame height, soot, mushrooming, and visible settling. If your main goal is smooth, even color rather than shimmer, it often helps to learn how to color candle wax without clumps or bleeding before you test decorative particulates.
Mica vs candle dyes (liquid, chips, blocks, pigments): safety & performance
Compared with candle dyes, mica and glitter stay as solid particles in the melt pool, so they can look more dramatic but usually put more strain on the wick and increase the potential for burn problems.
When you compare colorants safely, start with the main types of candle dye and keep one distinction in view: liquid dyes and most dye chips dissolve into the fuel, while mica and glitter remain tiny solids. Dissolved dyes ride up the wick as part of the liquid wax, so they do not add extra blockage inside the wick lattice, whereas mica platelets and glitter fragments can pile up near the flame. That is why dye-only candles, at reasonable loads, are usually easier to burn cleanly and pass standard burn tests, while pigment-heavy candles are more likely to soot, mushroom, or self-extinguish.
From a safety lens:
- Liquid dyes and dye chips/blocks: Best-behaved for open-flame use when dosed conservatively. They can still misbehave at extreme loads, but they do not add hard particles that disrupt capillary action.
- Mica: Adds platelets that may clog the wick or make the flame unstable, especially in narrow jars or with already-delicate wick families. It is often safer in wax melts, where there is no flame.
- Glitter (especially PET craft glitter): Not designed for sustained high temperatures near a flame; many safety-focused makers do not use it inside burning candles at all.
From a performance lens, dyes deliver clear, even color that works well in tinted glass, layered candles, and strong scent loads. Mica, by contrast, gives pearlescent, swirling effects that look striking in motion but are harder to control in burn tests. If you are still trying to choose the right dye for a burning candle, start with dissolved colorants and reserve mica for accent areas, top swirls, or non-flame products.
There are still ways to get shimmer without placing heavy decorative material near the wick in a burning candle. Some makers pour a dyed core candle and then add a thin outer ring or top layer that carries a very low mica load, staying several millimeters away from the wick path. Others use painted-on mica designs on the outside of containers, or pair dyed jar candles with highly shimmery wax melts in the same fragrance for display sets. The common pattern is simple: dissolved dyes do the hard work of fueling the flame, while mica stays where it can add visual interest without being pulled through the wick.
Steps to test mica safely with your wax + wick combo
To test mica safely with your wax and wick combo, compare a plain control candle to a low-mica variant and track flame, soot, and container temperature through several full burn cycles.
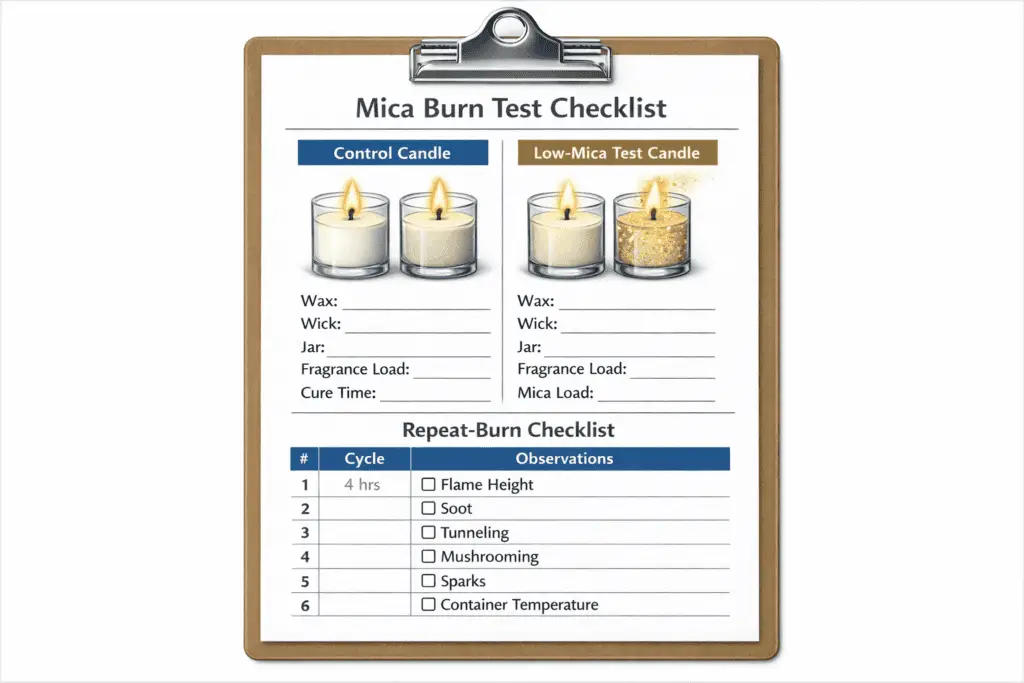
Before you pour anything fancy, commit to a consistent testing method so every experiment is comparable. Start by choosing one jar size, one wax, one fragrance load, and one wick size that already burns cleanly without mica. Pour at least two candles: a control with no pigment and a test candle with mica dispersed thoroughly in the same batch of wax, so the only variable is whether pigment is present. Label each jar clearly with wax, wick, fragrance percentage, and test code.
Next, pick a safe starting percentage of mica based on caution, not on the shiniest photos you have seen online. That usually means starting with barely-there shimmer and working upward, rather than aiming for a dramatic swirl on the first try. Let both jars cure for the same amount of time in the same conditions, and make a simple test sheet with boxes for time, flame height, melt-pool depth, jar temperature, and any visible soot or flicker. Treat this like a small lab experiment, not a quick glance.
During each burn, log mushrooming, soot, and tunneling exactly as you see them. Burn in 2 to 4 hour sessions on a stable, draft-free surface, trimming the wick only between cycles. Note the time when problems first appear: early soot, a shrinking flame, a wick that leans and carbon-balls, or a melt pool that tunnels instead of reaching the edges. If the control jar behaves well but the mica jar struggles, mark that combo as a fail and either lower mica, change wick family, or move shimmer to non-flame products.
Repeat this pattern whenever you change any major input: new wax brand, different wick series, or a big jump in fragrance load. Over a few rounds, your log becomes a personal safe-zone map for mica in your specific gear, and you can pour small showcase batches with more confidence instead of guessing from other people’s photos.
How much mica to add without clogging wicks (simple calculator logic)
To add mica without clogging wicks, treat dosage as a conservative starting point plus tiny test increments, always guided by your burn notes rather than by how much shimmer you wish you could add.
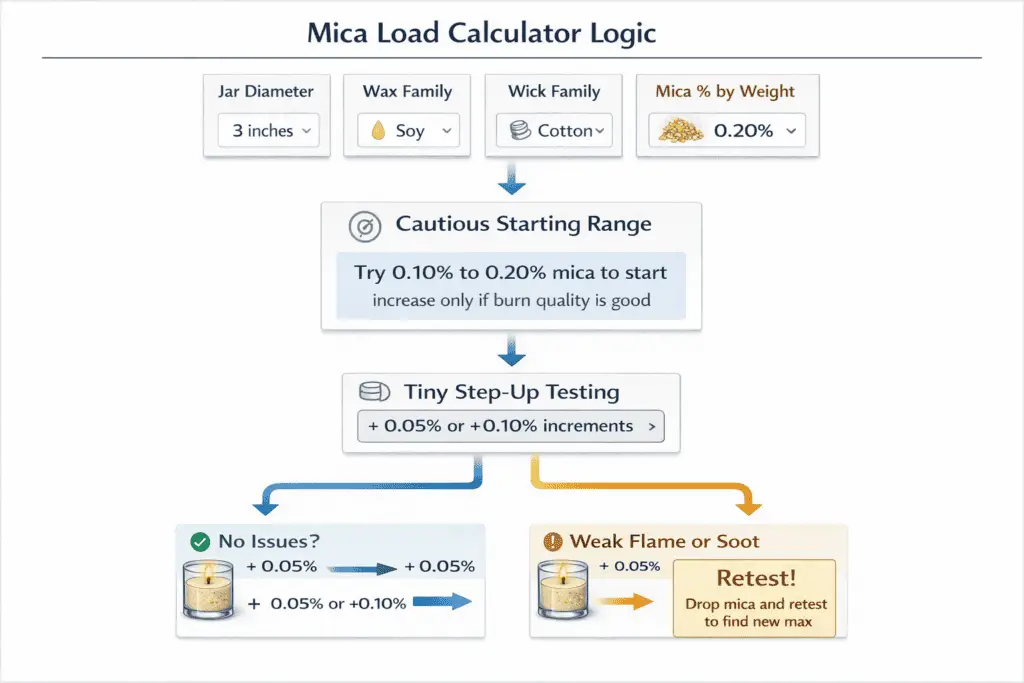
Think of this section as dosage basics, not a promise of one universal safe number. There is no single mica percentage that works across every wax, wick, jar, and fragrance load, so the safest approach is to start low and let testing decide whether you can go any higher.
- First trial: use only the faintest shimmer you can measure and compare it against a no-mica control candle.
- Next step: increase only one small test increment at a time, and only after repeated clean burns at the lower load.
- Stop point: if you need obvious metallic shimmer to get the look you want, move the design to wax melts, wickless candles, or a decorative surface effect instead of pushing the wick harder.
For each mica test, pour one control candle with no mica, one low-load mica candle, and one optional step-up version only if the first mica test stays stable. Keep the wax, jar, wick, fragrance load, cure time, and burn schedule identical. If the mica version shows a weaker flame, faster mushrooming, more soot, or self-extinguishing while the control stays clean, the usable mica load for that setup is lower than you hoped. That matters more than any generic percentage rule.
Jar diameter and wick structure still matter. Narrow jars with deep melt pools usually deserve stricter limits than wider jars, and some wick families clog sooner than others when solids are present. Your notebook becomes the real calculator over time: start here, test carefully, then adjust in very small steps.
Does mica affect cold/hot throw and opacity?
Mica can slightly reduce hot throw and change how strong scent feels, especially at higher loads, and it usually increases opacity or pearlescent haze in the wax.
To understand the trade-off, remember that fragrance oil and wick choice still control most of cold and hot throw. At low mica loads, the scent change may be minor, but overloaded jars often burn less efficiently and can produce a weaker hot throw while making the wax look more cloudy or pearly.
If you notice weaker performance after adding mica, reduce pigment before you raise fragrance. In clear waxes, mica usually adds haze and can reduce container glow; in opaque waxes, it often reads as a softer pearly finish rather than a dramatic sparkle.
Toxicity & heavy-metal concerns: what supplier SDS actually tells you
Supplier SDS sheets summarize handling hazards and composition, and they help you screen mica products, but they do not guarantee that a mica is automatically safe to burn in candles.
The first step is to interpret the paperwork correctly. SDS means safety data sheet, and it explains how a substance behaves in normal handling, including dust hazards, irritation risks, storage guidance, and emergency measures. It does not certify that a mica will burn well in a candle wick.
Look first at the sections that identify ingredients, hazards, and handling advice. Some products sold as mica include added pigments or mineral traces, so mismatched paperwork is a reason to stop and verify the product before use. Treat supplier paperwork as a screening tool for buying, storage, and labeling, not as a burn-safety certificate.
In practice, supplier paperwork helps you screen what you buy, organize records, and spot red flags when a document does not match the product being sold. It does not replace burn testing. For candle decisions, use SDS to filter the material first, then let repeated burn tests decide whether that mica belongs in a wicked candle.
Dispersing mica: suspending, swirling, embedding (what works)
To disperse mica effectively, choose a method that keeps particles even in the wax while minimizing wick-clog risk.
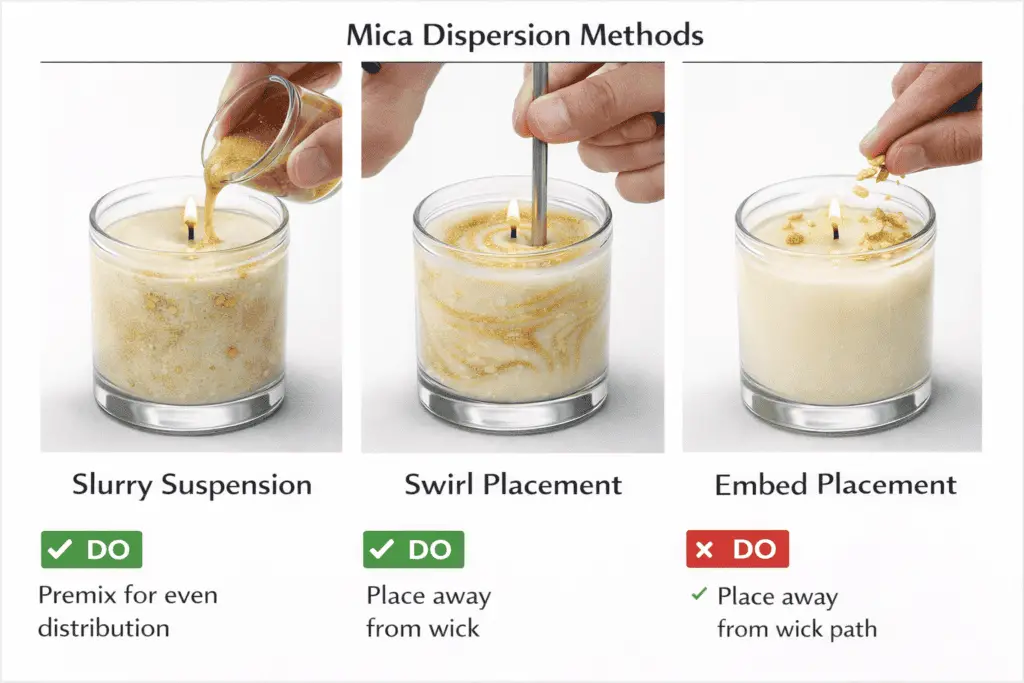
The safest way to read this section is to think in terms of lower-risk placement, not maximum shimmer. Full suspension mixes mica through the whole candle, swirls keep more of the visual effect in specific bands, and decorative embeds place mica-rich wax in set locations. The closer heavy pigment sits to the wick path, the higher the burn risk.
For suspension, start by premixing mica into a small amount of warm wax or fragrance to form a thin slurry, then blend that into your main batch. Stir thoroughly but not aggressively, because excess mixing adds bubbles without solving wick risk. If your main goal is even color in a plain candle, it is often better to color candle wax without clumps or bleeding before you test decorative particulates.
Swirls and light top effects are often easier to control than full-body suspension because they can keep more plain wax away from the wick. For deeper decorative routing, you can create swirl effects with candle dye and keep the wick path mostly plain. Decorative embeds are still riskier in burning candles and much easier to justify in wax melts.
Particle size still matters. PSD means particle size distribution, and a mica with too many coarse platelets tends to settle faster in softer waxes and create visible lines or stripes. Finer, more uniform micas usually suspend more evenly, but even a better-looking suspension still has to prove itself in burn tests before you treat it as usable.
Troubleshooting mica issues: tunneling, sooting, mushrooming, weak flame
To troubleshoot mica-related tunneling, soot, mushrooming, or weak flame, log each symptom, adjust either wick or pigment load, and validate fixes with repeat burn tests.
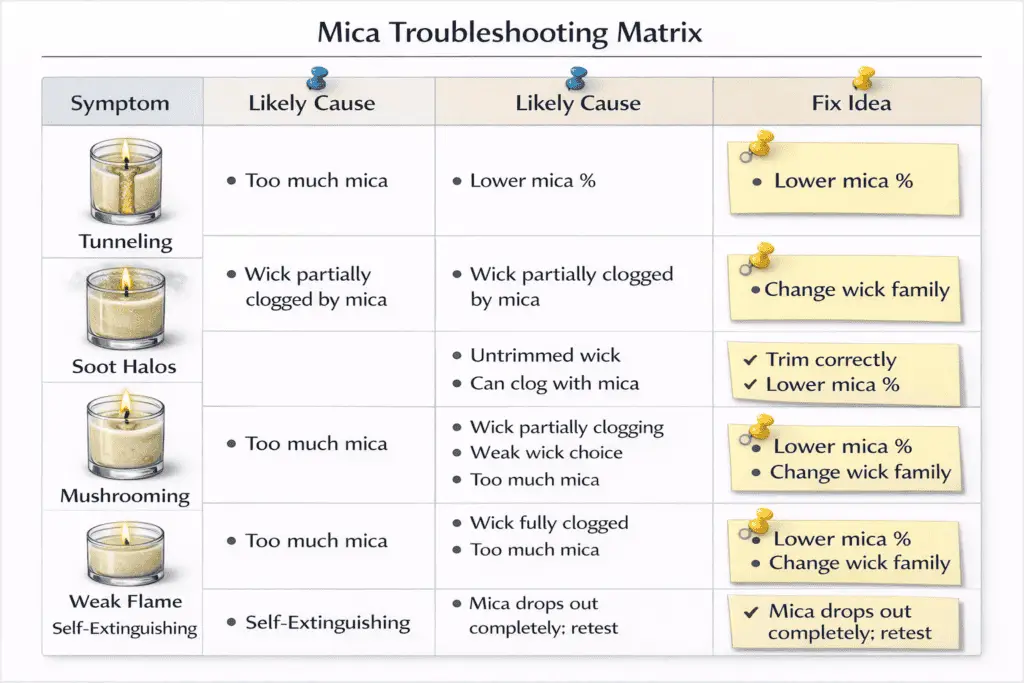
Start by turning your notes into a simple troubleshooting overview instead of random comments in the margins of your notebook. Write down the wax, jar, wick family and size, fragrance load, mica percentage, and what went wrong: tunneling, soot on one side, tall sooty flame, repeated self-extinguishing, or stubborn mushroom caps. That single page becomes your control panel for deciding whether the problem comes from overload, wick choice, trimming habits, or a combination.
Next, build a tiny failure log that maps symptom, likely cause, and test-and-fix idea:
- Symptom: heavy mushrooming, soot halos on glass
Likely cause: too much pigment or an untrimmed wick.
Fix idea: trim to the recommended length, then re-pour a small batch with slightly less mica. - Symptom: weak, shrinking flame and deep tunneling
Likely cause: wick too small for the combination of wax, fragrance, and mica.
Fix idea: test the next wick size up at the same mica level, while watching closely for soot. - Symptom: random flares or tiny sparks at the flame
Likely cause: clumped pigment or platelets collecting at the flame front.
Fix idea: mix more thoroughly, reduce pigment percentage, and consider a less aggressive shimmer goal. - Symptom: strong cold throw but disappointing hot throw
Likely cause: the setup is overloaded with fragrance and pigment, so the melt pool never gets hot enough.
Fix idea: bring fragrance and mica back into a more modest range and re-test both together.
When patterns in your log point to overload rather than wick design, lower pigment percentage first and keep the rest of the setup fixed. If the problem is uneven appearance as much as flame behavior, use a simple candle color fix workflow to separate color defects from wick defects. Every change still counts as a fresh experiment, so repeat the same burn schedule and keep only the combinations that move back toward a cleaner, more reliable burn zone.
Compliance snapshot: ASTM F2417 fire safety & CLP/OSHA labeling notes
ASTM F2417 and related candle-safety guidance focus on how a finished candle behaves in controlled burns, while CLP- and OSHA-aligned paperwork focuses on hazard communication and labeling. In practice, that means supplier documents can help you screen and document mica products, but they do not prove that a mica will burn well in a wicked candle.
Quick answers makers usually need
Makers usually need fast answers on wick clogging, wax melts, primary color use, cosmetic-grade claims, and glitter, because those are the questions that decide whether mica belongs in the project at all.
Can mica clog candle wicks?
Yes. Because mica stays particulate instead of dissolving fully into the wax, it can build up at the wick and interfere with clean burning.
Is mica safer in wax melts than in burning candles?
Yes. Wax melts and wickless products remove the wick problem, which is why mica is usually a better fit there.
Can I use mica as the main colorant in a wicked candle?
You can test it, but it is usually a poor primary color strategy. Candle dye is the more reliable base colorant for wicked candles.
Does cosmetic-grade mica automatically mean candle-safe?
No. Skin-use suitability and burn performance are not the same thing.
Is glitter any better?
Usually not. Non-dissolving decorative particles near a wick tend to create the same kind of performance risk, often worse.
Safer sparkle alternatives & when to use mica only in wax melts
Safer sparkle usually means moving mica to wax melts and keeping burning candles powered by clean dyes, occasional top accents, and other decorations that stay well away from the flame’s fuel path.
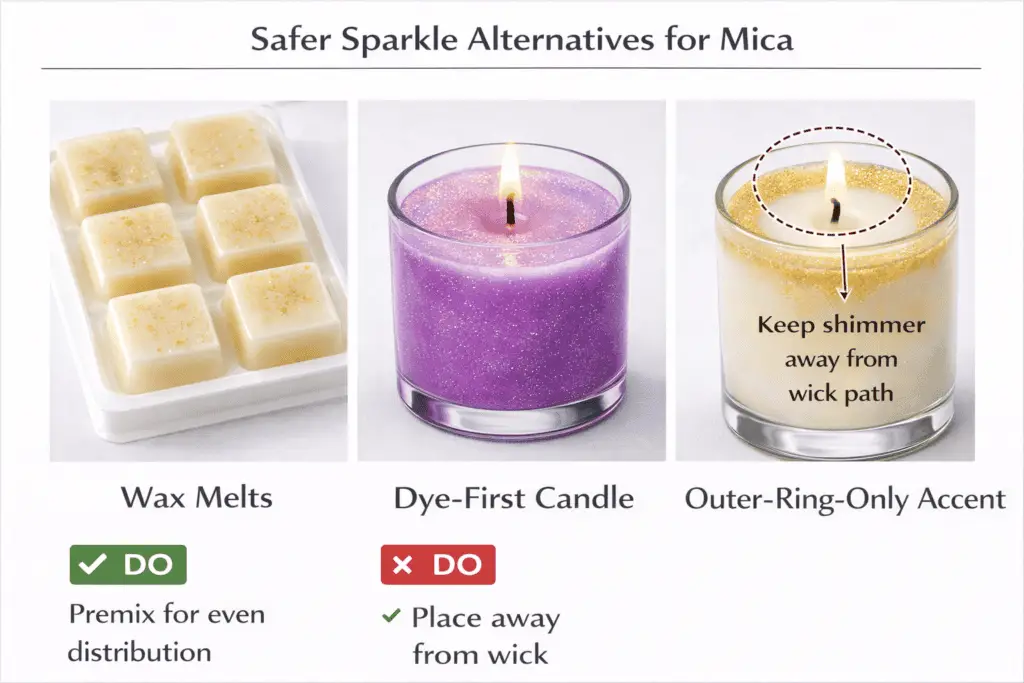
The most reliable way to choose no-flame colorant uses is to split your product ideas into two buckets: items that will sit under a visible flame, and items that will only ever be warmed. Mica, chunky glitter, and heavily pigmented embeds belong mainly in the second bucket, where they cannot clog wicks or create sparks. That is why many safety-focused makers use dye-only formulas for container candles and pillars, then save their boldest shimmer ideas for clamshell melts, snap bars, and warmers. You still get the showy swirl when the wax moves, but the open flame never touches those particles.
Once you decide that melts will carry your sparkle, keep the workflow simple: use a wax that releases cleanly, premix mica into a small slurry, and test only enough shimmer to get the finish you want without gritty texture or leaking cavities. For a deeper wickless route, see can mica be used in wax melts.
If you love the idea of sparkly candles themselves, treat them as special pieces with strict rules: modest mica in the outer ring only, plain dye near the wick path, and clear communication to customers about burn times and trimming. For everyday selling and gifting, though, the cleanest compromise is simple: let your candles handle scent and ambiance, and let your wax melts carry the wild shimmer. That separation keeps your testing workload manageable while giving customers the best of both worlds: safer, more reliable flames and lower-risk sparkle on the warmer.