
To create clean swirl effects with multiple candle dyes, pour a lighter base, add slightly stronger accents in sequence, and stop after a few shallow passes.
This guide is for candle makers who can already pour a basic container candle. It shows how to get cleaner marbled lines with repeatable control instead of guesswork. You will learn how dye load, accent timing, and tool depth change line definition. Start with the quick-start method, then change one variable at a time when colors blur, sink, or bleed.
Quick-start method — 7 steps for clean two-color swirl candles
Start with one wax, one dye format, and two colors only. This first-pass workflow gives you a repeatable baseline before you test extra colors, higher fragrance loads, or wider jars. For a full primer on colorants before you tune swirl technique, start with candle dye and coloring.
Use candle-safe dyes only, and keep one dye format for the whole batch so dissolve speed and color strength stay predictable.
Use these tools and materials:
- one container wax you already know how to pour
- one dye format only for the whole batch
- a digital gram scale
- a thermometer
- one main pitcher plus one small accent pitcher
- a skewer or chopstick
- clear jars so you can see bleed at the glass
Follow this sequence for a first two-color test batch:
- Weigh your total wax and split it into a base portion and a smaller accent portion.
- Color the base at the low end of your safe working range and keep the accent only slightly stronger, not dramatically darker.
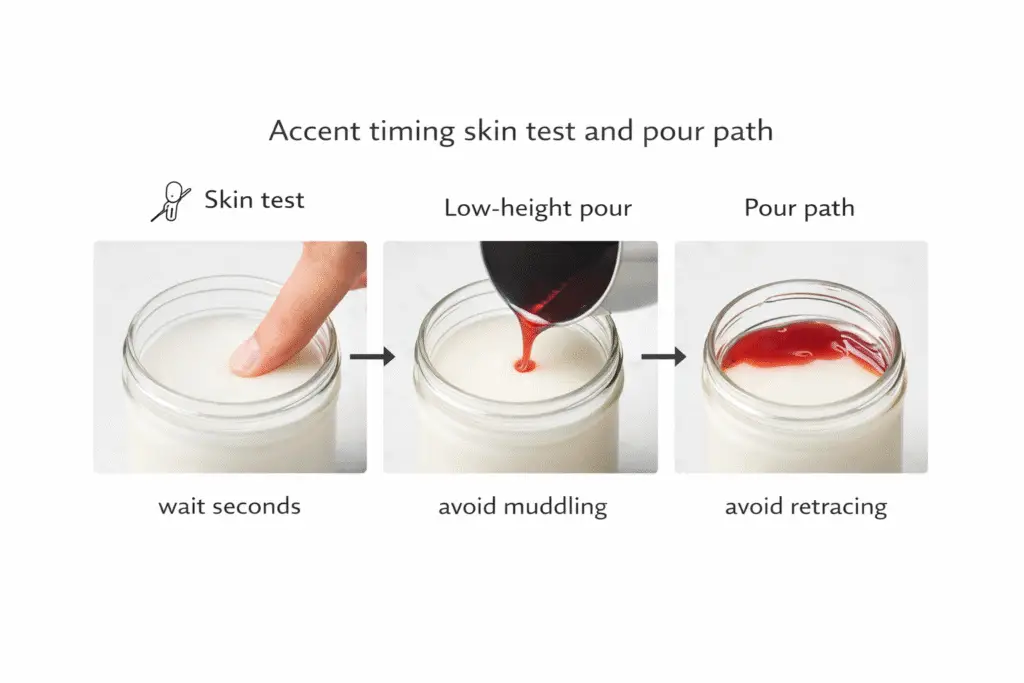
- Pour the base in a steady, low stream and start a timer immediately.
- Wait until the surface changes from glossy to slightly satin but still moves when the jar is tilted gently.
- Pour the accent in thin lines from low height, using a different path for each ribbon instead of retracing the same line.
- Make only two to four shallow passes with a skewer, ring motion, or short feather strokes, then stop as soon as the pattern appears.
- Let the candle cool undisturbed and judge the result after cure before changing more than one variable in the next test batch.
For a first test, keep the design simple: one base color, one accent color, one jar size, and one swirl pattern.
Accent timing — How to layer multiple dyes without muddling
To avoid muddy colors, pour accent ribbons while the base is thickening but still mobile and stagger each accent pour by a few seconds instead of dumping all colors at once.
Think of swirling as choreography: each color needs its own entrance. Treat the timing cues below as starting cues rather than fixed rules, because wax type, jar size, room temperature, and fragrance load will shift the window. If you want to layer swirl colors without muddling, start with a base pour at your chosen temperature, then watch the surface closely. As the wax cools, it shifts from mirror-shiny to a slightly satin look—that’s your cue that the base is thickening enough to hold lines. Your first accent pour goes in at this stage; later accent colors come in slightly warmer and a few seconds apart, so they sit on top of previous ribbons instead of blending into a single shade.
Simple timing pattern for two or three colors
A straightforward routine for most container swirls:
- Pour the base color and start a timer.
- When the surface shifts from glossy to slightly satin but still moves, pour Accent A in thin, steady trails.
- Once Accent A begins holding its shape, pour Accent B slightly warmer, using a different motion path.
This lets you time your accent pours for clean trails instead of guessing. If you’re working with three accent colors, stretch the spacing a bit more and keep later colors warmer and thinner so they skim over earlier ribbons. Always test in your own room conditions, because a cool basement and a warm kitchen will give very different timing windows.
Avoiding instant mud when colors touch
Muddiness usually happens when both the base and accent are too hot, or when you linger in one area with multiple passes. Once your first color is down, try not to trace the exact same path with the next color more than once. Change the angle or height of the pour to cross lines instead of retracing them. If you notice the surface still looks glassy and any accent immediately sinks in, pause briefly and test again with a tiny drizzle near the wick before committing to full ribbons. This small pause is often enough to fix muddy swirl candle patterns without scrapping the entire batch.
Scaling timing for larger or smaller jars
Wider containers cool more slowly in the center, so your timing window may be longer than with tiny votives. In big jars, start accent pours closer to the wick where wax is warmest, then move outward as the surface thickens. For very small vessels, your entire swirl routine might need to happen quickly before the top skins. Log your timing ranges along with temperatures in a simple notebook so you can repeat a perfect batch later instead of relying on memory. Over a few sessions, you’ll build an instinct for when each color should enter the dance.
Stir patterns — Steps to create ring, feather, and marble effects
To get clean ring, feather, and marble effects, keep your tool movements shallow, slow, and deliberate, and stop as soon as the pattern appears instead of over-stirring.
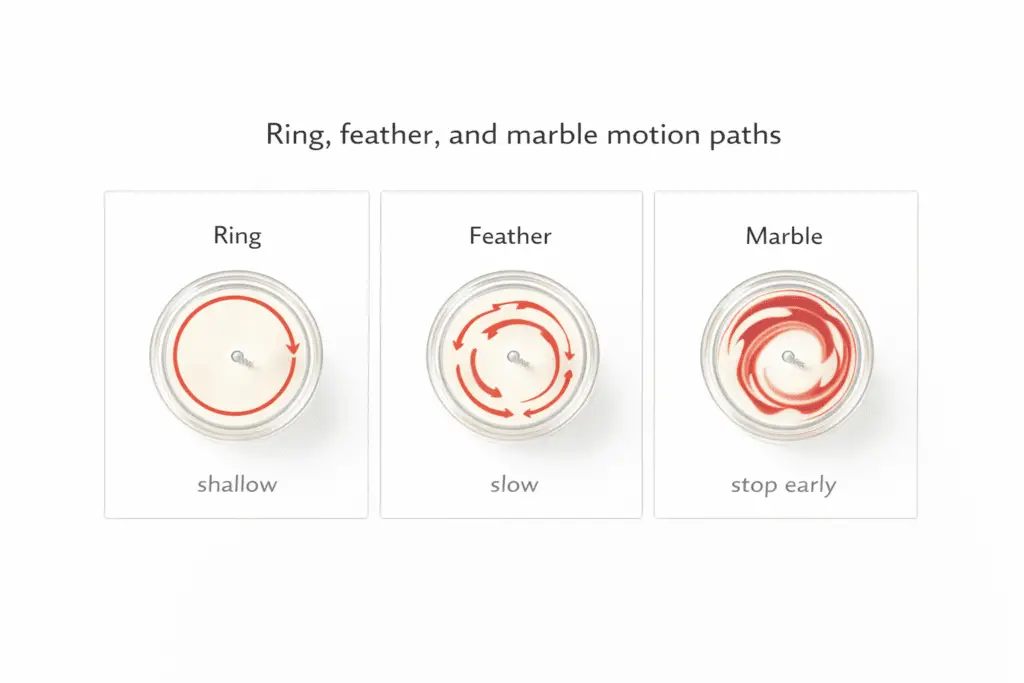
Start with simple ring designs so you can create basic swirl and ring patterns without worrying about complex choreography. After your base and accents are poured, lightly drag a skewer or chopstick in a smooth circle around the wick, keeping the tip just below the surface. One or two laps is plenty; any more and lines start merging into mush. For spirals, begin near the wick and move in a slow, outward spiral, then stop at the jar wall. Rings and spirals are your training wheels for control, teaching you how far a small movement travels in your chosen wax.
Feather patterns with minimal passes
Feather effects come from short, repeated strokes that cross existing lines. To explore feather swirl techniques for candles, pour two or three accent ribbons, then drag your tool in straight lines across them, alternating directions like a gentle zig-zag. Keep the strokes shallow and evenly spaced, and avoid re-tracing the same path more than once. The pattern should form within seconds as colors pull into delicate “feathers.” If everything turns into one color, you’re either moving too slowly, stirring too deep, or working while both waxes are too hot. Shorten the stroke length, let the surface thicken slightly, and try again.
Marble looks without losing contrast
Classic marbling is all about layering motions: rings plus crosses plus tiny wiggles. Once you’re comfortable with rings and feathers, you can build marble swirl candle designs step-by-step by stacking techniques. For example, pour a ring, cross it with a few feather strokes, then add one or two small figure-eight motions in open spaces. Think “three moves and done” rather than endless stirring. Switch tools as you experiment: skewers give sharp lines, while the end of a spoon or a wider stick softens edges.
Make quick sketches on paper before pouring so you know exactly which moves you’ll make and in what order. As you test, photograph every batch from above; those photos become your personal pattern library, helping you replicate a favorite look later without guessing.
Fast troubleshooting — Why swirls turn muddy, faint, or blurry
Use this table when a swirl looks wrong so you can change one variable instead of rebuilding the whole recipe.
| Symptom | Most likely cause | Fastest fix | Test next |
|---|---|---|---|
| Colors blend into one muddy tone | Base and accent were both too hot or too many passes were made | Wait a little longer before the first accent and stop after a few shallow tool movements | Lower the accent-pour temperature slightly |
| Accent color sinks instead of sitting near the surface | Base was still too fluid | Let the base thicken to a satin look before pouring accents | Increase the wait between base and accent pours |
| Lines look broken or jagged | Wax was too cool or the accent stream was too thick | Raise accent temperature slightly and pour from lower height | Use a narrower spout or thinner ribbon |
| Strong color halos appear at the glass | Dye load is too high for that wax or the wall was reheated | Reduce accent dye load first | Re-test with the same temperature and a lighter accent |
| Swirls look hazy after cure | Additives or fragrance softened contrast | Re-test with a simpler formula and lower total additive load | Compare a no-fragrance control batch |
| The design blurs fast on the first burn | Wick heat is moving too much color through the melt pool | Test a smaller wick or shorter single-session burn time | Photograph before and after each burn |
When the problem starts before the swirl stage and the dye is already unstable in the wax, review how to color candle wax without clumps or bleeding.
Dye load — How to keep base and accent colors distinct
Clean swirls need a quieter base and a slightly stronger accent, not the darkest possible mix.
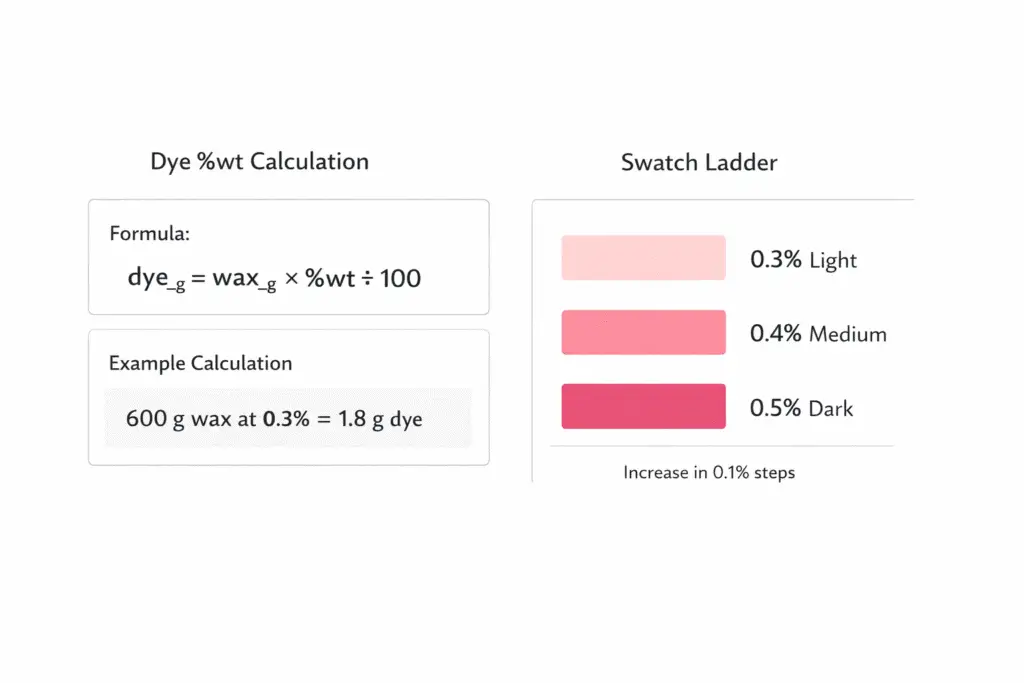
Dye load is the amount of dye you add relative to wax weight. Measure dye by weight instead of by drops so you can repeat the result and compare one batch to the next. A digital gram scale makes small adjustments easier to track, especially when you are testing two close shades in the same jar.
- keep one dye format for the whole batch
- keep the base lighter than the accent
- change only one variable in the next test
- judge the pattern after cure, not just after the pour
If the dye is already clumping, bleeding, or separating before the swirl stage, fix that stability problem first before you adjust the swirl method.
Pour temperature and timing
Swirls stay sharper when the base is fluid enough to accept accent ribbons but thick enough to hold them.
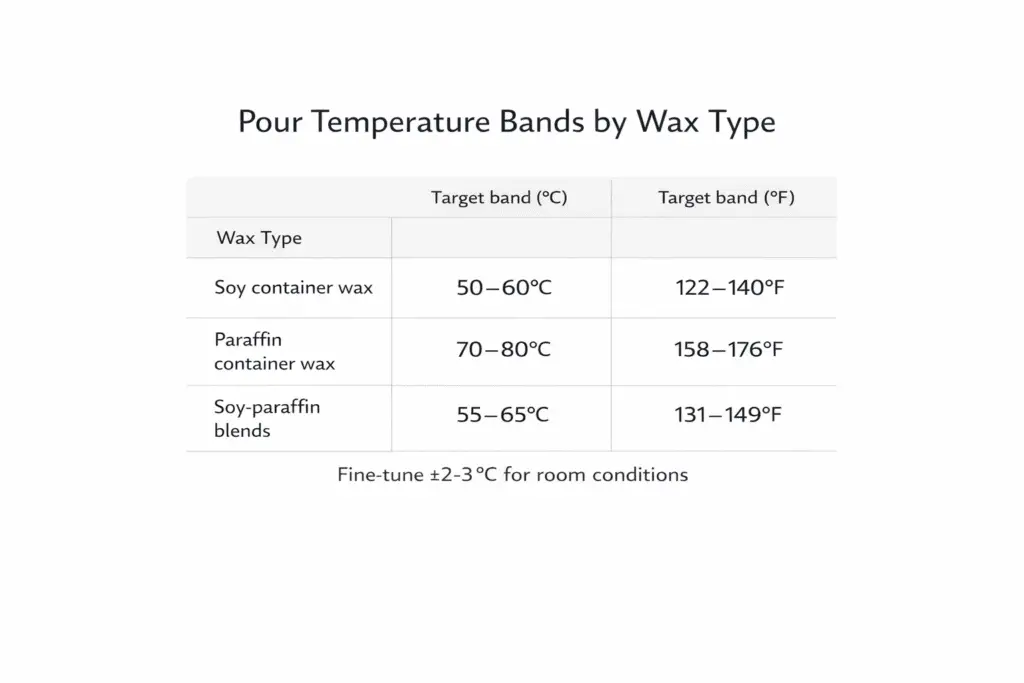
Use your wax supplier’s normal pour range as the outer guardrail, then watch the surface. Treat any charted ranges as starting references rather than universal targets. Add accents when the top shifts from glossy to satin and still moves slightly when you tilt the jar. That visual cue is more useful for swirl work than chasing one universal temperature.
- Prep jars and tools before the wax reaches final pour temperature.
- Pour the base and start a timer.
- Watch the surface, not just the thermometer.
- Add accent ribbons in thin lines from low height.
- Make only a few shallow passes, then stop.
If the accent sinks, wait longer before adding it. If the lines drag or break, pour the accent slightly warmer or work a little sooner. For wax-specific range testing, use ideal pour temperatures for common candle waxes.
Variables that change swirl definition
After the basic method works, adjust wax family, jar size, dye format, and pour tool one at a time.
These support variables change how far color travels and how sharply it holds at the surface. Treat them as tuning controls after dye load, accent timing, and shallow movement are already working. If you change more than one at once, you will not know what actually fixed or blurred the pattern.
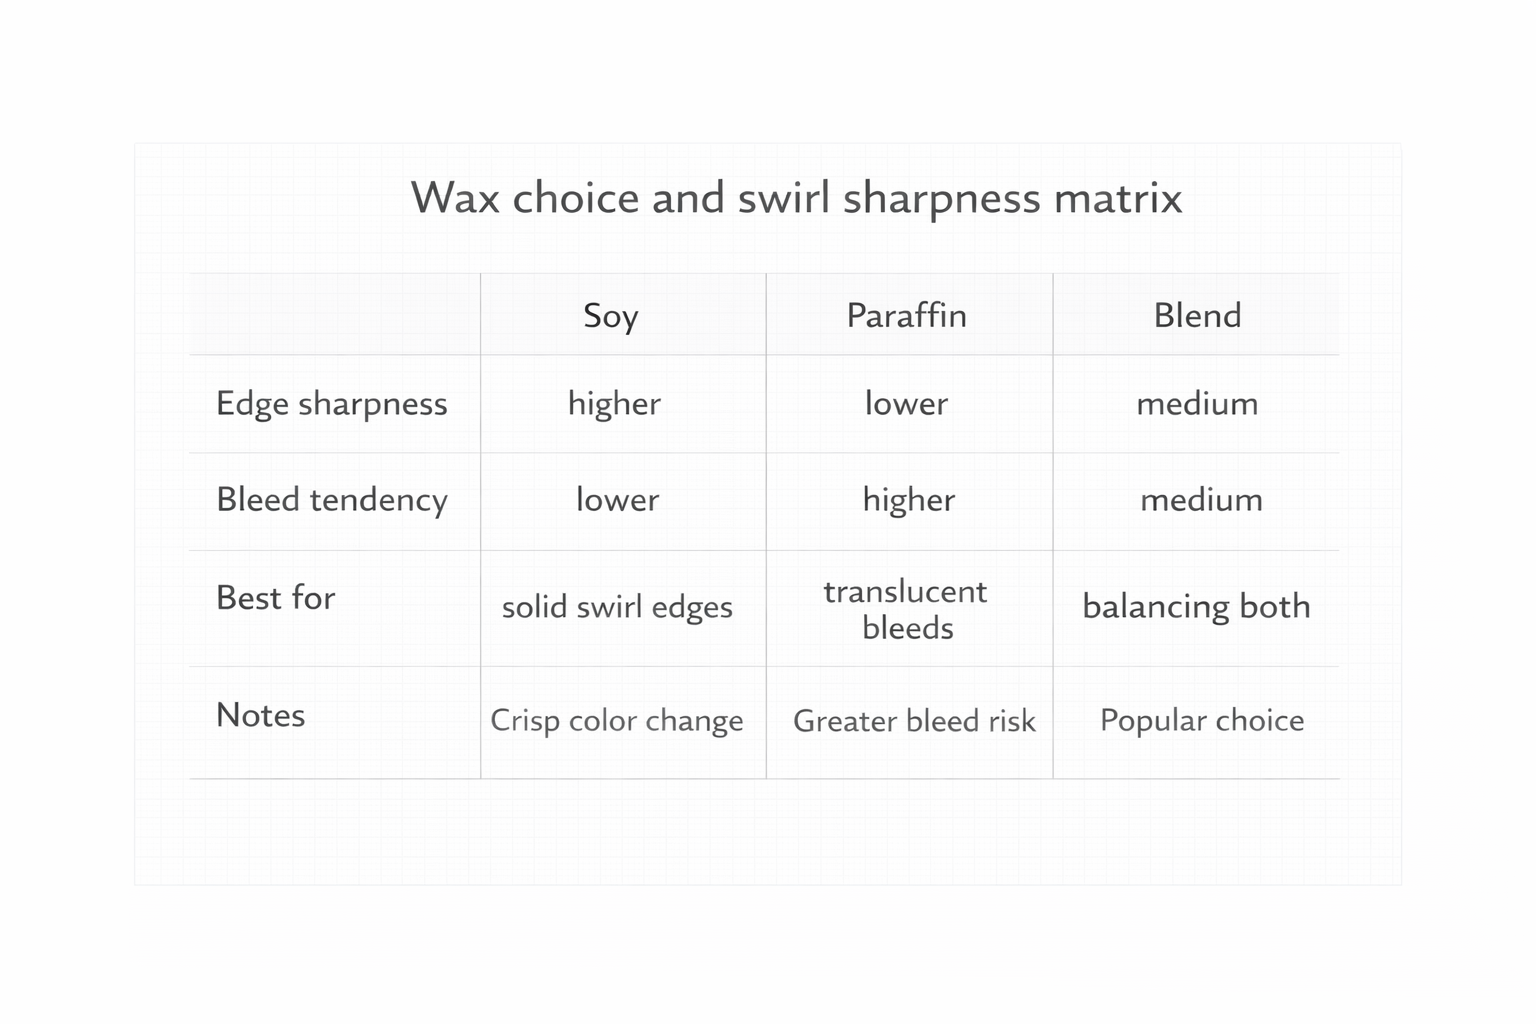
- Wax family: soy usually gives softer, cloudier edges, while clearer blends and some paraffins tend to show sharper trails.
- Container size: narrow jars shorten the swirl window, while wide jars give you more time but need bolder paths.
- Dye format: keep one format per batch so dissolve speed and color strength stay predictable.
- Pour tool: narrower spouts draw thinner lines, while wider lips lay down heavier ribbons.
For deeper support on dye choice and format behavior, see choose the right dye for candle projects and types of candle dye: liquid, chips, blocks, and more. If cured colors keep creeping toward the glass, troubleshoot that separately after you finish tuning the swirl method.
Why a clean swirl can blur later
A swirl that looks sharp at pour can still soften during cure or the first burn if fragrance, additives, or wick heat increase movement through the wax. Treat these as support variables after you have already locked in dye load, pour temperature, and accent timing, and change only one at a time.
Fragrance and additives
Keep first swirl tests near the middle of your wax supplier’s supported fragrance range and measure any UV inhibitor, whitener, or hardener by weight. Heavy loads can soften contrast, create haze, or increase bleed at the glass. If color keeps creeping after cure instead of blurring only during the pour, see how to prevent color bleeding between candle layers. If pale swirls are turning beige or yellow over time, troubleshoot vanillin discoloration in candles separately from the swirl method itself.
Cure window
Judge edge definition only after the candle has fully settled for your wax system. Photograph the top at a few consistent checkpoints across your normal cure window so you can separate technique problems from cure drift.
Burn heat
If the design blurs fast on the first burn, test a smaller wick or shorter single-session burn time before changing the swirl recipe. A melt pool that becomes deep too quickly will move color more aggressively and erase fine lines.