You can burn multiple candles in one room only when spacing, airflow, surface heat, candle type, scent load, burn time, and supervision stay controlled.
Multiple candles means two or more finished candles burning at the same time in the same room. Here, safely means reducing fire, heat, smoke, soot, scent, draft, placement, and supervision risk, not making candle use risk-free.
Keep each lit candle away from combustibles, unstable surfaces, pets, children, traffic paths, and direct drafts. This guide covers household same-room candle use, not candle making, formal burn testing, product certification, soot cleanup, HVAC calculations, fragrance design, or medical advice. <!– Meta description: Learn how to burn multiple candles in one room safely with room-size limits, spacing, ventilation, heat, scent, supervision, warning signs, and a same-room checklist. –>
How Many Candles Can You Safely Burn in One Room?
There is no universal safe number of candles for one room.
Fire-safety guidance gives controls for placement, spacing, supervision, and extinguishing, but it does not give one certified maximum number of candles for every room.
Use fewer candles in small, closed, crowded, poorly ventilated, or strongly scented rooms, and reduce the count whenever heat, smoke, scent, or supervision becomes harder to control. Multiple candles here means finished candles burning at the same time in one room, not candles being tested, made, or certified.
Fire-safety sources give a clear baseline: keep candles at least 12 inches from anything that can burn, keep them attended, and put them out before leaving the room or sleeping.
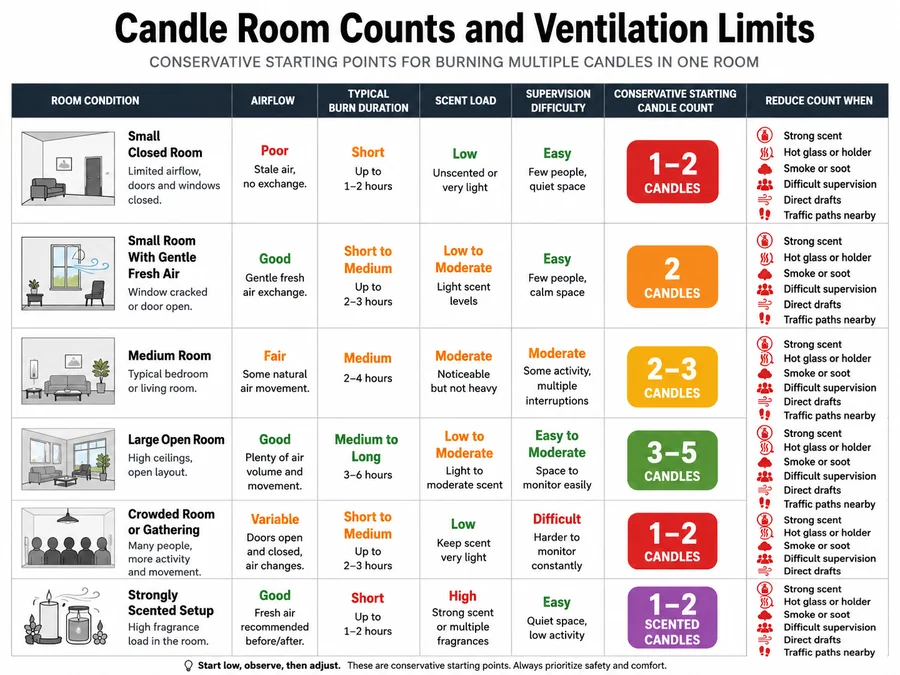
| Room condition | Conservative starting point | Ventilation condition | Burn duration | Reduce the count if |
|---|---|---|---|---|
| Small closed room | 1–2 candles | Door closed or little fresh air | Short session only | Scent feels strong, glass feels hot, smoke appears, or supervision is difficult |
| Small room with gentle fresh air | 2 candles | Fresh air present, no direct draft on flames | Short to moderate session | Flames lean, flicker hard, smoke, or heat collects near shelves |
| Medium room | 2–3 candles | Light fresh-air exchange | Moderate session | Candles sit near fabrics, papers, décor, vents, pets, or walking paths |
| Large open room | 3–5 candles | Gentle airflow, no draft on flames | Moderate session | The setup becomes hard to watch from one place |
| Crowded room or gathering | 1–2 candles | Airflow varies as people move | Short session | Guests, sleeves, bags, pets, or children pass near flames |
| Strongly scented setup | 1–2 scented candles | Fresh air available | Short session | Scent feels heavy, guests react, smoke appears, or the room feels stuffy |
Methods note: This table is practical household guidance, not a certified fire-risk calculation. It models candle count by room size, ventilation, scent load, burn duration, and supervision difficulty. Candle labels and manufacturer directions override this table.
The safer count is the number you can place, watch, ventilate, and extinguish without crowding flames or losing control of heat and scent. When the room condition changes, the safe-use decision changes with it.
Adjust the Candle Count for Room Size, Ceiling Height, and Burn Time
Use fewer candles and shorter burn sessions in small, low-ceiling, closed, or poorly ventilated rooms.
Heat, scent, smoke, and supervision problems build faster when room volume is limited or airflow is poor. Gentle ventilation can dilute indoor pollutants, but it should not become direct airflow on the flame zone.
| Room factor | Safer adjustment | Why it matters |
|---|---|---|
| Small floor area | Start with 1 candle | Less space means less separation between flames, objects, people, and surfaces |
| Low ceiling | Use fewer candles | Heat and scent can feel concentrated sooner |
| Door closed | Shorten the burn session | Fresh-air exchange is lower, so scent and smoke may build faster |
| Poor ventilation | Burn fewer candles or wait | Smoke, soot, and scent have fewer ways to clear |
| Long burn session | Reduce candle count | More time increases heat exposure for jars, holders, trays, and nearby surfaces |
| Mixed candle sizes | Count large flames and hot containers more cautiously | A large jar, tall taper, or cluster of tea lights can change heat and supervision needs |
| Crowded room | Keep only the candles you can watch clearly | Movement increases bump, reach, sleeve, and blocked-view risk |
Methods note: This adjustment table is modeled for ordinary household candle use. It is not HVAC design, oxygen-level testing, fire-load engineering, or product certification.
A larger room does not make every candle setup safe. The candles still need stable holders, heat-safe surfaces, space from combustibles, gentle fresh air, and direct supervision until every flame is out.
Place Candles Far Enough Apart and Away From Combustibles
Place every candle at least 1 foot from anything that can burn.
That distance applies to each flame, not just the group. When several candles burn in the same room, every candle needs its own clearance from curtains, books, paper, bedding, furniture, dried flowers, decorations, shelves, cords, and loose clothing.
NFPA and U.S. Fire Administration candle-safety guidance use the same 1-foot clearance rule for candle fire safety.

| Placement area | Safer choice | Do not use |
|---|---|---|
| Tabletop | Flat, sturdy, uncluttered surface | Wobbly table, stack of books, tray on fabric, crowded shelf |
| Near walls | Open space around the flame | Curtains, wallpaper, hanging fabric, posters, dried plants |
| Near décor | Non-burning space around each candle | Garland, paper décor, faux leaves, gift wrap, napkins |
| Near furniture | Centered, stable placement away from edges | Sofa arms, bed frames, upholstered chairs, carpeted ledges |
| Near windows | Away from curtains and moving air | Window sills with blinds, drapes, or gusts |
| Near vents or fans | Outside the direct air path | HVAC stream, fan stream, open-window cross-draft |
| Candle grouping | Spread candles so heat and flames do not crowd | Tight clusters where jars, holders, or flames heat each other |
A same-room candle setup is unsafe when one candle’s clearance depends on another object staying perfectly still. Curtains move, sleeves swing, pets jump, and guests reach across tables.
For grouped candles, leave space between the candles as well as around the group. Crowding candles can concentrate heat, make one flame harder to watch, and make it harder to extinguish one candle without reaching over another flame.
Methods note: Treat the 1-foot rule as a minimum flame-to-combustible clearance for normal household use. Use more space when candles are tall, wide, close to fabric, near movement, or burning in a busy room.
Keep Candles Out of Reach, Tail Paths, and Traffic Paths
Put candles where people and pets cannot reach, brush, bump, or knock them over.
A candle can be well spaced from curtains and still be unsafe if it sits near a child’s reach zone, a dog’s tail path, a cat’s jump route, a party tray, or the edge of a table.
| Risk path | Safer placement | Why it matters |
|---|---|---|
| Child reach | High, stable surface beyond reach | A child can pull, grab, or lean toward the flame |
| Dog tail path | Away from low tables, coffee tables, and narrow walkways | A tail can hit the candle, holder, or nearby fabric |
| Cat jump route | Not on shelves, counters, or window sills cats use | A cat may land beside or behind the flame |
| Guest traffic | Away from doorways, buffet areas, and crowded side tables | People may brush past without seeing the flame |
| Sleeve or hair path | Away from dining spots, mirrors, and dressing areas | Loose fabric or hair can pass through the flame zone |
| Table edge | Centered away from the edge | A candle near the edge is easier to bump or tip |
| Serving area | Separate from food, drinks, bags, and plates | Reaching across the table can move people into the flame path |
Use fewer candles when the room has pets, children, guests, or frequent movement. One well-placed candle is safer than several candles that create reach, bump, or tail hazards.
Do not place multiple candles along a walking route just because they look balanced. For same-room burning, the safer layout is the one you can supervise clearly without anyone passing through the flame zone.
Keep the Room Ventilated Without Creating Drafts
Use fresh air around the room, not direct airflow across the flames.
Ventilation means replacing or diluting indoor air with cleaner air. For multiple candles, ventilation helps reduce smoke and fragrance buildup, while direct drafts can make flames lean, flare, smoke, or burn unevenly.
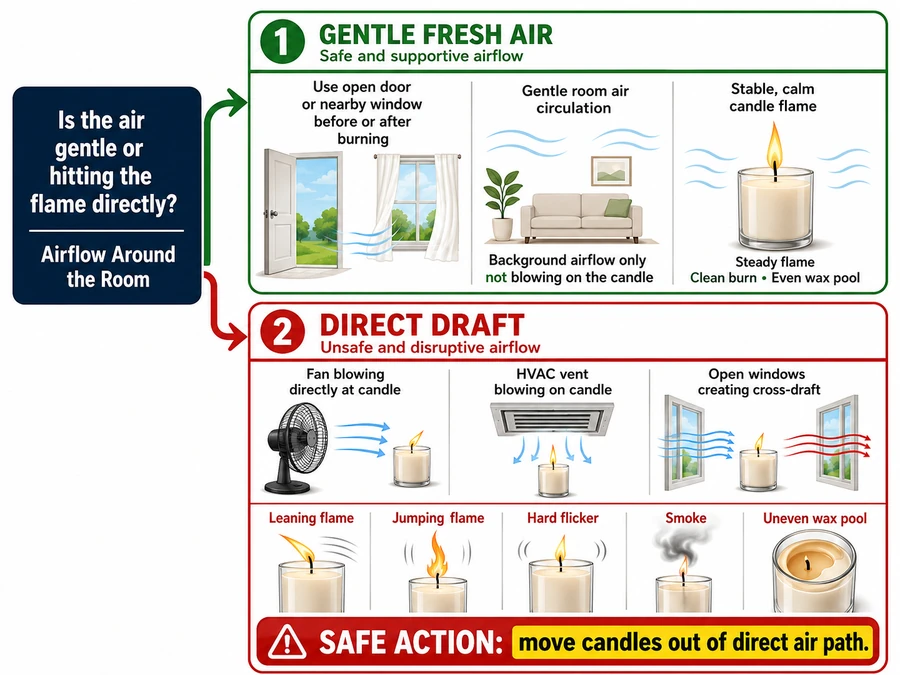
| Airflow condition | Safer choice | Unsafe sign |
|---|---|---|
| Closed room | Open a door or nearby window briefly before or after burning | Room feels stuffy, smoky, or heavy with scent |
| Open window | Keep candles out of the direct air path | Flame leans, jumps, or burns unevenly |
| Ceiling fan | Turn it off or move candles outside the airflow | Flame flickers hard or wax melts unevenly |
| HVAC vent | Place candles away from supply and return vents | Flame bends toward or away from the vent |
| Bathroom or small room | Use fewer candles and shorter burn sessions | Scent, steam, or heat builds quickly |
| Large room | Use gentle background air movement only | One candle burns faster than the others |
Draft means moving air that pushes directly on a flame. Candle-safety guidance warns against placing candles near open windows, fans, or air vents because drafts can affect the flame and increase smoke or uneven burning.
Do not solve a smoky candle setup by pointing a fan at it. Extinguish the candles, let smoke clear, move the candles away from the airflow path, and relight only if the room, surfaces, and flames can stay controlled.
Methods note: This section treats ventilation as comfort and smoke-reduction guidance for household candle use. It is not indoor-air testing, medical advice, HVAC design, or a guarantee that candle smoke or fragrance exposure is harmless.
Fix Flickering, Leaning, or Draft-Exposed Flames
Move or extinguish candles when flames flicker hard, lean sideways, flare, or smoke.
A steady candle flame may move slightly, but repeated bending, jumping, high flames, or visible smoke means the candle setup needs correction. When several candles burn together, one unstable flame can make the whole room setup harder to supervise.
| Flame sign | Likely cause | Safer action |
|---|---|---|
| Flame leans in one direction | Window, fan, vent, or walking-path airflow | Extinguish, move the candle, and relight away from the draft |
| Flame jumps or flares | Strong draft, long wick, debris, or too much heat around the candle | Put it out and correct the cause before relighting |
| Flame flickers hard | Air movement or unstable placement | Move it to a still, stable surface |
| Black smoke appears | Draft, long wick, debris, poor burn condition, or overheated setup | Extinguish and do not ignore the smoke |
| One candle burns faster | Uneven airflow or grouped heat | Separate candles and move them out of direct air |
| Wax pool shifts to one side | Tilted surface or draft | Level the surface or stop using that location |
| Nearby curtain moves | Combustible material entering the flame zone | Extinguish and move the candle setup |
Trimmed wicks help reduce high flames and soot, but wick trimming does not make a drafty setup safe. The National Candle Association recommends trimming the wick to 1/4 inch before each use and keeping candles away from open windows, fans, and air vents.
Do not move a burning candle to fix the flame. Extinguish it first, wait for hot wax to settle, then move the candle to a stable, heat-resistant location away from direct airflow.
Prevent Heat Buildup on Jars, Holders, Trays, and Surfaces
Multiple candles can overheat nearby containers, holders, trays, shelves, and tabletop surfaces.
Use stable, heat-resistant surfaces and leave space above, below, and between candles. The National Candle Association advises placing candles on stable, heat-resistant surfaces, avoiding movement while wax is liquid, and stopping when 1/2 inch of wax remains.
| Heat risk | Safer setup | Stop or change the setup when |
|---|---|---|
| Hot glass jar | Use the jar only as labeled, on a heat-resistant base | Glass is cracked, smoking, scorching nearby material, or too hot to manage safely |
| Hot tray | Use a metal, ceramic, stone, or other heat-resistant tray | The tray transfers heat into wood, plastic, fabric, or paint |
| Shelf above candle | Leave open vertical space above the flame | Heat collects under a shelf, cabinet, mirror ledge, or wall décor |
| Tight candle cluster | Separate candles so they do not heat each other | Jars feel hotter than usual or flames start to flare |
| Tea lights | Use suitable holders with airflow around each cup | Heat builds under the cup or the holder sits on plastic |
| Liquid wax | Leave the candle still until wax cools | Wax is pooled, sloshing, smoking, or close to the holder edge |
| Low remaining wax | Stop before the flame nears the base or container | The flame sits close to the holder, jar bottom, or decorative material |
A heat-resistant tray does not make a crowded display safe by itself. It protects the surface underneath, but each candle still needs flame clearance, side spacing, vertical clearance, and supervision.
For candle spacing, follow the label first. As a general same-room rule, keep multiple burning candles at least 3 inches apart; European candle guidance commonly uses 10 cm unless the label gives another distance.
Methods note: This guidance covers finished candles used in a room. It does not validate jar glass, test container heat resistance, certify candle holders, or replace manufacturer instructions.
Compare Jar, Pillar, Taper, Votive, and Tea Light Risks
Jar, pillar, taper, votive, and tea-light candles should not be counted as equal because they create different heat, tipping, wax, and holder risks.
Do not count every candle as equal just because each has one flame. A jar candle concentrates heat in glass, a taper raises the flame higher, and a tea light cluster can heat the surface below faster than expected.
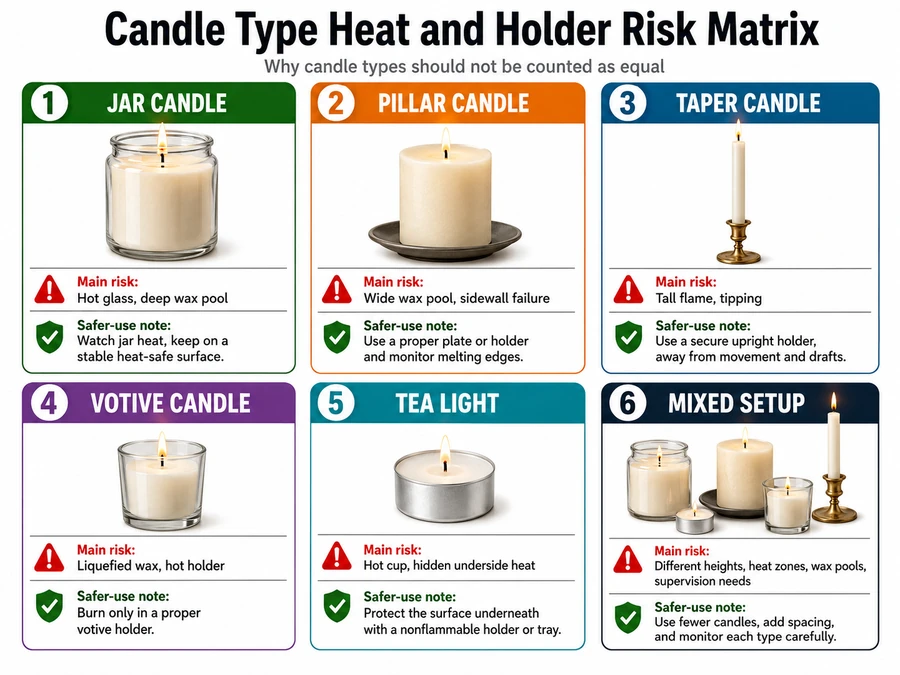
| Candle type | Main same-room risk | Safer use when burning several candles |
|---|---|---|
| Jar candle | Hot glass, deep wax pool, heat near the container base | Keep jars separated, stop before wax burns too low, and do not move while wax is liquid |
| Pillar candle | Wide wax pool, sidewall failure, heat spreading across the base | Use a broad heat-resistant plate and extinguish if the wax pool reaches the outer edge |
| Taper candle | Tall flame position, tipping, dripping, sleeve contact | Use fitted holders and keep tapers away from reach paths, curtains, and dining movement |
| Votive candle | Liquefied wax, hot holder, container dependence | Burn only in a suitable holder that can contain the wax |
| Tea light | Small flame but hot cup and hidden underside heat | Use proper holders with airflow and avoid tight rows on plastic, fabric, or painted surfaces |
| Mixed setup | Different heights, heat zones, wax pools, and supervision needs | Put higher-risk candles where they are easiest to watch and extinguish |
Tea lights need special caution because their small size can hide surface heat. Some fire-safety sources warn that tea lights can become hot enough to damage unsuitable plastic surfaces, and European candle guidance states that tea lights should be used only in holders or warming stoves with enough ventilation.
Mixed candle setups are safer when the largest flame, hottest container, and least stable holder are treated as the limiting candle. If one candle type makes the room harder to supervise, reduce the whole setup.
Supervise Every Candle Until Every Flame Is Out
Never leave multiple burning candles unattended.
Same-room candle safety depends on active supervision from lighting to full extinguishing. Candle-safety guidance says never to leave a burning candle unattended and to make sure the candle is completely out before leaving the room.
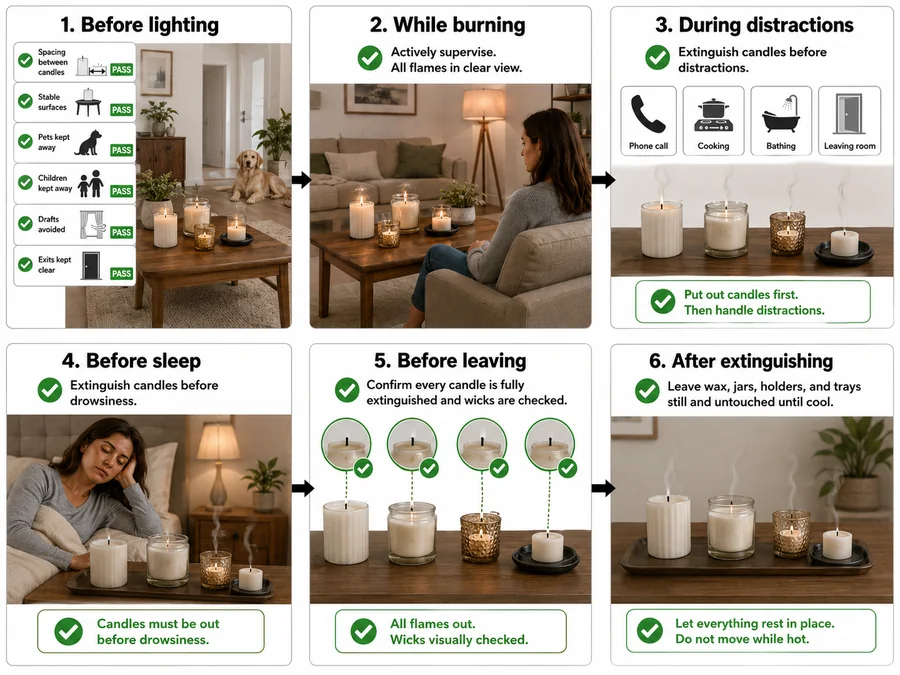
| Supervision moment | What to do | Why it matters |
|---|---|---|
| Before lighting | Check spacing, surfaces, pets, children, drafts, and exits | Problems are easier to fix before wax is hot |
| While burning | Keep candles visible from where you sit | A hidden candle can smoke, flare, or heat nearby objects unnoticed |
| During distractions | Extinguish candles before calls, cooking, bathing, or leaving the room | Divided attention weakens supervision |
| During gatherings | Use fewer candles and keep them away from serving areas | Guests may not track flame paths |
| Before sleep | Put every candle out before drowsiness starts | Bedrooms and sleep areas raise unattended-flame risk |
| Before leaving | Extinguish all candles, then check each wick | A glowing wick can remain hot after the flame disappears |
| After extinguishing | Leave candles still until wax and containers cool | Moving hot wax or hot glass can cause burns or spills |
Extinguish the hardest-to-reach candle first. Then work from the back of the setup toward the front, so you do not reach over active flames.
Do not carry a burning candle from room to room. If a candle must move, put it out, let the wax cool, move it carefully, and relight only after the new location passes the same spacing, surface, airflow, and supervision checks.
Put Candles Out When Smoke, Soot, Heat, or Strong Scent Appears
Extinguish the candles when the room shows smoke, soot, overheating, unstable flames, or overwhelming scent.
Do not wait to see whether the problem improves while the candles keep burning. In a multiple-candle setup, one warning sign can affect the whole room because heat, airflow, scent, and supervision are shared.
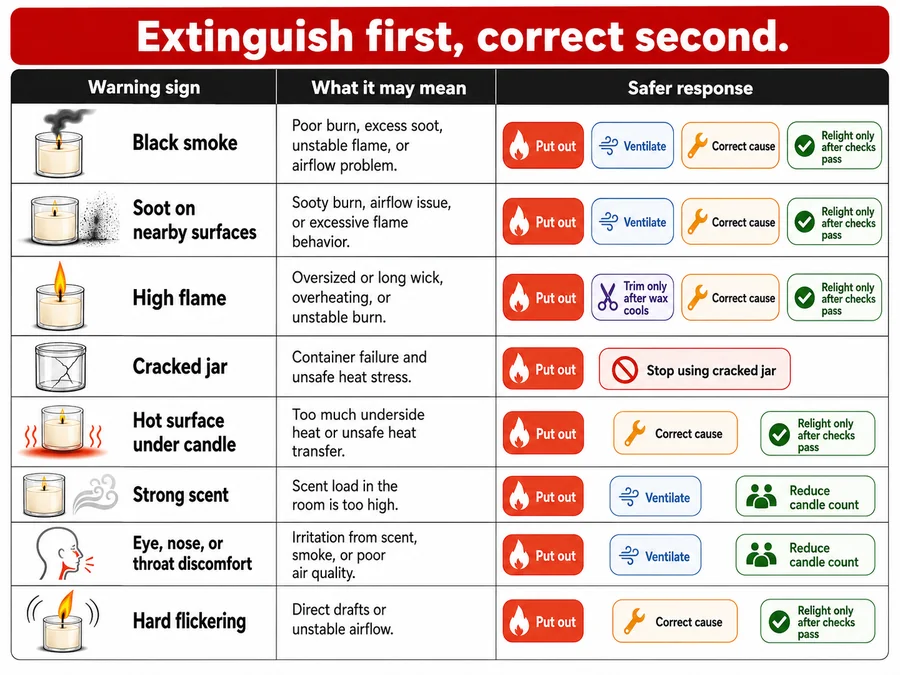
| Warning sign | What it may mean | Safer response |
|---|---|---|
| Black smoke | Draft, long wick, debris, poor burn condition, or overheated setup | Put the candle out, ventilate the room, and relight only after correcting the cause |
| Soot on nearby surfaces | Flame or wick problem, poor airflow, or candle too close to a surface | Extinguish and move or stop using the candle setup |
| High flame | Long wick, too much heat, debris, or unsafe burn behavior | Extinguish and trim only after the wax cools |
| Cracked jar | Heat stress or damaged container | Stop using the candle immediately |
| Hot surface under candle | Heat transfer through holder, tray, or container | Extinguish and move the setup only after cooling |
| Strong scent | Too many scented candles, small room, long burn time, or poor airflow | Put out one or more candles and bring in fresh air |
| Eye, nose, or throat discomfort | Smoke, scent intensity, or sensitivity | Extinguish candles and ventilate the room |
| Hard flickering | Draft, fan, vent, open window, or unstable location | Put candles out and move them away from direct airflow |
A candle warning sign is not a decoration problem. It is a stop-use signal. For same-room burning, the safer rule is to extinguish first, correct second, and relight only if the room setup passes spacing, surface, airflow, scent, and supervision checks again.
Do not troubleshoot a smoking, overheating, or cracked candle while it stays lit. Put the flame out, wait for hot wax and containers to cool, then decide whether the candle can be used again.
Reduce Scent Load When Burning Scented Candles Together
Burn fewer scented candles when the room starts to smell heavy, sharp, smoky, or uncomfortable.
Multiple scented candles release fragrance at the same time, so the room can feel overloaded even when each candle seems mild on its own. Safer use means keeping scent comfortable and controllable, not trying to fill the room as strongly as possible.
| Scent setup | Safer choice | Stop or reduce when |
|---|---|---|
| Two strong scented candles | Burn one at a time | The scent feels heavy within minutes |
| Several different fragrances | Use fewer candles or choose one scent family | The room smells mixed, sharp, or unpleasant |
| Small bedroom or bathroom | Use one candle or a short burn session | Scent lingers, feels stuffy, or bothers anyone |
| Dinner table | Avoid strong scented candles near food | Fragrance competes with food or guests react |
| Guests present | Ask before burning several scented candles | Someone reports headache, irritation, nausea, or discomfort |
| Pets in the room | Use fewer candles and extra caution | Pets cannot leave the area or seem bothered |
| Unscented plus scented candles | Let the scented candle set the limit | Heat or flame count is safe, but fragrance load is too strong |
Scent discomfort is enough reason to put candles out. You do not need smoke, soot, or a visible flame problem before reducing the candle count.
Avoid treating fragrance strength as a safety guarantee. A clean-smelling candle can still create flame, heat, wax, placement, and supervision risks when burned with other candles.
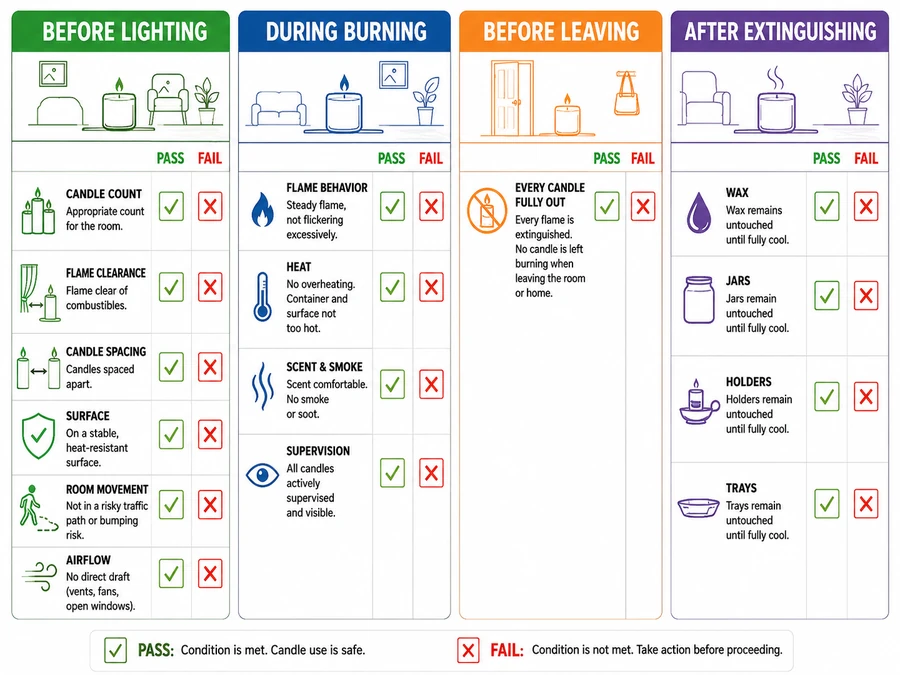
Use a Same-Room Candle Safety Checklist Before, During, and After Burning
Use a pass/fail checklist every time you burn multiple candles in one room.
If any item fails, fix it before lighting or extinguish the candles if they are already burning. The checklist keeps the decision practical: candles should stay spaced, stable, ventilated, visible, and easy to put out.
| Time | Check | Pass condition |
|---|---|---|
| Before lighting | Candle count | The number of candles fits the room size, airflow, burn time, scent load, and supervision level |
| Before lighting | Flame clearance | Each candle is at least 1 foot from anything that can burn |
| Before lighting | Candle spacing | Candles are not tightly clustered and do not heat each other |
| Before lighting | Surface | Every candle sits on a stable, heat-resistant surface or holder |
| Before lighting | Room movement | Pets, children, guests, sleeves, and traffic paths cannot reach the flames |
| Before lighting | Airflow | The room has fresh air, but no direct draft crosses the flames |
| During burning | Flame behavior | Flames stay steady, not high, smoky, leaning, or jumping |
| During burning | Heat | Jars, trays, holders, shelves, and surfaces are not overheating |
| During burning | Scent and smoke | The room does not feel smoky, stuffy, or overloaded with fragrance |
| During burning | Supervision | A responsible person can see and reach the setup safely |
| Before leaving | Extinguishing | Every candle is fully out before leaving, sleeping, bathing, or getting distracted |
| After extinguishing | Cooling | Wax, jars, holders, and trays stay still until cool |
The safest multiple-candle setup is the one that still passes this checklist after the candles have been burning for a while. A layout that passes before lighting can fail later if wax pools grow, scent builds, guests arrive, airflow changes, or surfaces heat up.
Extinguish candles in the order that avoids reaching over active flames. Check each wick after the flame disappears, then leave the candles undisturbed until the wax and containers cool.